Overall/general resources
Downloadable PDF version
Overview of recombinant protein expression
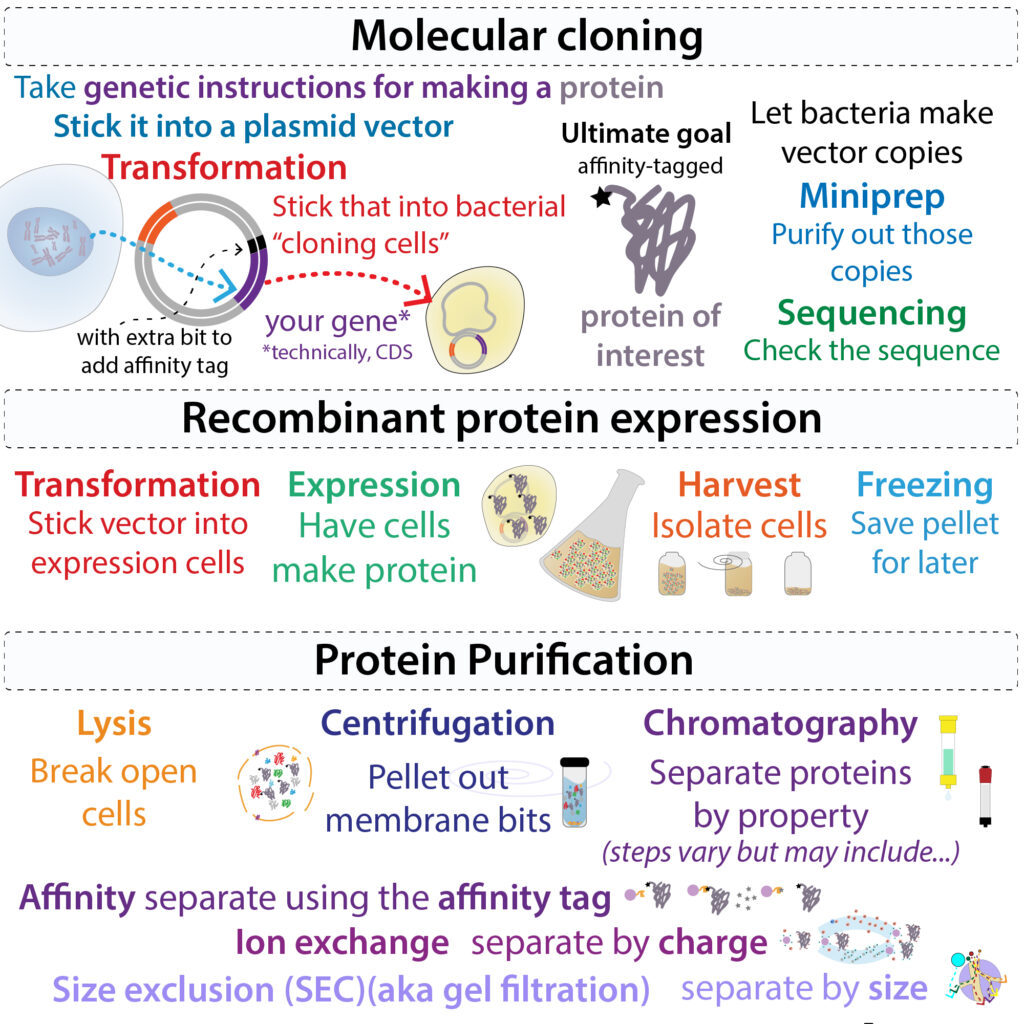
If you want to study a protein in detail, you typically want to acquire lots of that protein in a pure form that you can manipulate and test – perhaps studying its physical and/or enzymatic properties, how those properties might be affected by their environment (e.g., changes in pH and/or salt), and/or how the protein interacts with other molecules such as other proteins. Although proteins may be purified directly from their natural (native) source, and scientists were restricted to this in the olden days, these days it’s much more common and convenient to use “recombinant protein” technology, whereby we stick the genetic instructions for making a protein of interest into “expression cells” (specific types of bacterial, yeast, insect, or mammalian cells optimized for lab growth and protein-making) and get them to make the protein for us. Since we’re controlling what genetic instructions we put in, we can make changes to the genetic instructions to get the cells to make different versions of the protein (perhaps, for instance, with mutations designed to abolish catalytic activity (prevent enzymatic function), test what specific parts of the protein do, and/or versions that mimic disease-causing mutations). Then, we can break open (lyse) the cells and purify out the proteins.
Even when we’re putting in the un-mutated, “wild-type” version of the protein’s genetic instructions, we often add a short sequence onto the end of those instructions that cause the cells to add a string of amino acids onto the end of the protein that can subsequently serve as an “affinity tag” (e.g., a His-tag or a Strep-tag). These “tags” will help us purify the protein by acting like velcro that will allow us to get our protein of interest to (reversibly) stick to specific types of affinity resin (little beads) in a chromatography column, while other (contaminating/unwanted) proteins flow on by. We can then (typically by using a competitor molecule mimicking the tag or using a site-specific protease to cut off the tag) un-stick (elute) our protein of interest.
It’s often still not pure enough, so we might follow this affinity/capture chromatography step with additional forms of column chromatography, such as ion exchange chromatography (which separates molecules by charge), hydrophobic interaction chromatography (HIC) (which separates molecules by hydrophobicity (lipid-loving-ness), and/or size exclusion chromatography (SEC, aka gel filtration), which separates molecules by size. Each of these takes advantage of the fact that different proteins have different properties (due to having different numbers and combinations of amino acids). Thus, they’ll travel differently through resins with different properties. This allows us to separate proteins in a mixture and isolate the one we’re interested in.
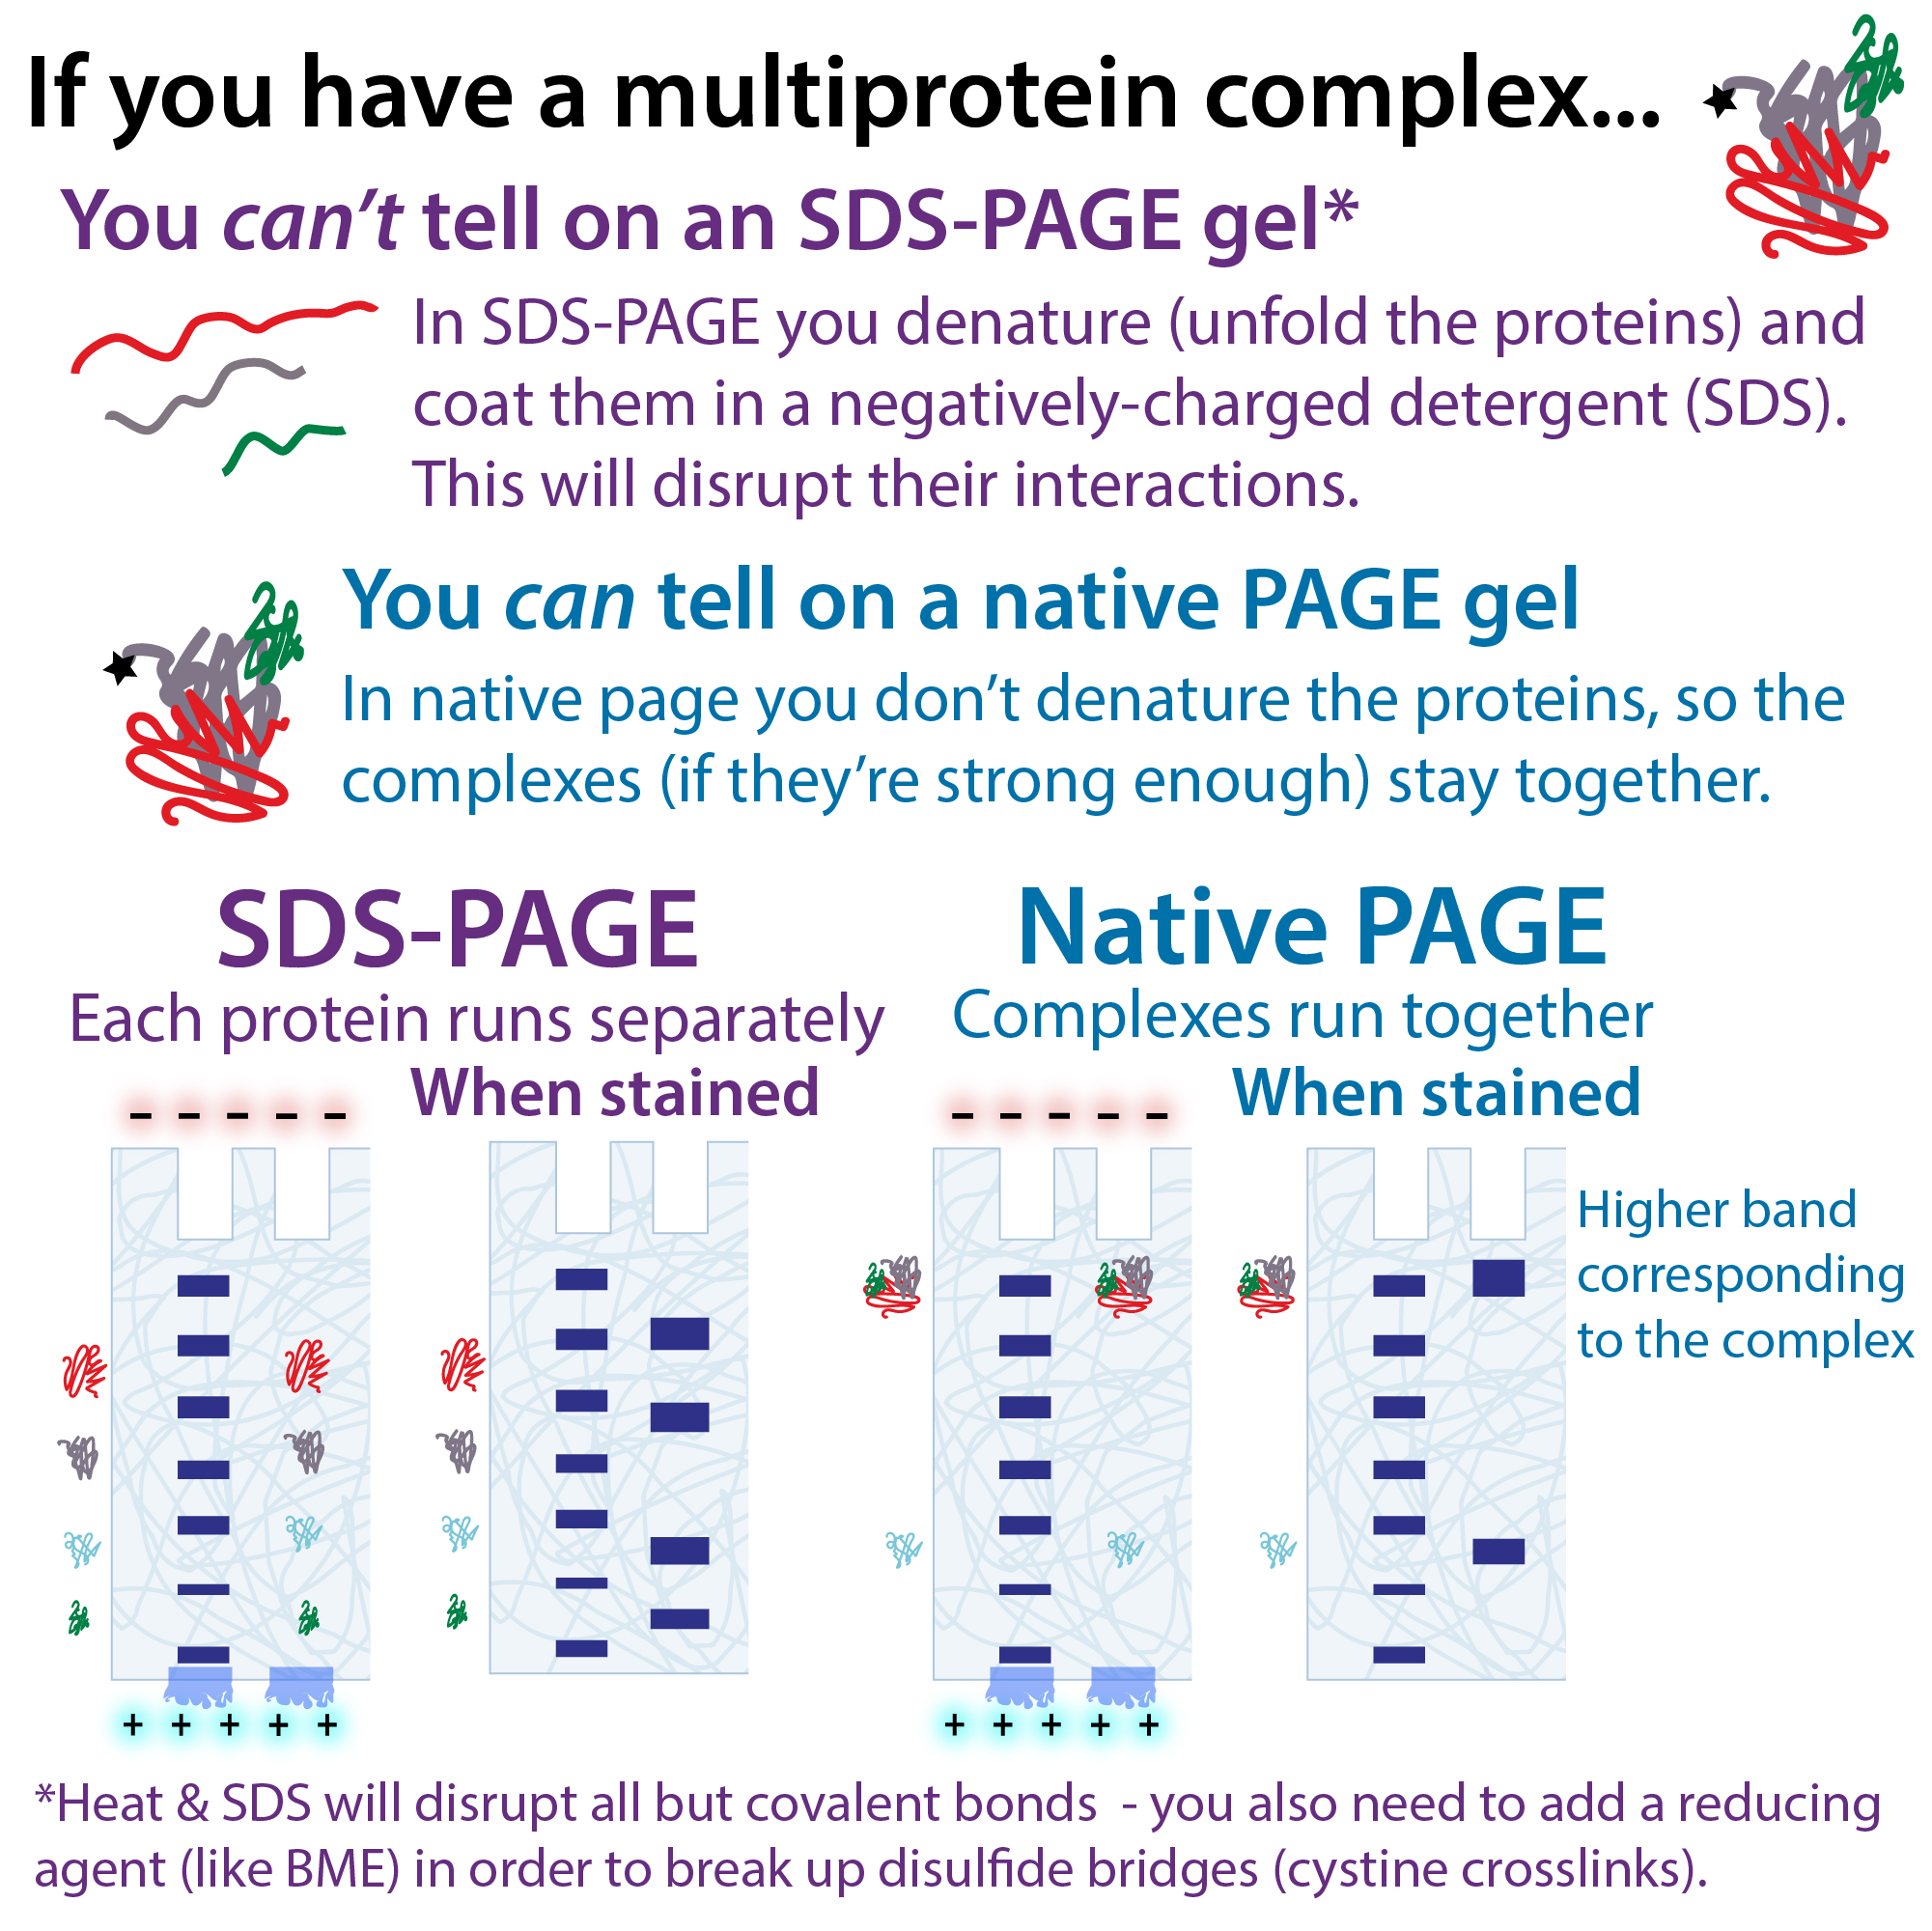
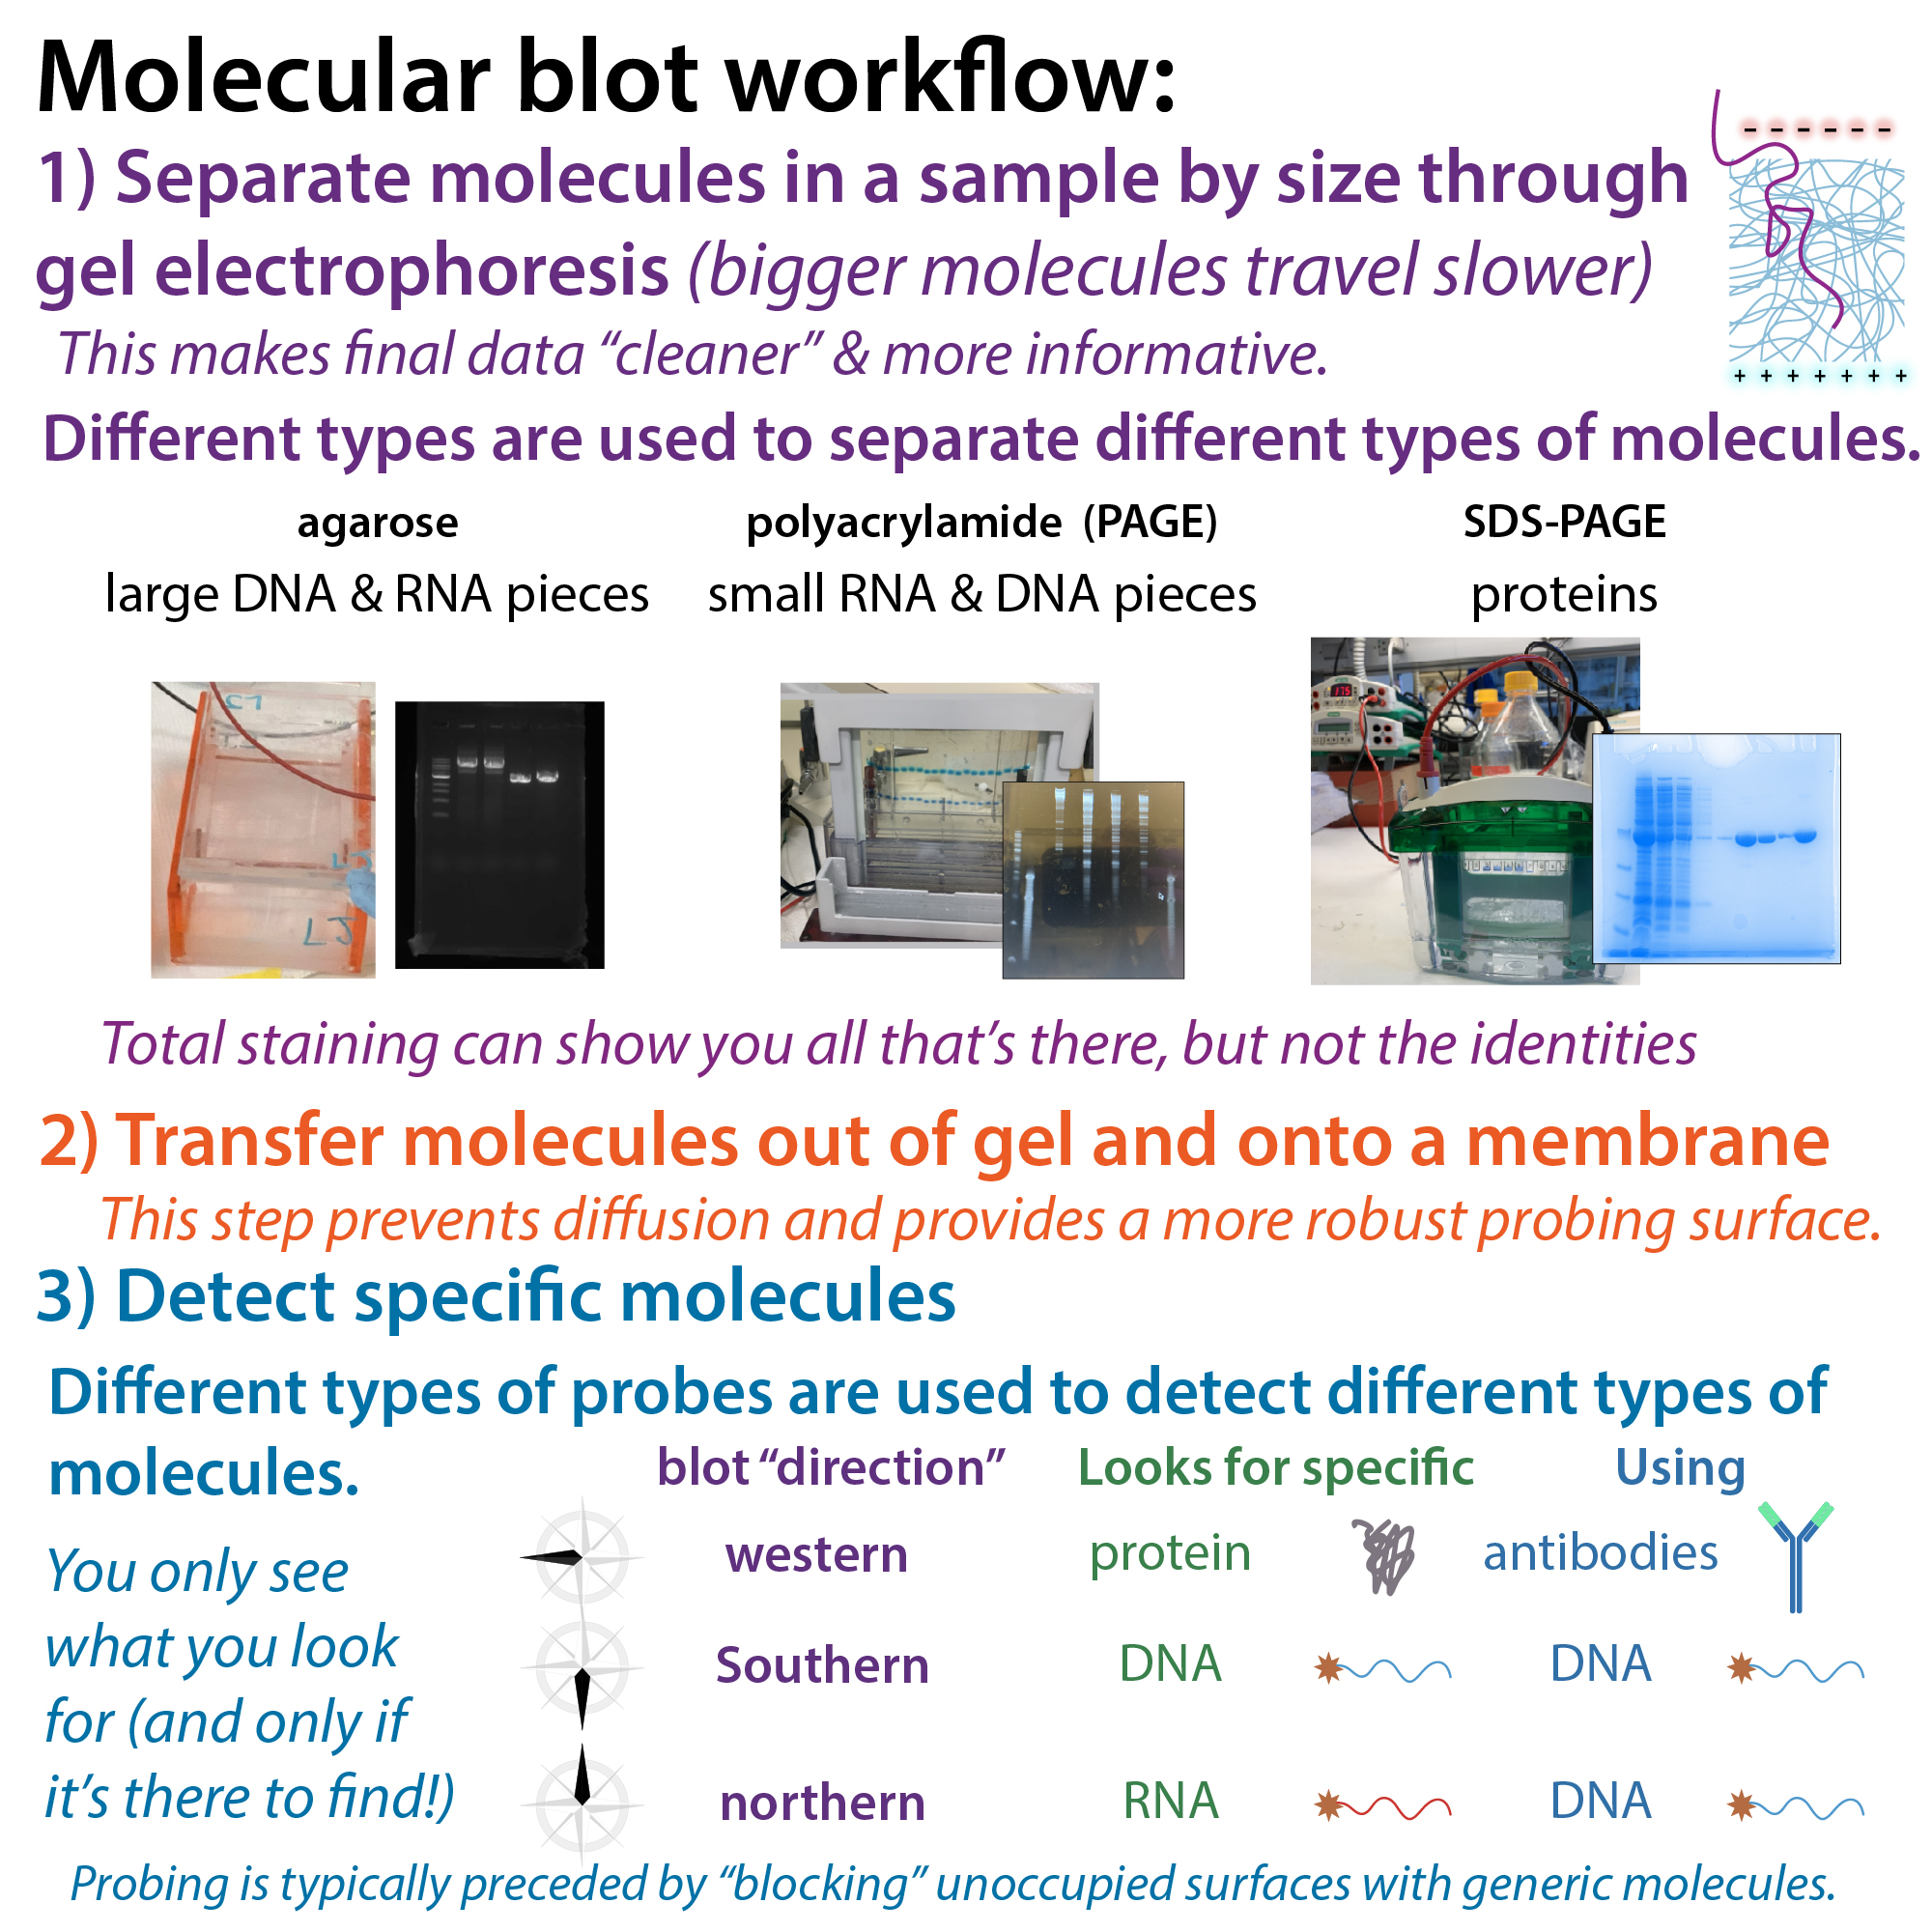
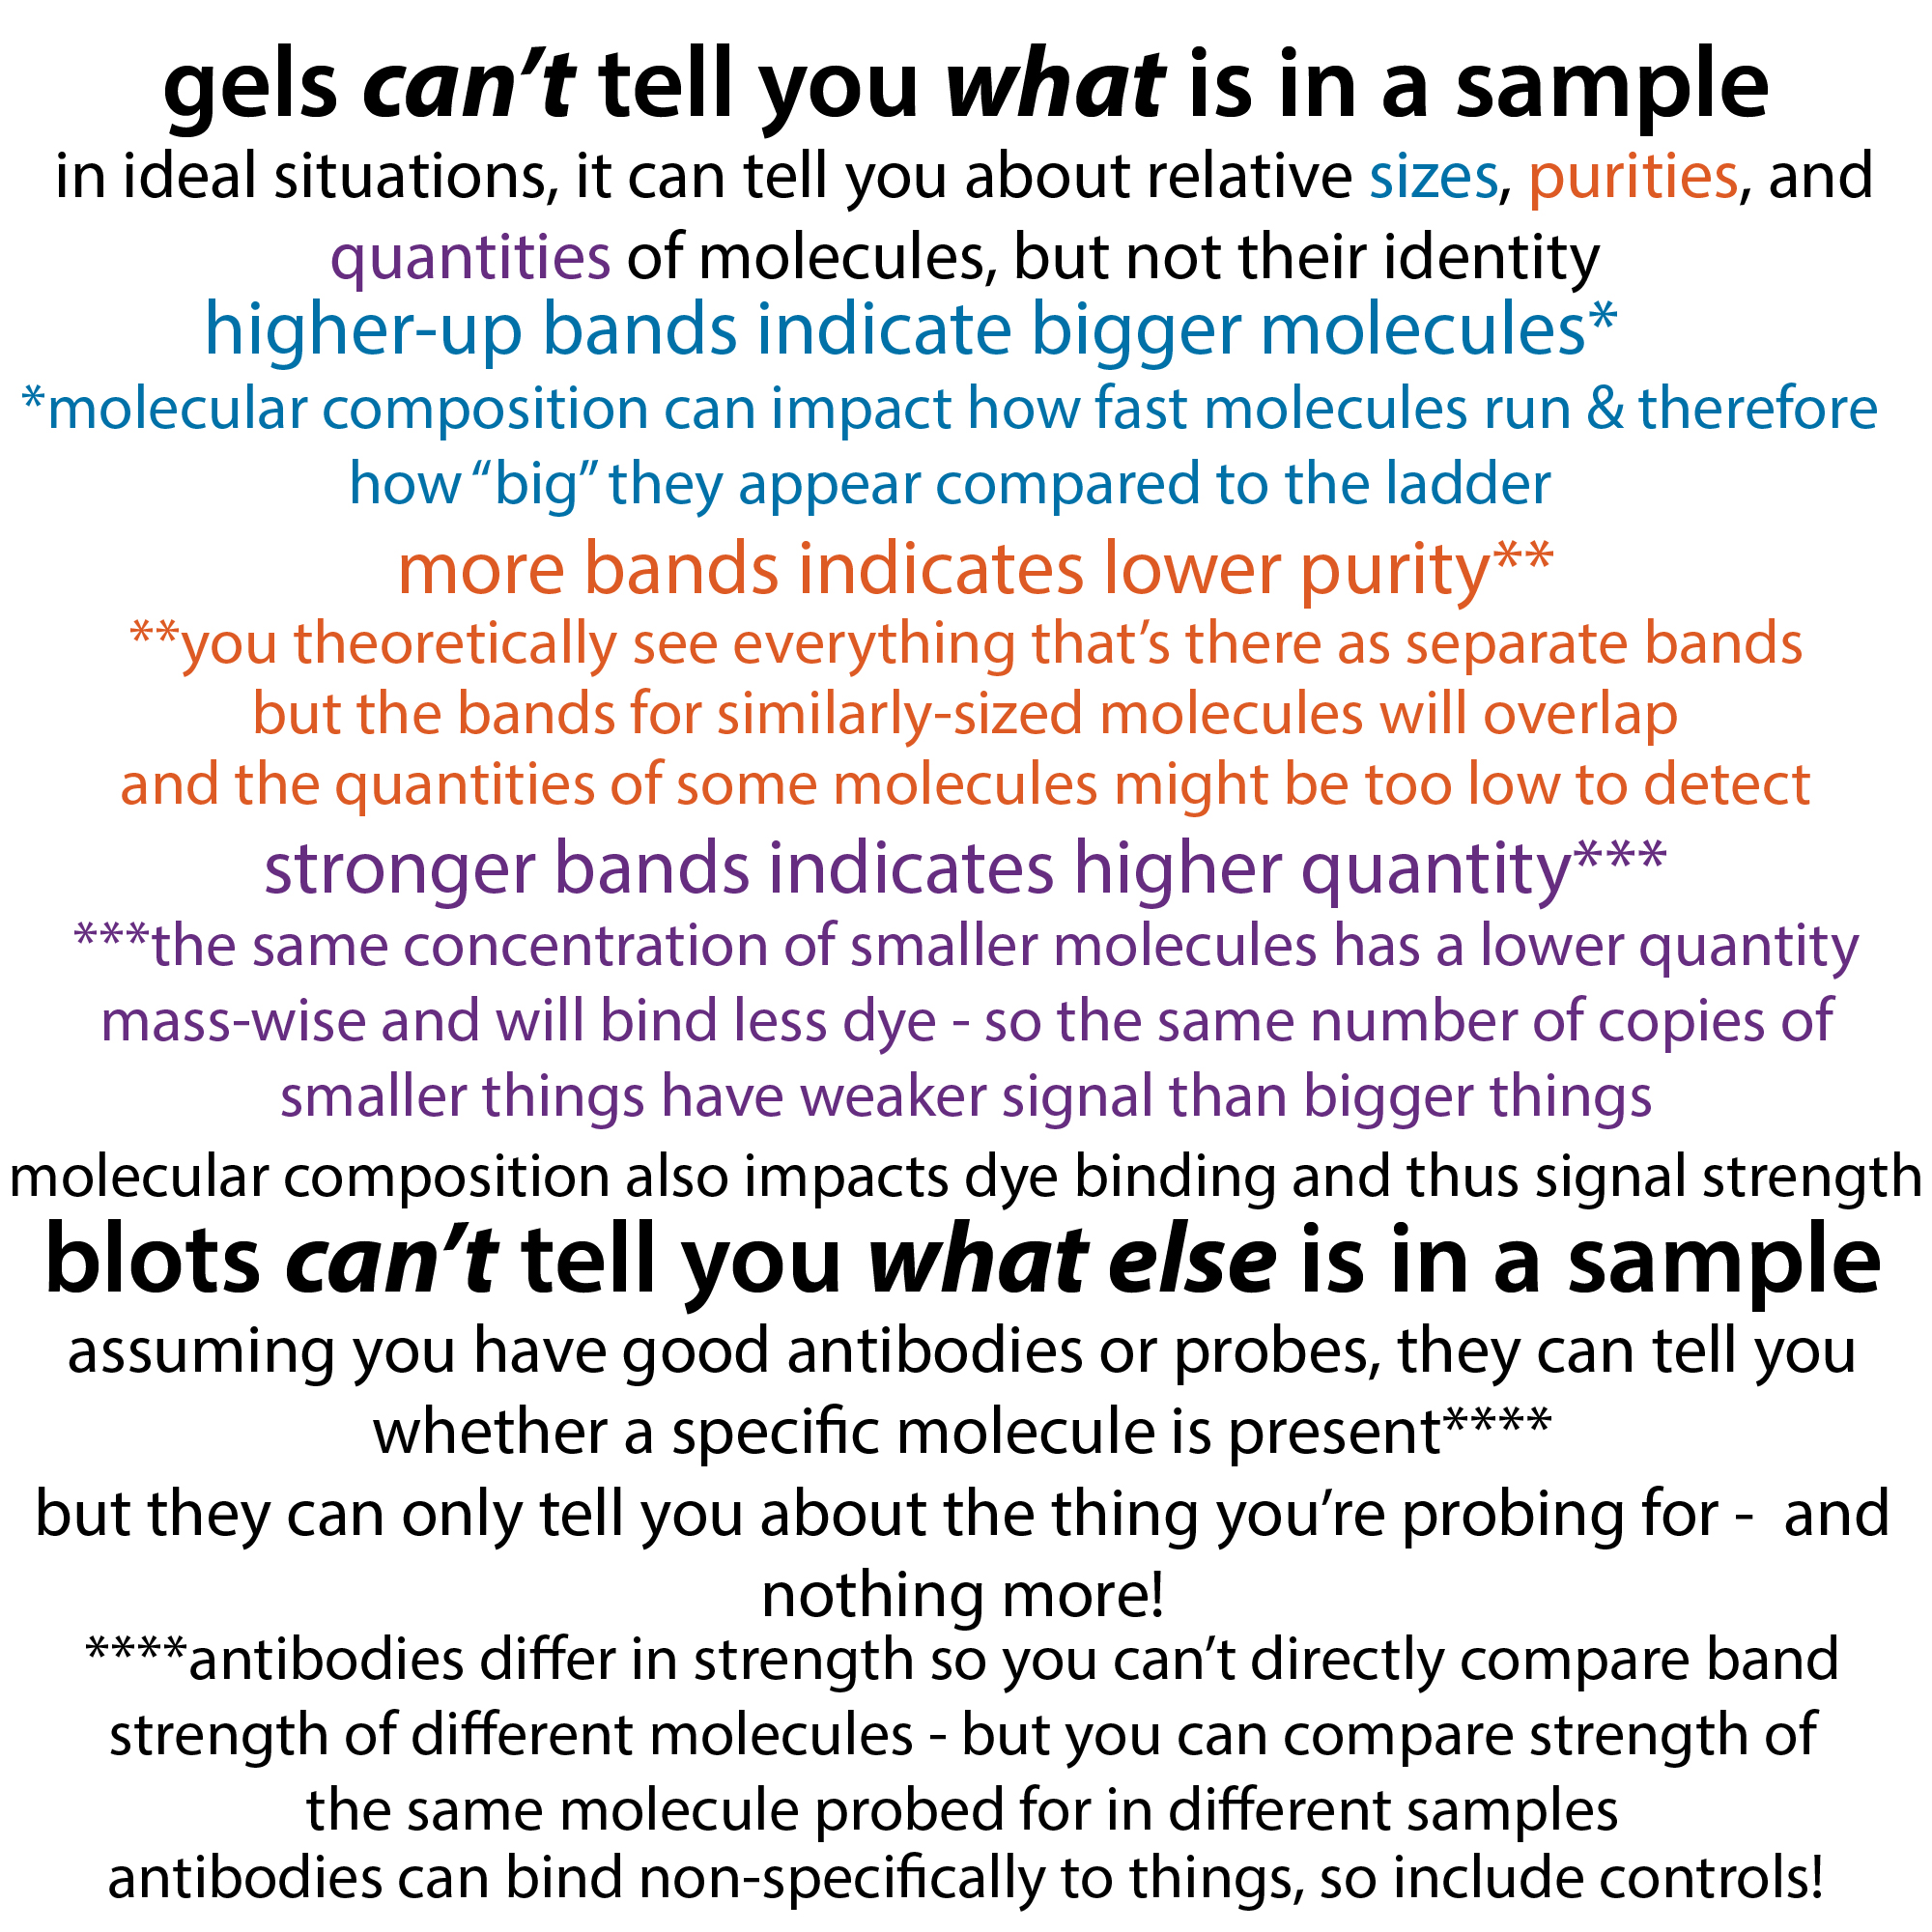
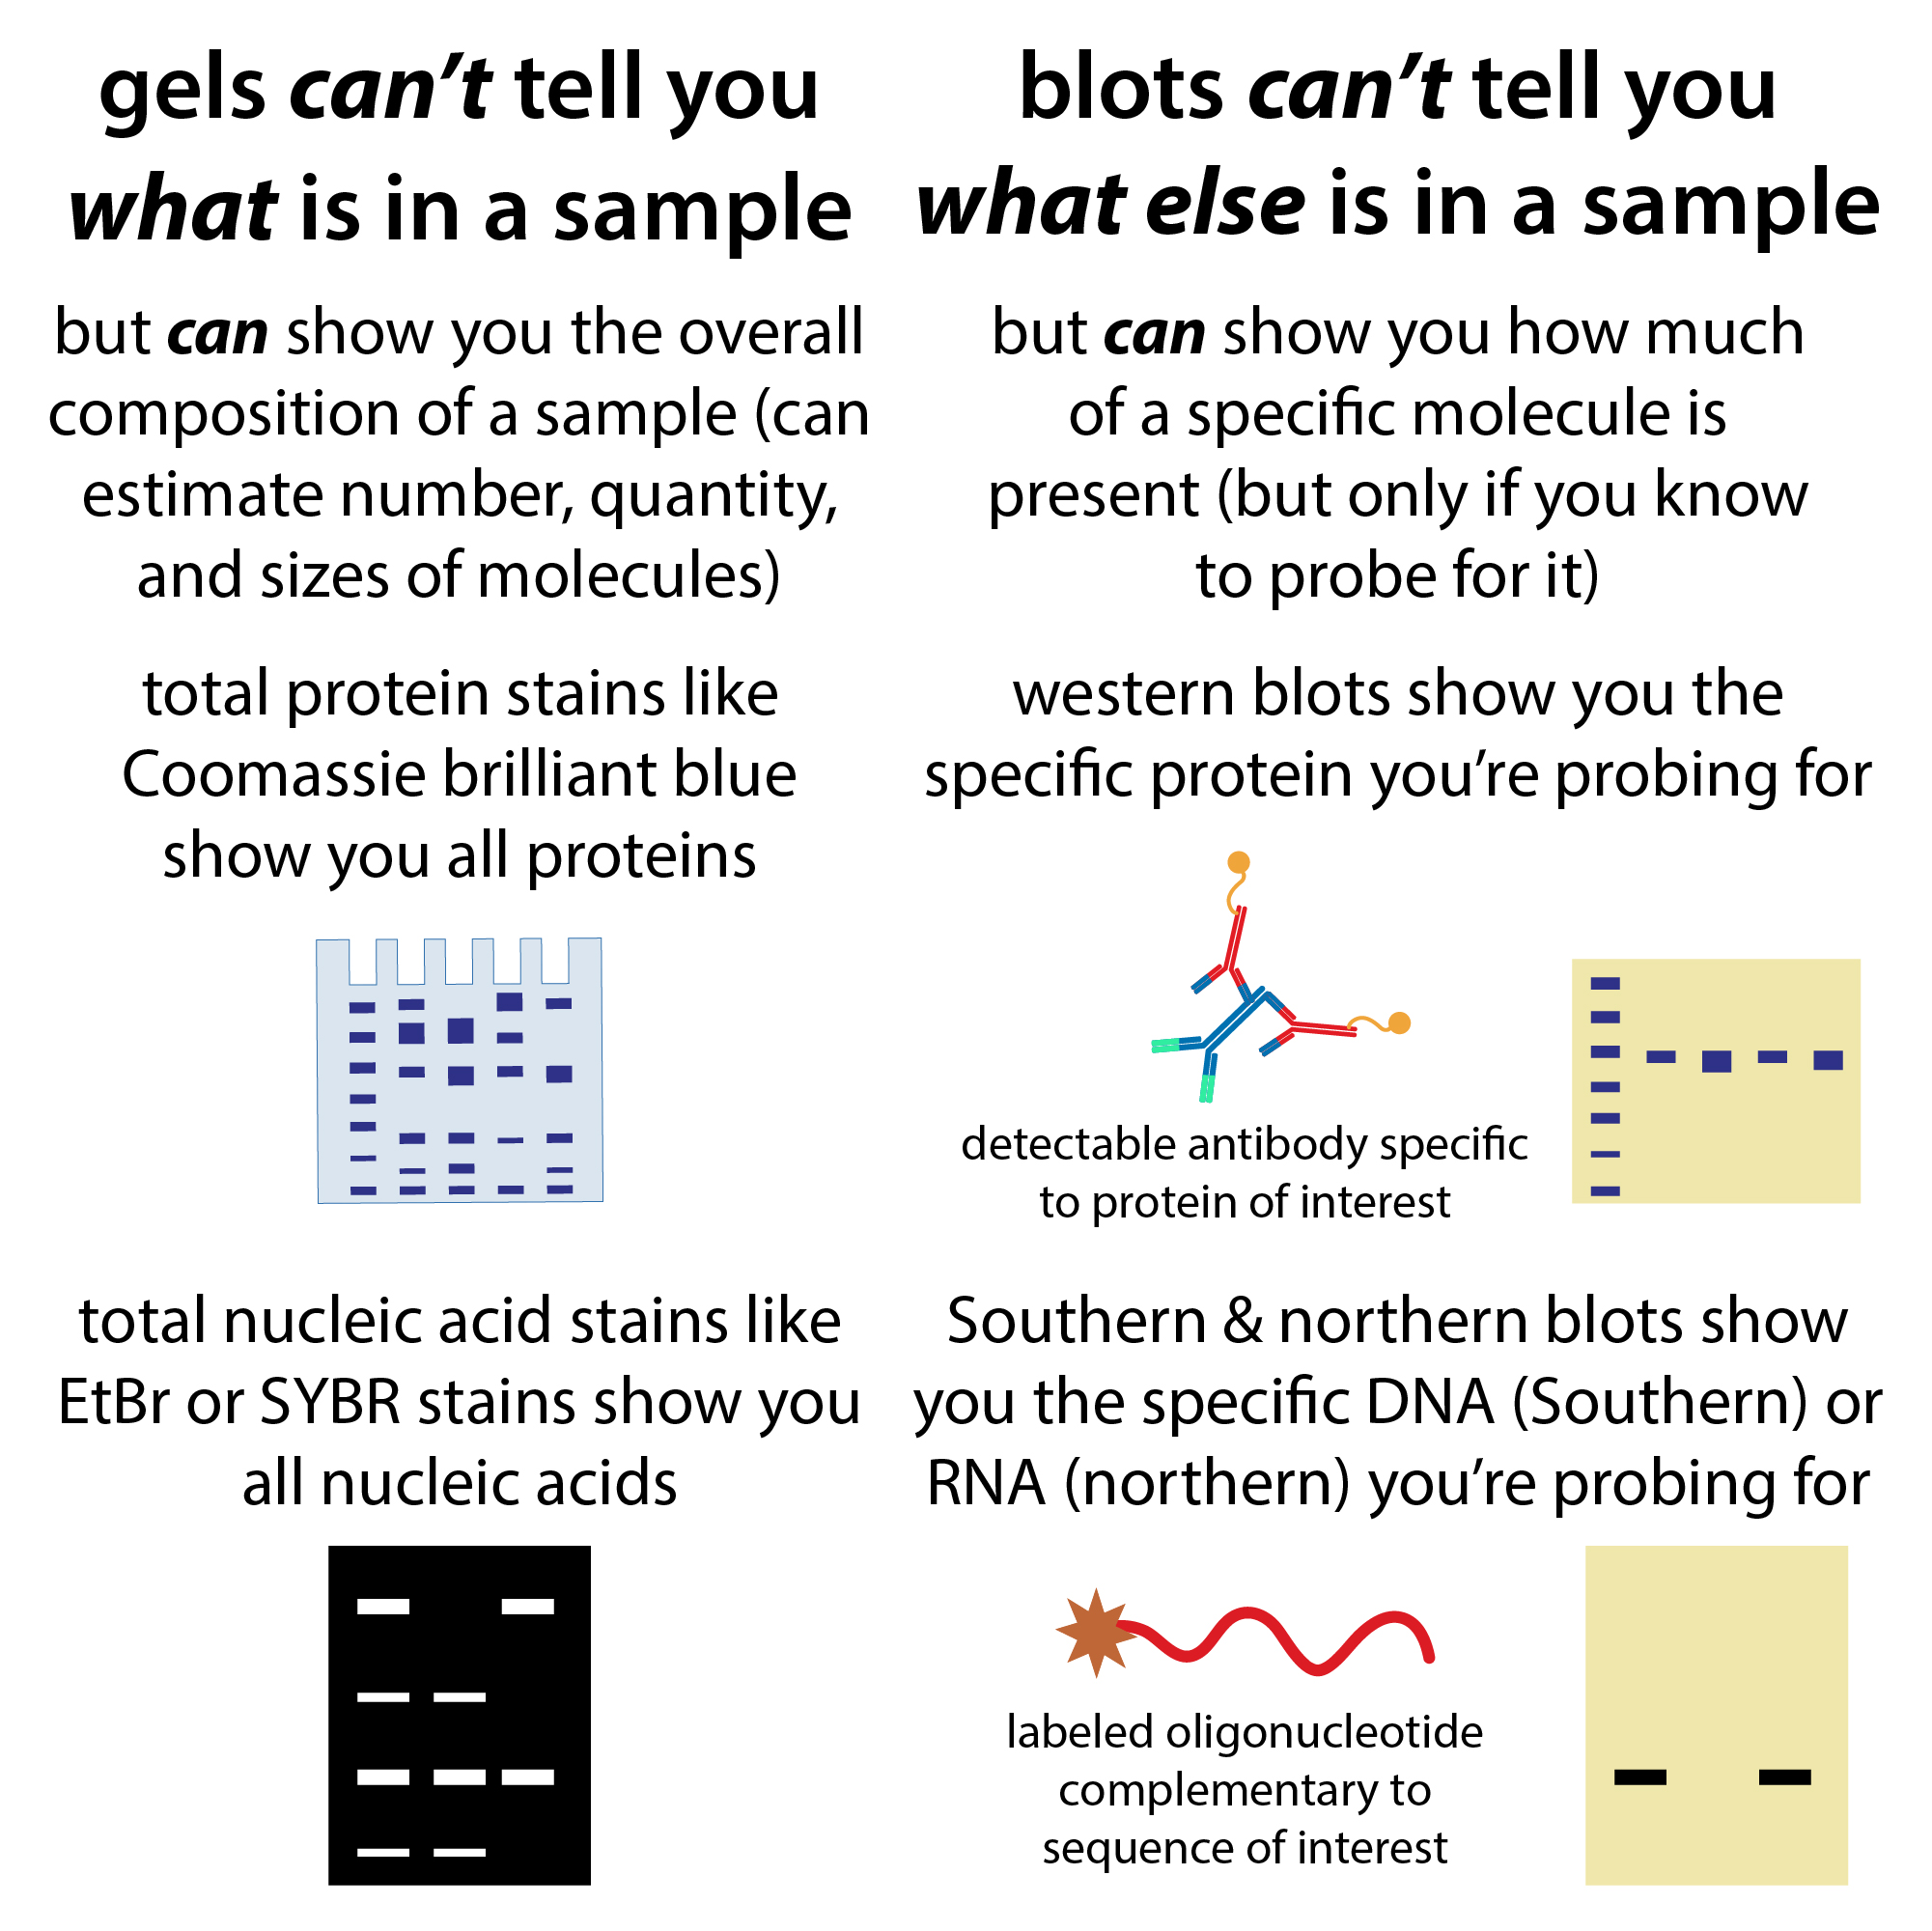
Along the way, we can assess protein purity using gel electrophoresis, typically in the form of SDS-PAGE. Here, we take a small sample of solution containing the protein, unfold them and coat them in a negatively-charged detergent, and use a positive charge to entice them to travel through a gel mesh. The bigger the protein, the slower they’ll travel, and thus the higher up in the gel they’ll be when we turn off the electricity (thus removing the positive charge). We can then stain the proteins in the gel (e.g., with Coomassie dye) to get a look (based on the presence, strength, locations, and number of bands).
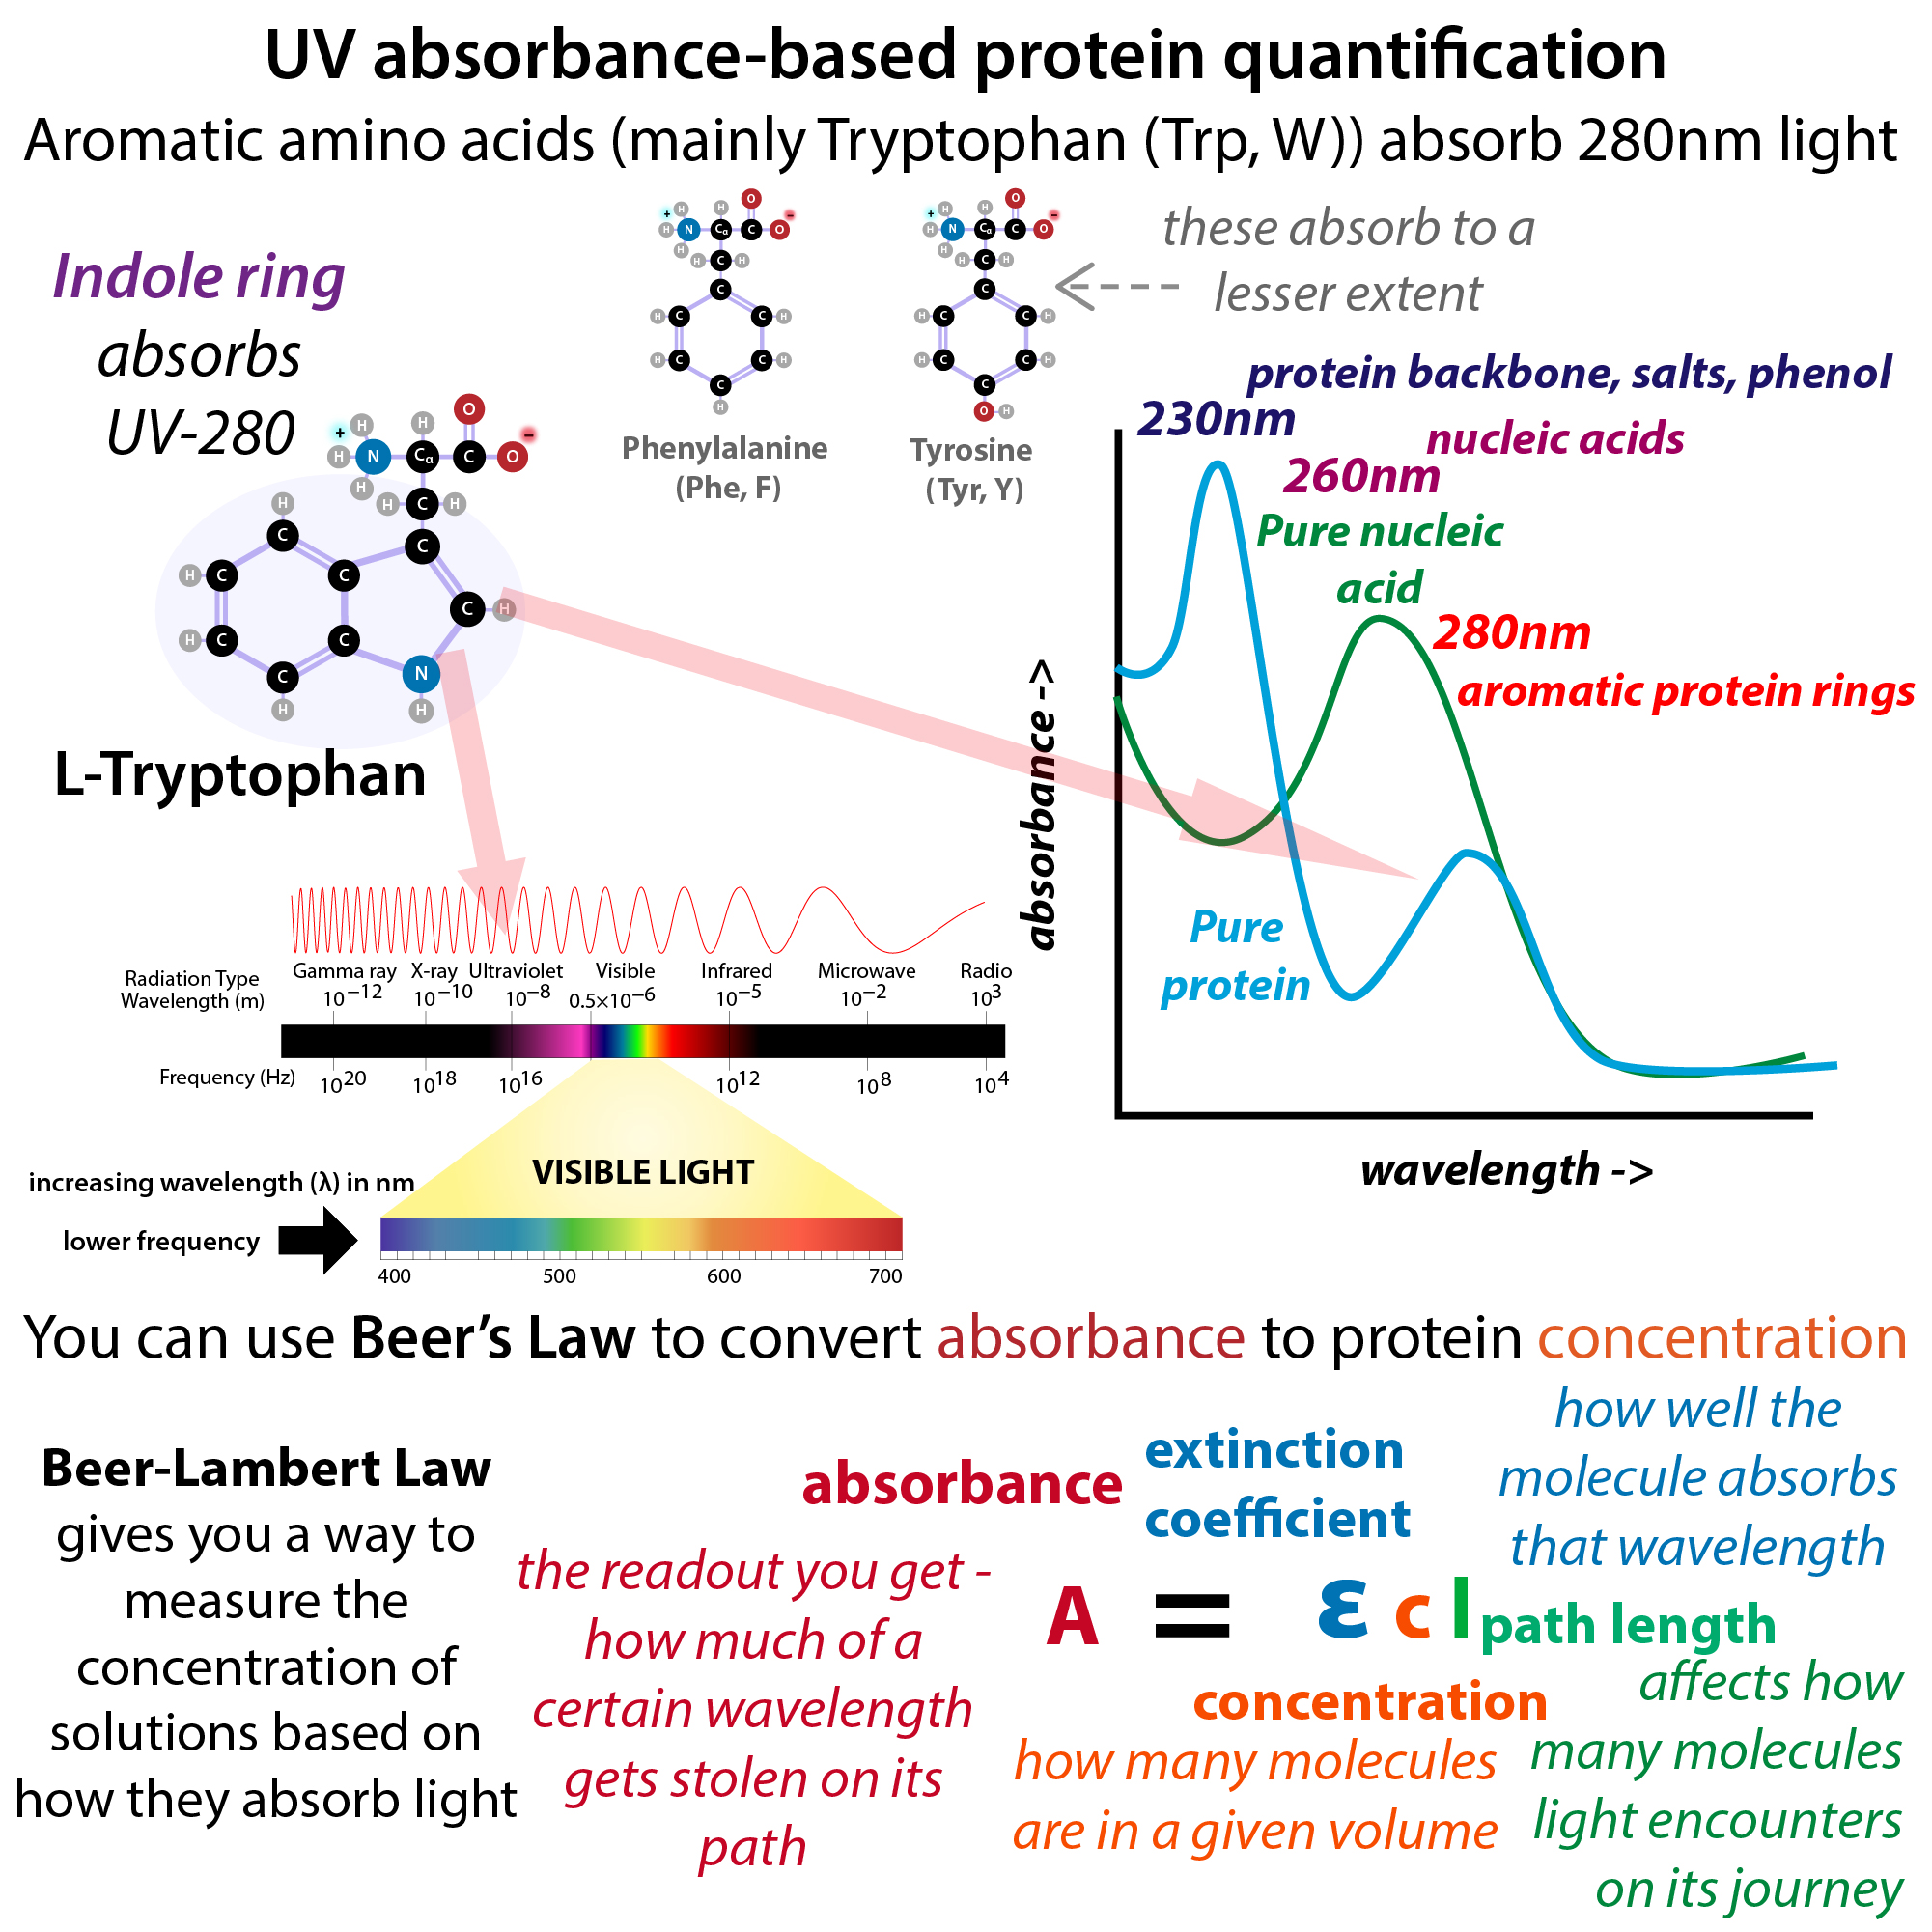
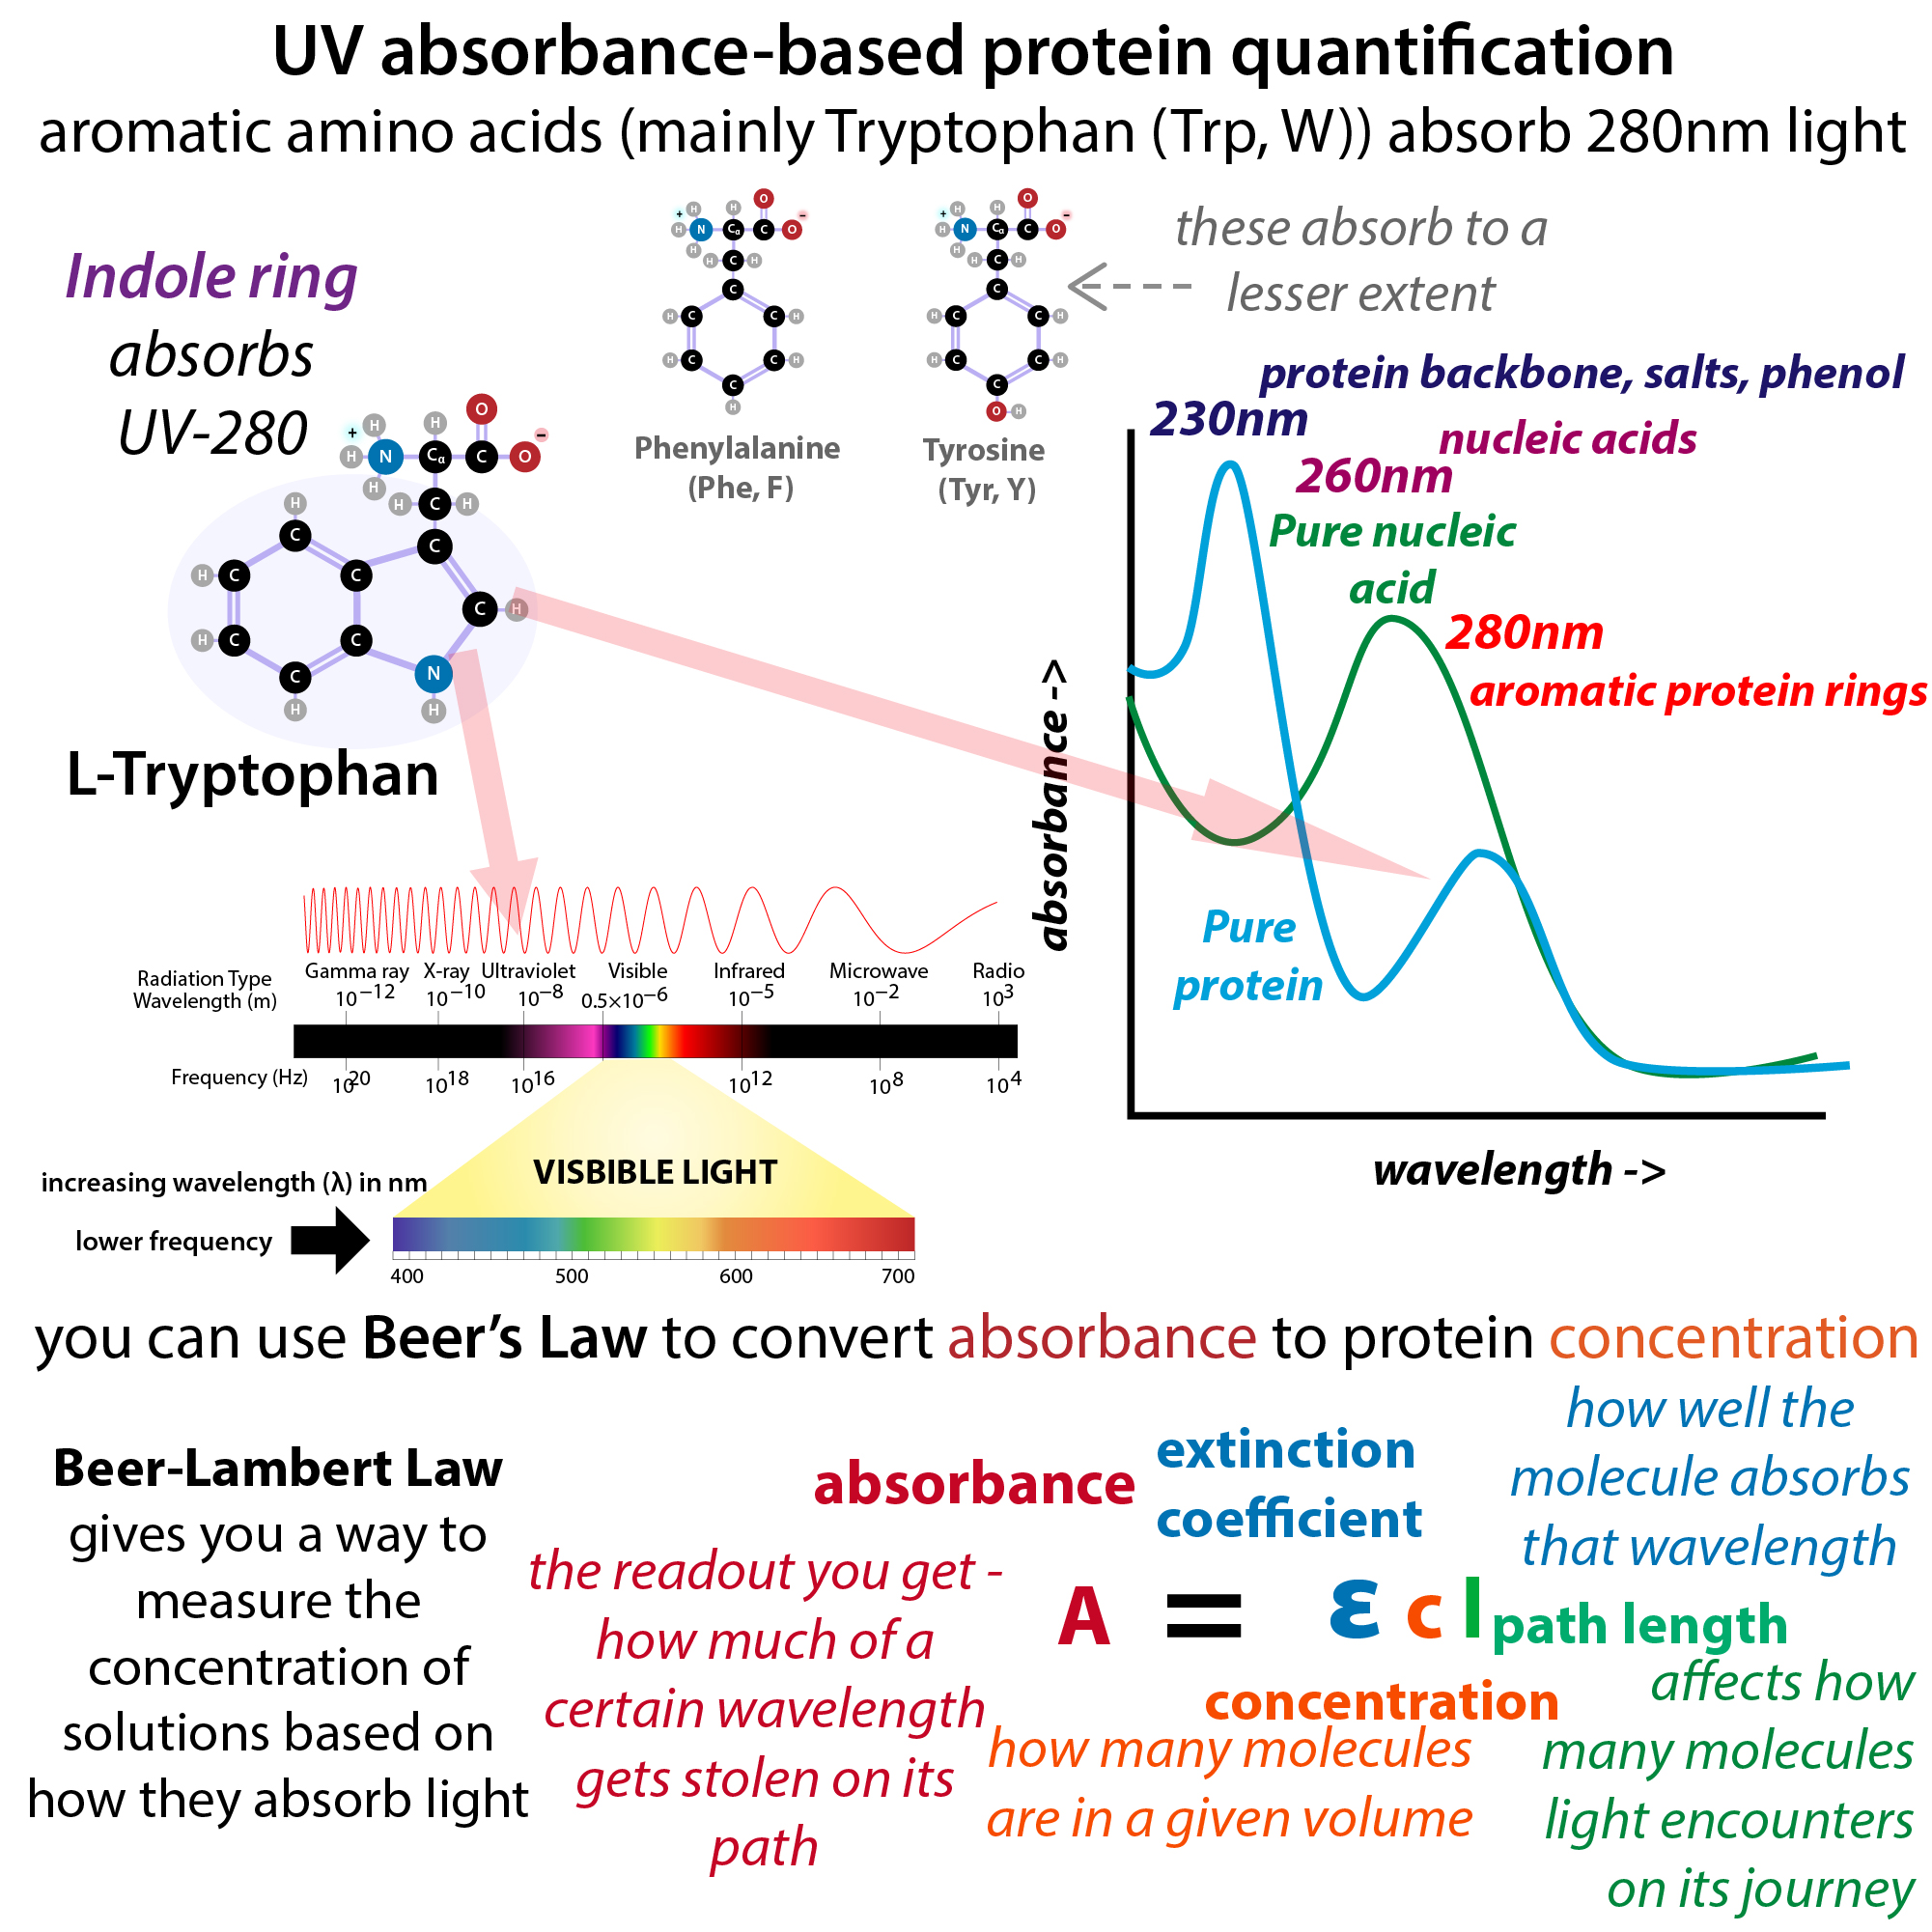
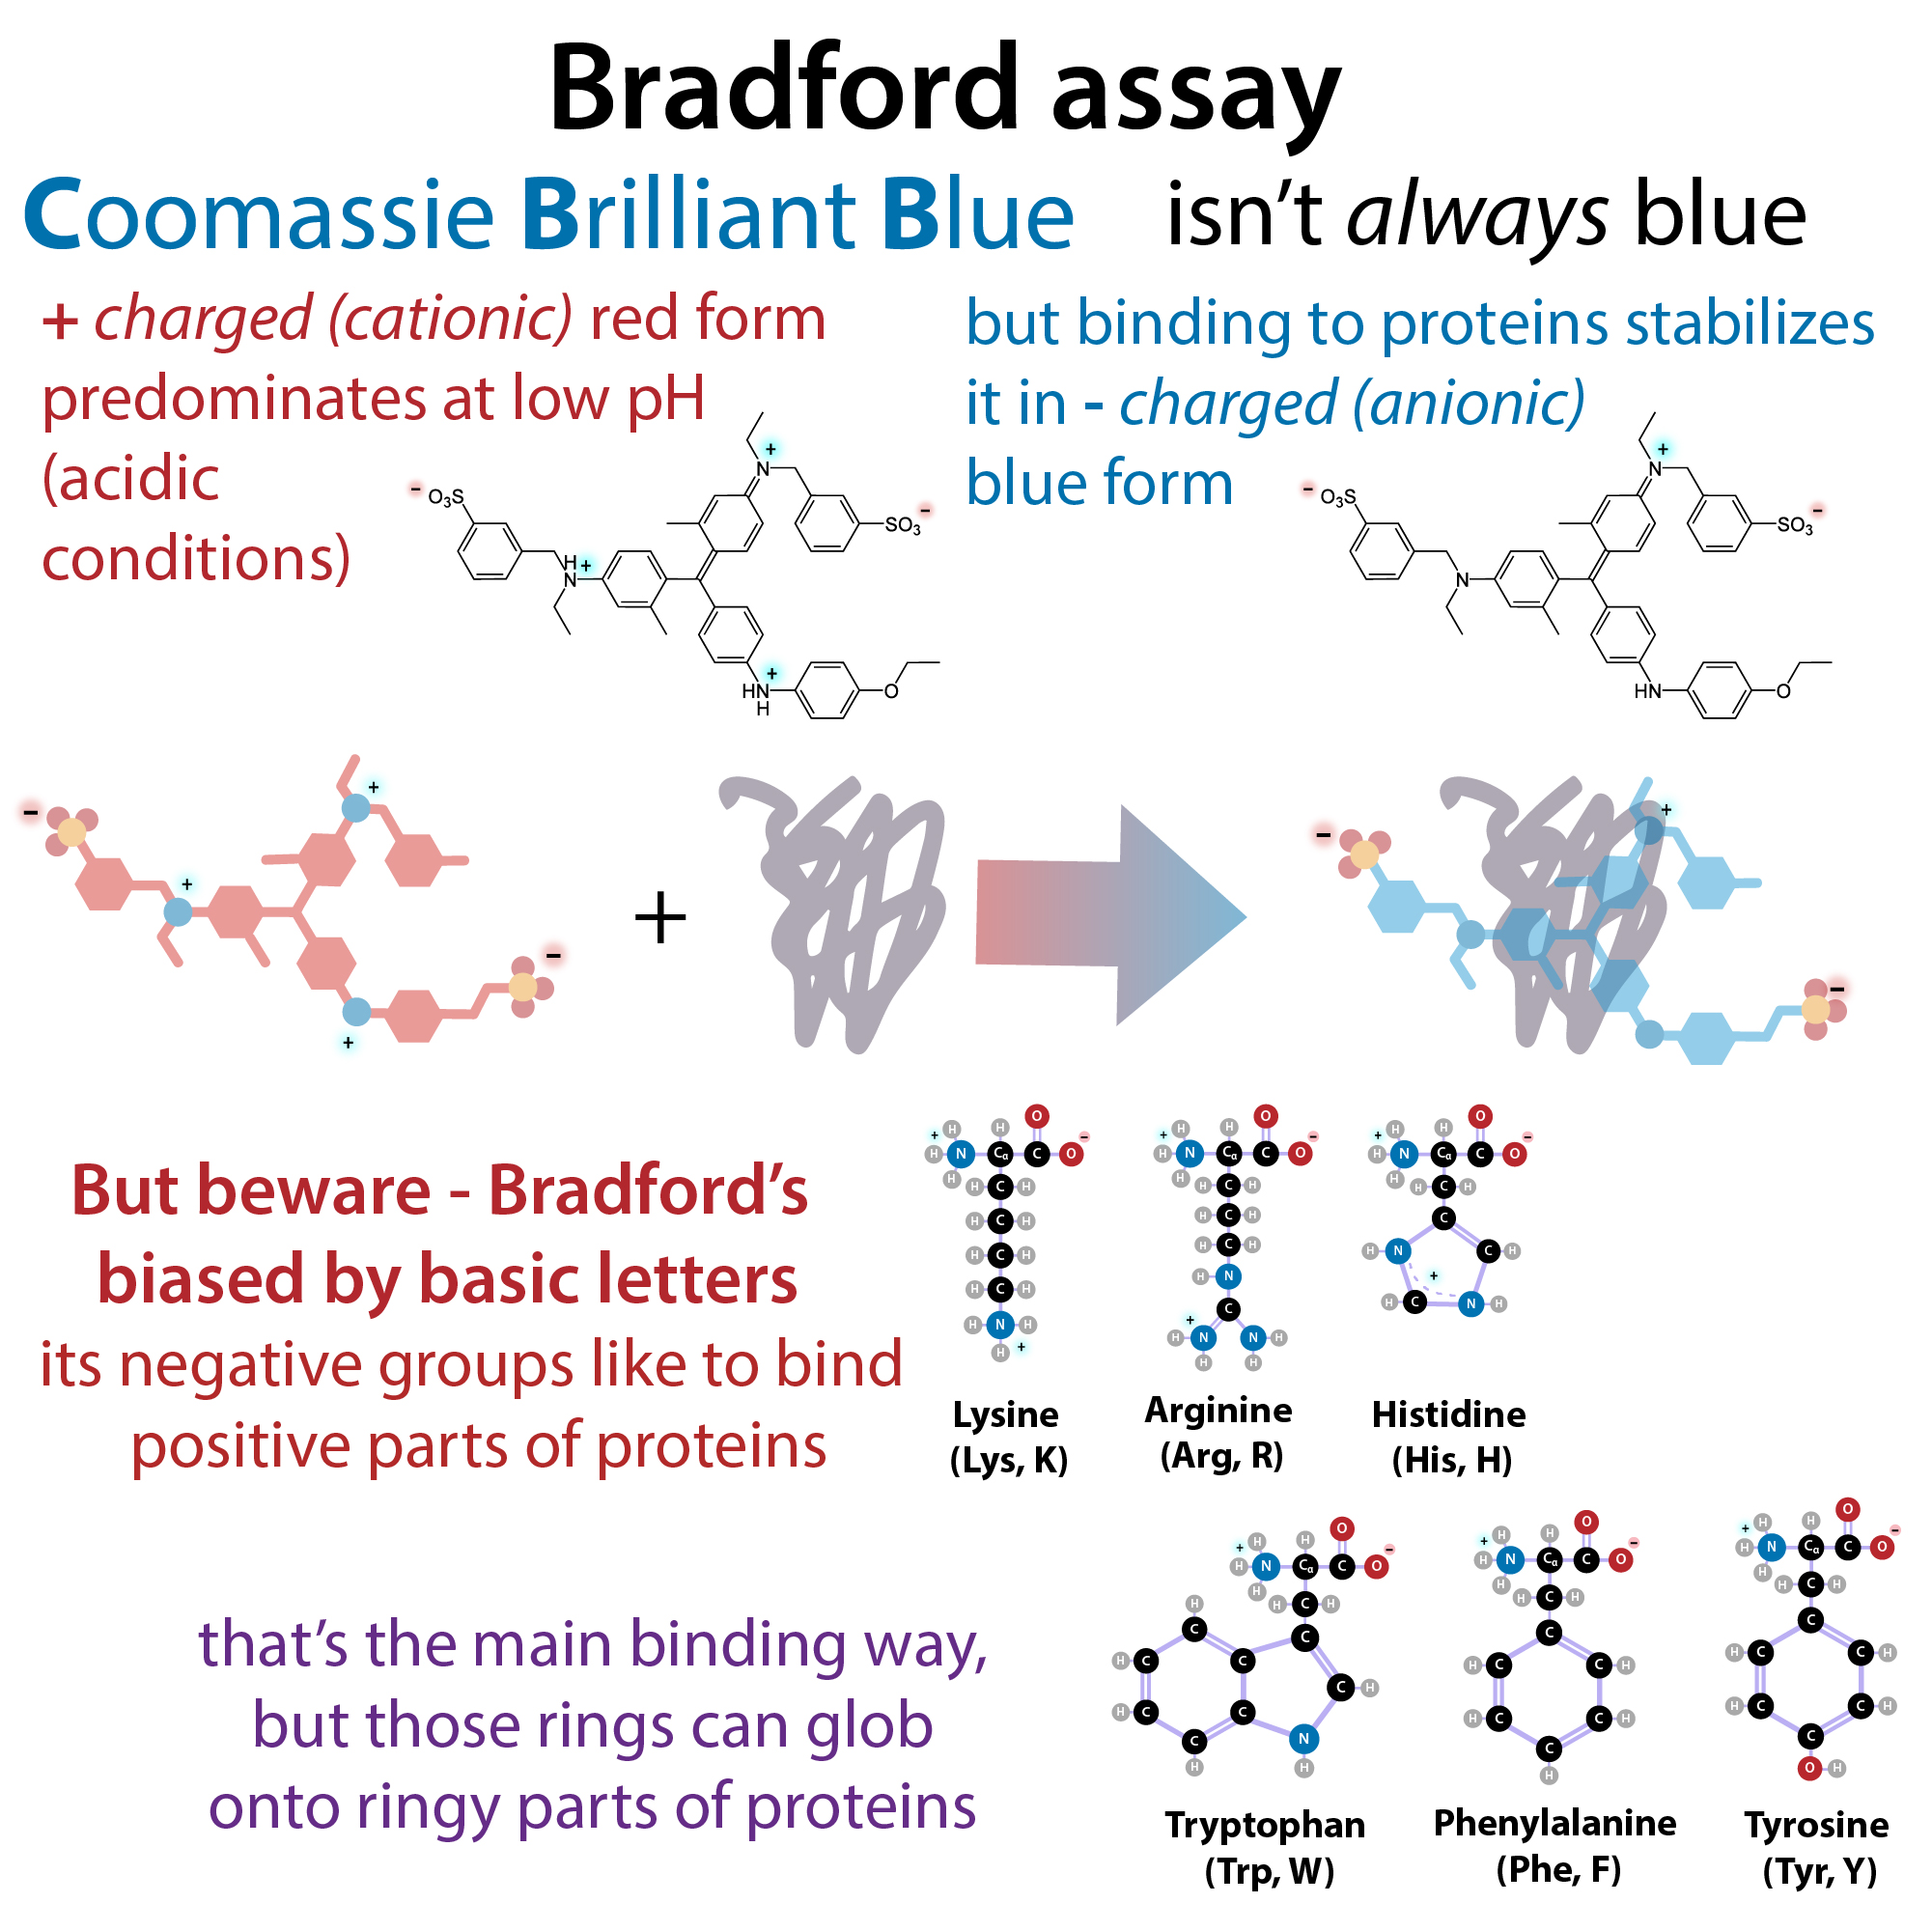
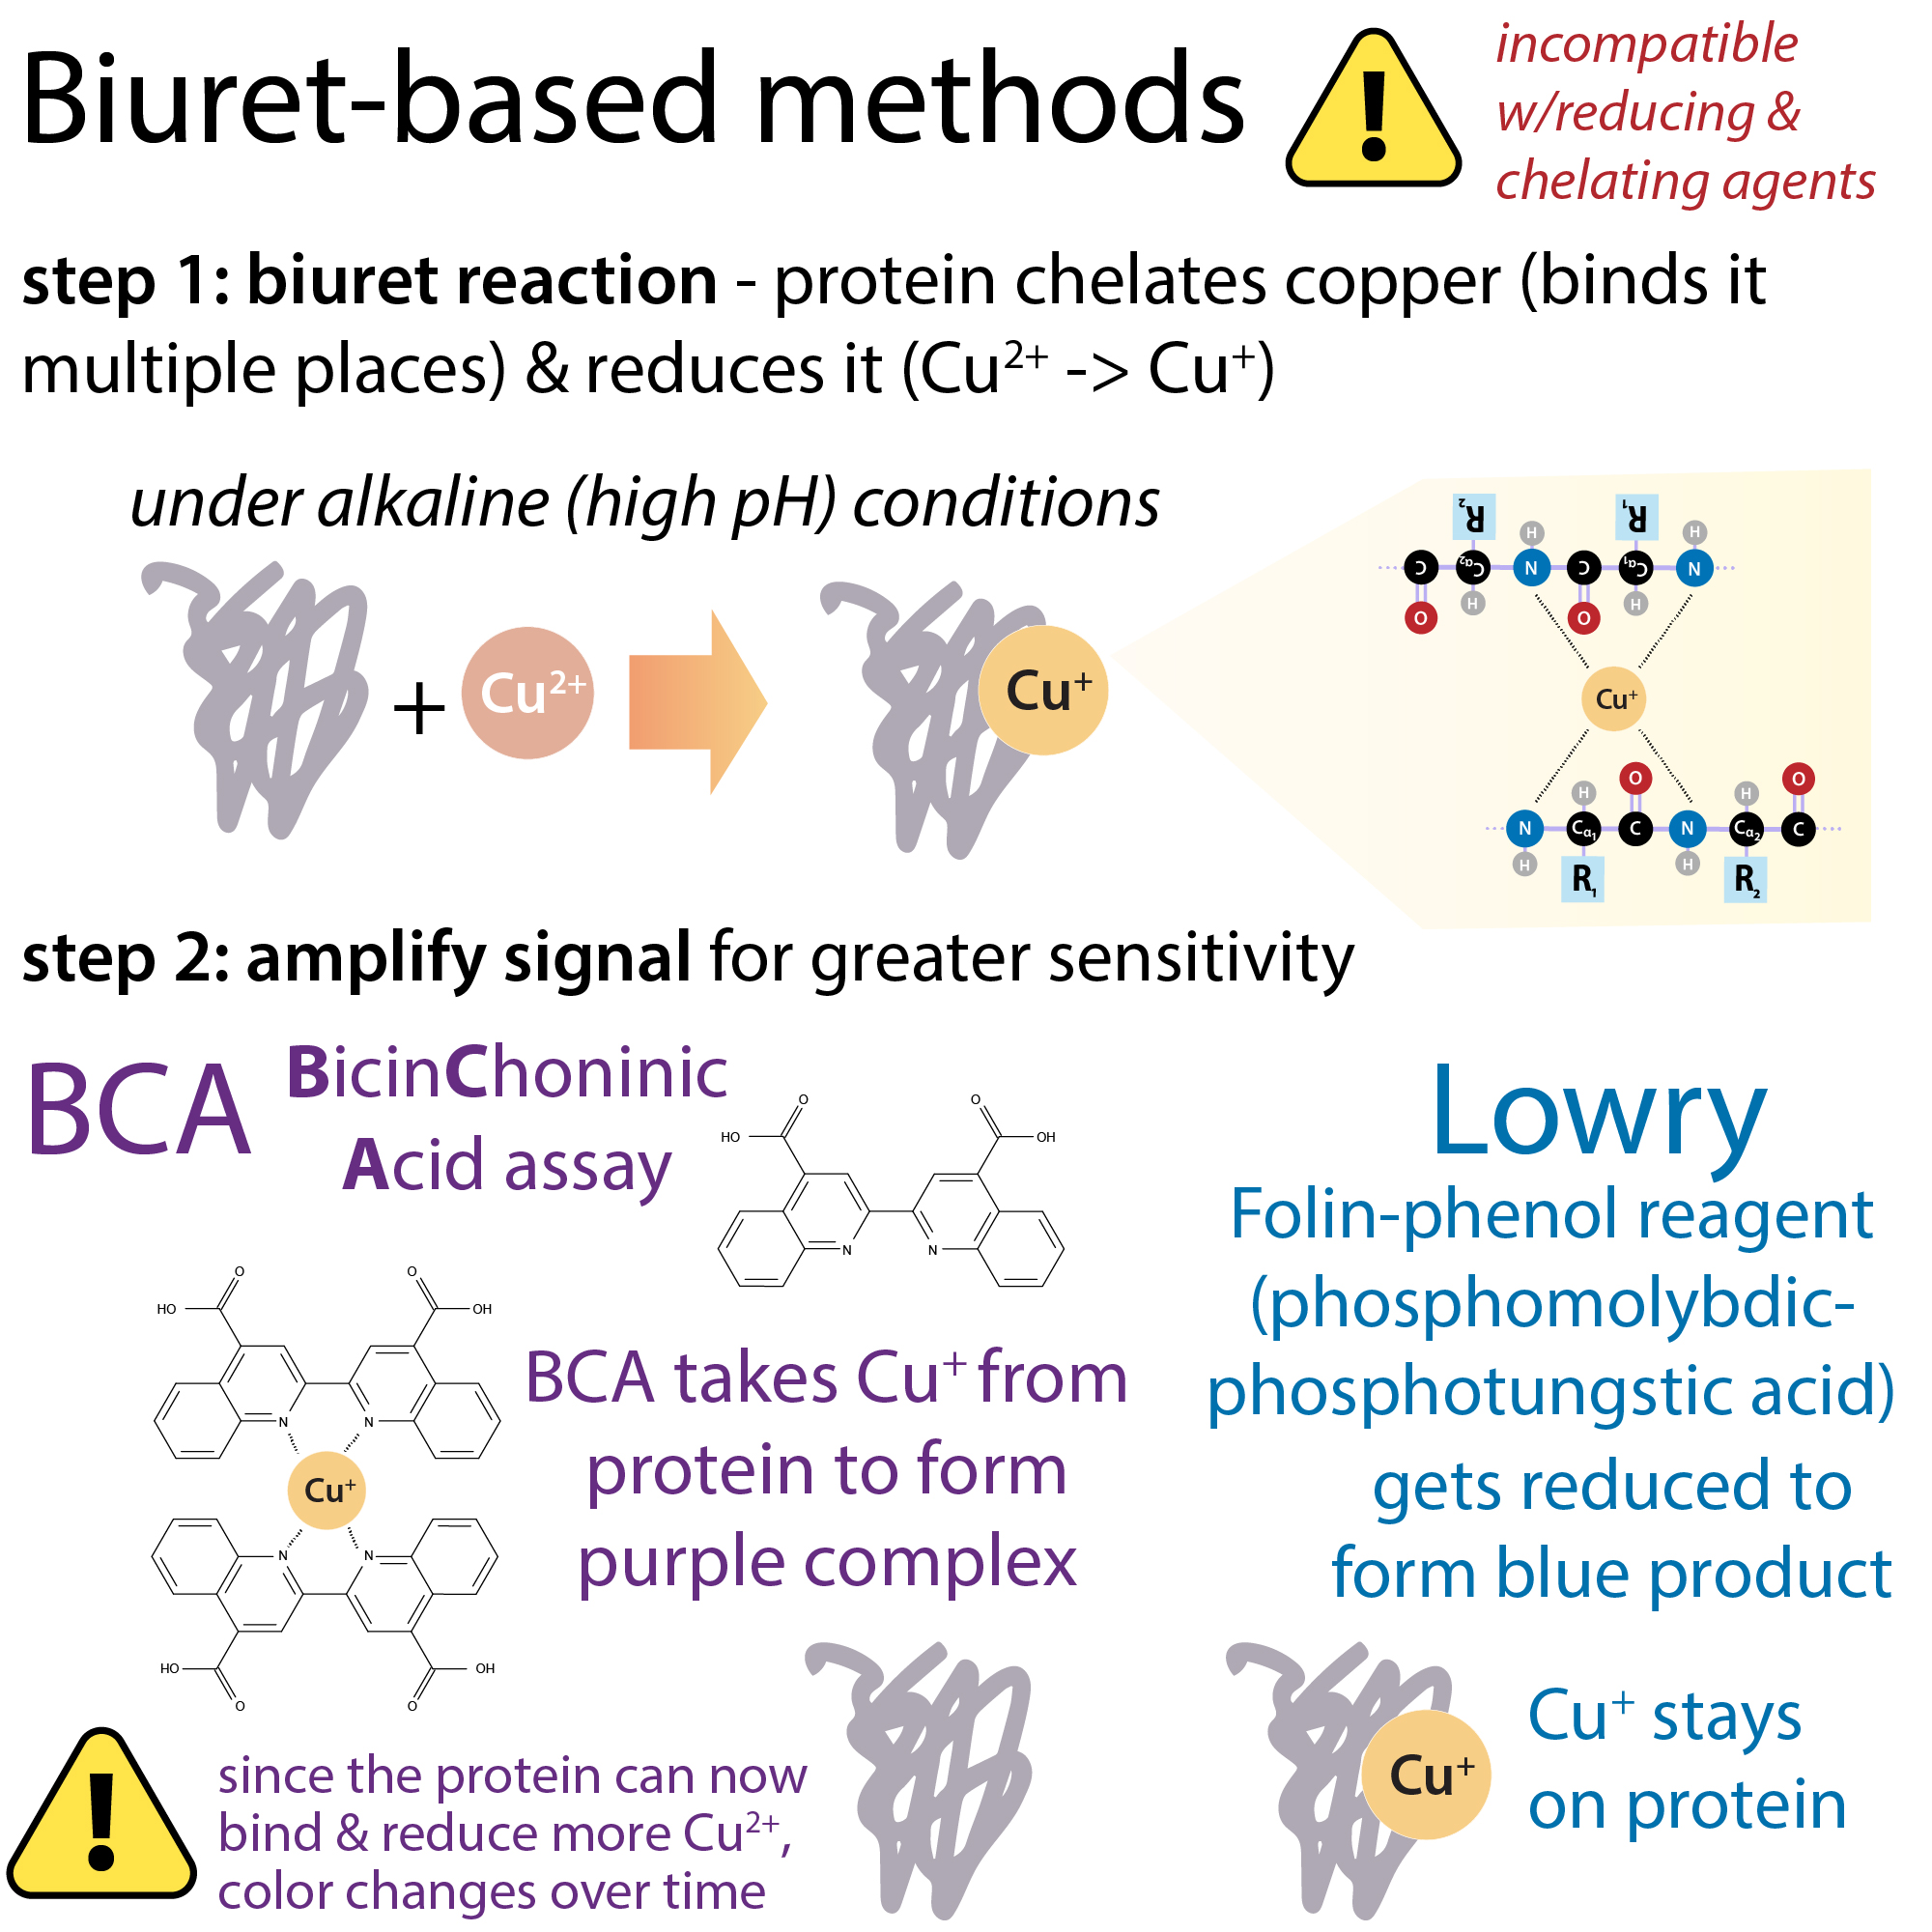
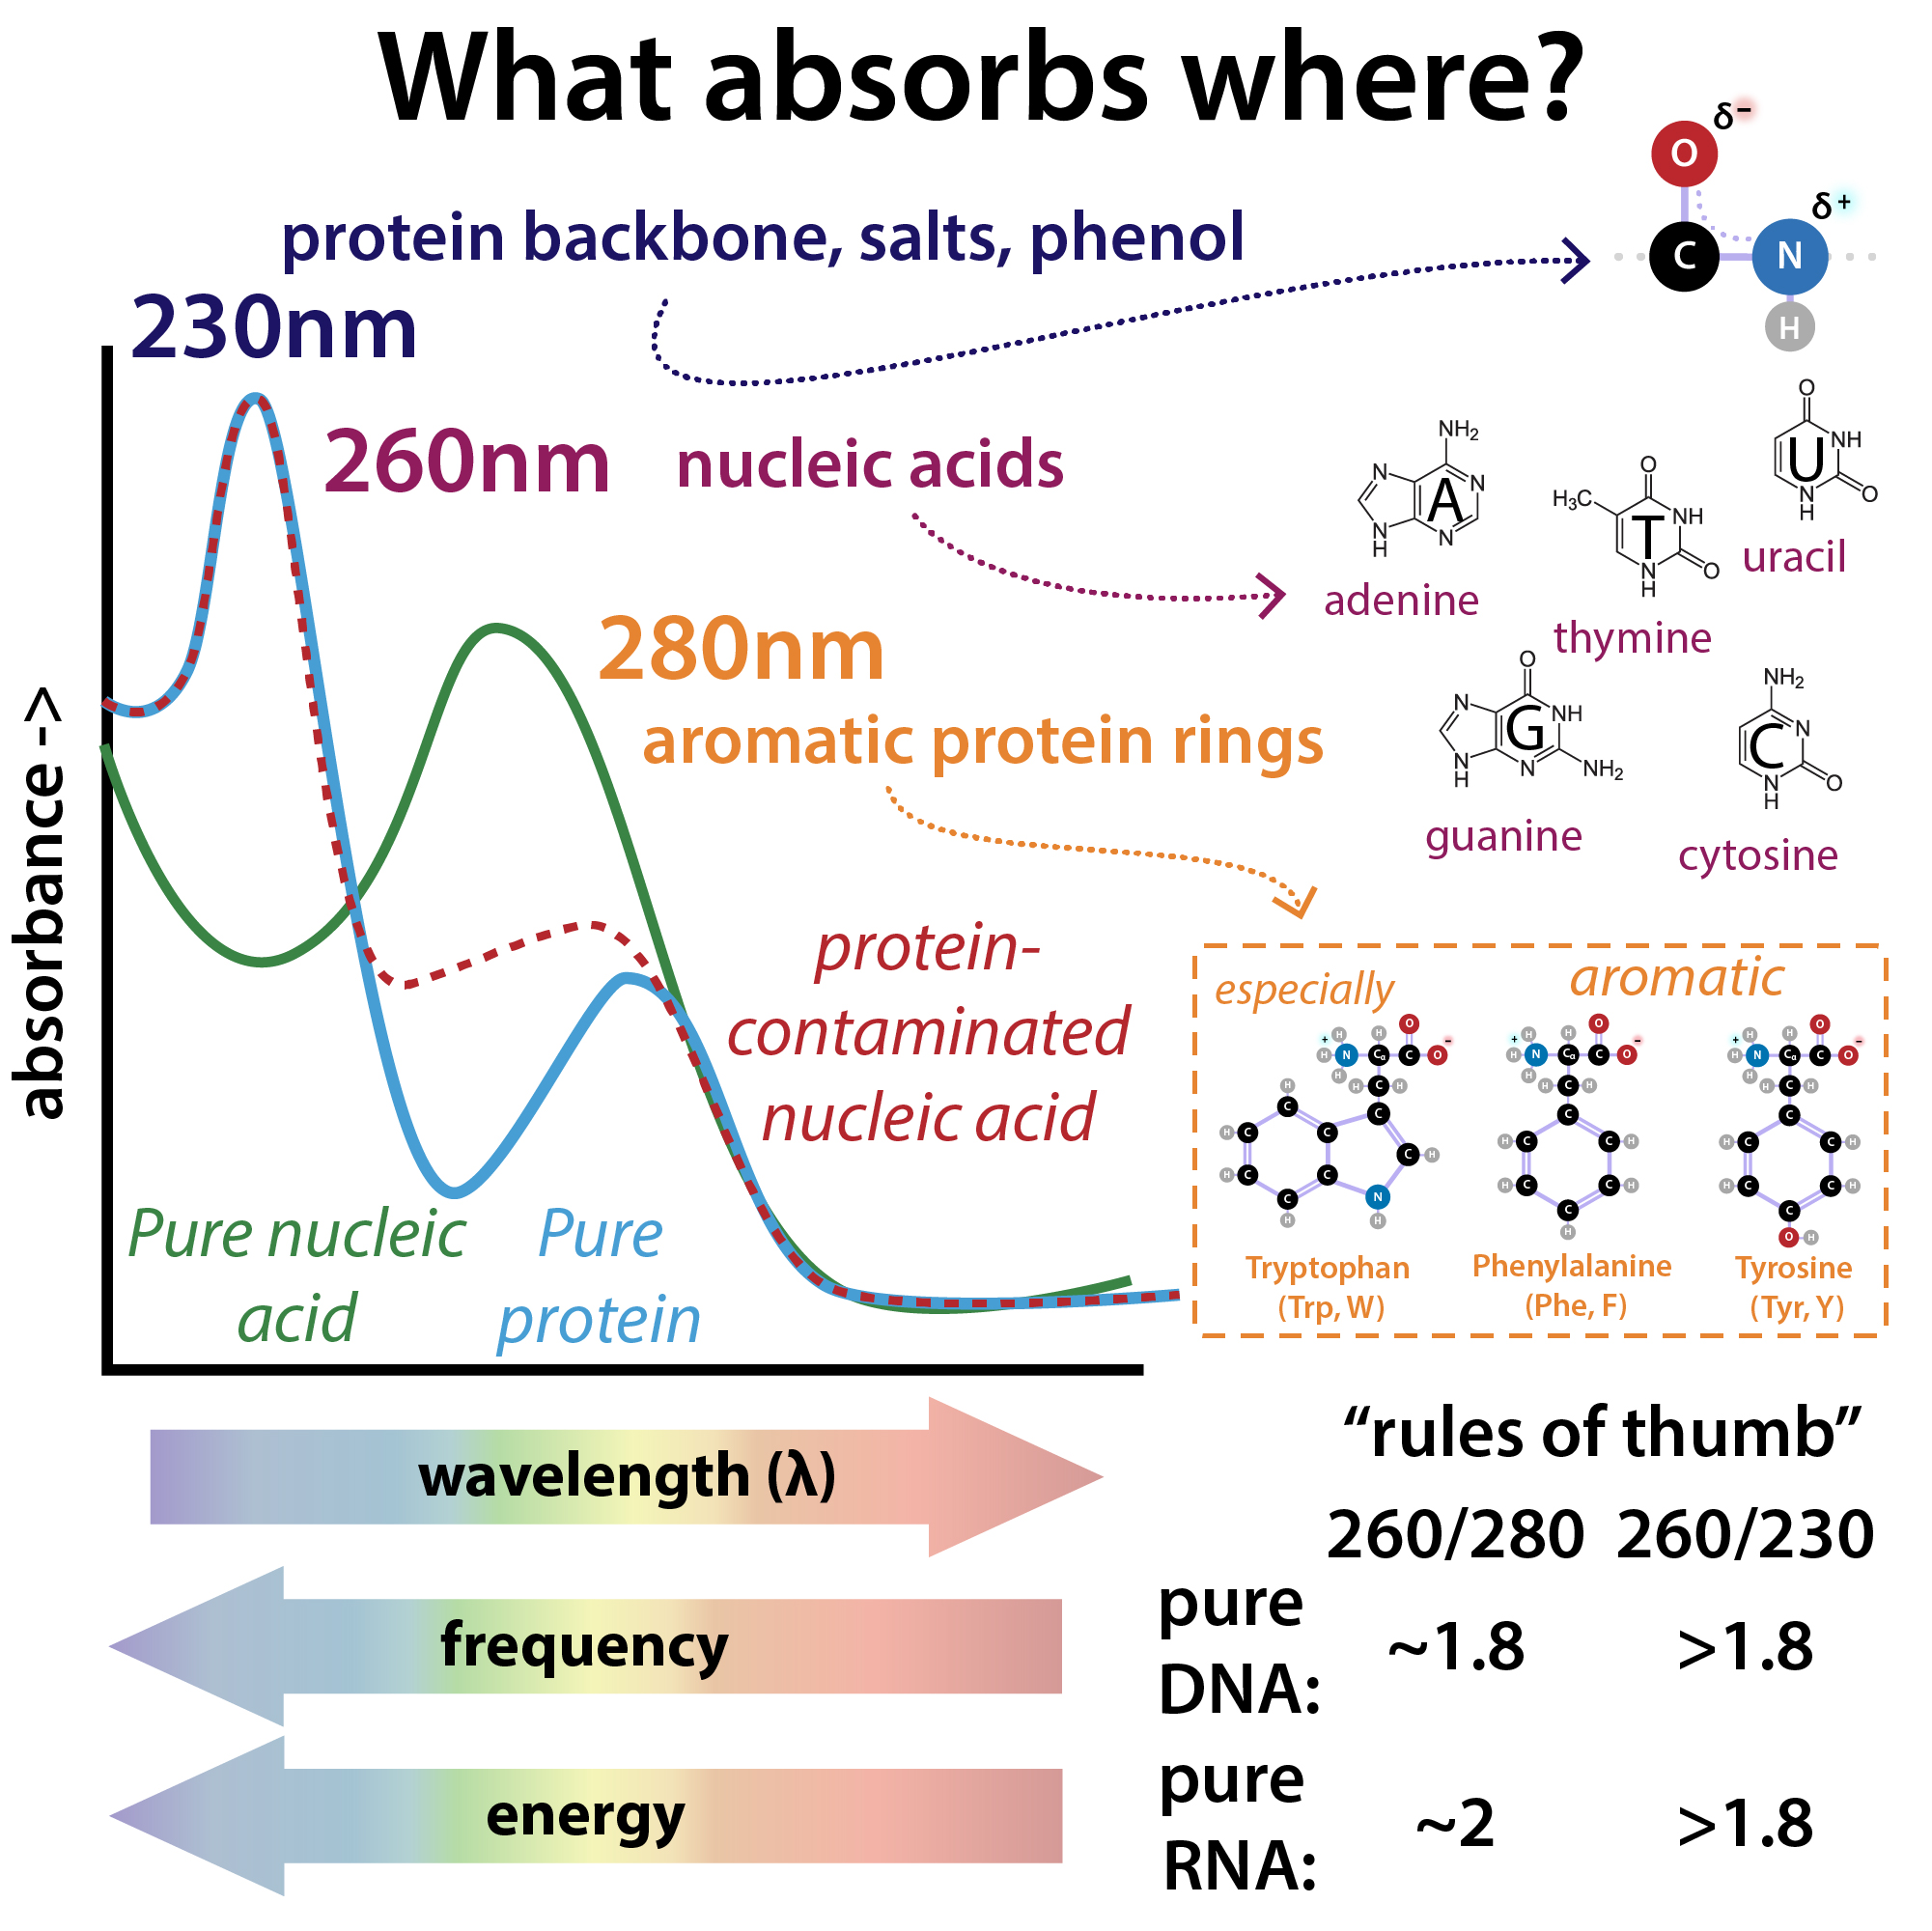
To measure protein concentration, we can use tests such as a Bradford assay (in which a dye binds to proteins and turns blue and you calculate how much protein there is based on how blue a protein-containing solution turns), a BCA assay (another dye-based method, but with a different mechanism, that’s less biased by amino acid differences between proteins), and/or the amount of 280 nanometer (nm) ultraviolet (UV) light absorbed (UV280).
Once we have pure protein, and we know how much we have, we can carry out endless possible experiments on it.
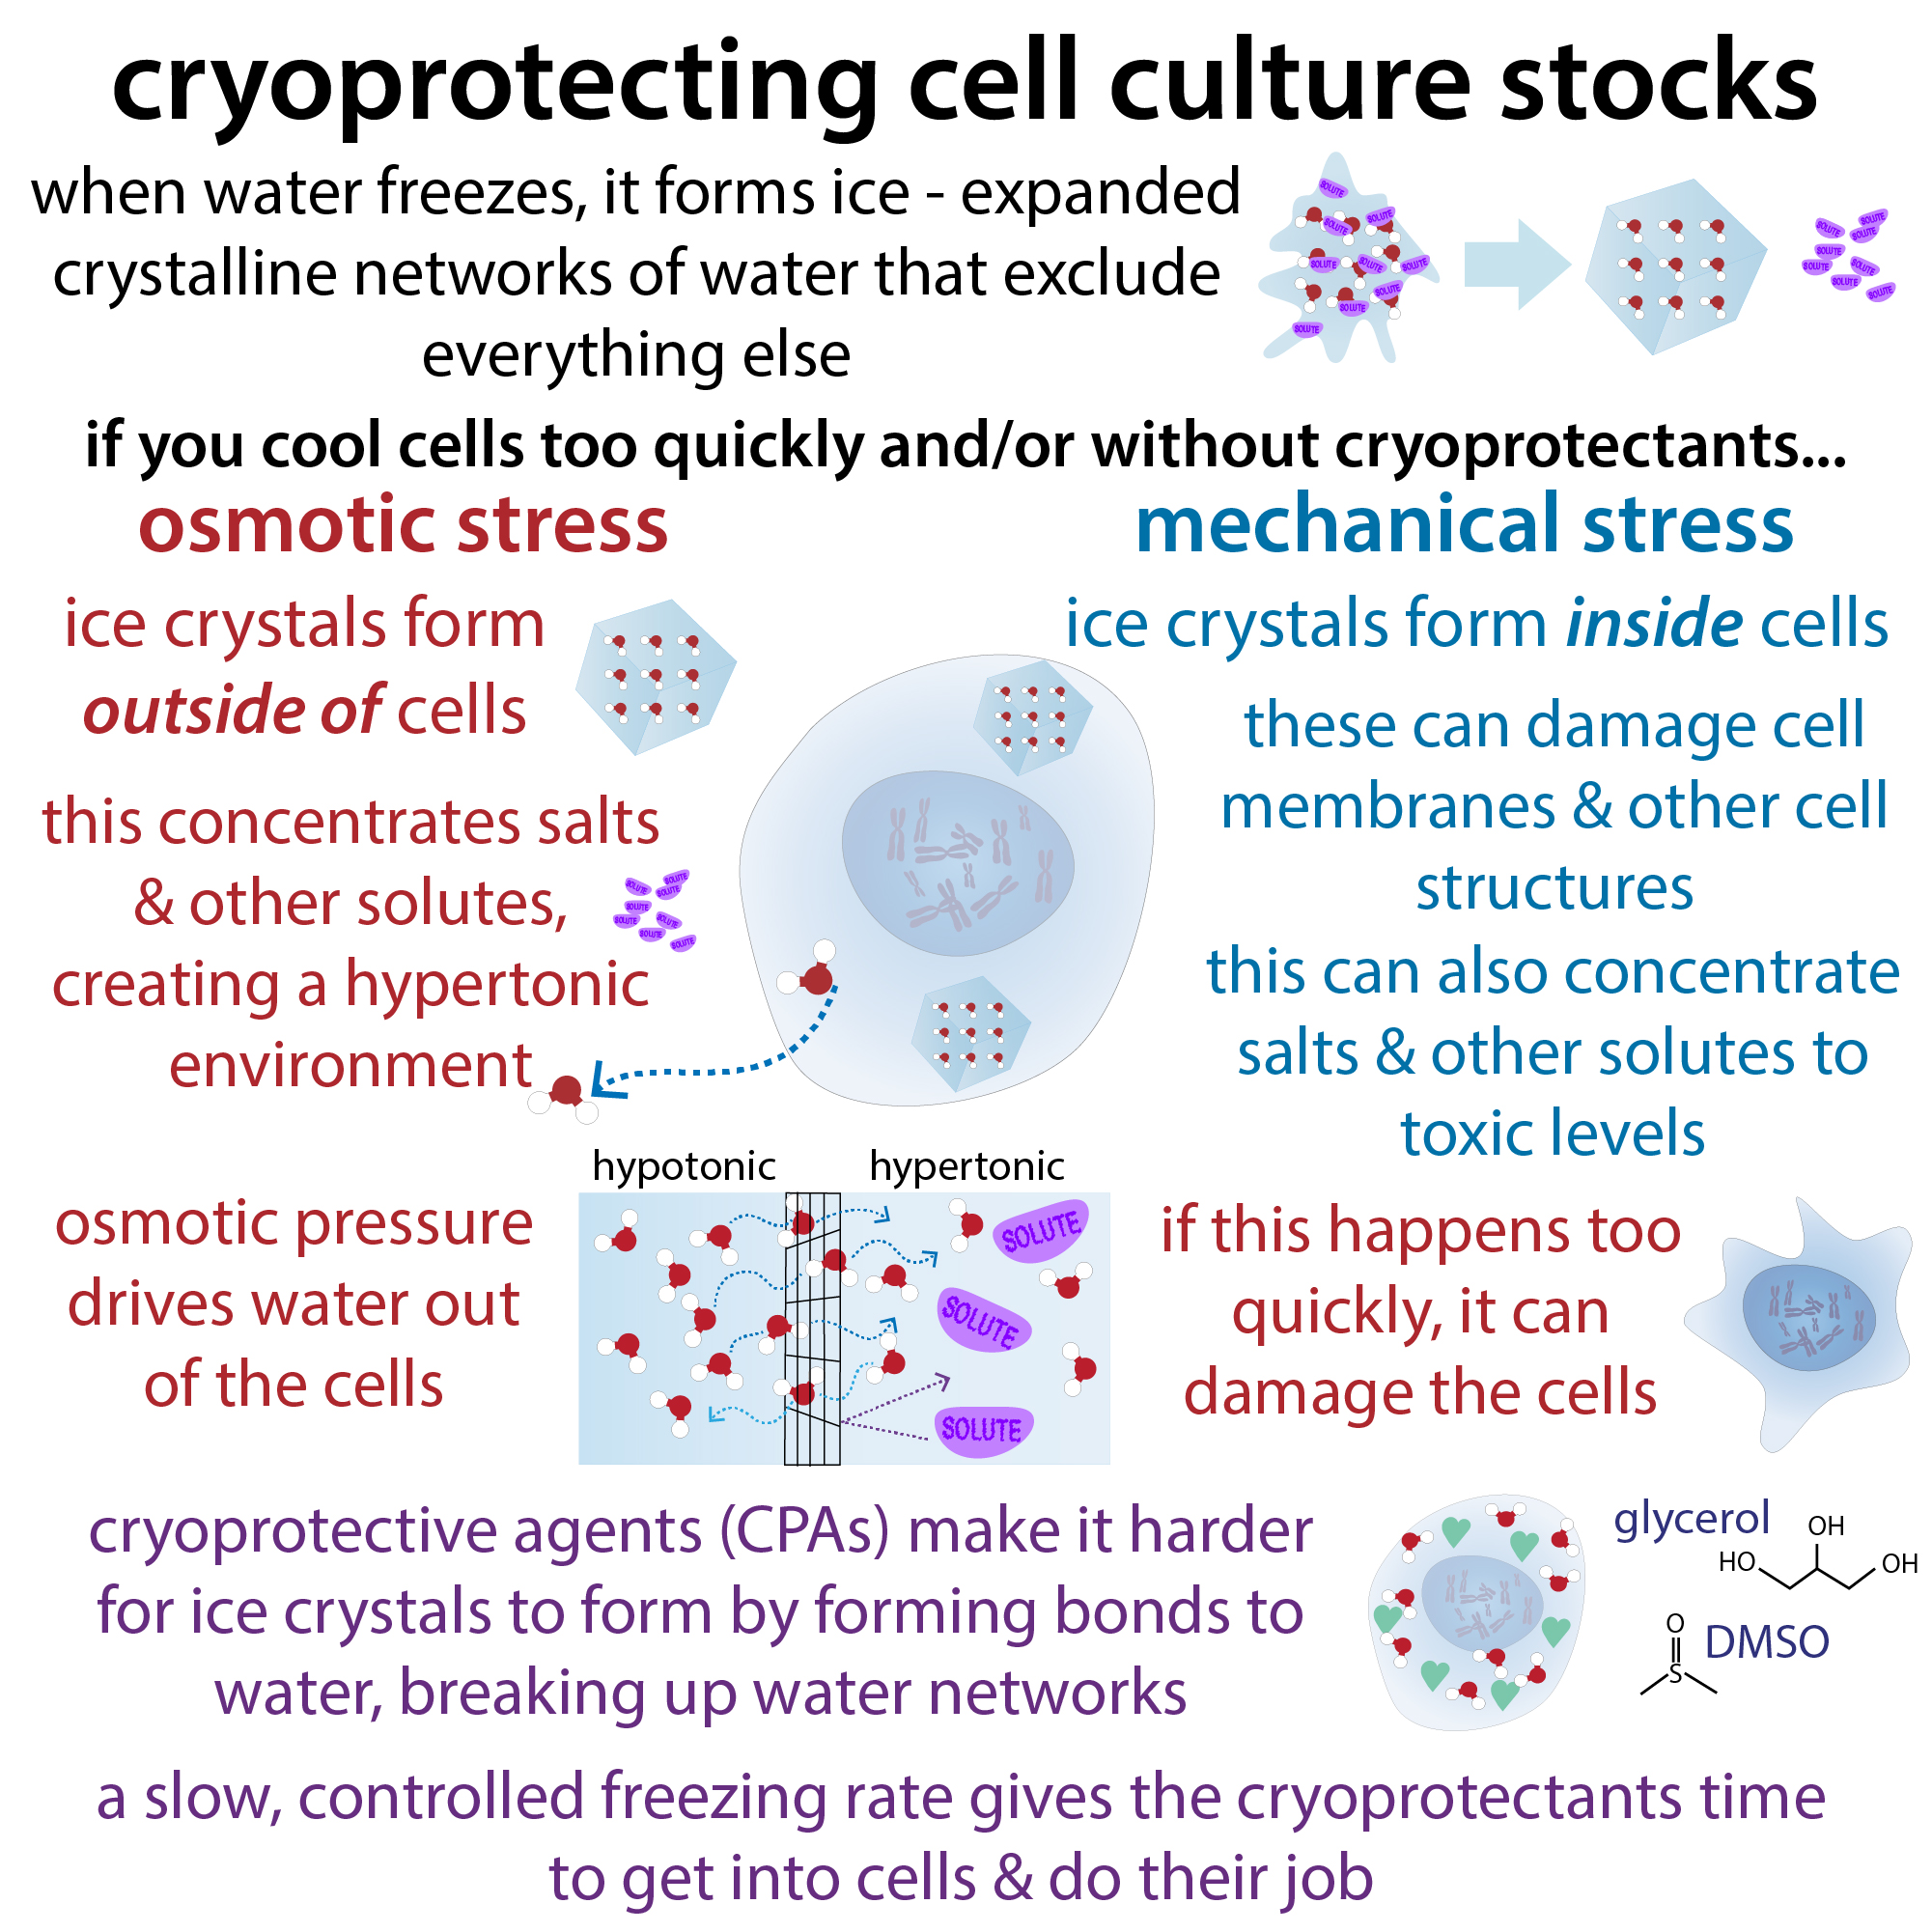
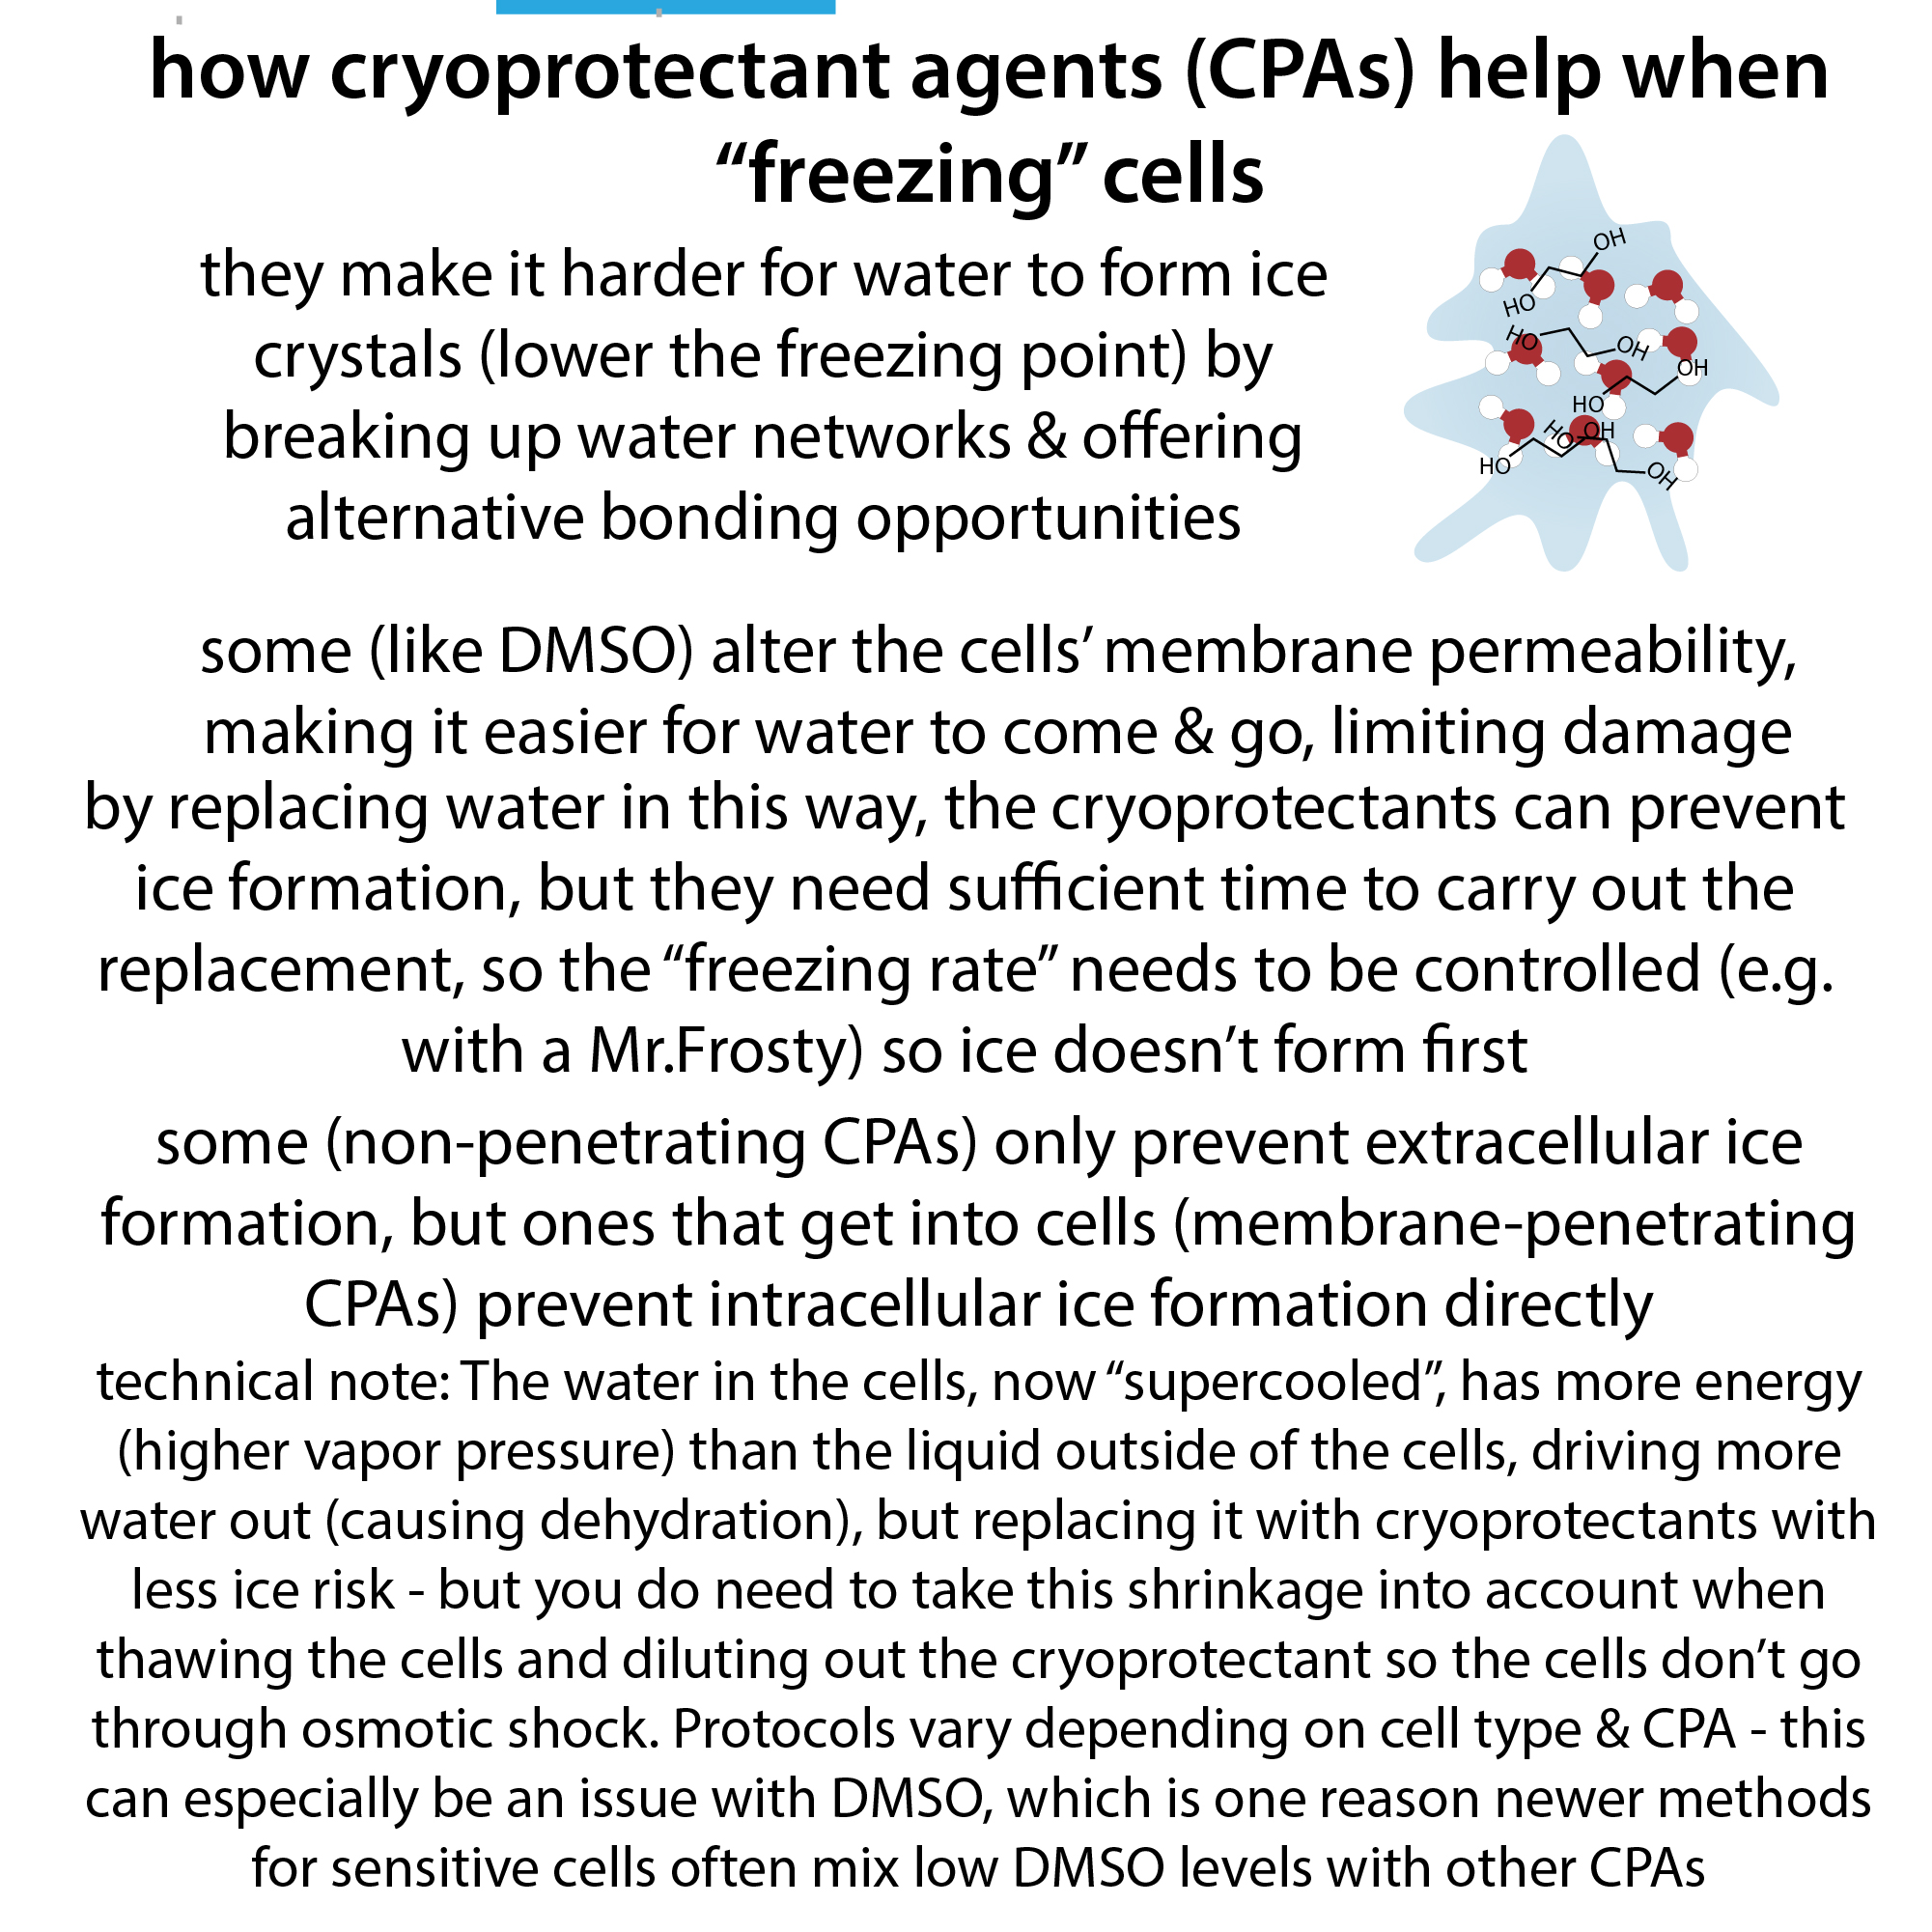
Typically, those experiments will be a task for a later date, however, so the first step after a successful purification is typically flash/snap freezing the protein. This is where we chill the protein super duper quickly by dunking it in liquid nitrogen (LN2). We typically first mix the protein with a cryoprotectant like glycerol. The combination of cryoprotectant (which prevents water molecules from finding and interacting with one another) and quick freezing makes it so that water molecules can’t form ice, which could harm the protein. To keep our protein “frozen” (technically vitrified), we typically store it in a -80°C freezer. To avoid having to freeze-thaw protein samples multiple time, we usually first aliquot it (split it into small, typically single-use portions) and then just thaw one aliquot at a time.
Speaking of time, now that we have an overview, it’s time to go into some details and direct you to sources of more information. Keep in mind the basic workflow:
- Molecular cloning/subcloning (potentially with site-directed mutagenesis to introduce specific changes to the protein): Obtain and/or construct the genetic instructions for making a protein of interest
- Recombinant protein expression (get cells to make the protein for you)
- Transformation: Stick the genetic instructions for the protein of interest into expression cells
- Induction: Tell the cells to make the protein
- Harvest: Isolate the cells from the growth media (food), typically by using centrifugation to “pellet” the cells (which sink because they’re heavy), then pouring off the media
- Protein purification
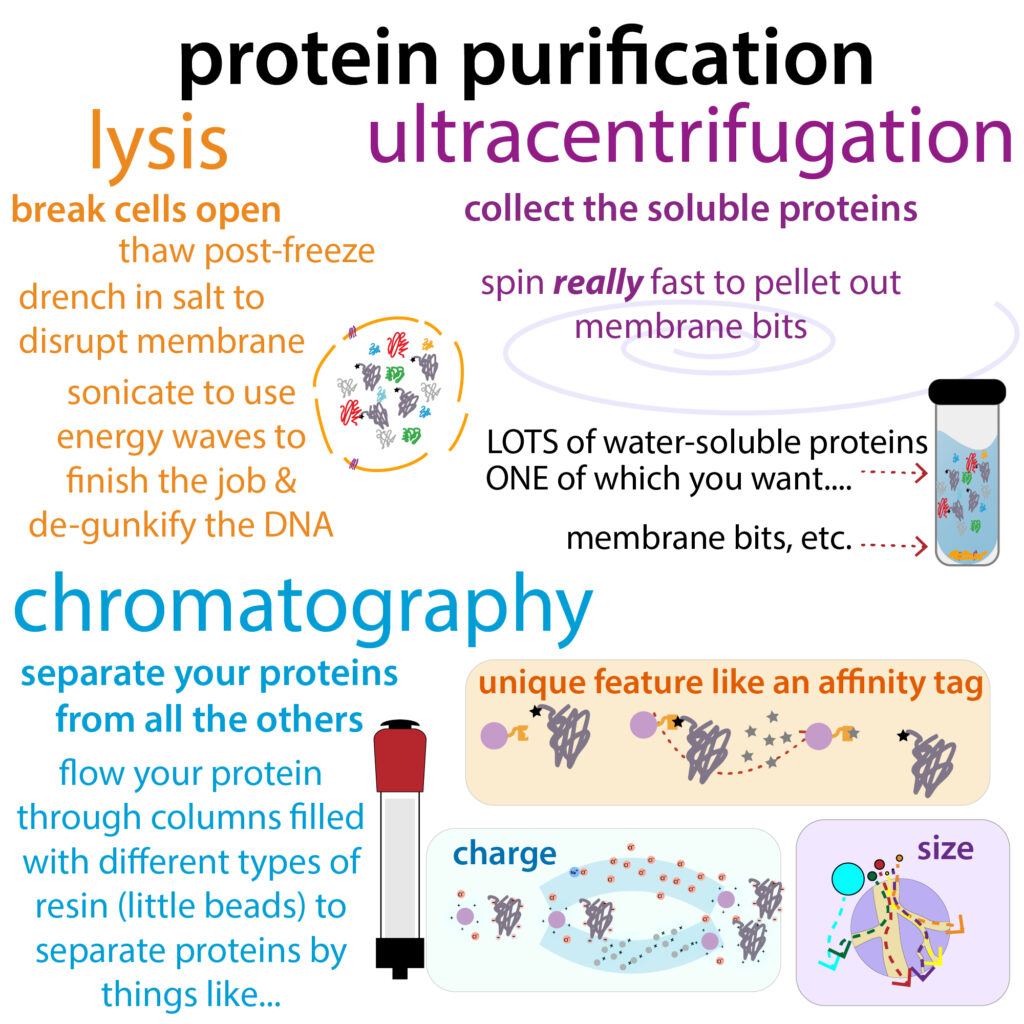
- Lysis: Break the cells open, generating “lysate”
- (Ultra)centrifugation: Spin the lysate to pellet out membrane bits and other non-water-soluble gunk. Keep the supernatant (liquid portion) – unless, of course, you’re studying a membrane-bound protein, in which case you use alternative methods.
- Column chromatography: Flow protein-containing solutions through columns filled with little beads (resin). Different resins have different properties and different proteins have different properties (due to having different numbers and combinations of amino acids). Therefore, different proteins will travel differently through different columns allowing you to separate proteins in a mixture and isolate the one you’re interested in. The types of chromatography used will vary based on the project and how pure you need the protein to be. Some common forms:
- Affinity chromatography: Sometimes referred to as a “capture step” this is often done first, taking advantage of an affinity tag or other unique feature of the protein to specifically bind the protein of interest while other proteins flow on by.
- Ion exchange chromatography: Separates proteins based on their charge (using charged resin)Hydrophobic interaction chromatography
- (HIC): Less common, but becoming more common, separates proteins based on hydrophobicity/polarity.Size exchange chromatography
- (SEC)(aka gel filtration): Often used as a “polishing step”, it separates proteins based on their size using porous beads. Larger proteins take detours and travel through (and thus elute) more quickly.
- Aliquoting, flash freezing, and placing in the freezer (typically -80°C)
- Protein characterization (some parts of which may be done in parallel with purification to assess how the purification is going:
- SDS-PAGE to assess purity
- Bradford, BCA, UV280, etc. to measure protein concentration
- Endless possible experiments
Graphics



Associated content
Molecular cloning and subcloning
Overview/outline, with graphics (click to enlarge)
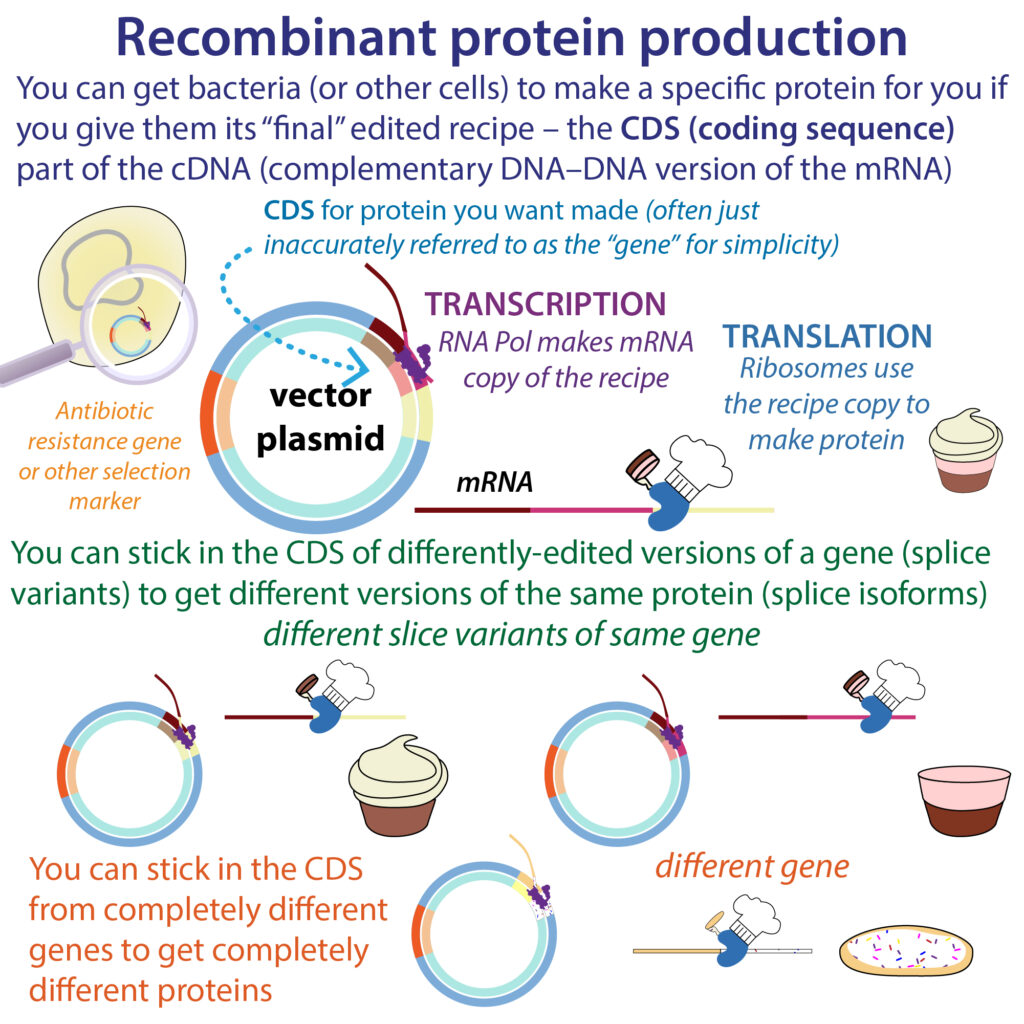
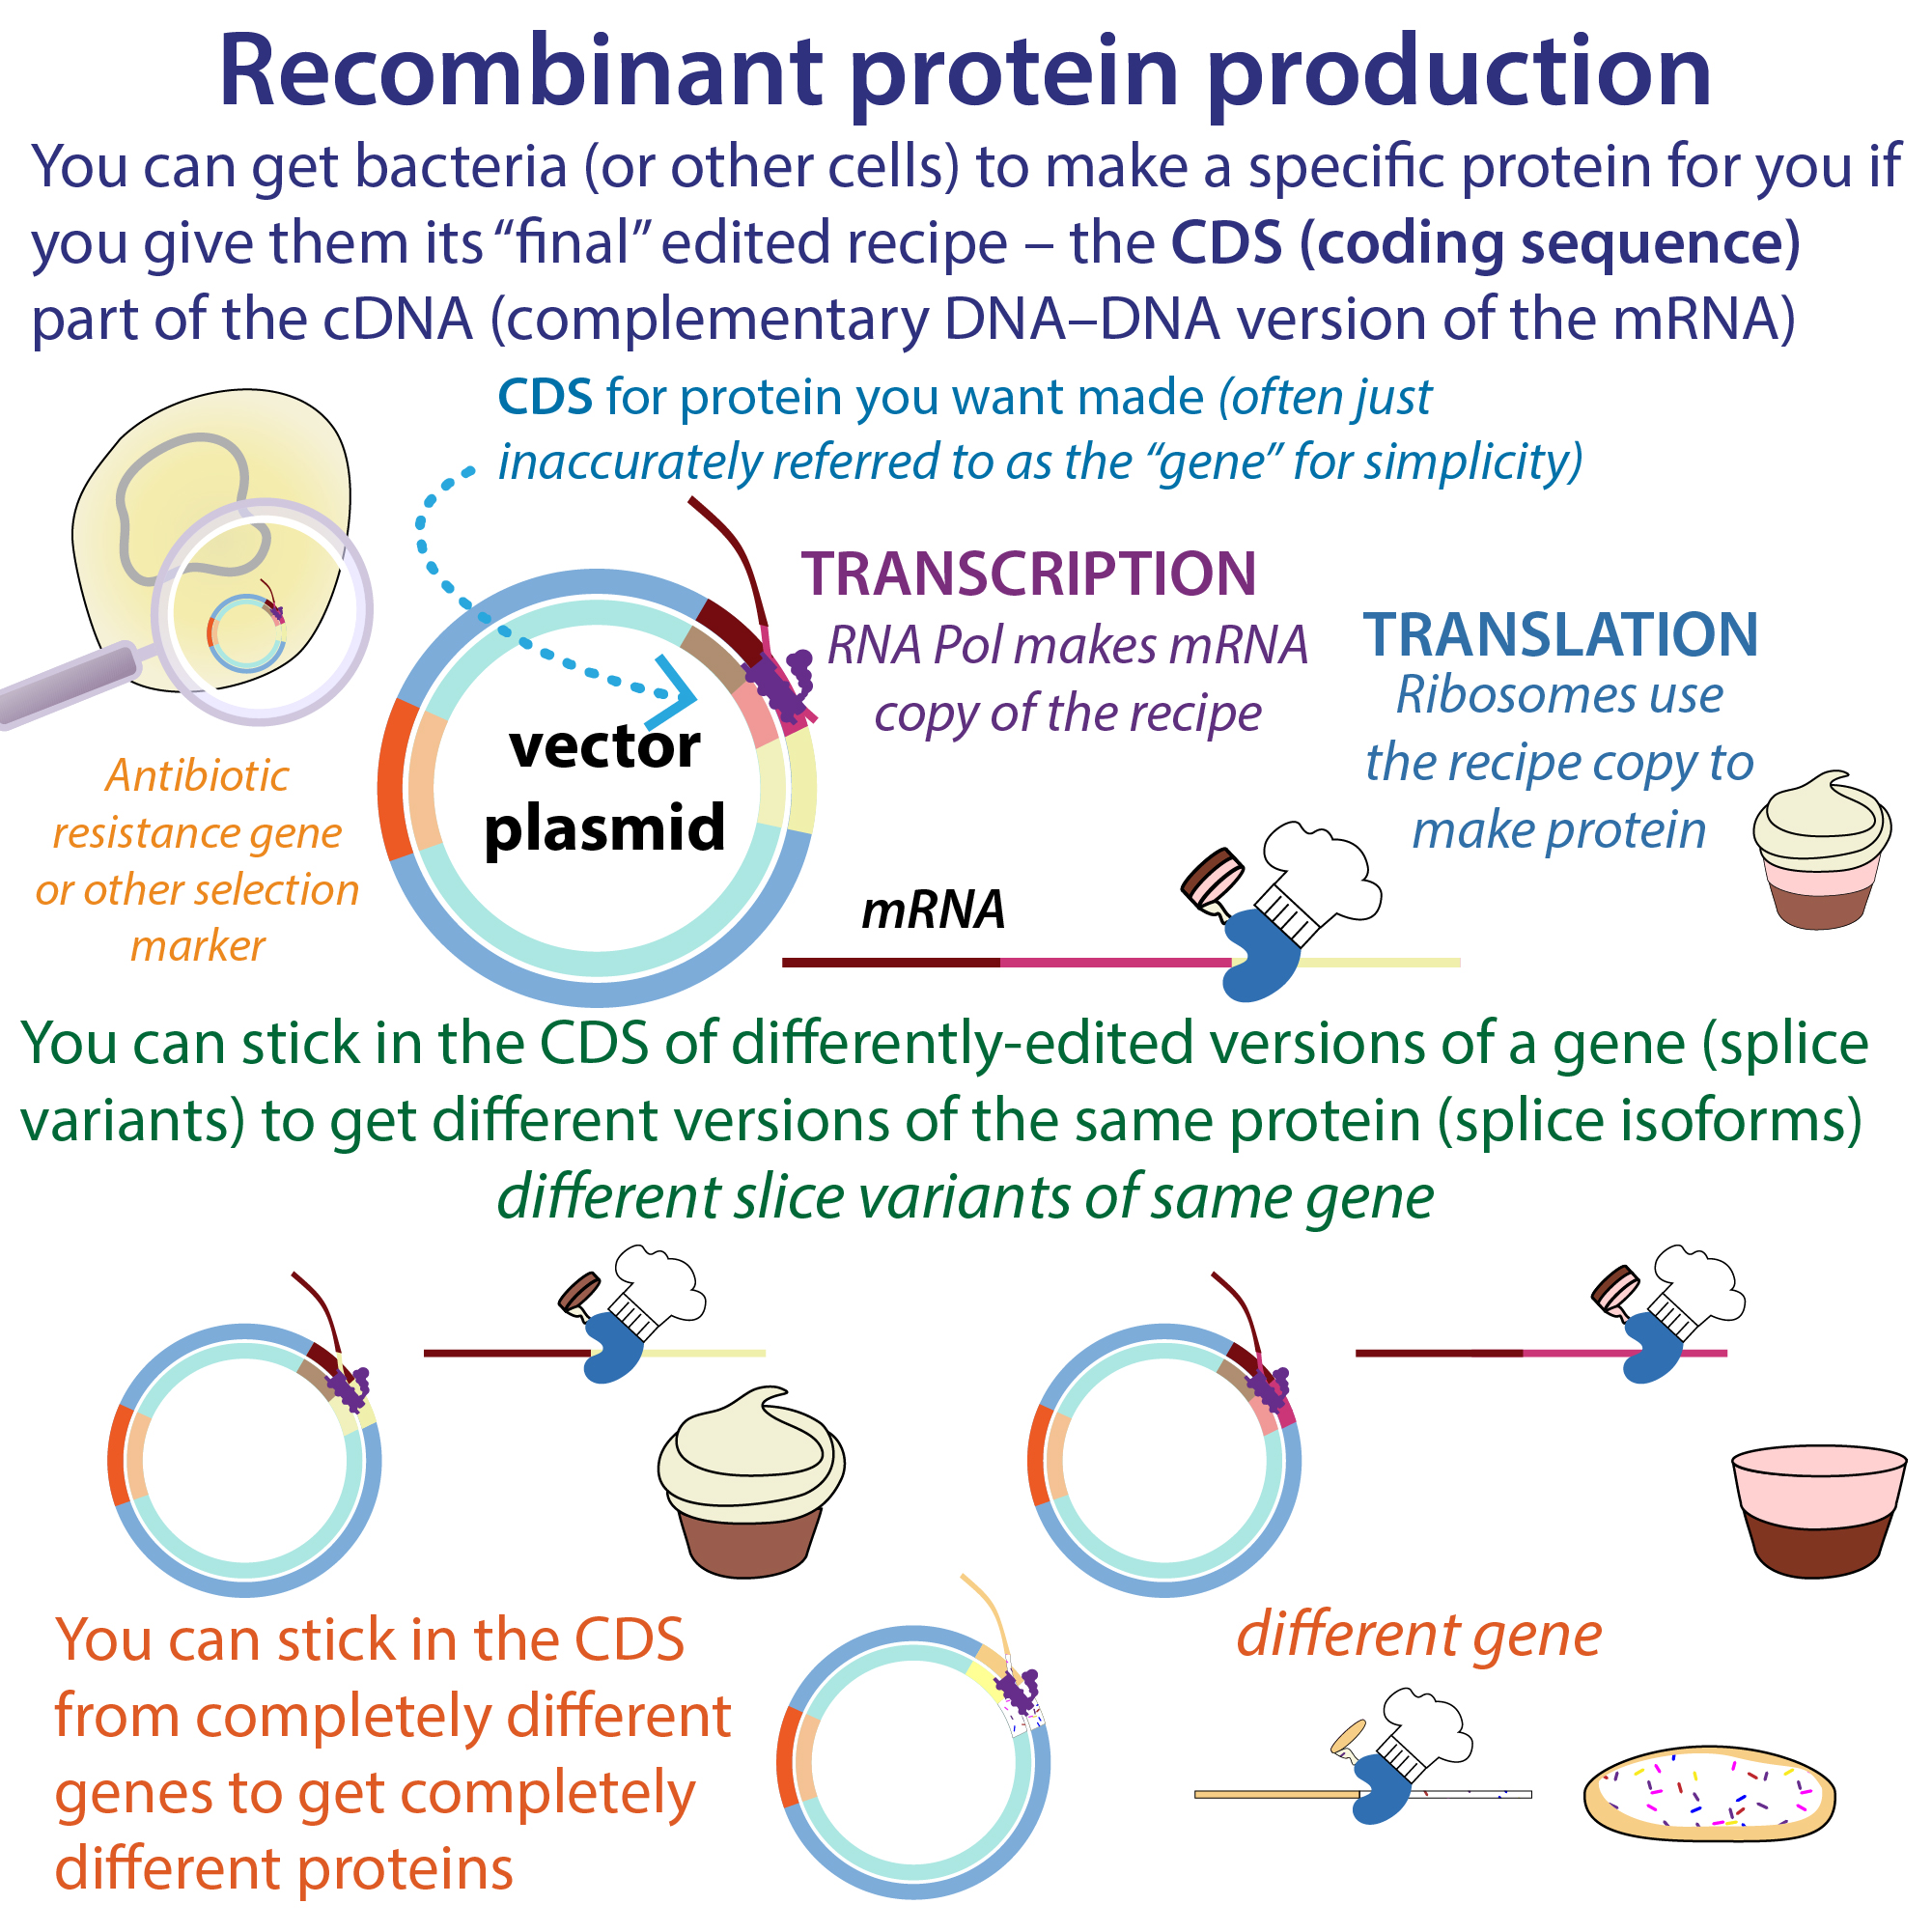
This is where you isolate & copy (clone) and manipulate pieces of DNA, typically “recombining” them with the DNA of some sort of vector (transport/hosting vehicle) such as a circular piece of DNA called a plasmid) so that you can work with them more easily, have cells make protein from them, etc.
More technical and nomenclature details
- Often we stick sequences in circular pieces of DNA called plasmids that can be stably held and/or copied in bacteria (or other cell types depending on the specific features it contains).
- Technically speaking, we call it subcloning when we take already-cloned sequences and put them in a different vector. But we often just call it all “cloning.”
- We often refer to cloning “genes,” but we are more commonly actually cloning protein coding sequences (CDSs) which correspond to just the portion of a gene that has information encoding the amino acid sequence of the precise version of a protein we’re interested in (e.g. the splice isoform we want).
Graphics


Experimental methods
- Conventional methods have made use of restriction enzyme cloning, using site-specific endonucleases (typically referred to simply as “restriction enzymes”) that recognize and cut specific DNA sequences. By cutting 2 pieces of DNA with compatible restriction enzymes, you can create “matching” ends that can be stitched together with another enzyme called DNA ligase.
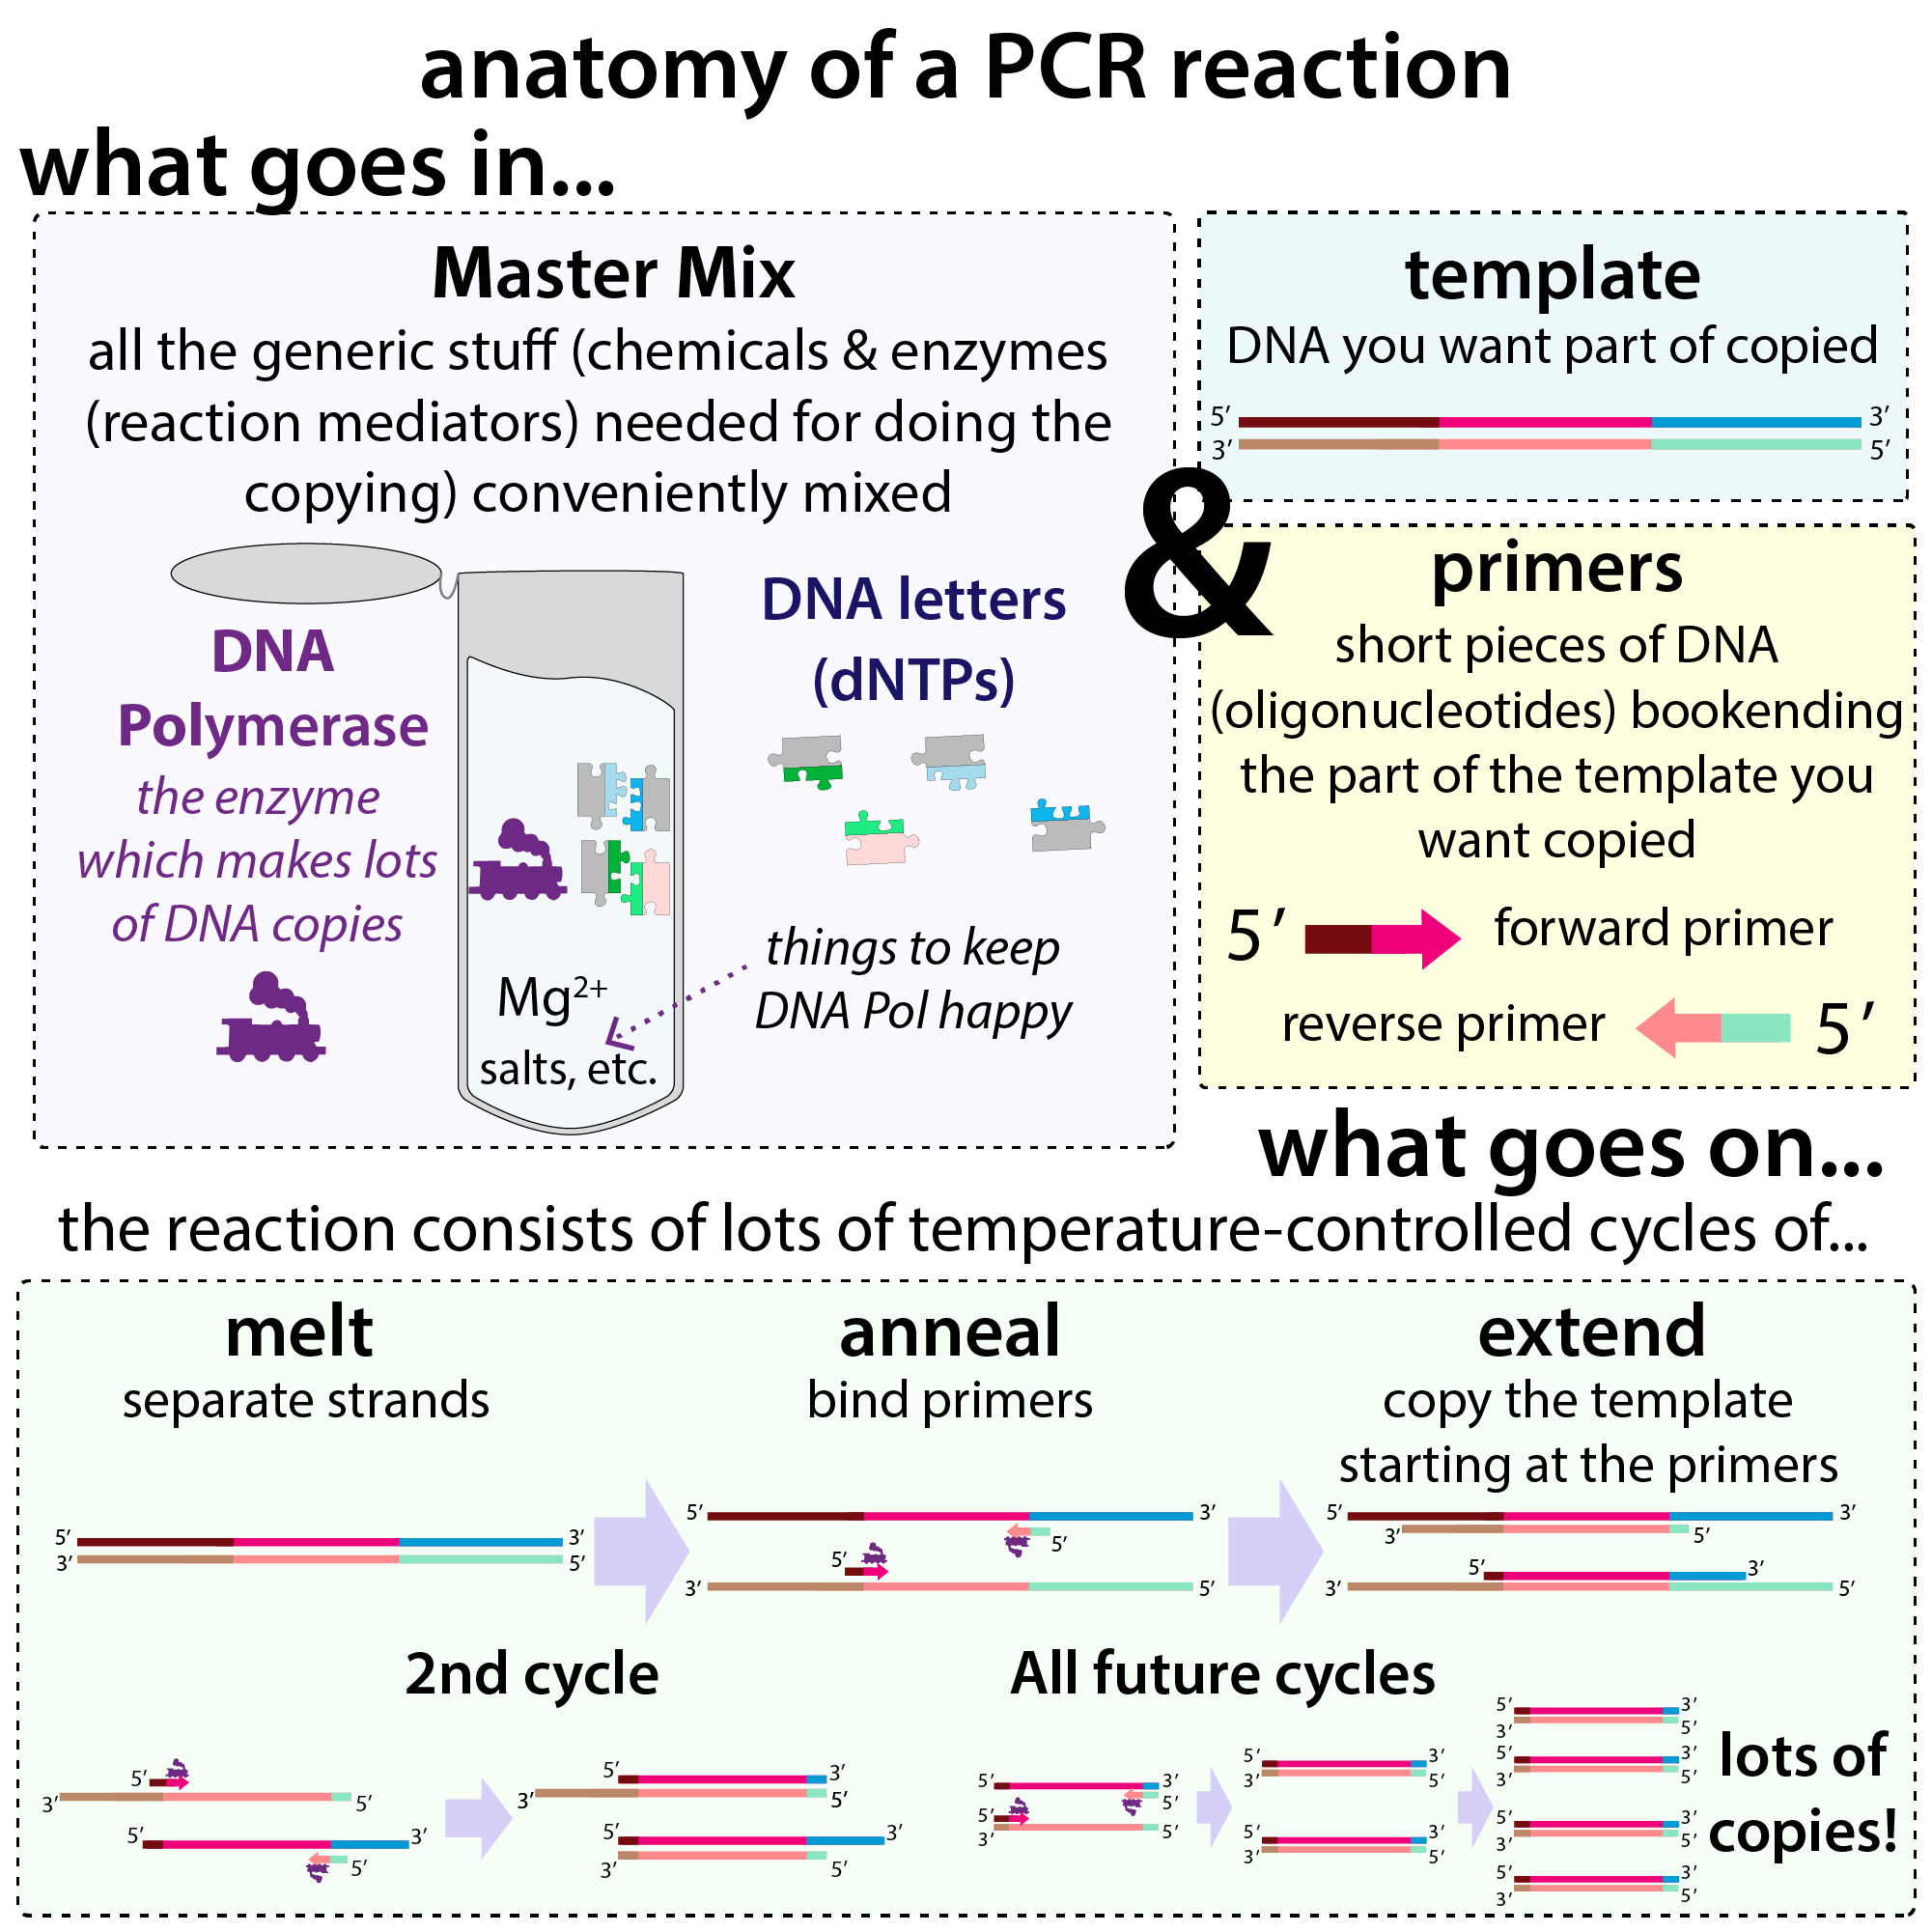
- Increasingly, PCR-based methods are used in which pieces of DNA to be joined are amplified (copies of them are made) using polymerase chain reaction (PCR) with primers (the starting pieces of DNA that signify the regions to be copied) that add complementary overhangs to both pieces, allowing them to be joined together once transformed into cells.
- PCR-based methods include LIC (Ligation Independent Cloning), SLIC (Sequence and Ligation Independent Cloning), Golden Gate Assembly, and Gibson Assembly).
Graphics


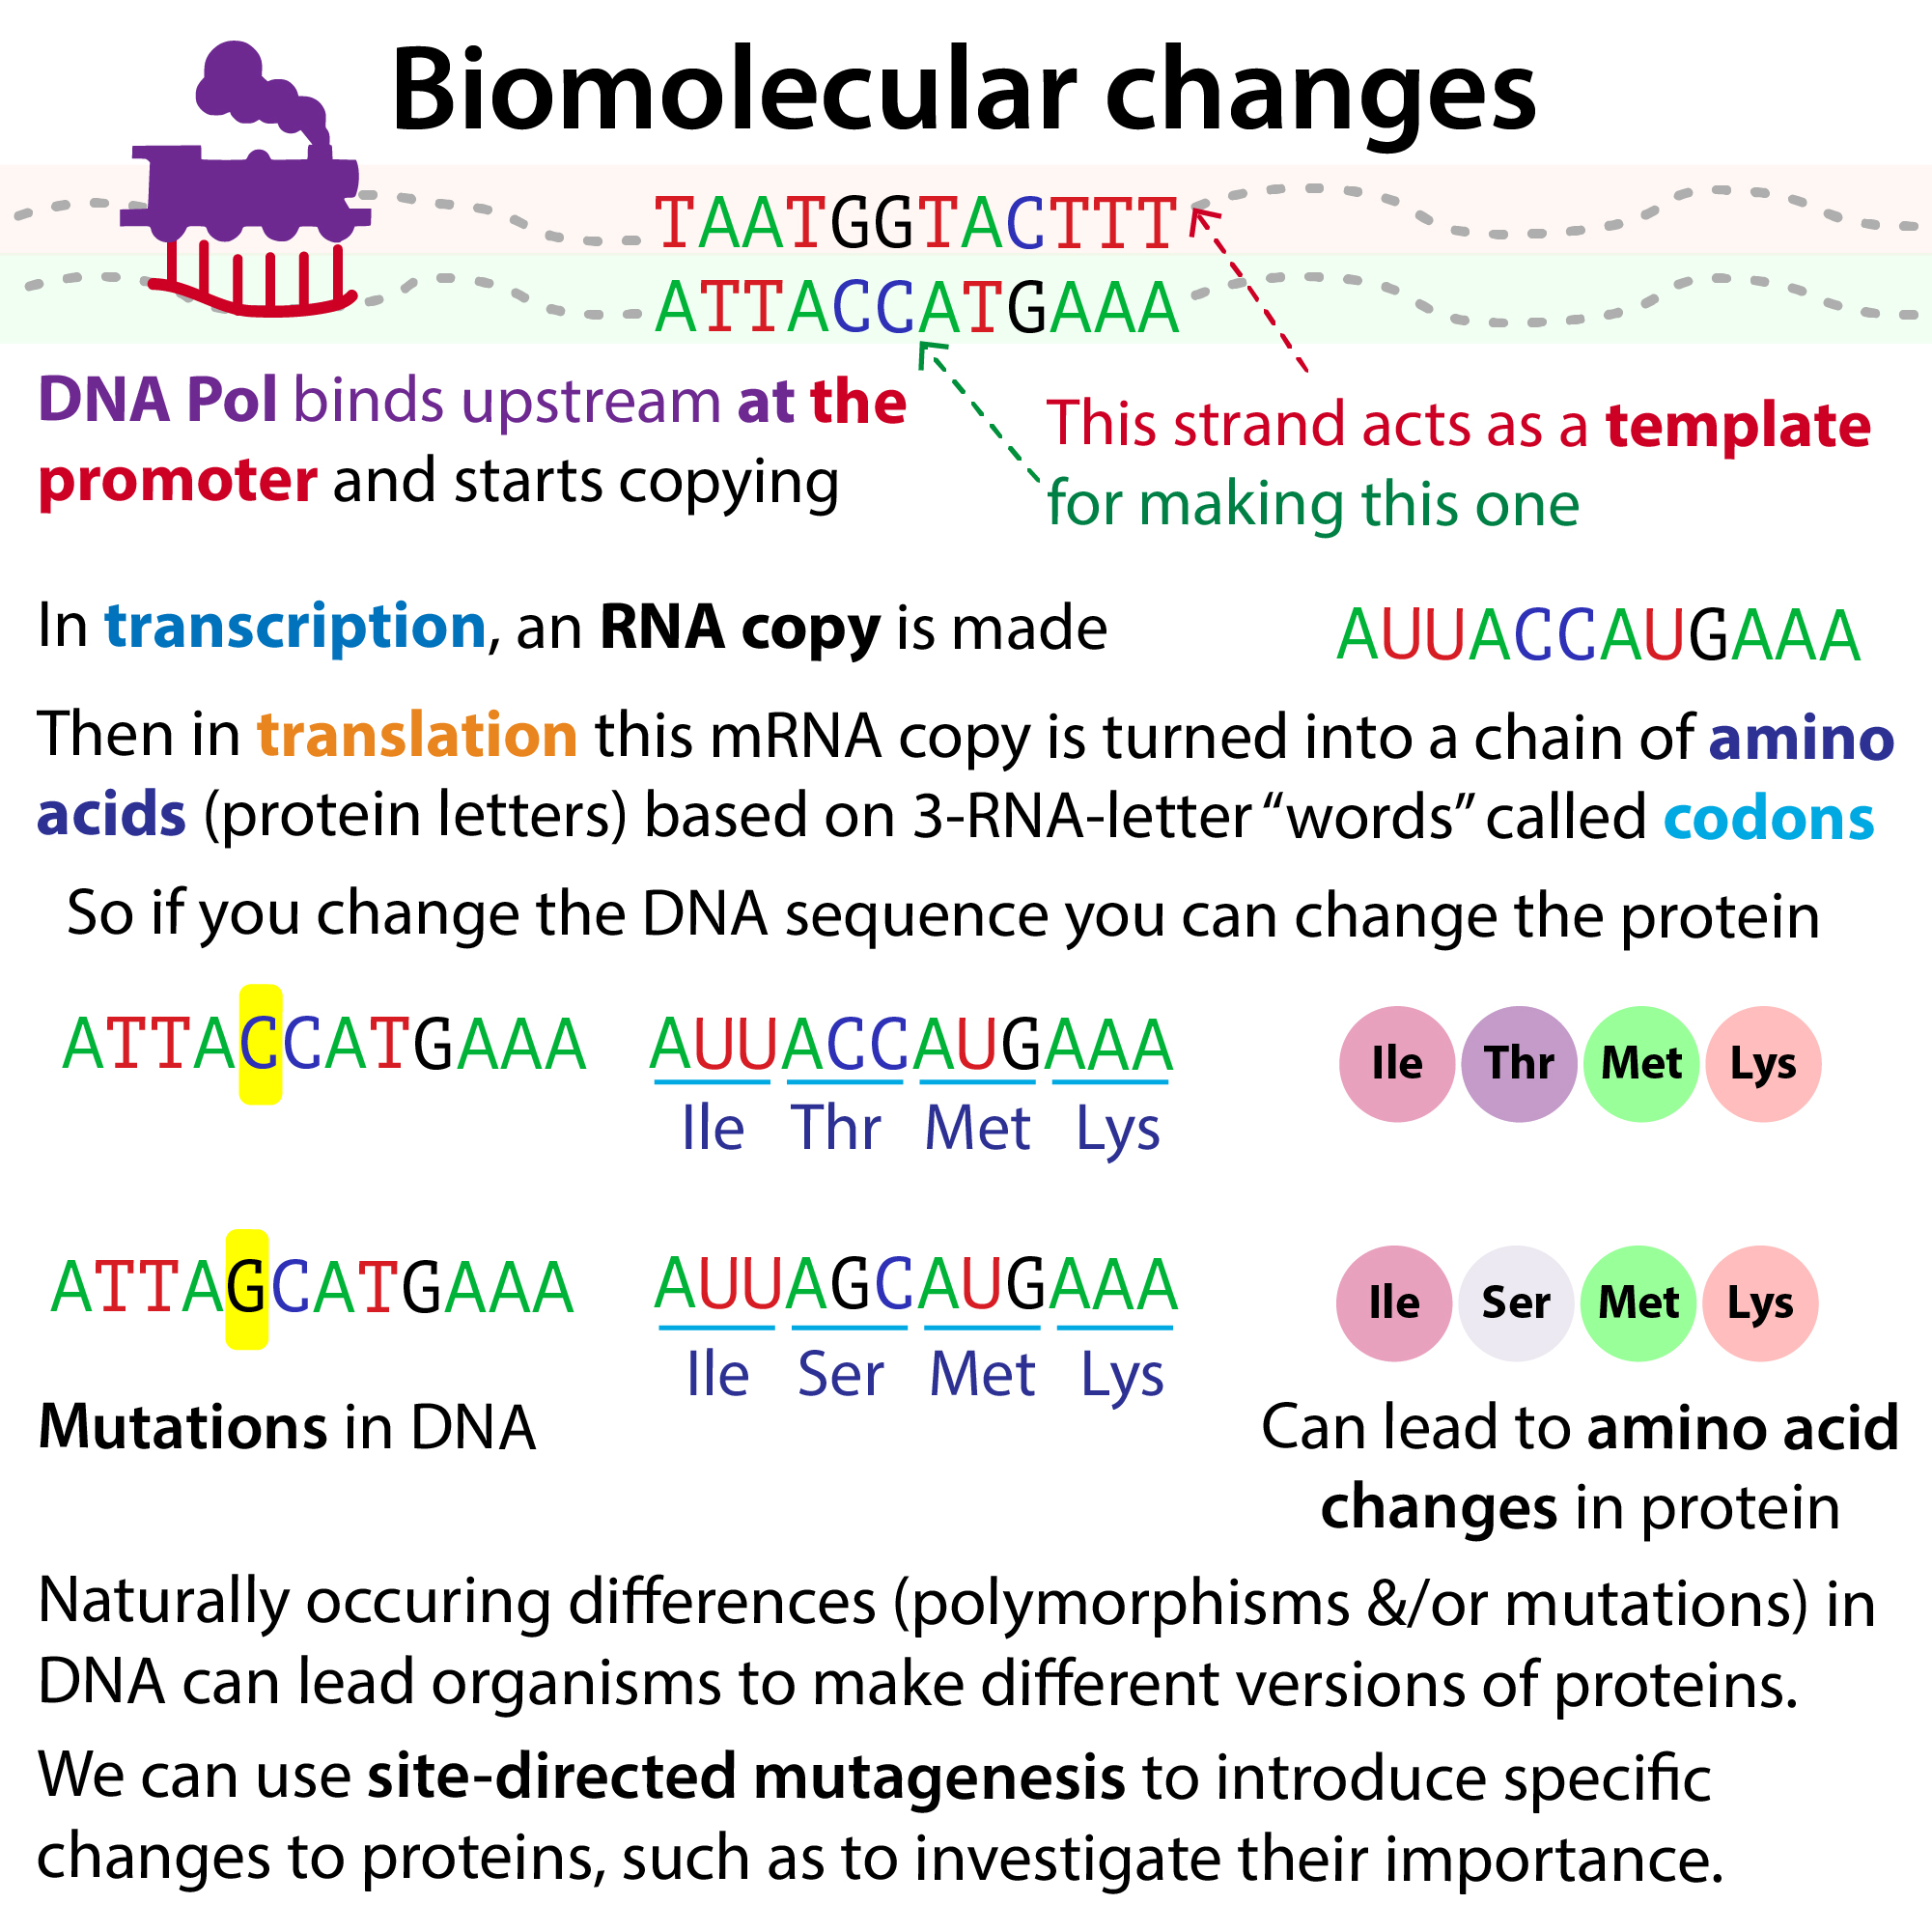
- If you want to introduce changes to the protein, you’ll need to introduce changes to the DNA. This is called mutagenesis.
- Site-directed mutagenesis: This is where scientists introduce specific mutations into the DNA sequence for protein (the CDS or in less-technically-correct terms, the “gene”) in order to introduce a specific change in a protein (e.g. a substitution of one amino acid for another). This is typically done while the DNA is held in a plasmid.
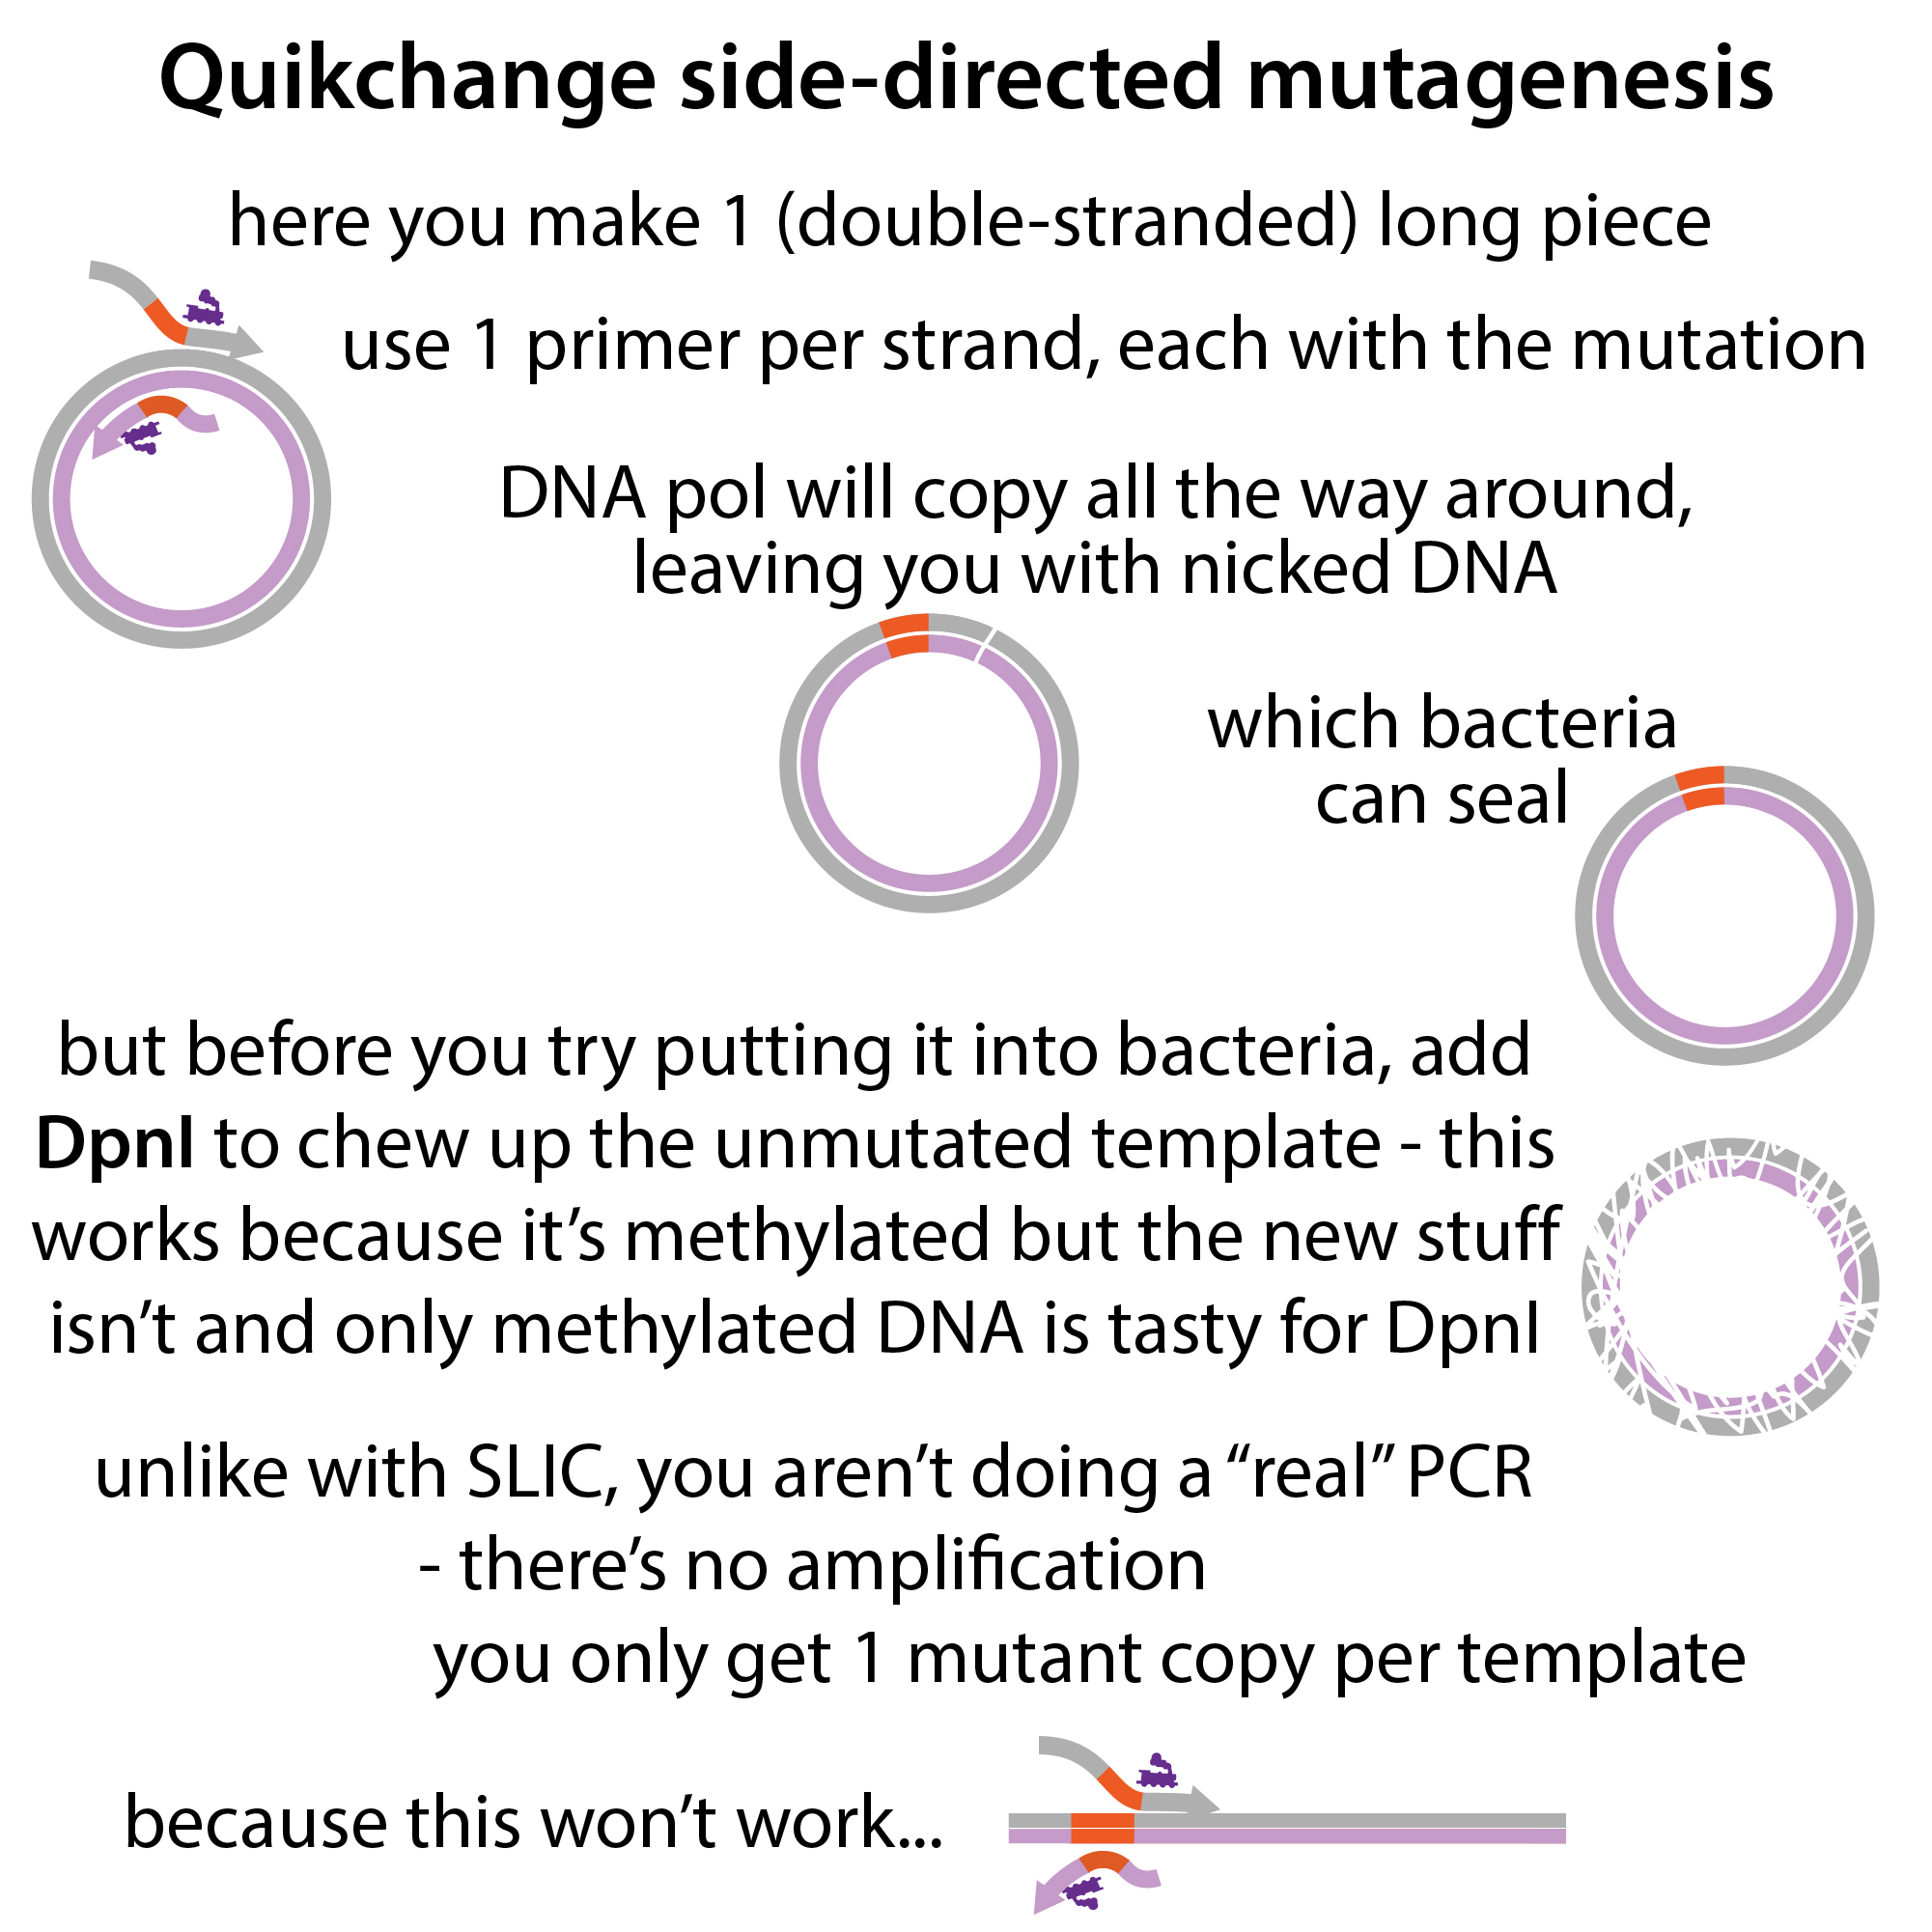
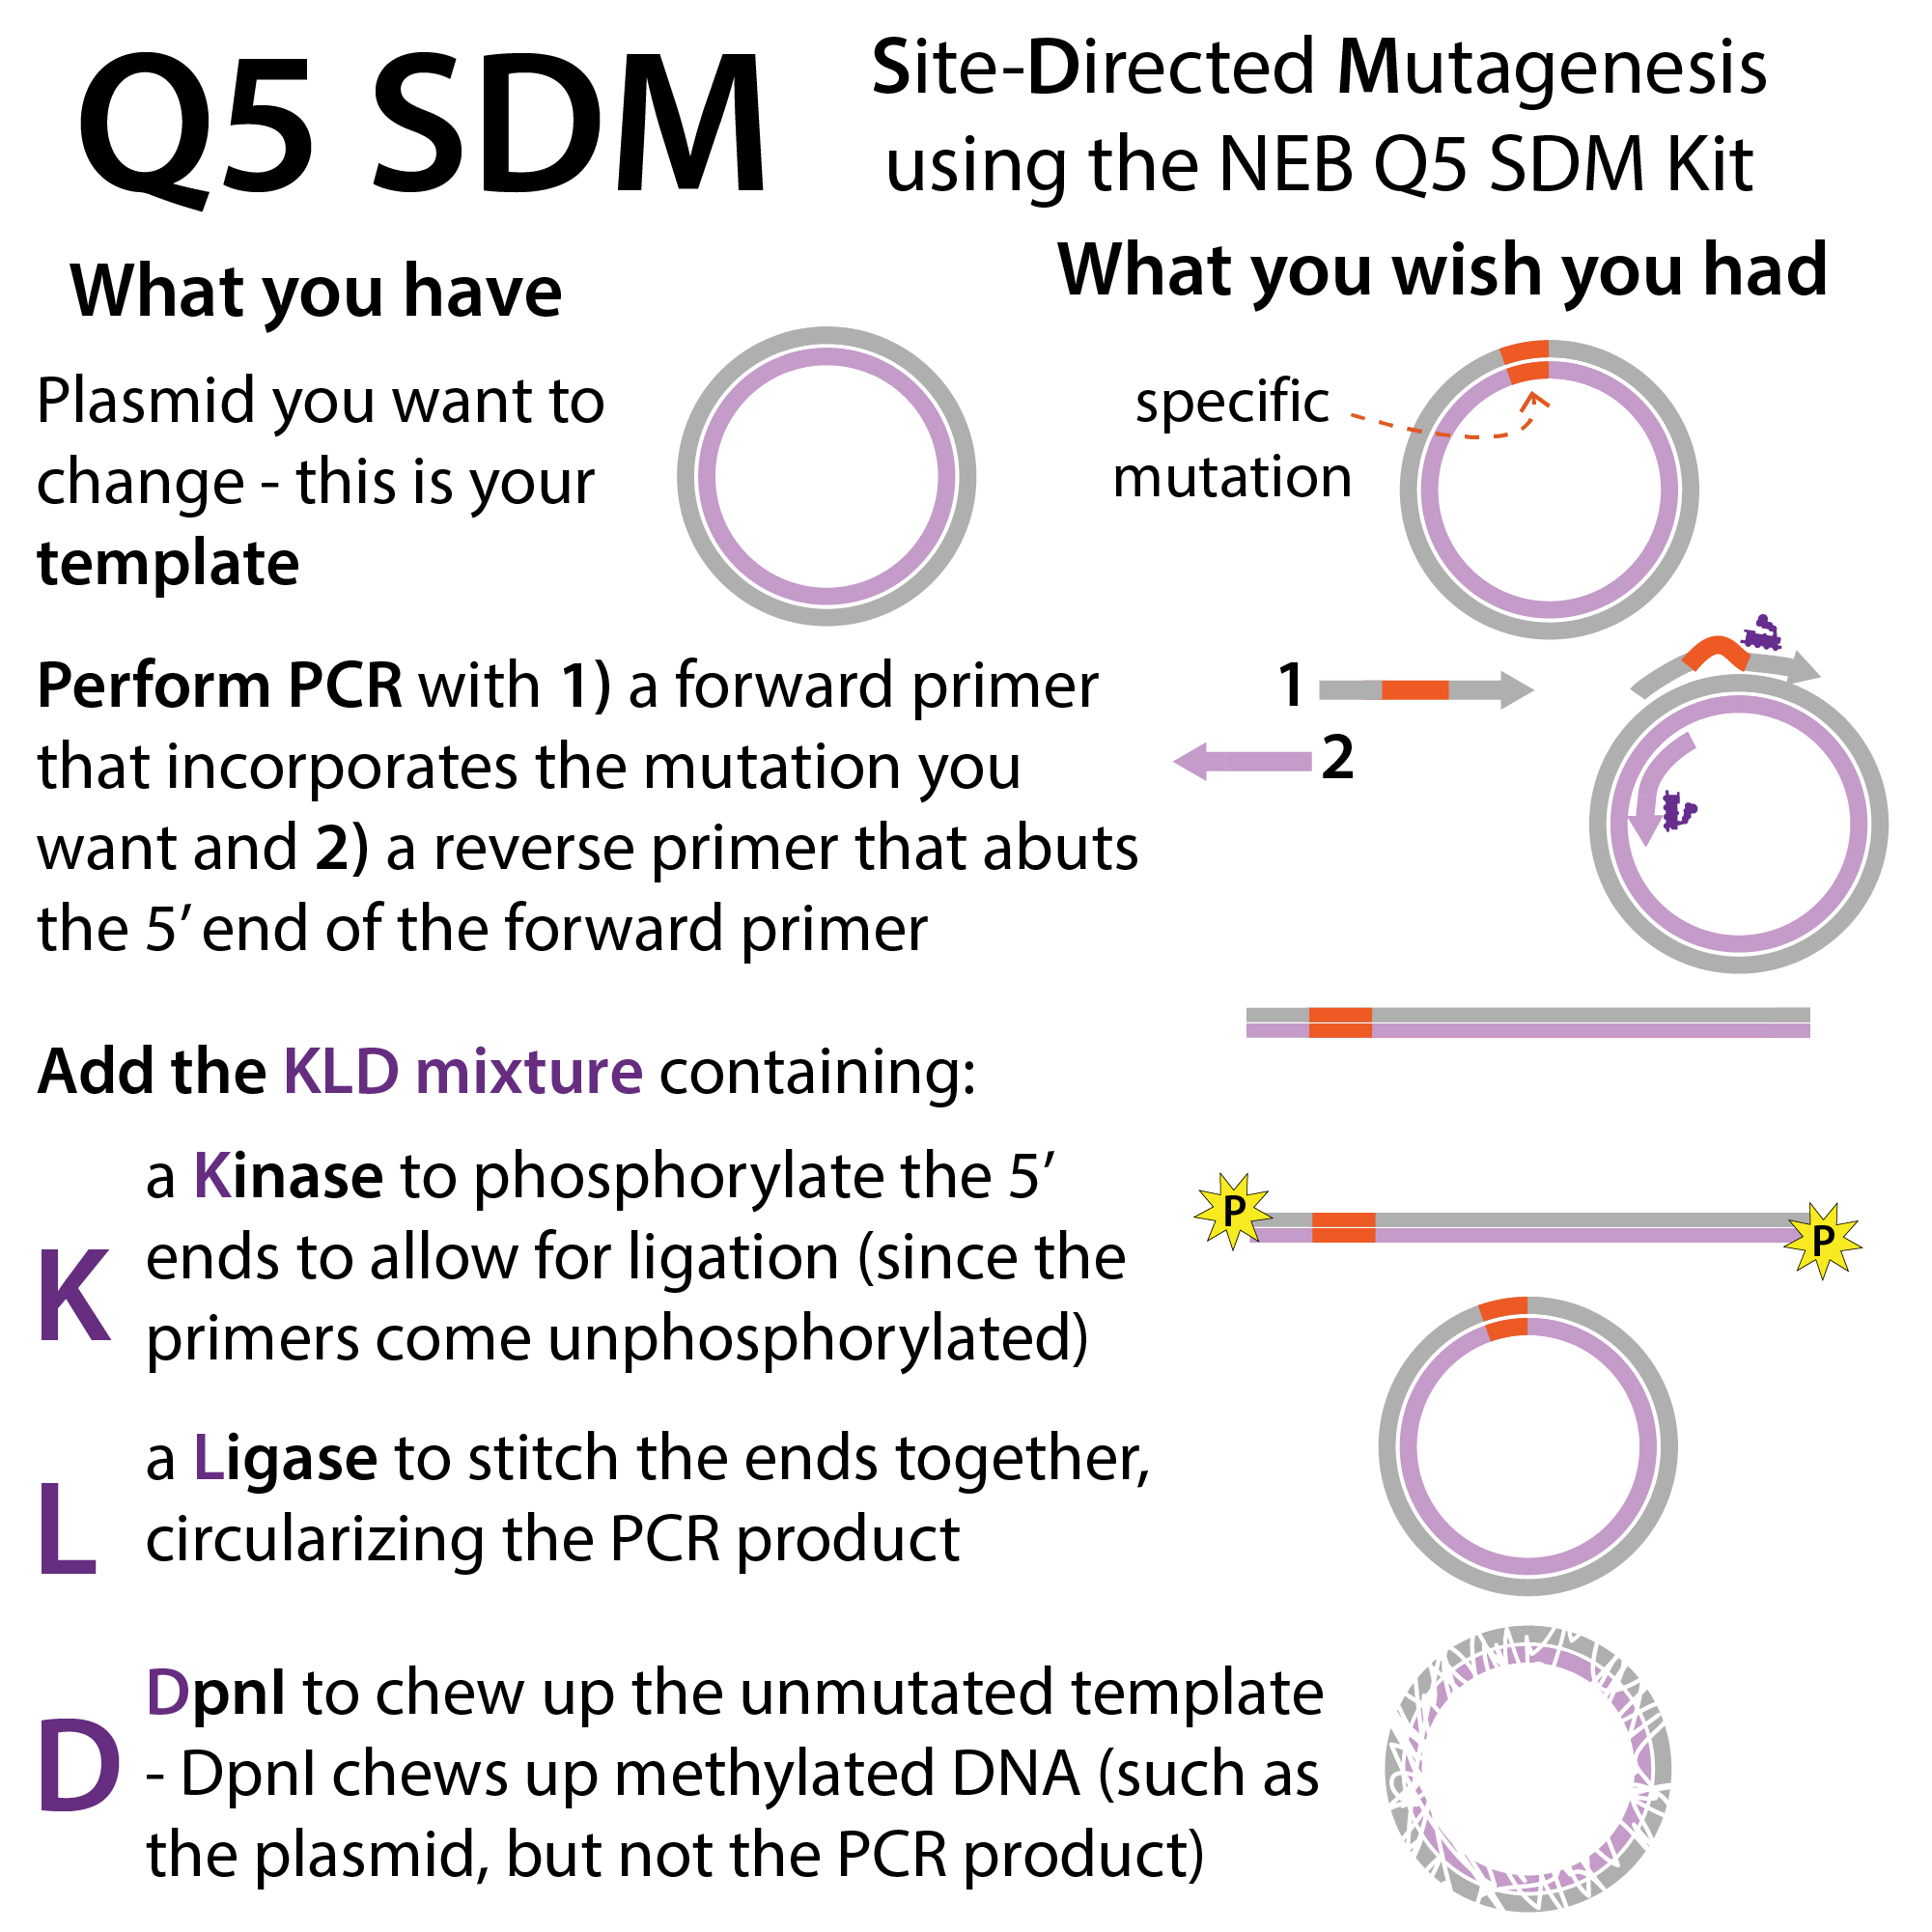
- Experimental methods include: SLIC (Sequence and Ligation Independent Cloning), QuikChange, NEB Q5 SDM
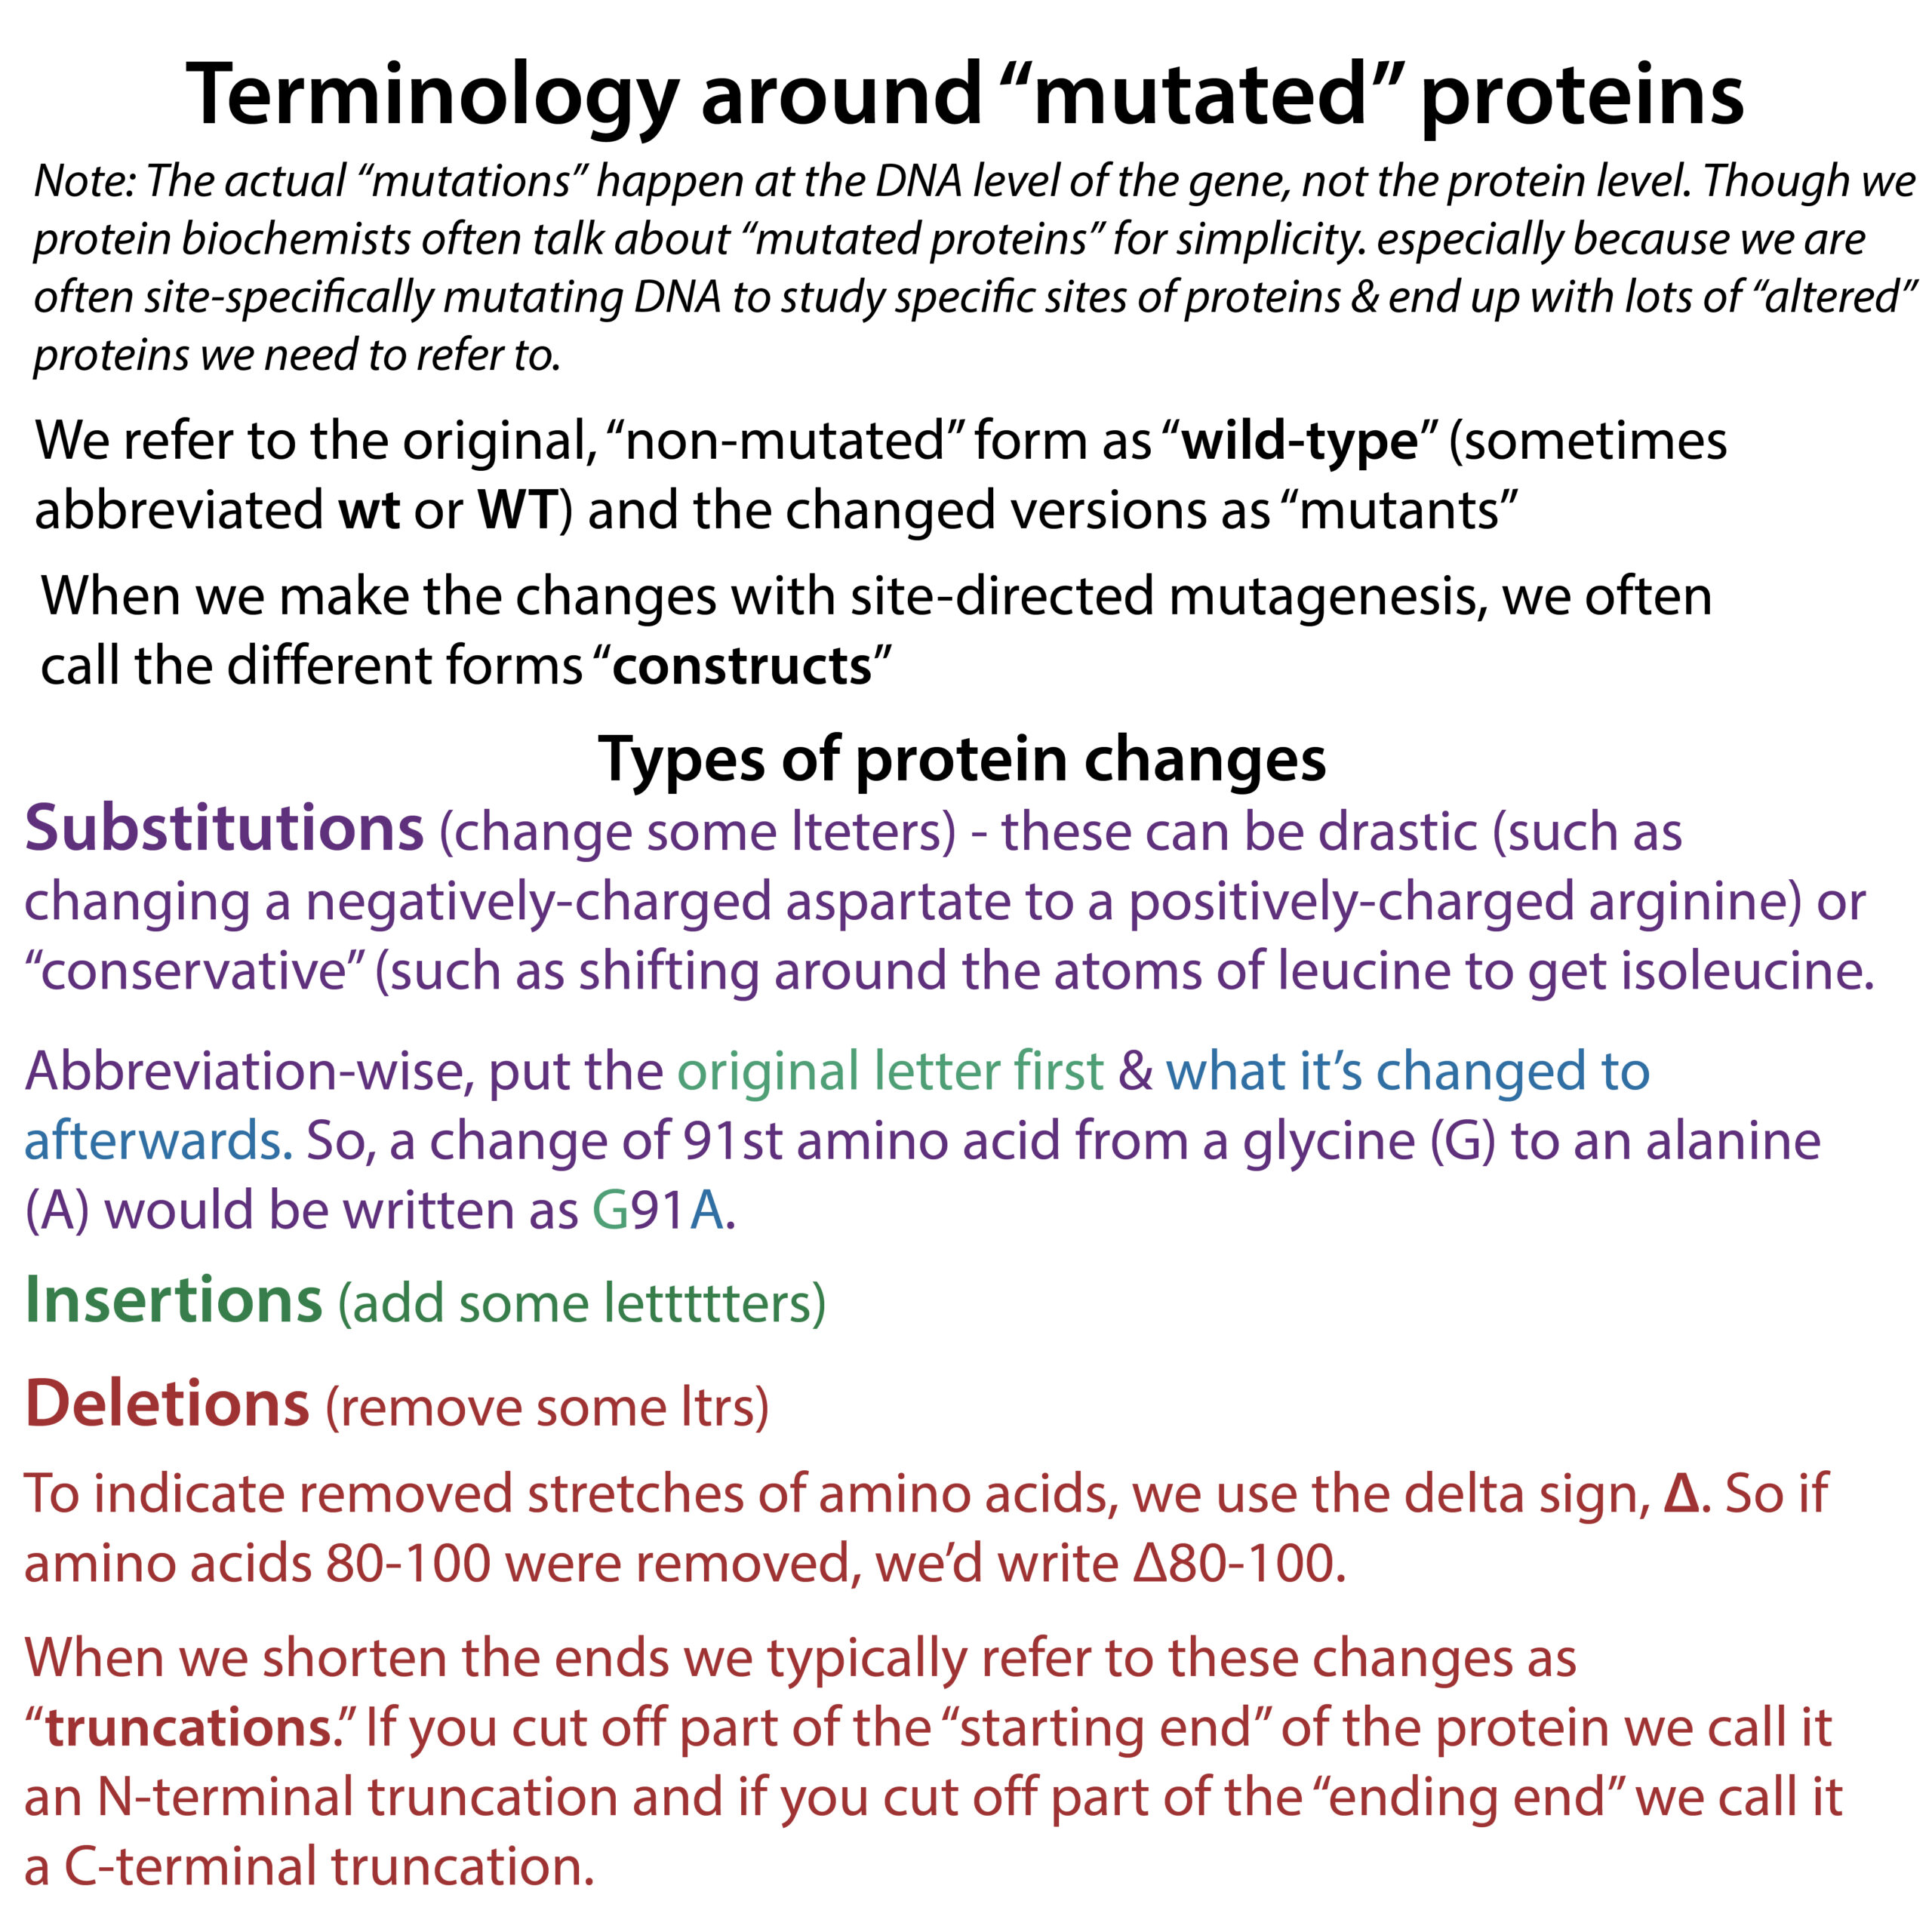
- Alanine scan: This is where scientists use site-directed mutagenesis to change each amino acid in the protein (or a region of a protein) to alanine, one at a time, to see which amino acids might be important for something.
- Saturation mutagenesis: This is where scientists use a low-fidelity (error-prone) DNA polymerase when using PCR-based methods in order to introduce “every” possible mutation at “every” site in the protein in order to 1) get an idea of what parts do what, 2) what features of a site are necessary for a specific function (charge, size, etc.) and/or 3) evolve proteins to have desired features.
- Site-directed mutagenesis: This is where scientists introduce specific mutations into the DNA sequence for protein (the CDS or in less-technically-correct terms, the “gene”) in order to introduce a specific change in a protein (e.g. a substitution of one amino acid for another). This is typically done while the DNA is held in a plasmid.
Graphics


Choosing a plasmid vector
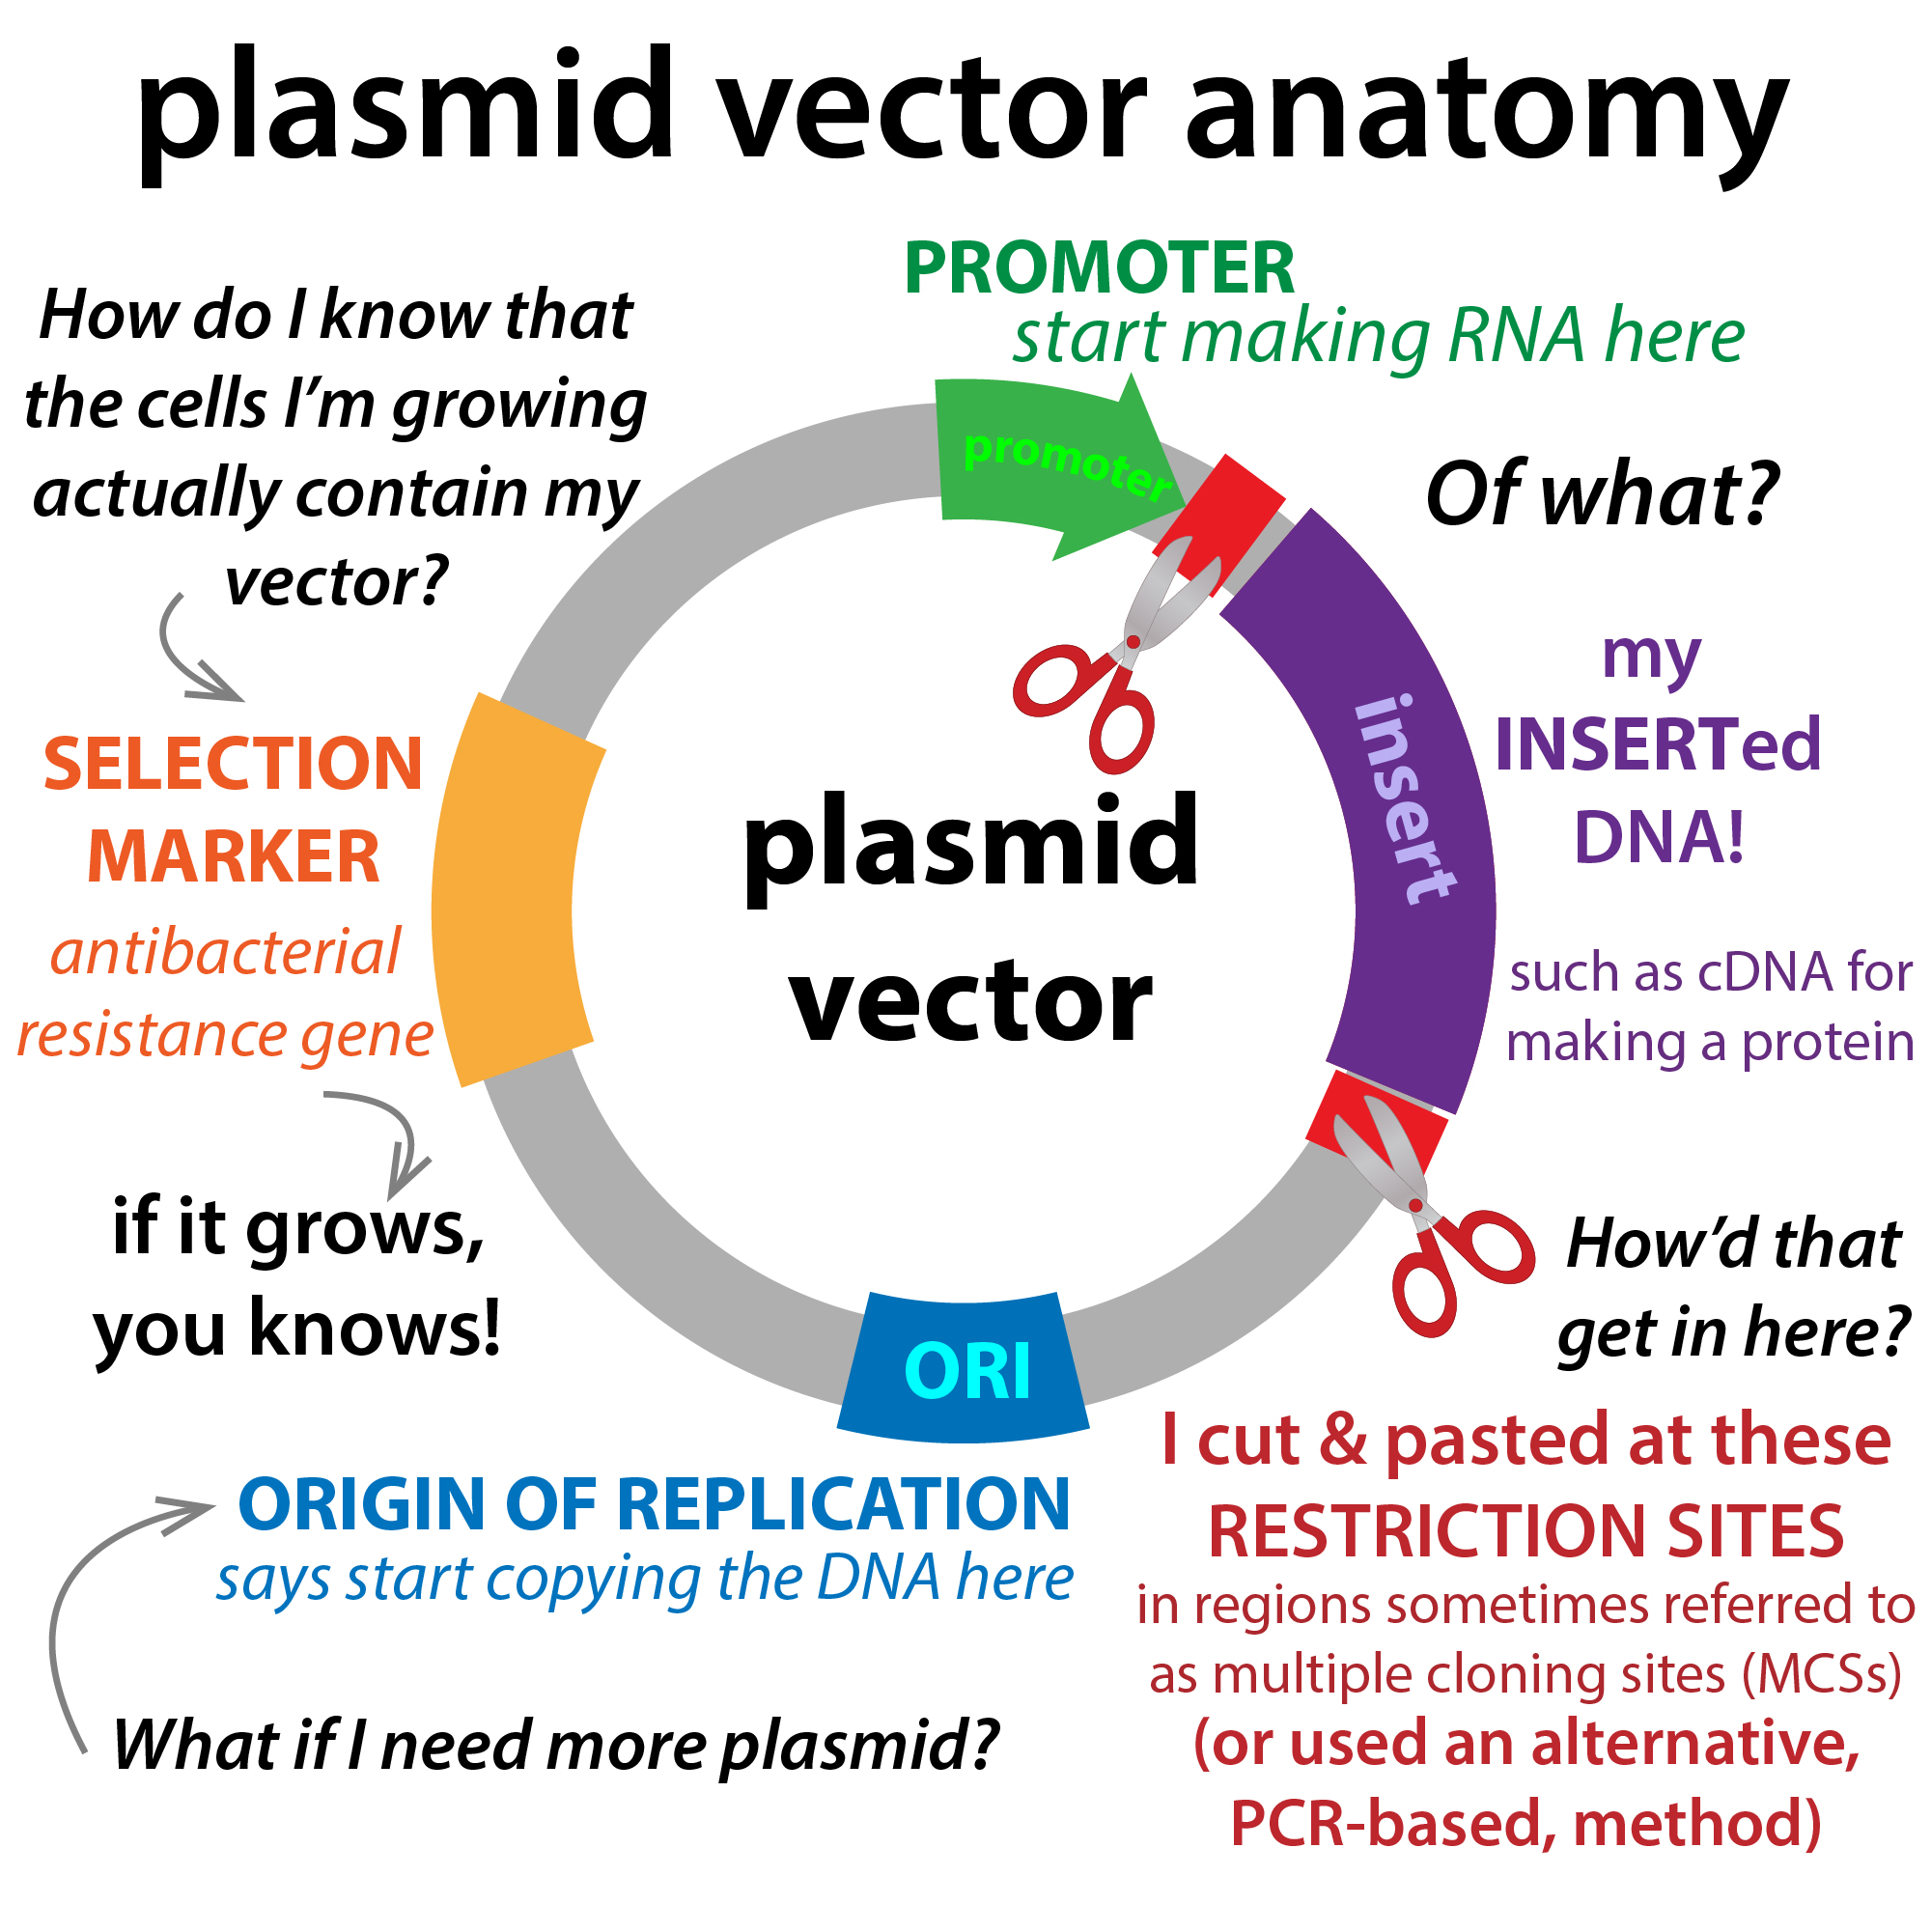
Different plasmid vectors have different features. They vary with regards to, among other things: what antibiotic resistance markers they use (for selection, described below); what promoters are used (to control gene expression); what if any affinity tags and/or fusion partners are present and on which terminus and what if any protease cleavage site is between them and the protein of interest; whether reporter genes (GFP, etc.) are present; what restriction enzyme cut sites are present; and what origin of replication (ori) is present (for the cell to replicate the plasmid – the ori must match the cells used and different ones can make it so there are lots of copies of the plasmid made (high copy number) or just a few (low copy number)).
Graphics


Choosing host cells
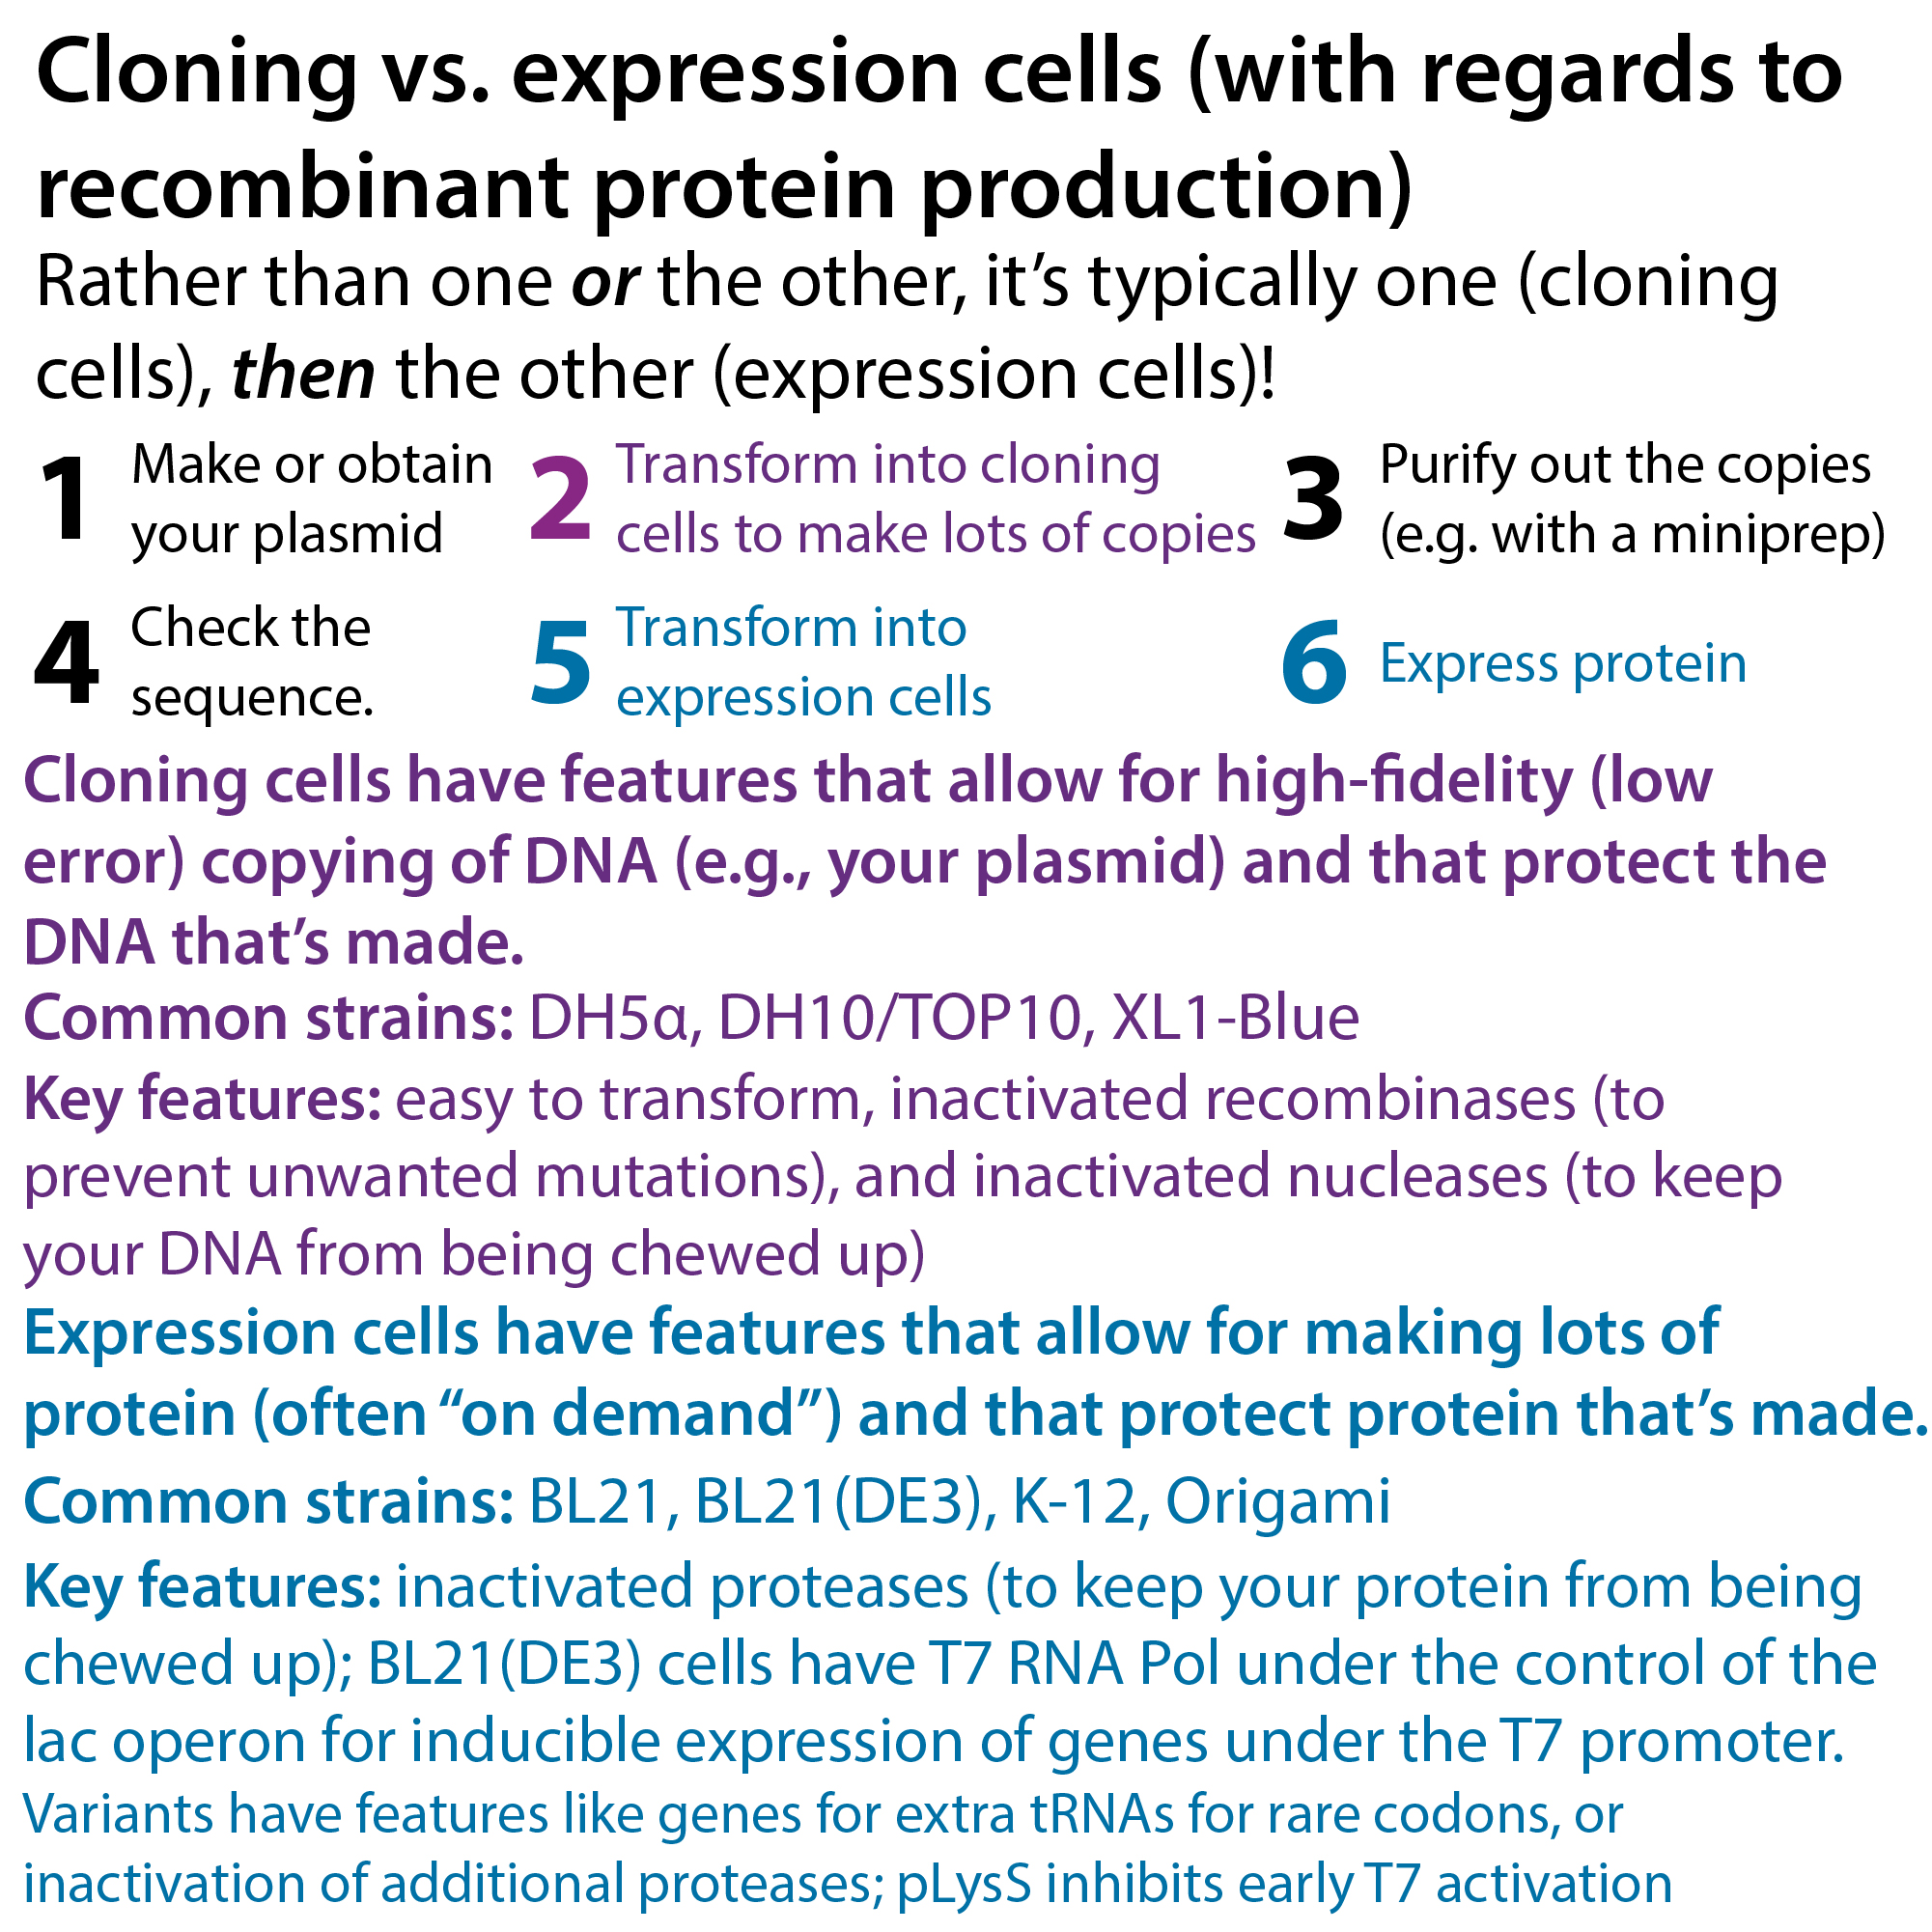
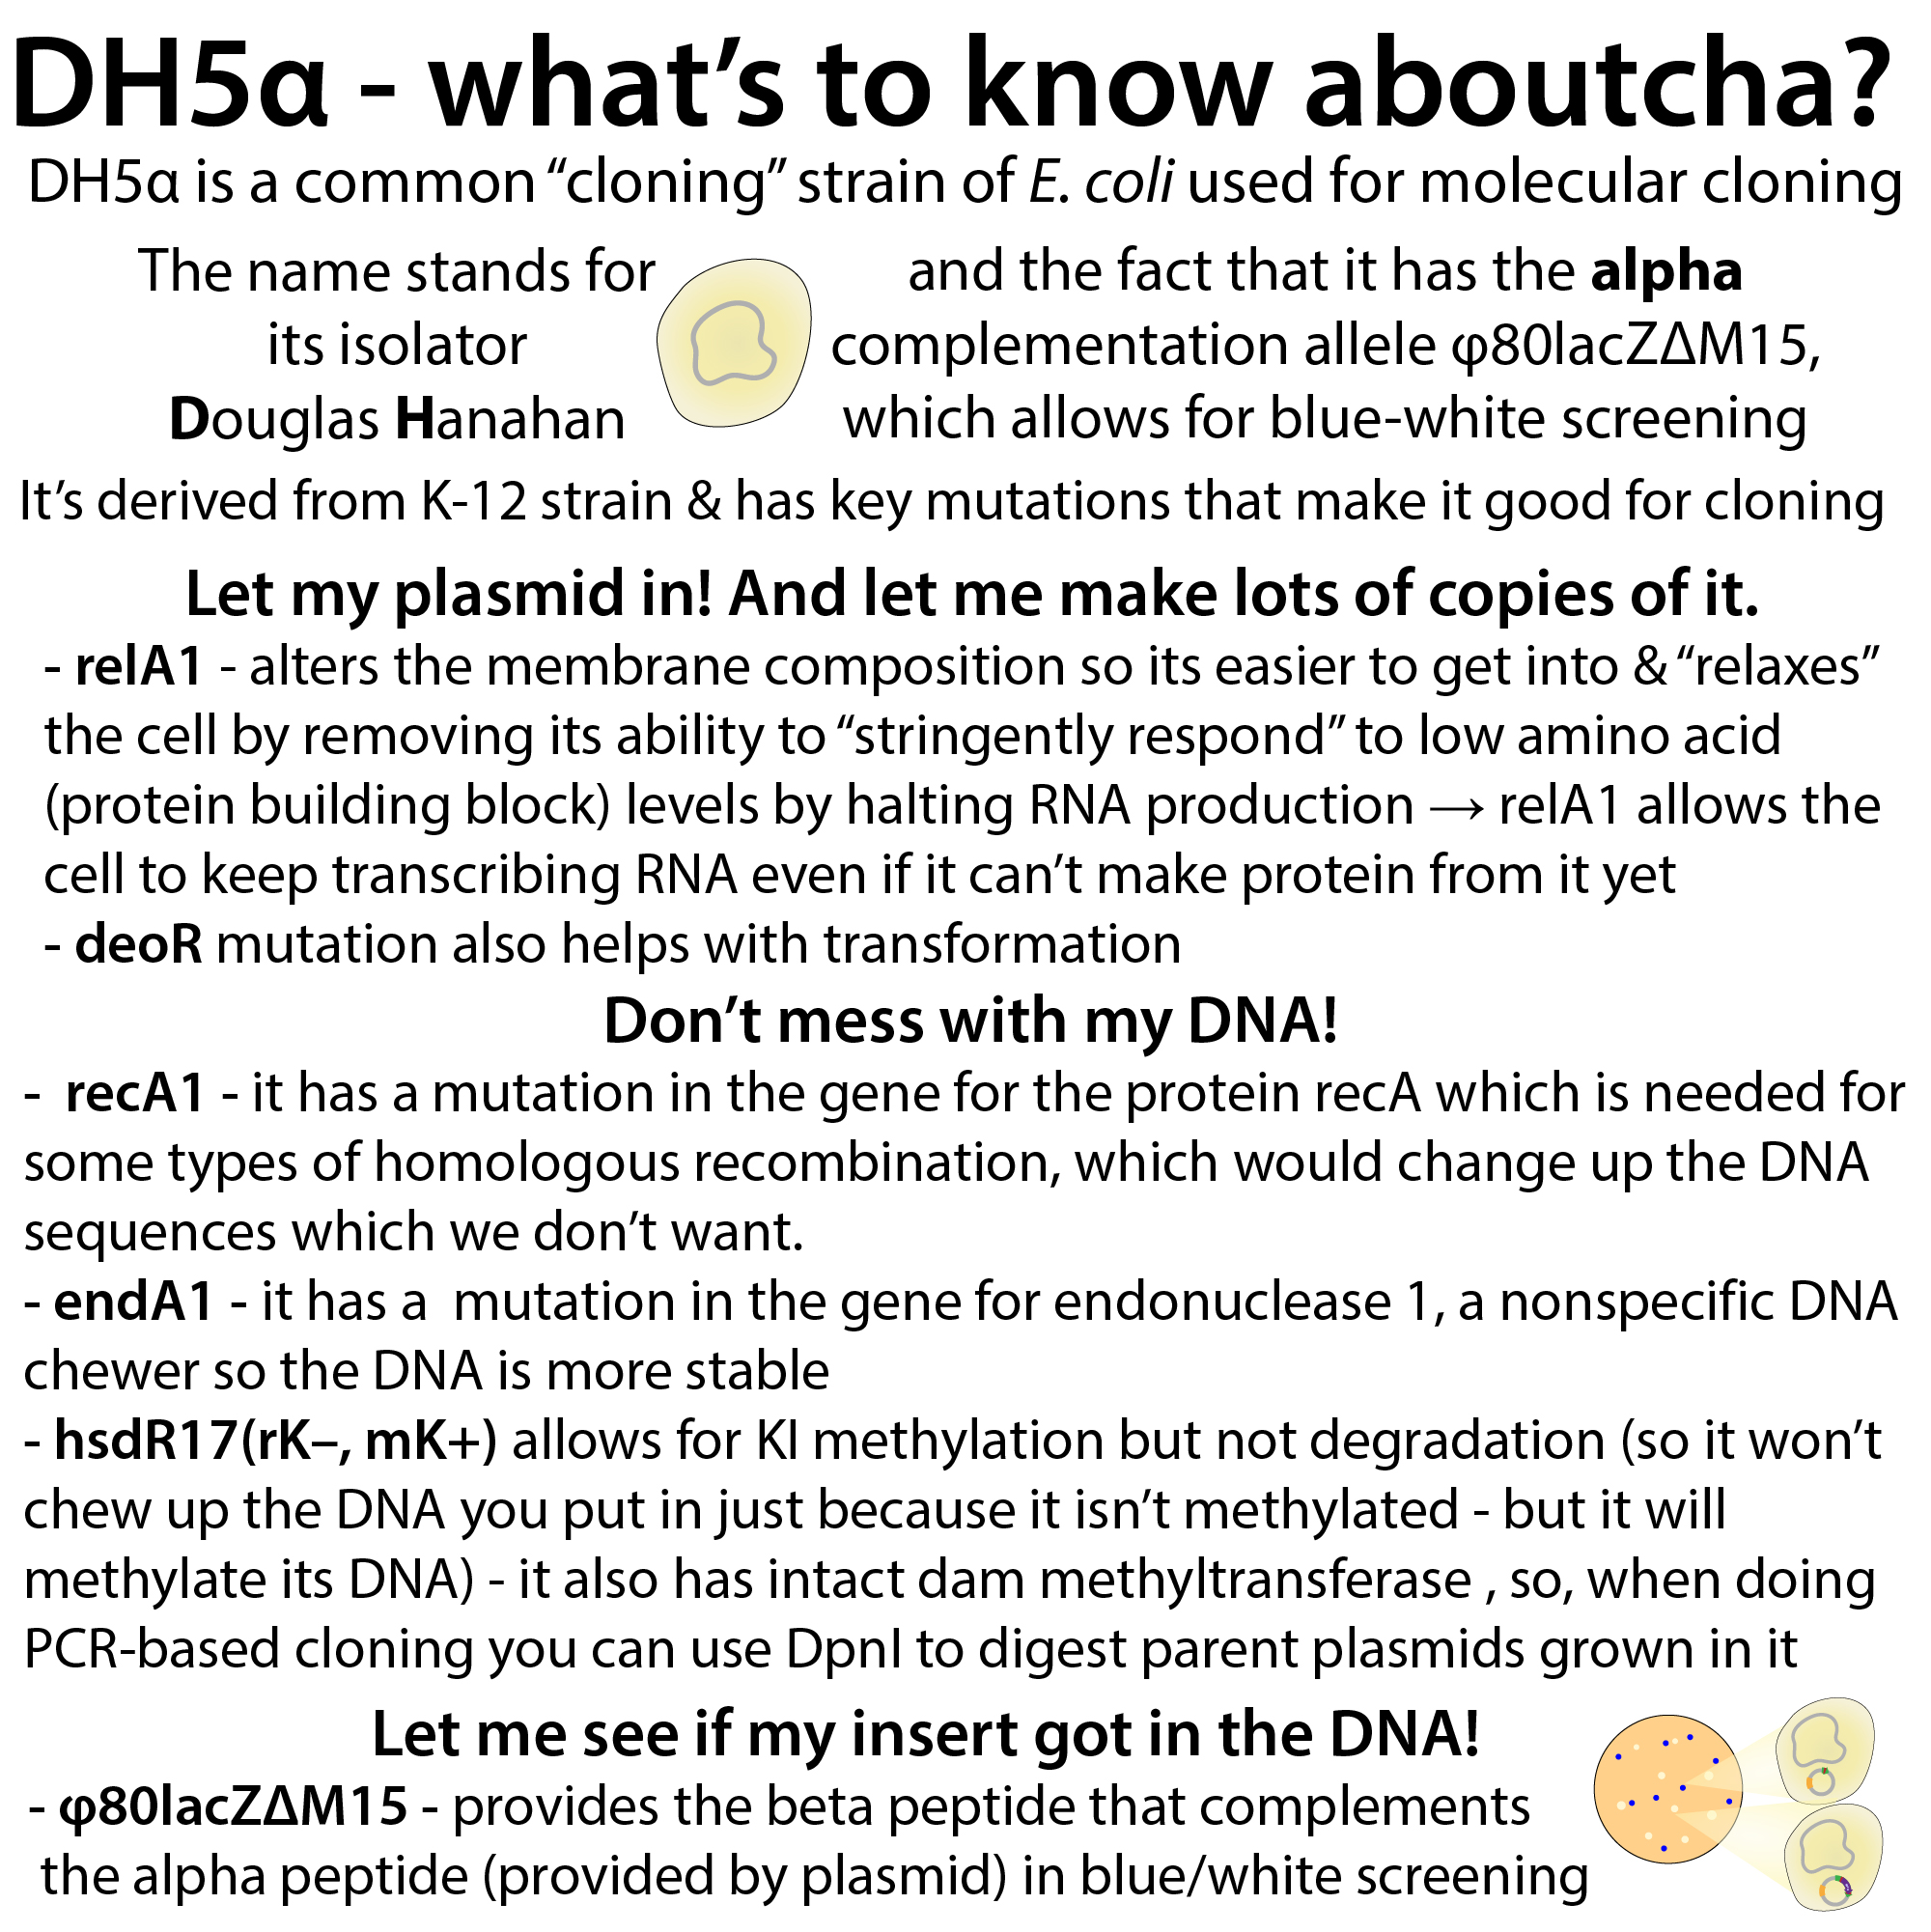
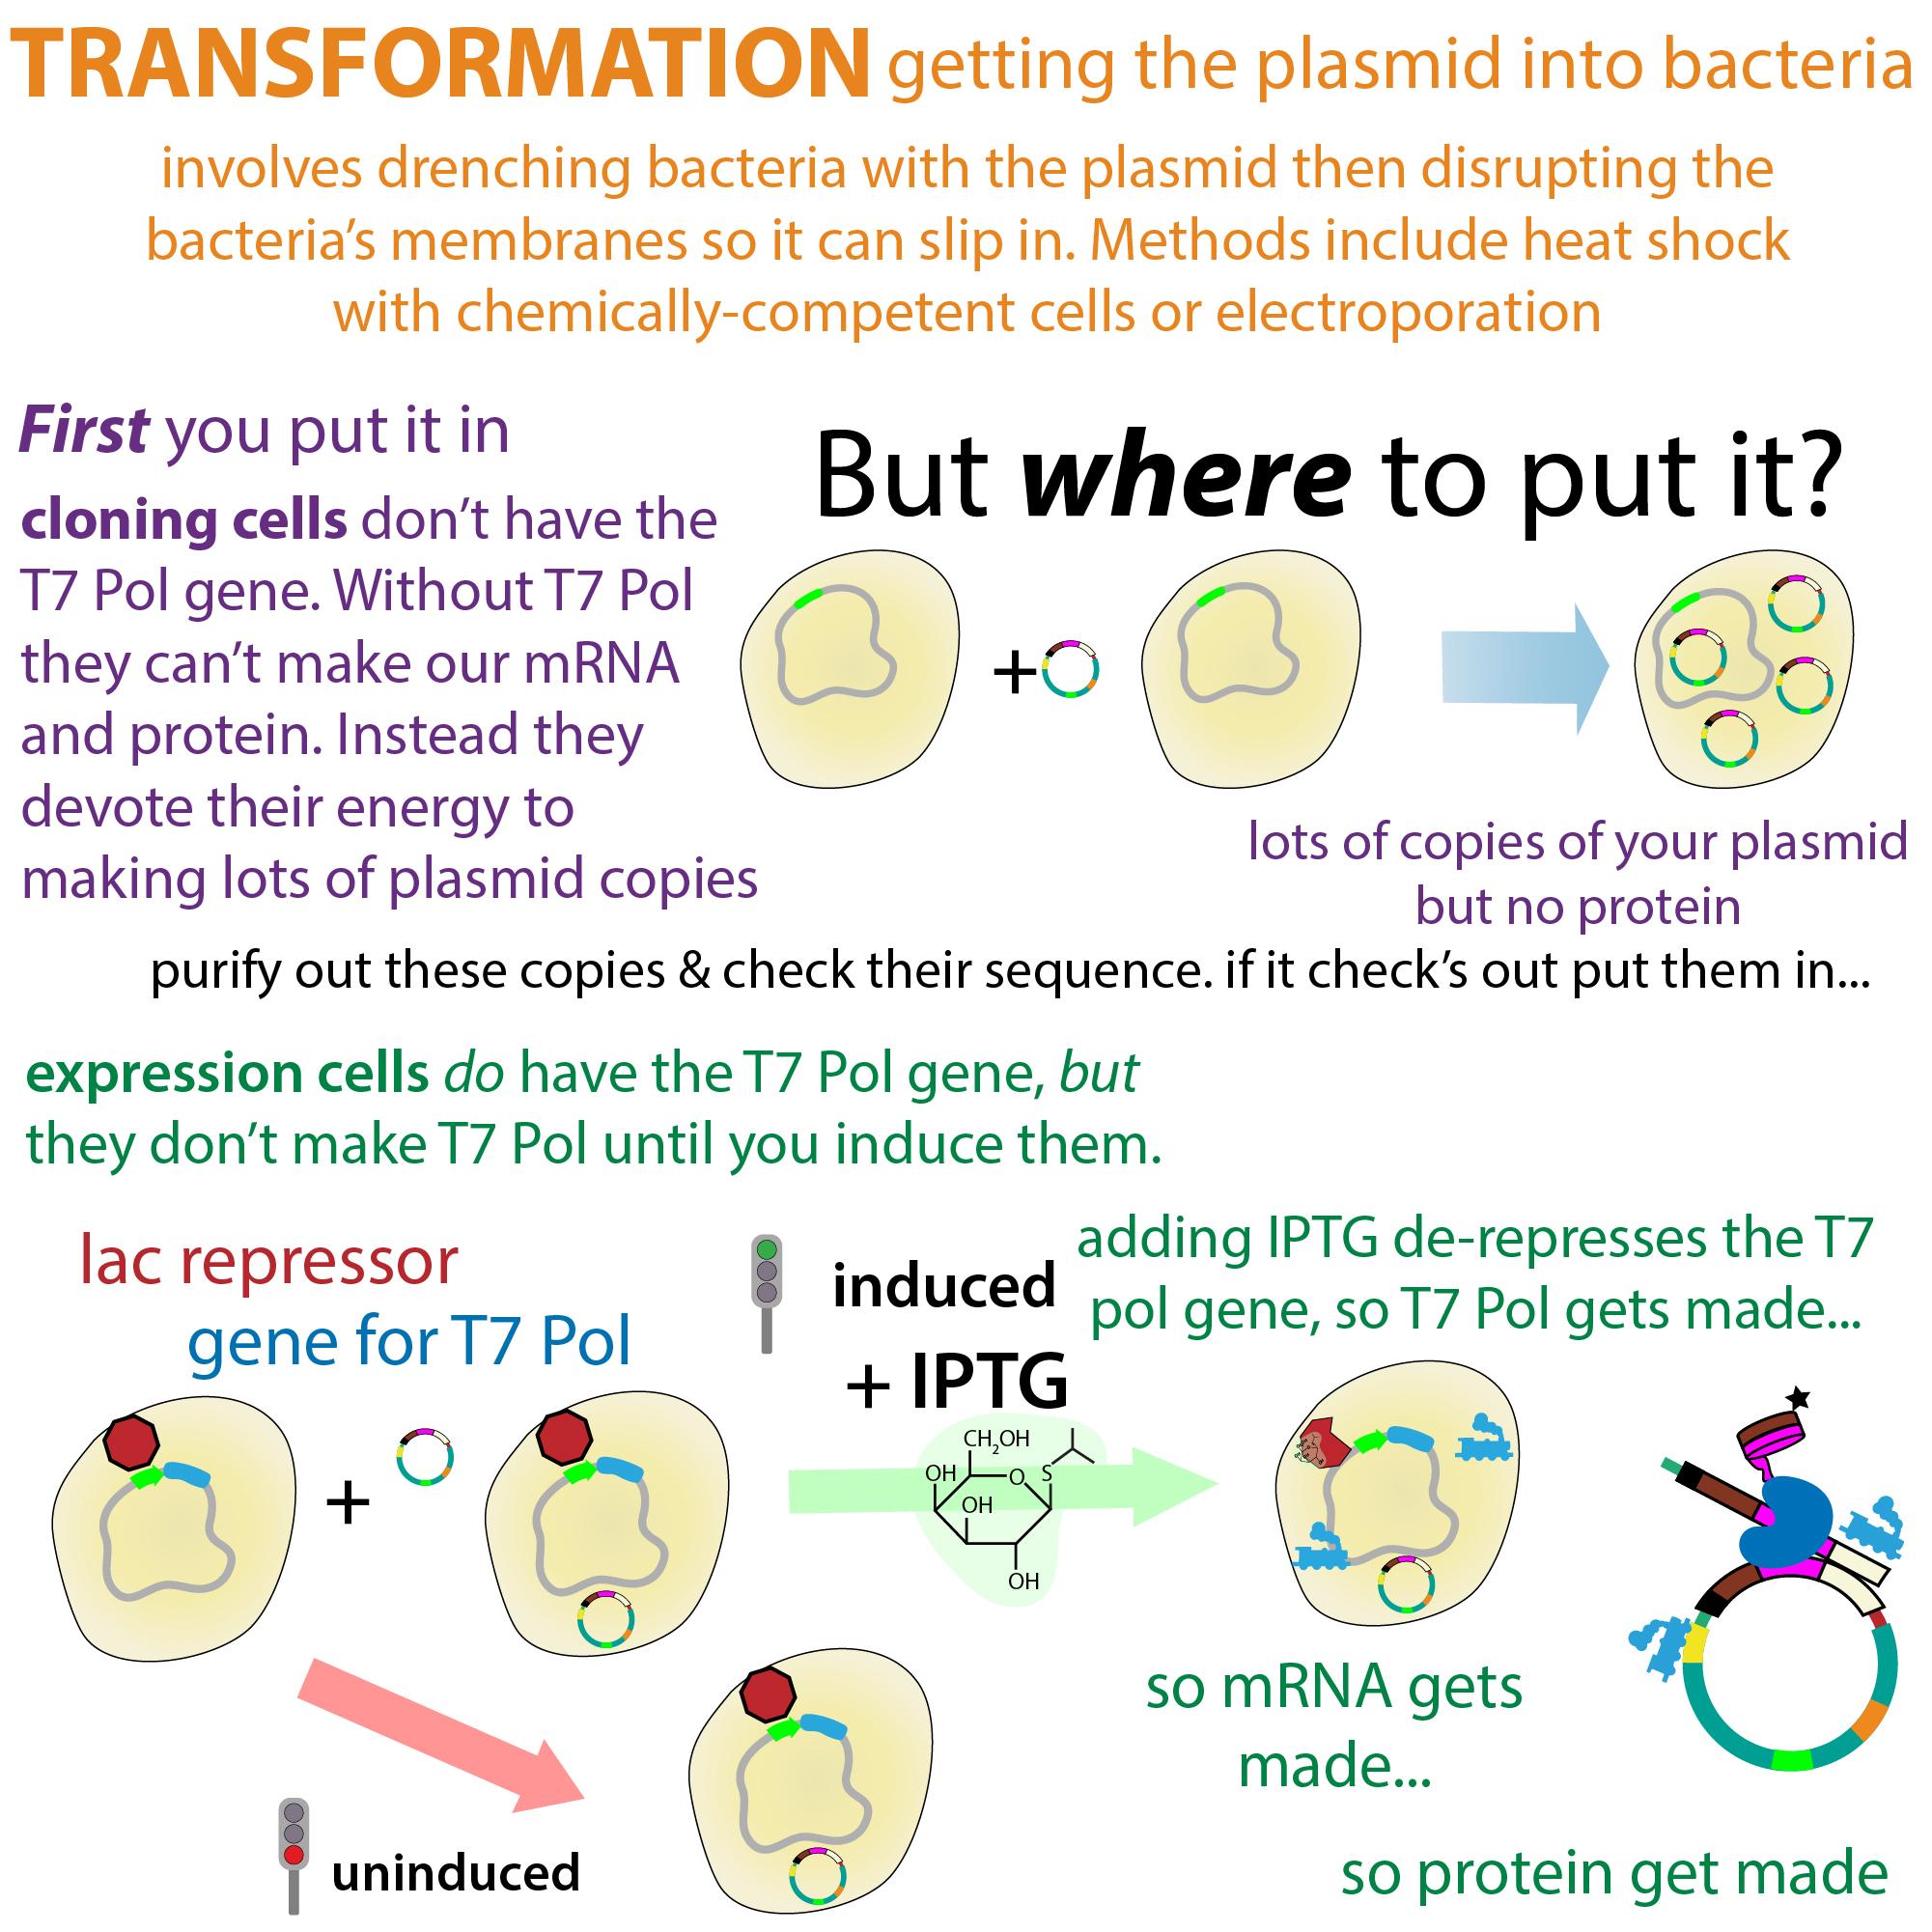
You typically do the cloning in “cloning cells” which have high fidelity (copy plasmids without making errors), but lack features needed for the expression of the protein encoded for by the plasmid (e.g., the gene for T7 polymerase for the inducible expression system commonly used for overexpression of protein in E. coli). Then, once you have verified the cloning worked, you take the purified and validated plasmid and stick it into the desired expression cells. Typically, the cloning is done in E. coli cells, even if the expression is then done in a non-bacterial expression system. Sometimes, shuttle vectors are used which have origins of replication compatible with multiple cell types to facilitate this.
- Bacterial cloning cells:
- Examples: DH5a, DH10/TOP10, XL1-Blue
- Key features: easy to transform, inactivated recombinases (to prevent unwanted mutations), and inactivated nucleases (to keep your DNA from being chewed up)
- Bacterial expression cells:
- Examples: BL21, BL21 (DE3), K-12, Origami
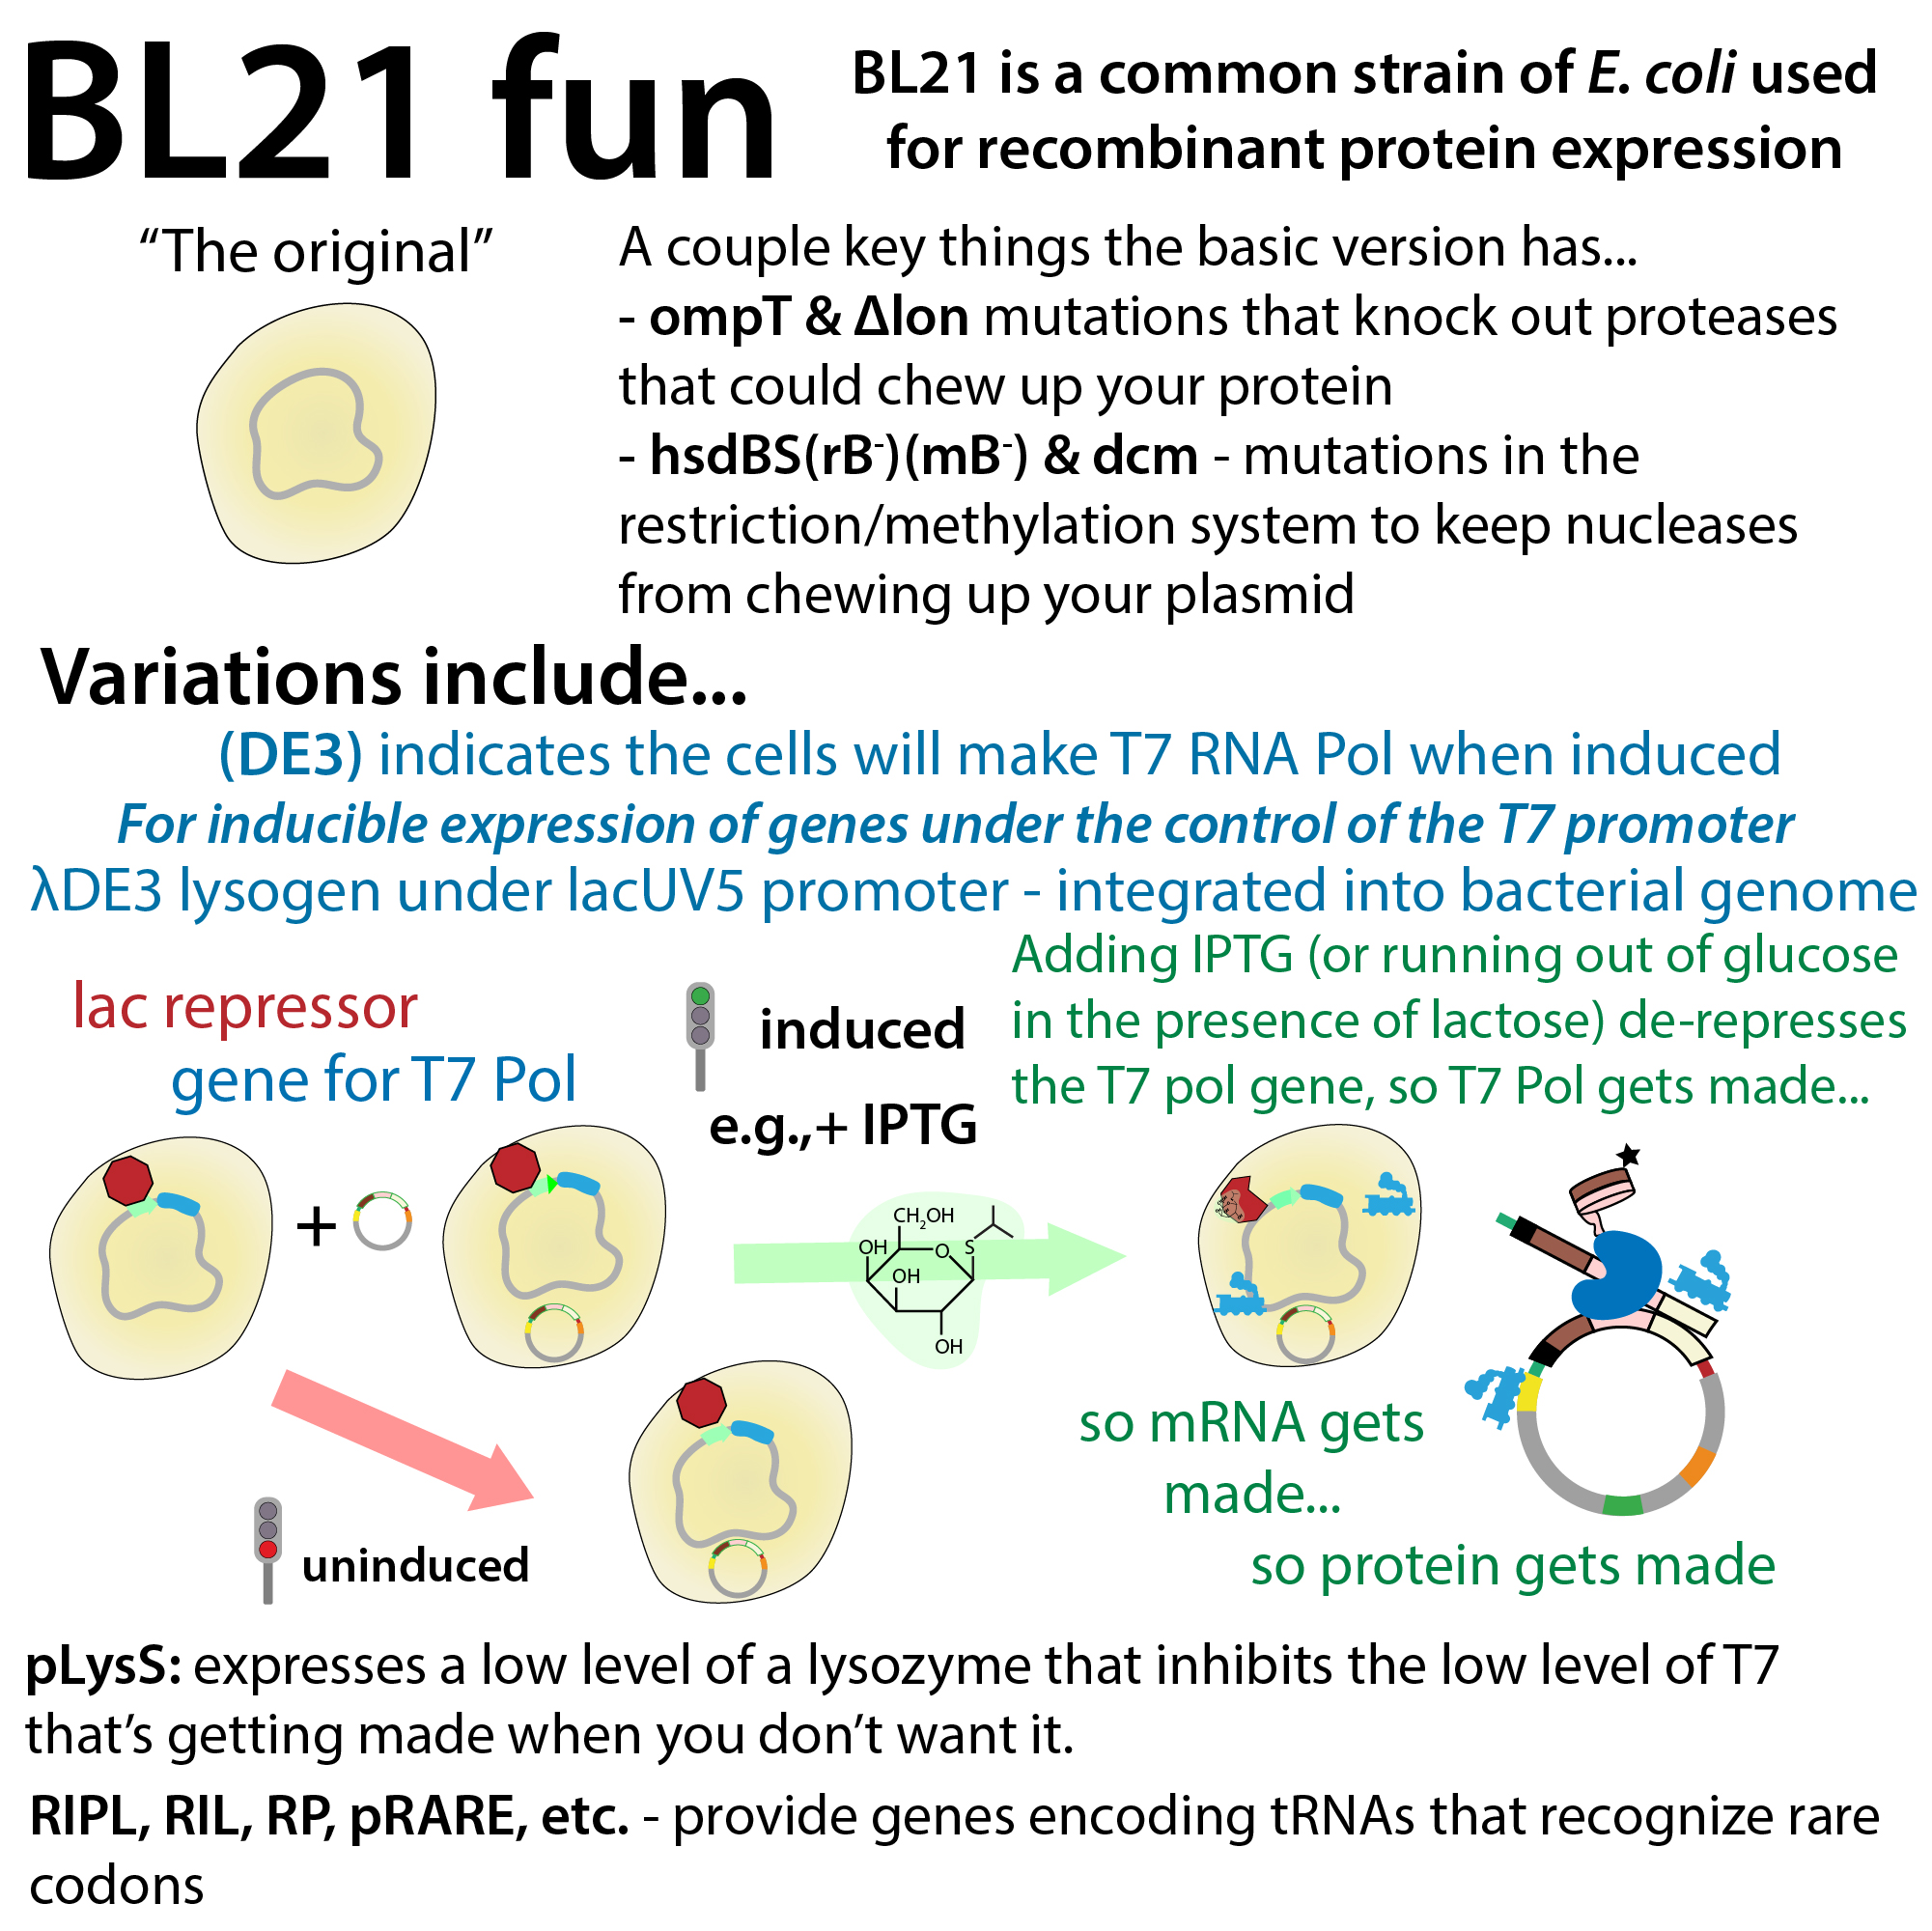
- Key features: inactivated proteases (to keep your protein from being chewed up); BL21(DE3) cells have T7 RNA Pol under the control of the lac operon for inducible expression of genes under the T7 promoter.
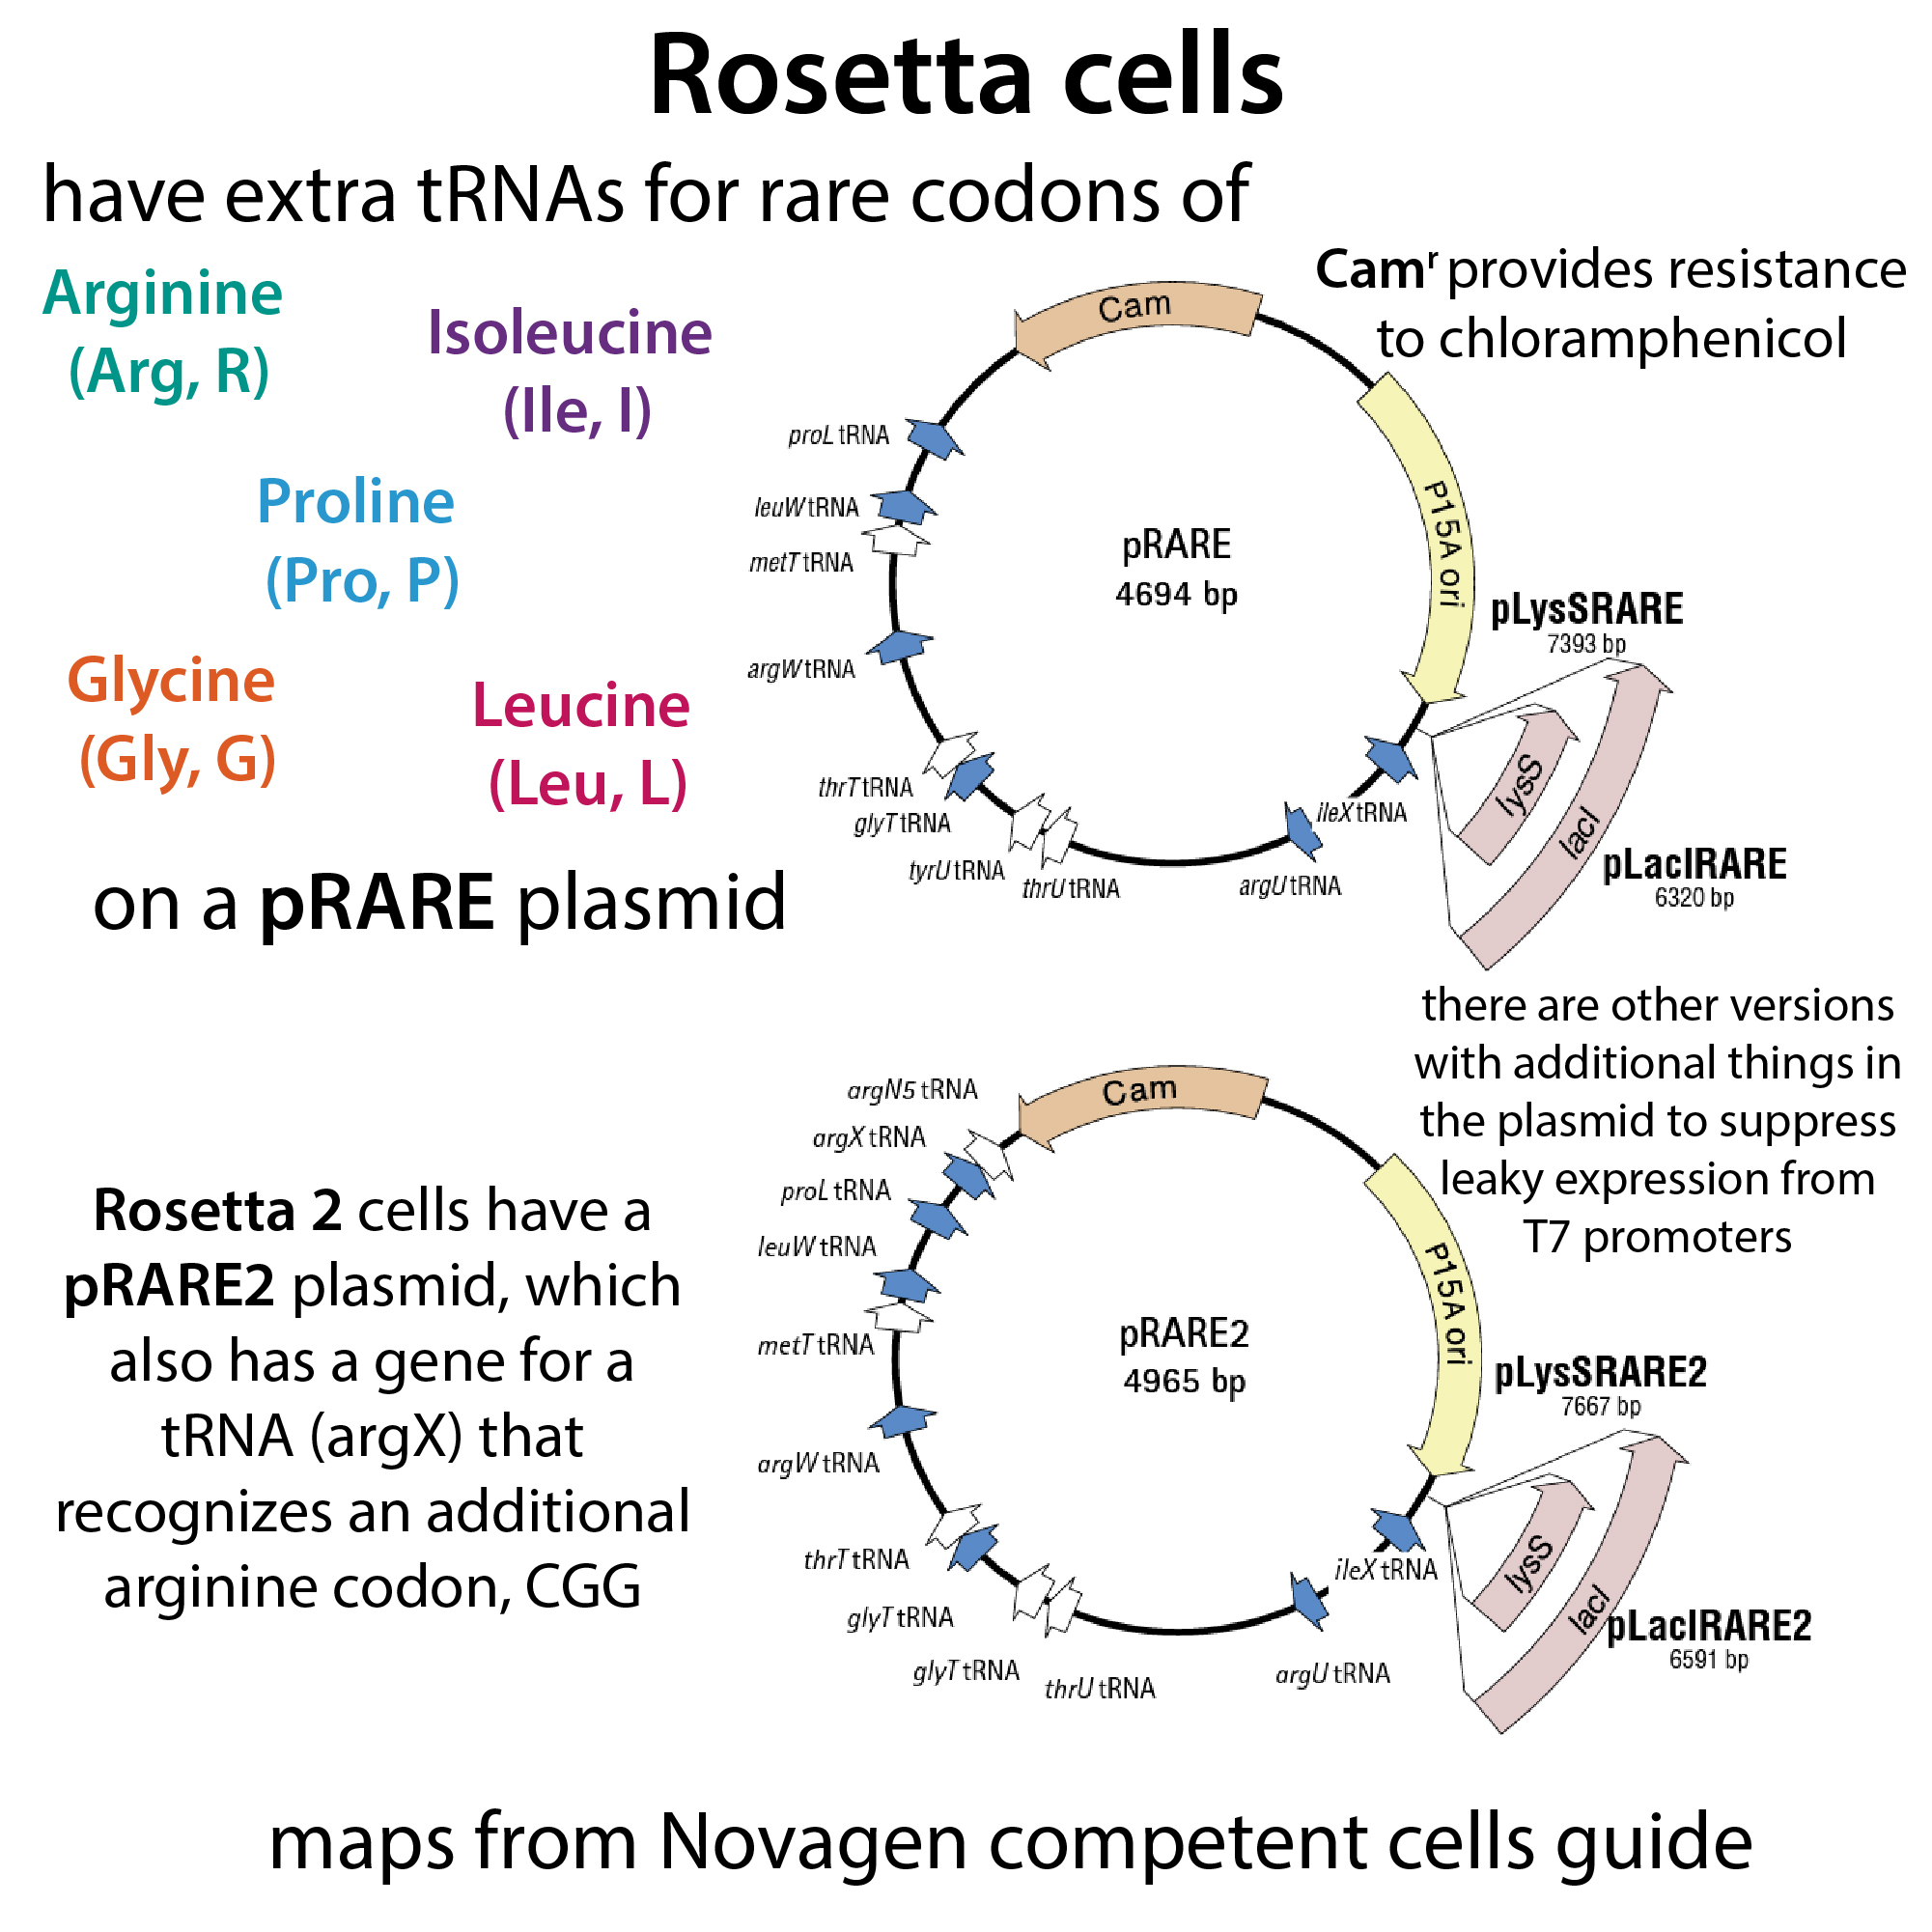
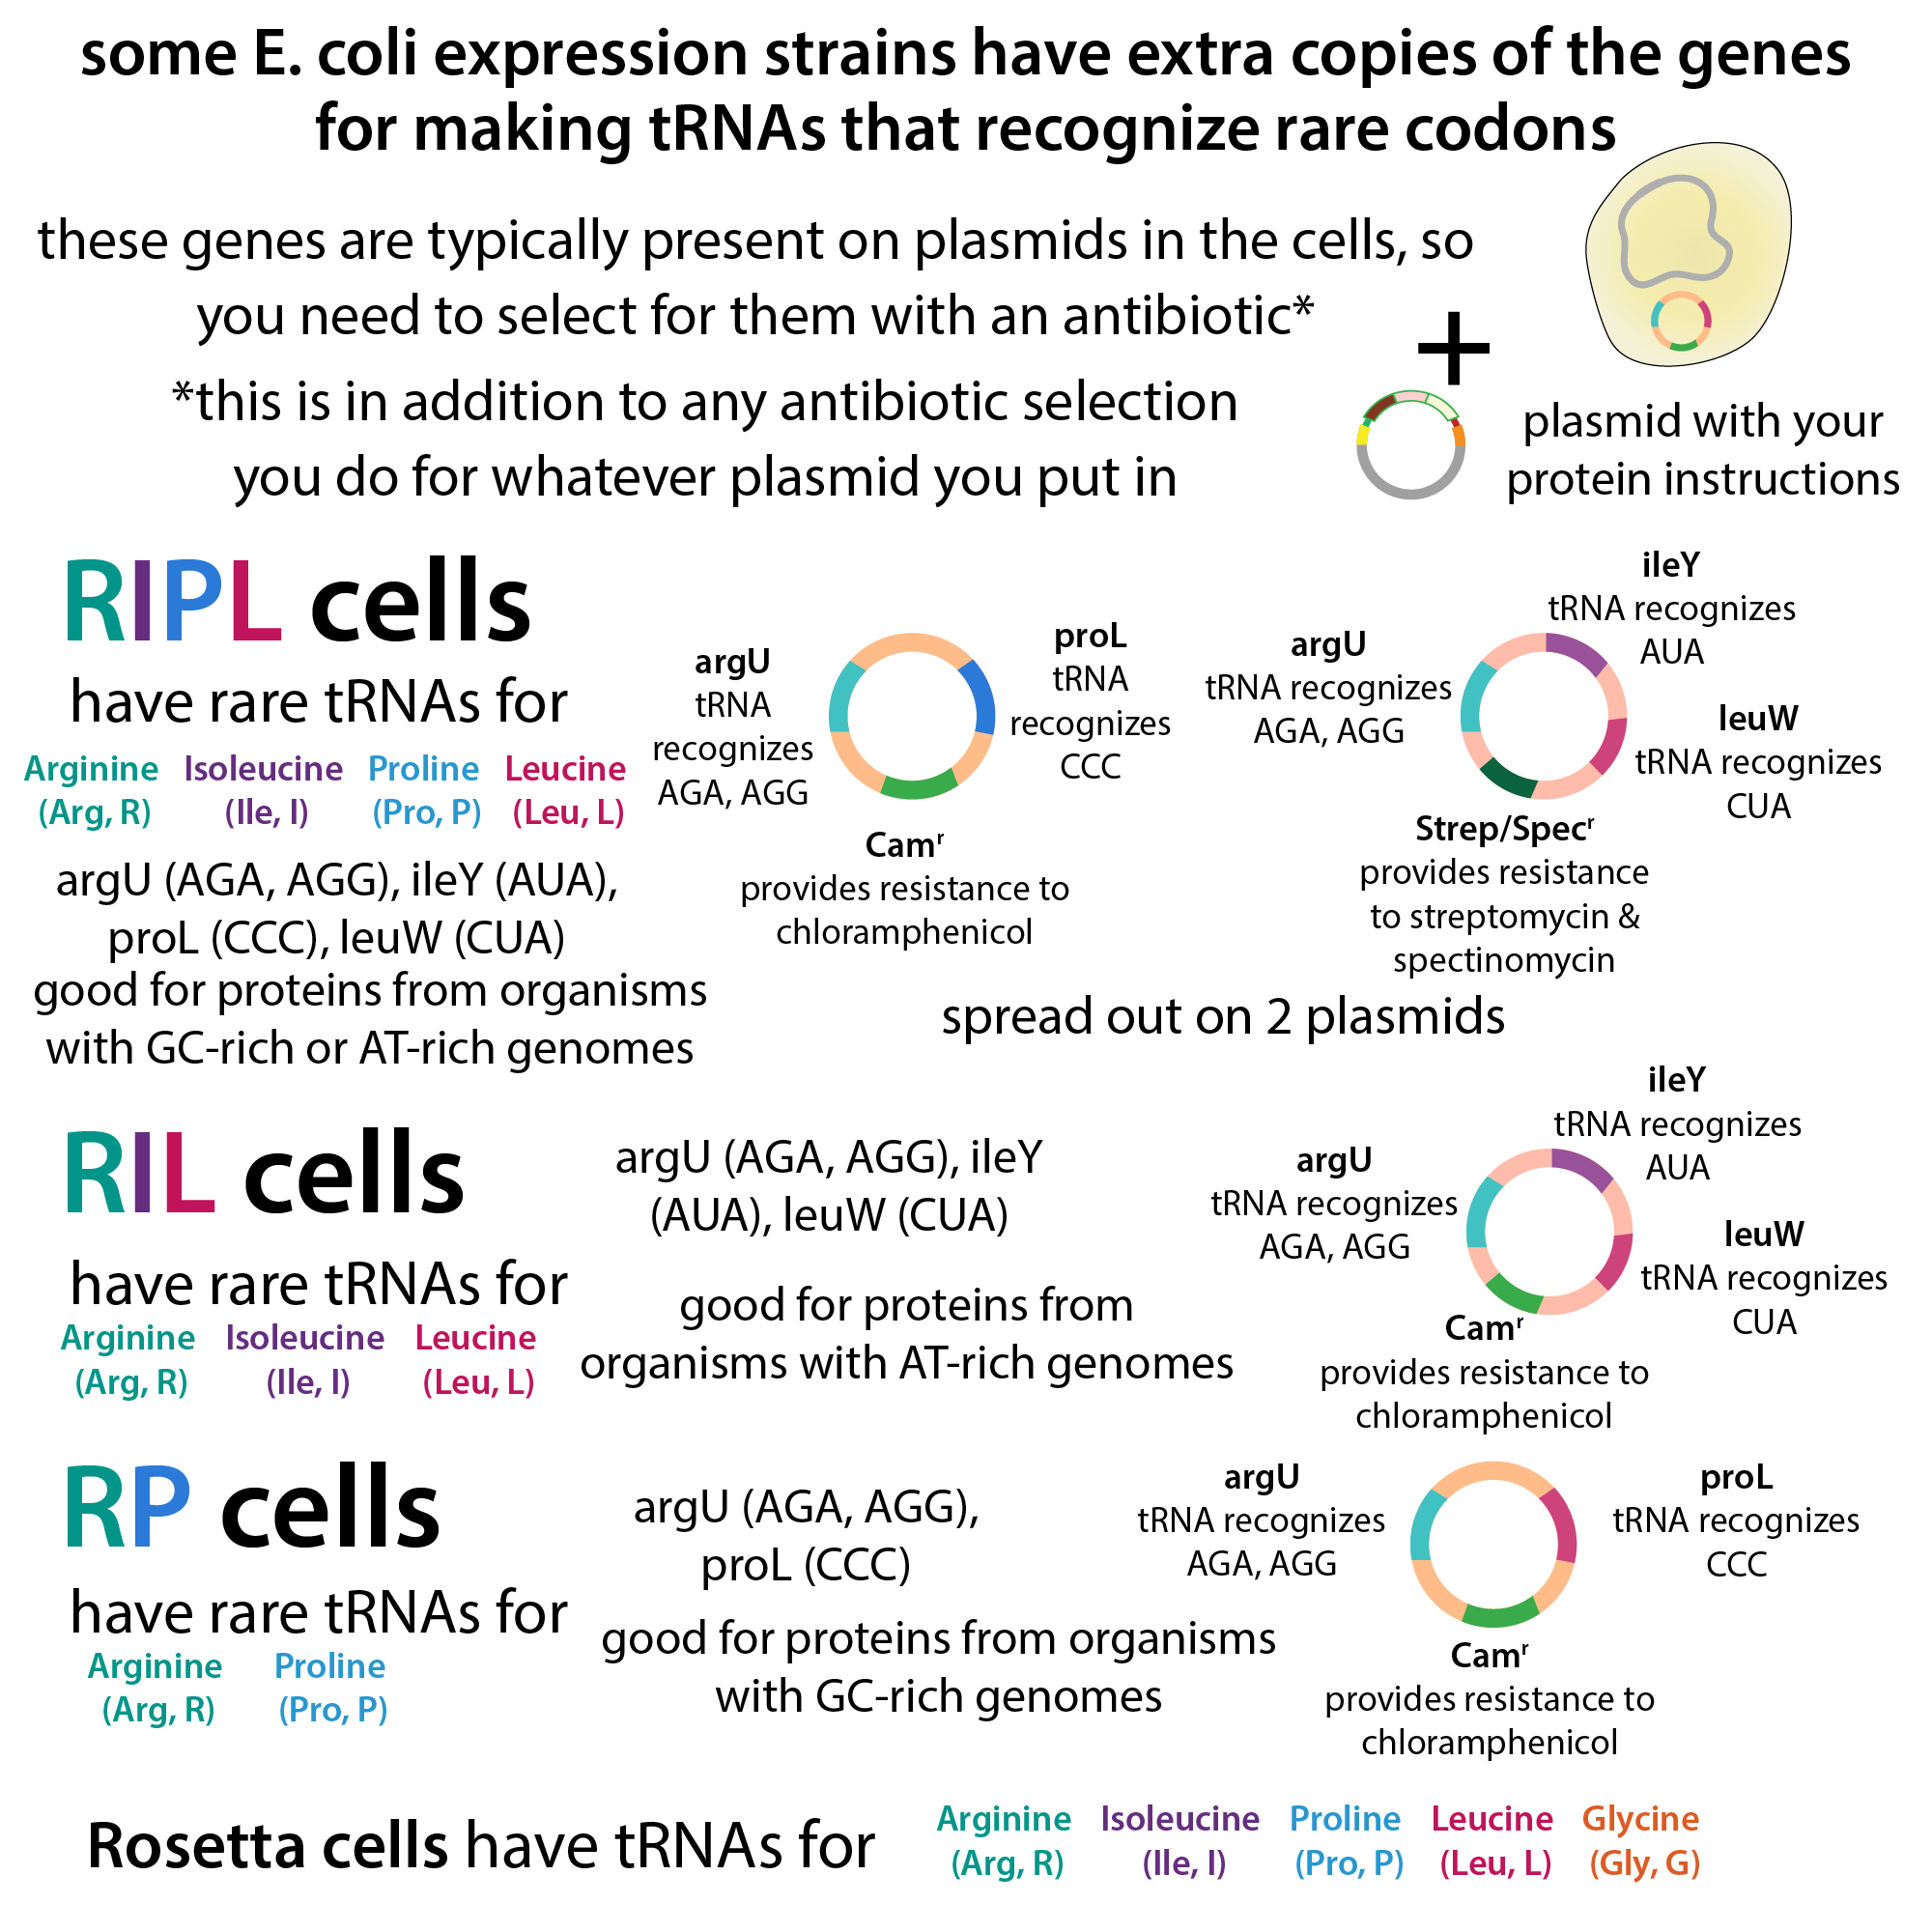
- Variants have features like genes for extra tRNAs for rare codons, or inactivation of additional proteases; pLysS inhibits early T7 activation
Graphics
Transfection
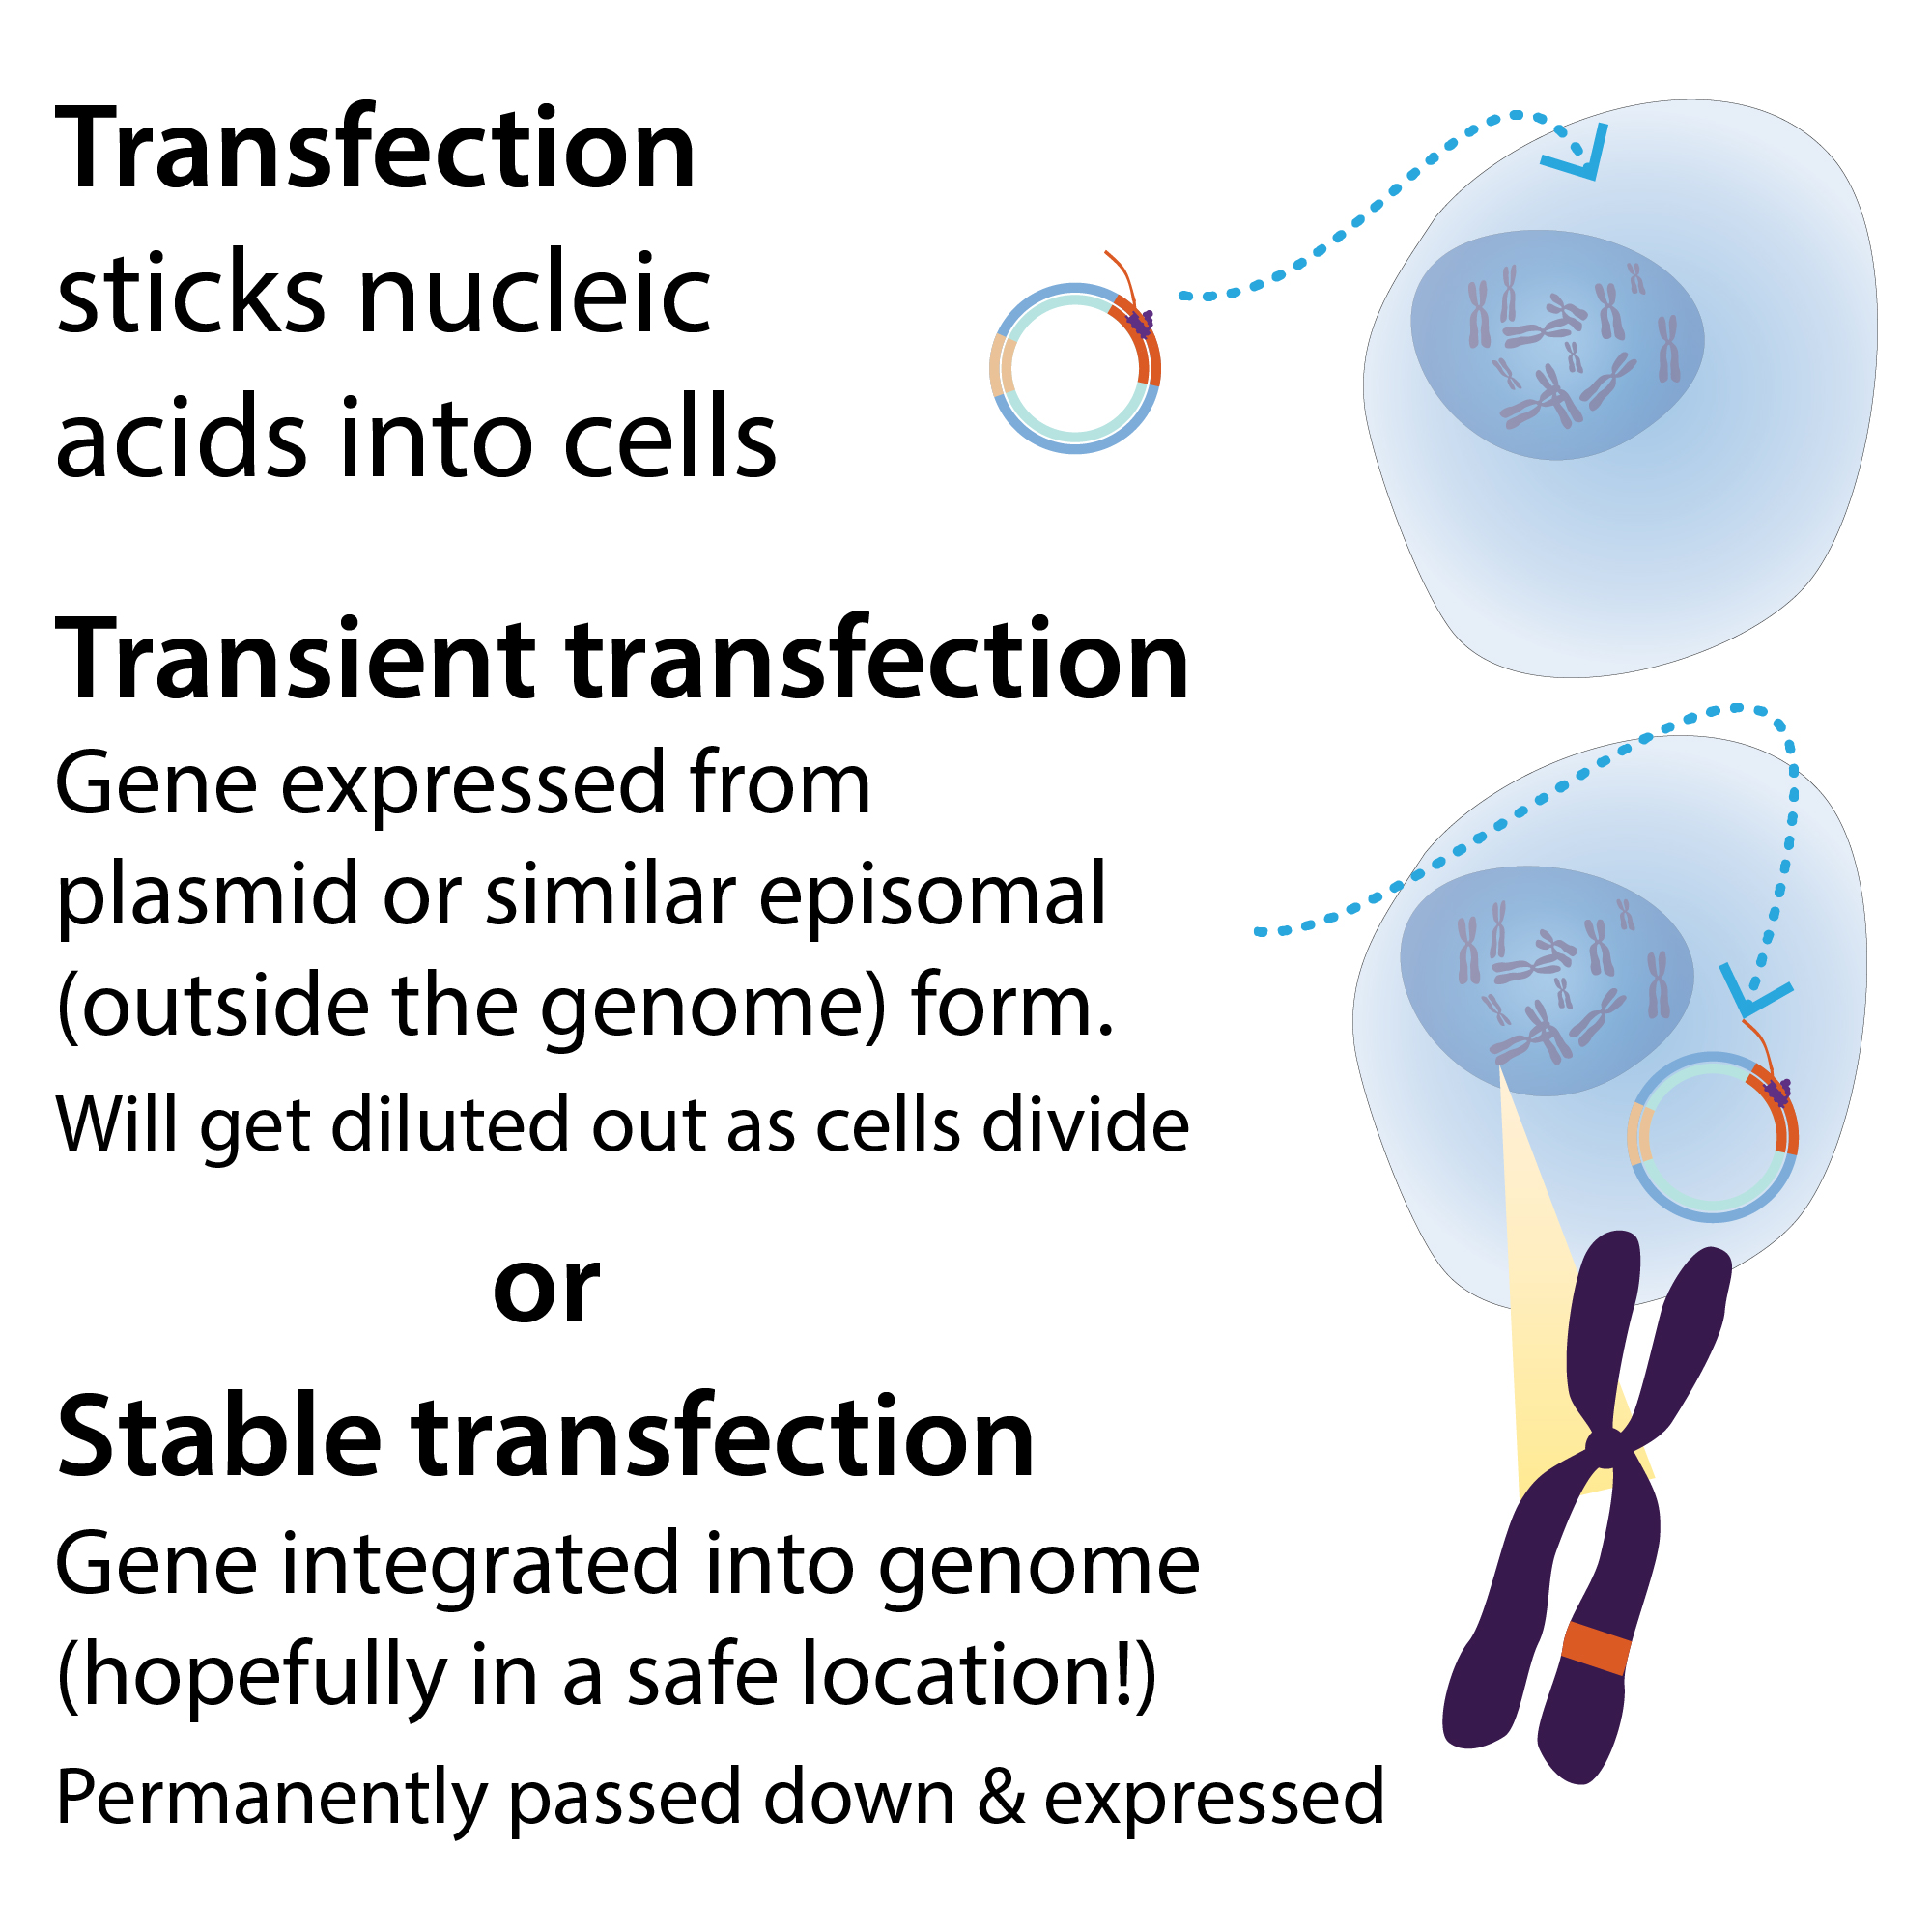
This is where DNA and/or RNA is inserted into cells.
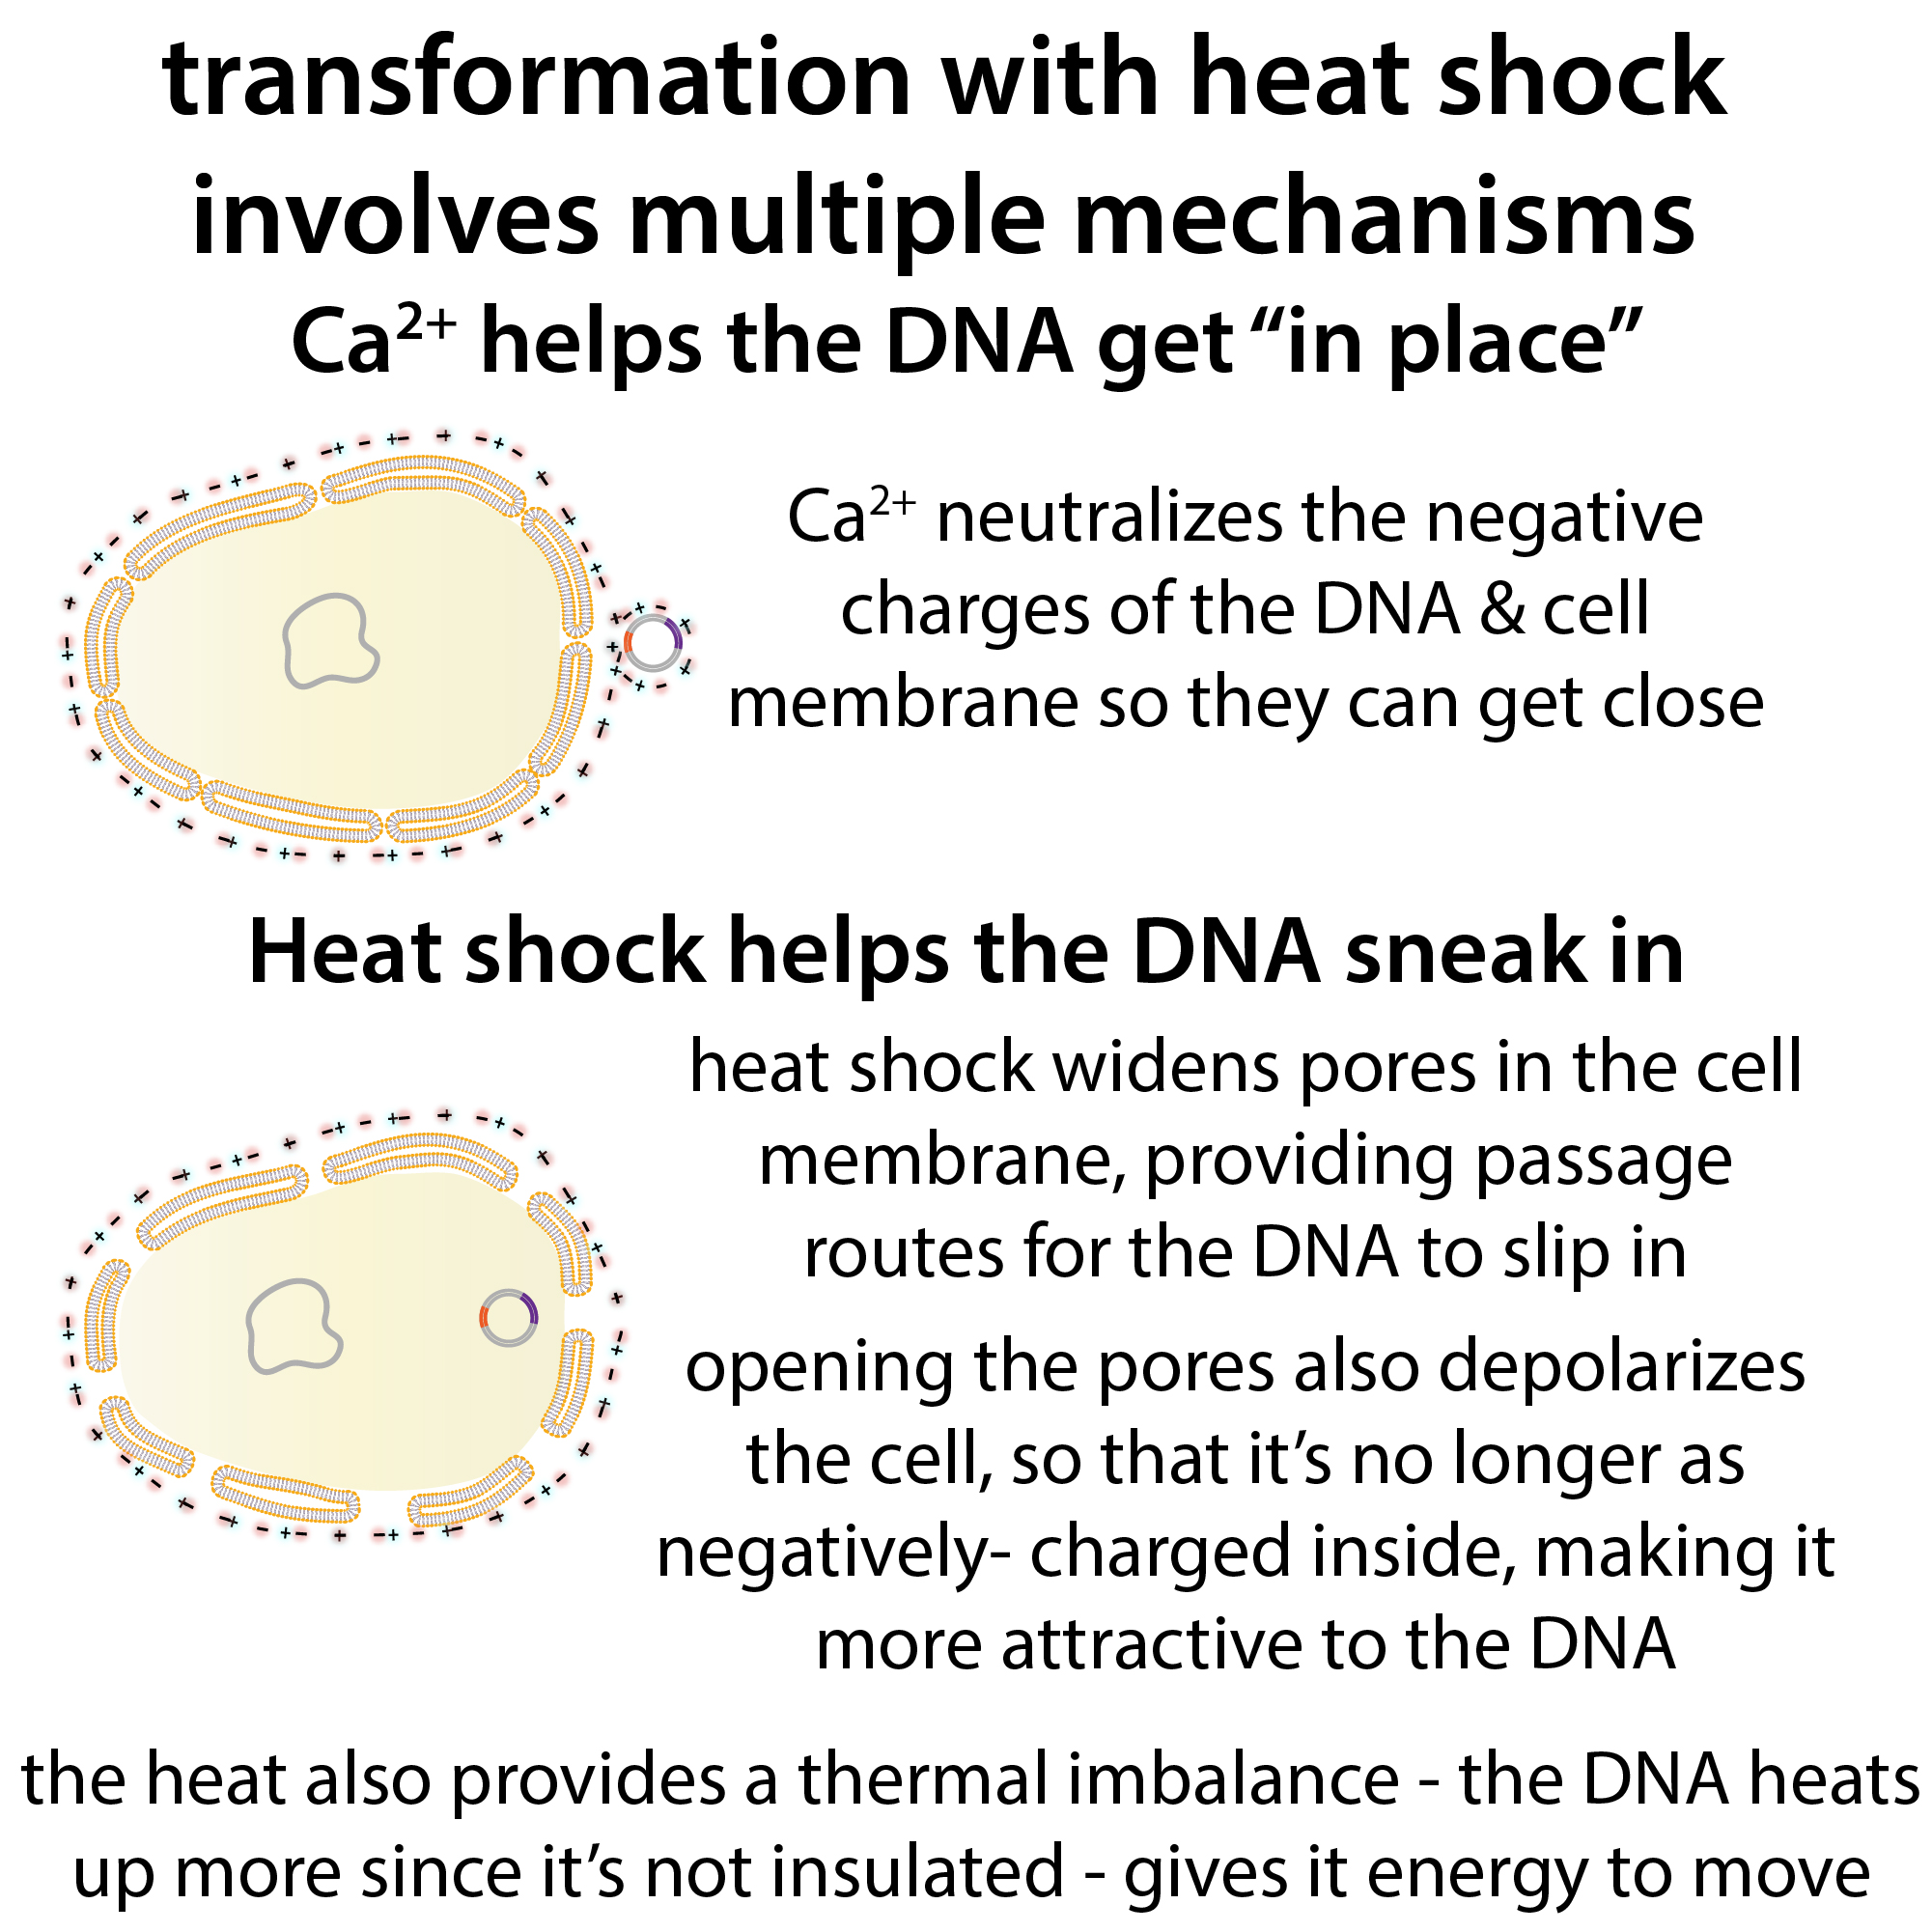
- Transformation: the term used for transfection into bacterial cells
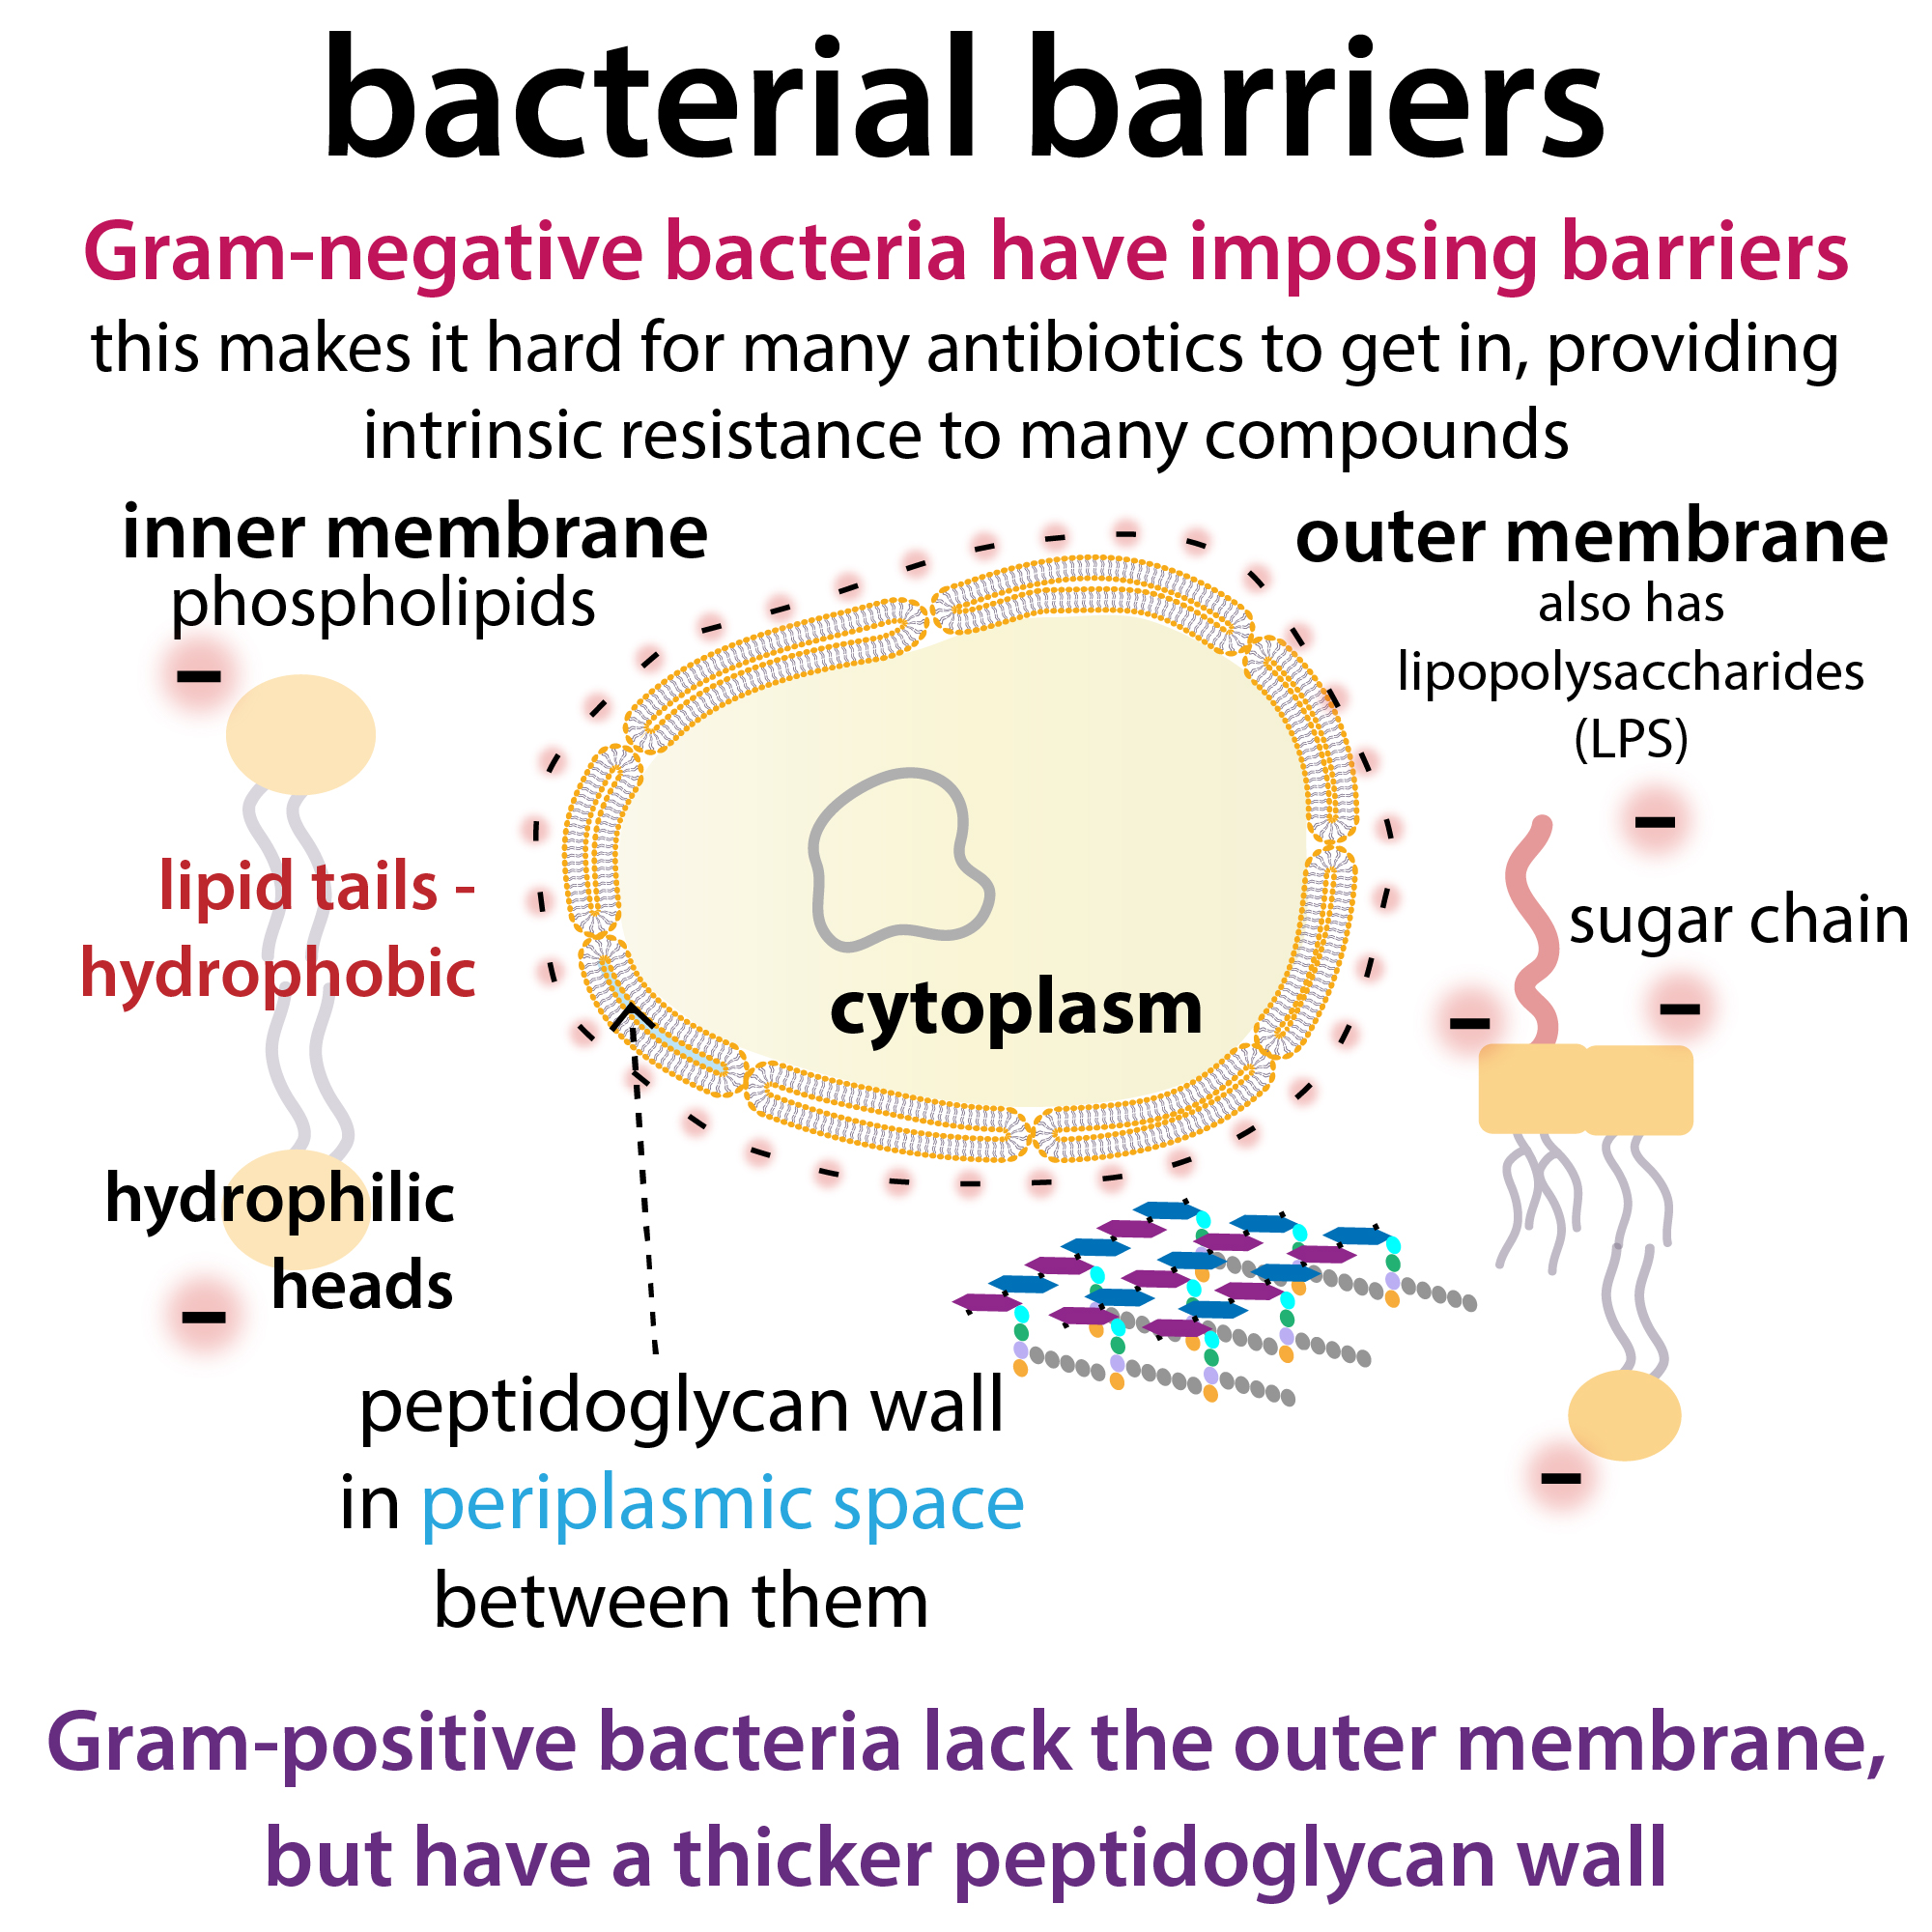
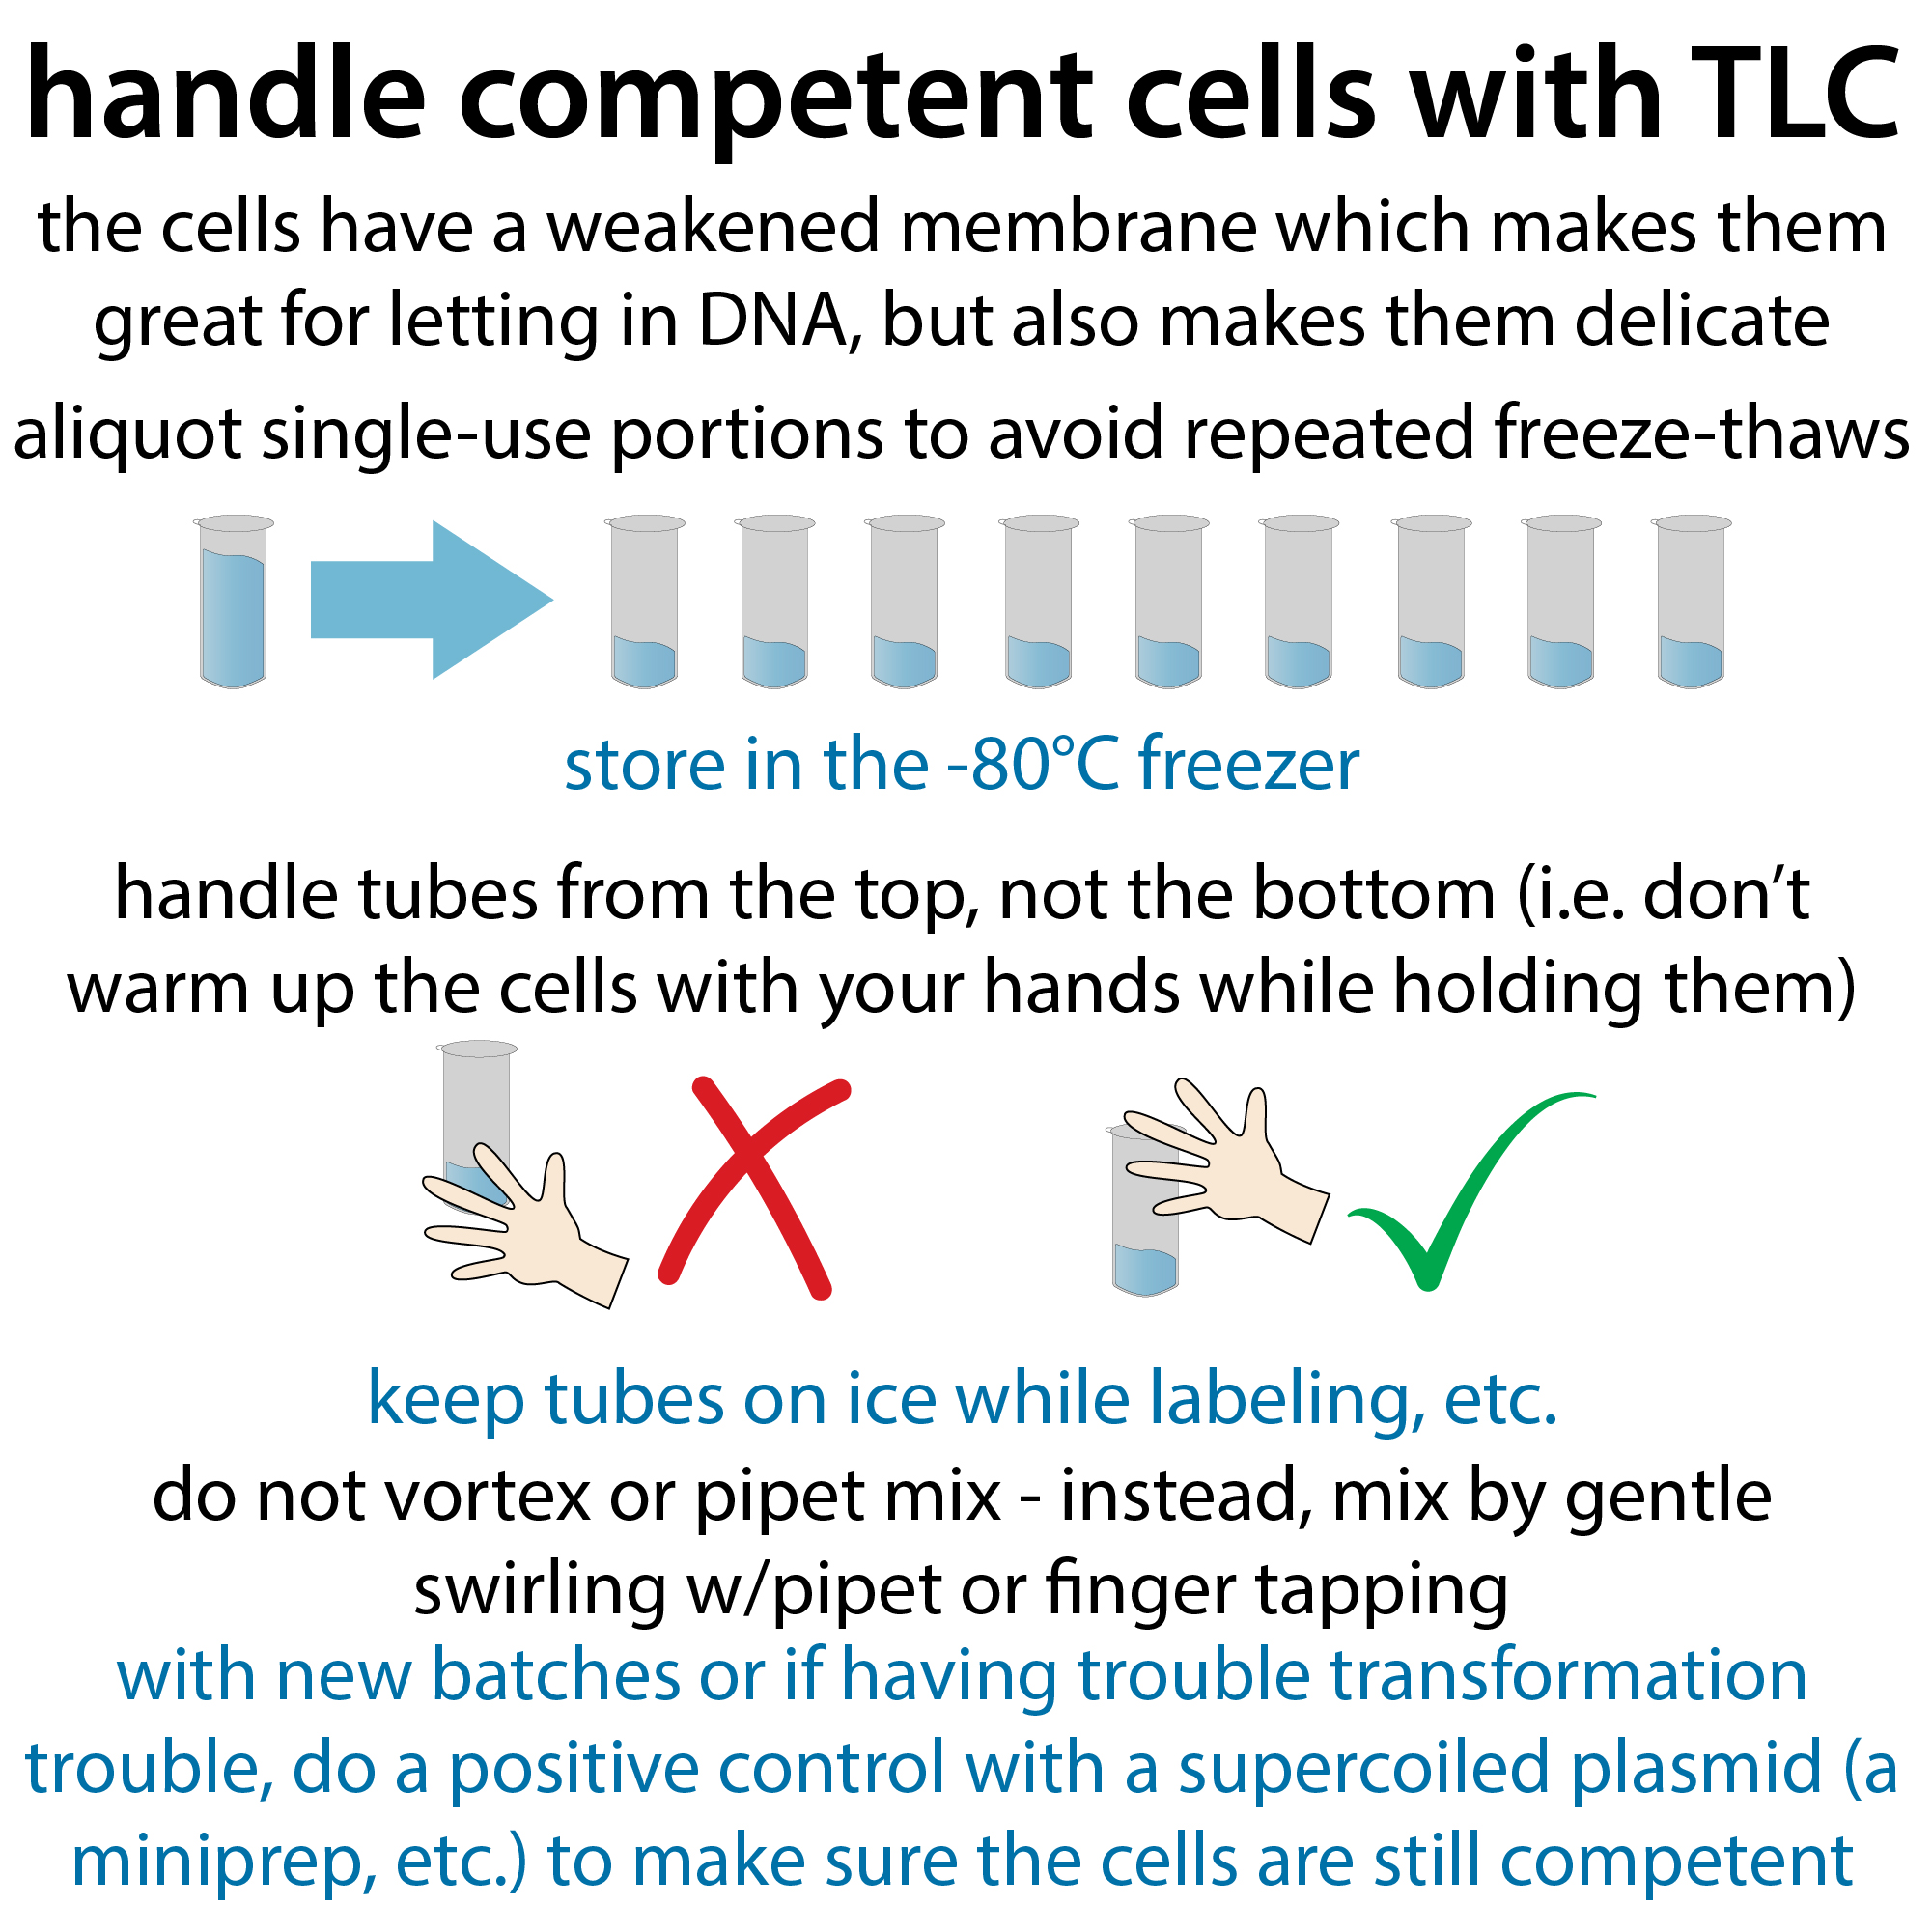
- Experimental Methods: heat shock with chemically competent cells to briefly open pores in the bacterial membrane, electroporation (use of electricity to coax the nucleic acids in)
- Experimental Methods: electroporation; nucleofection (a specific type of electroporation optimized for delivery into nuclei); use of cationic lipids (e.g. as lipid nanoparticles (LNPs) to bundle up and disguise the nucleic acids to sneak them in; transduction (use of viruses).
Graphics



Post-transfection selection
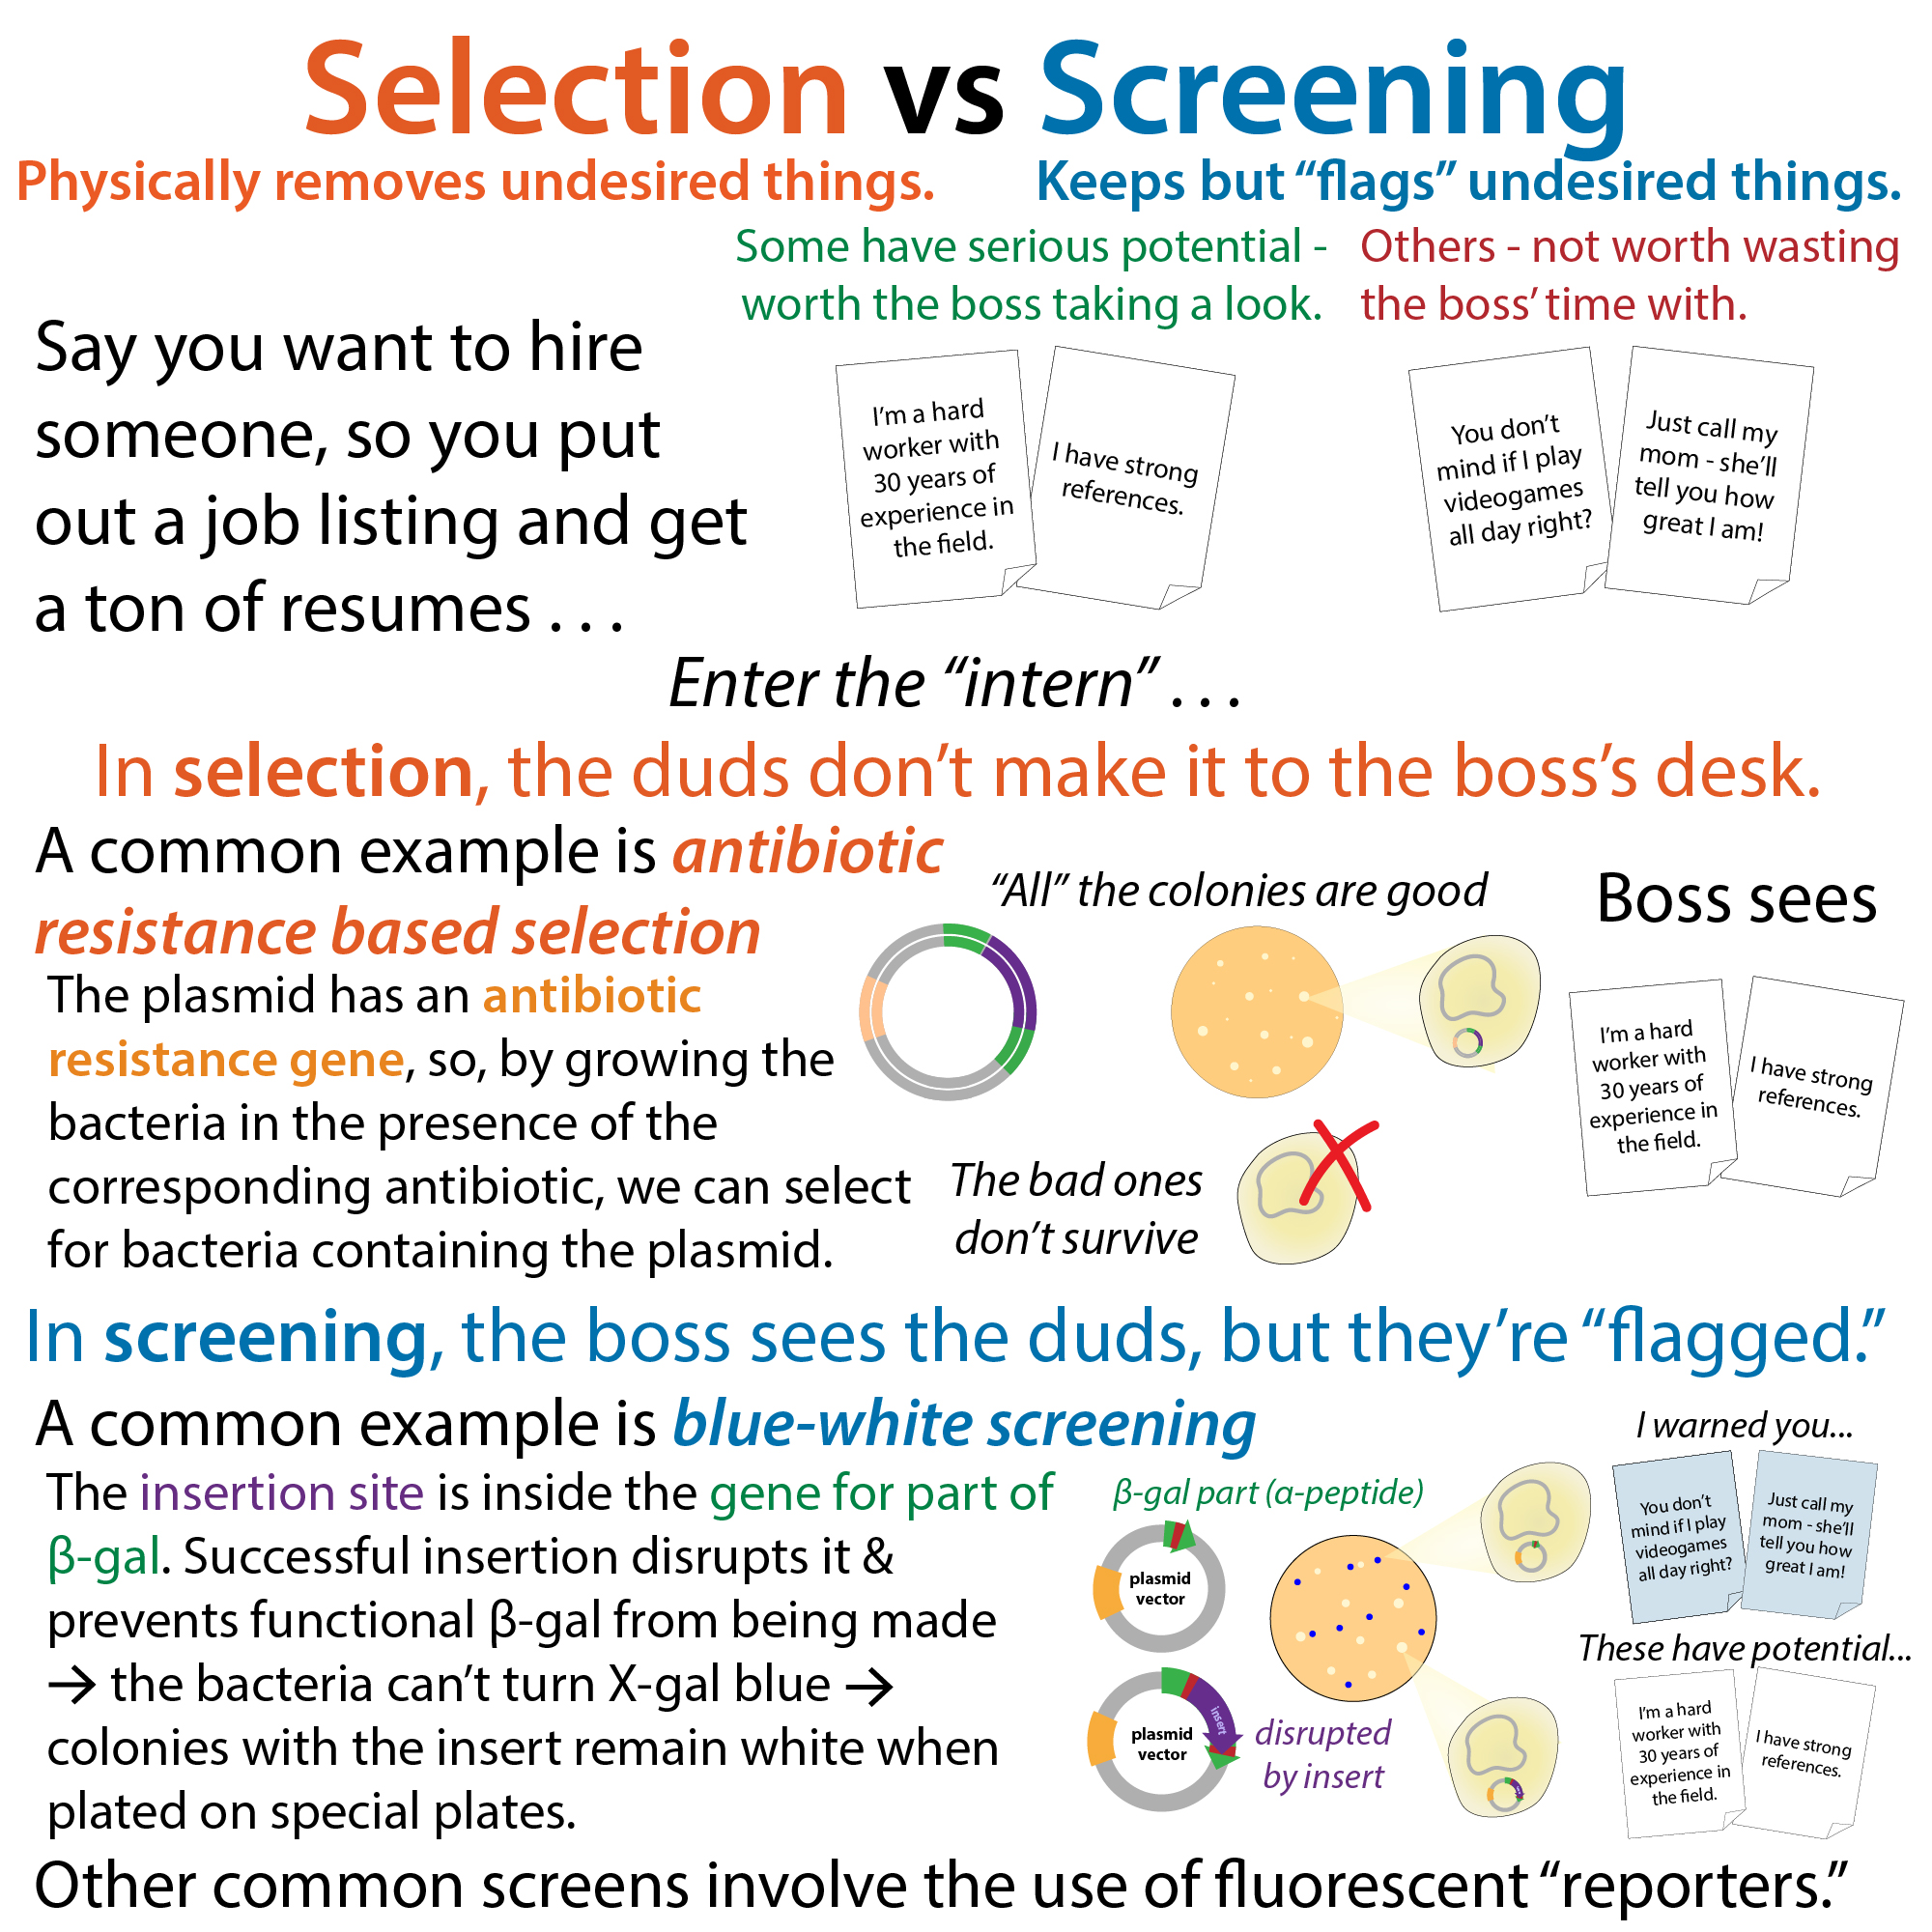
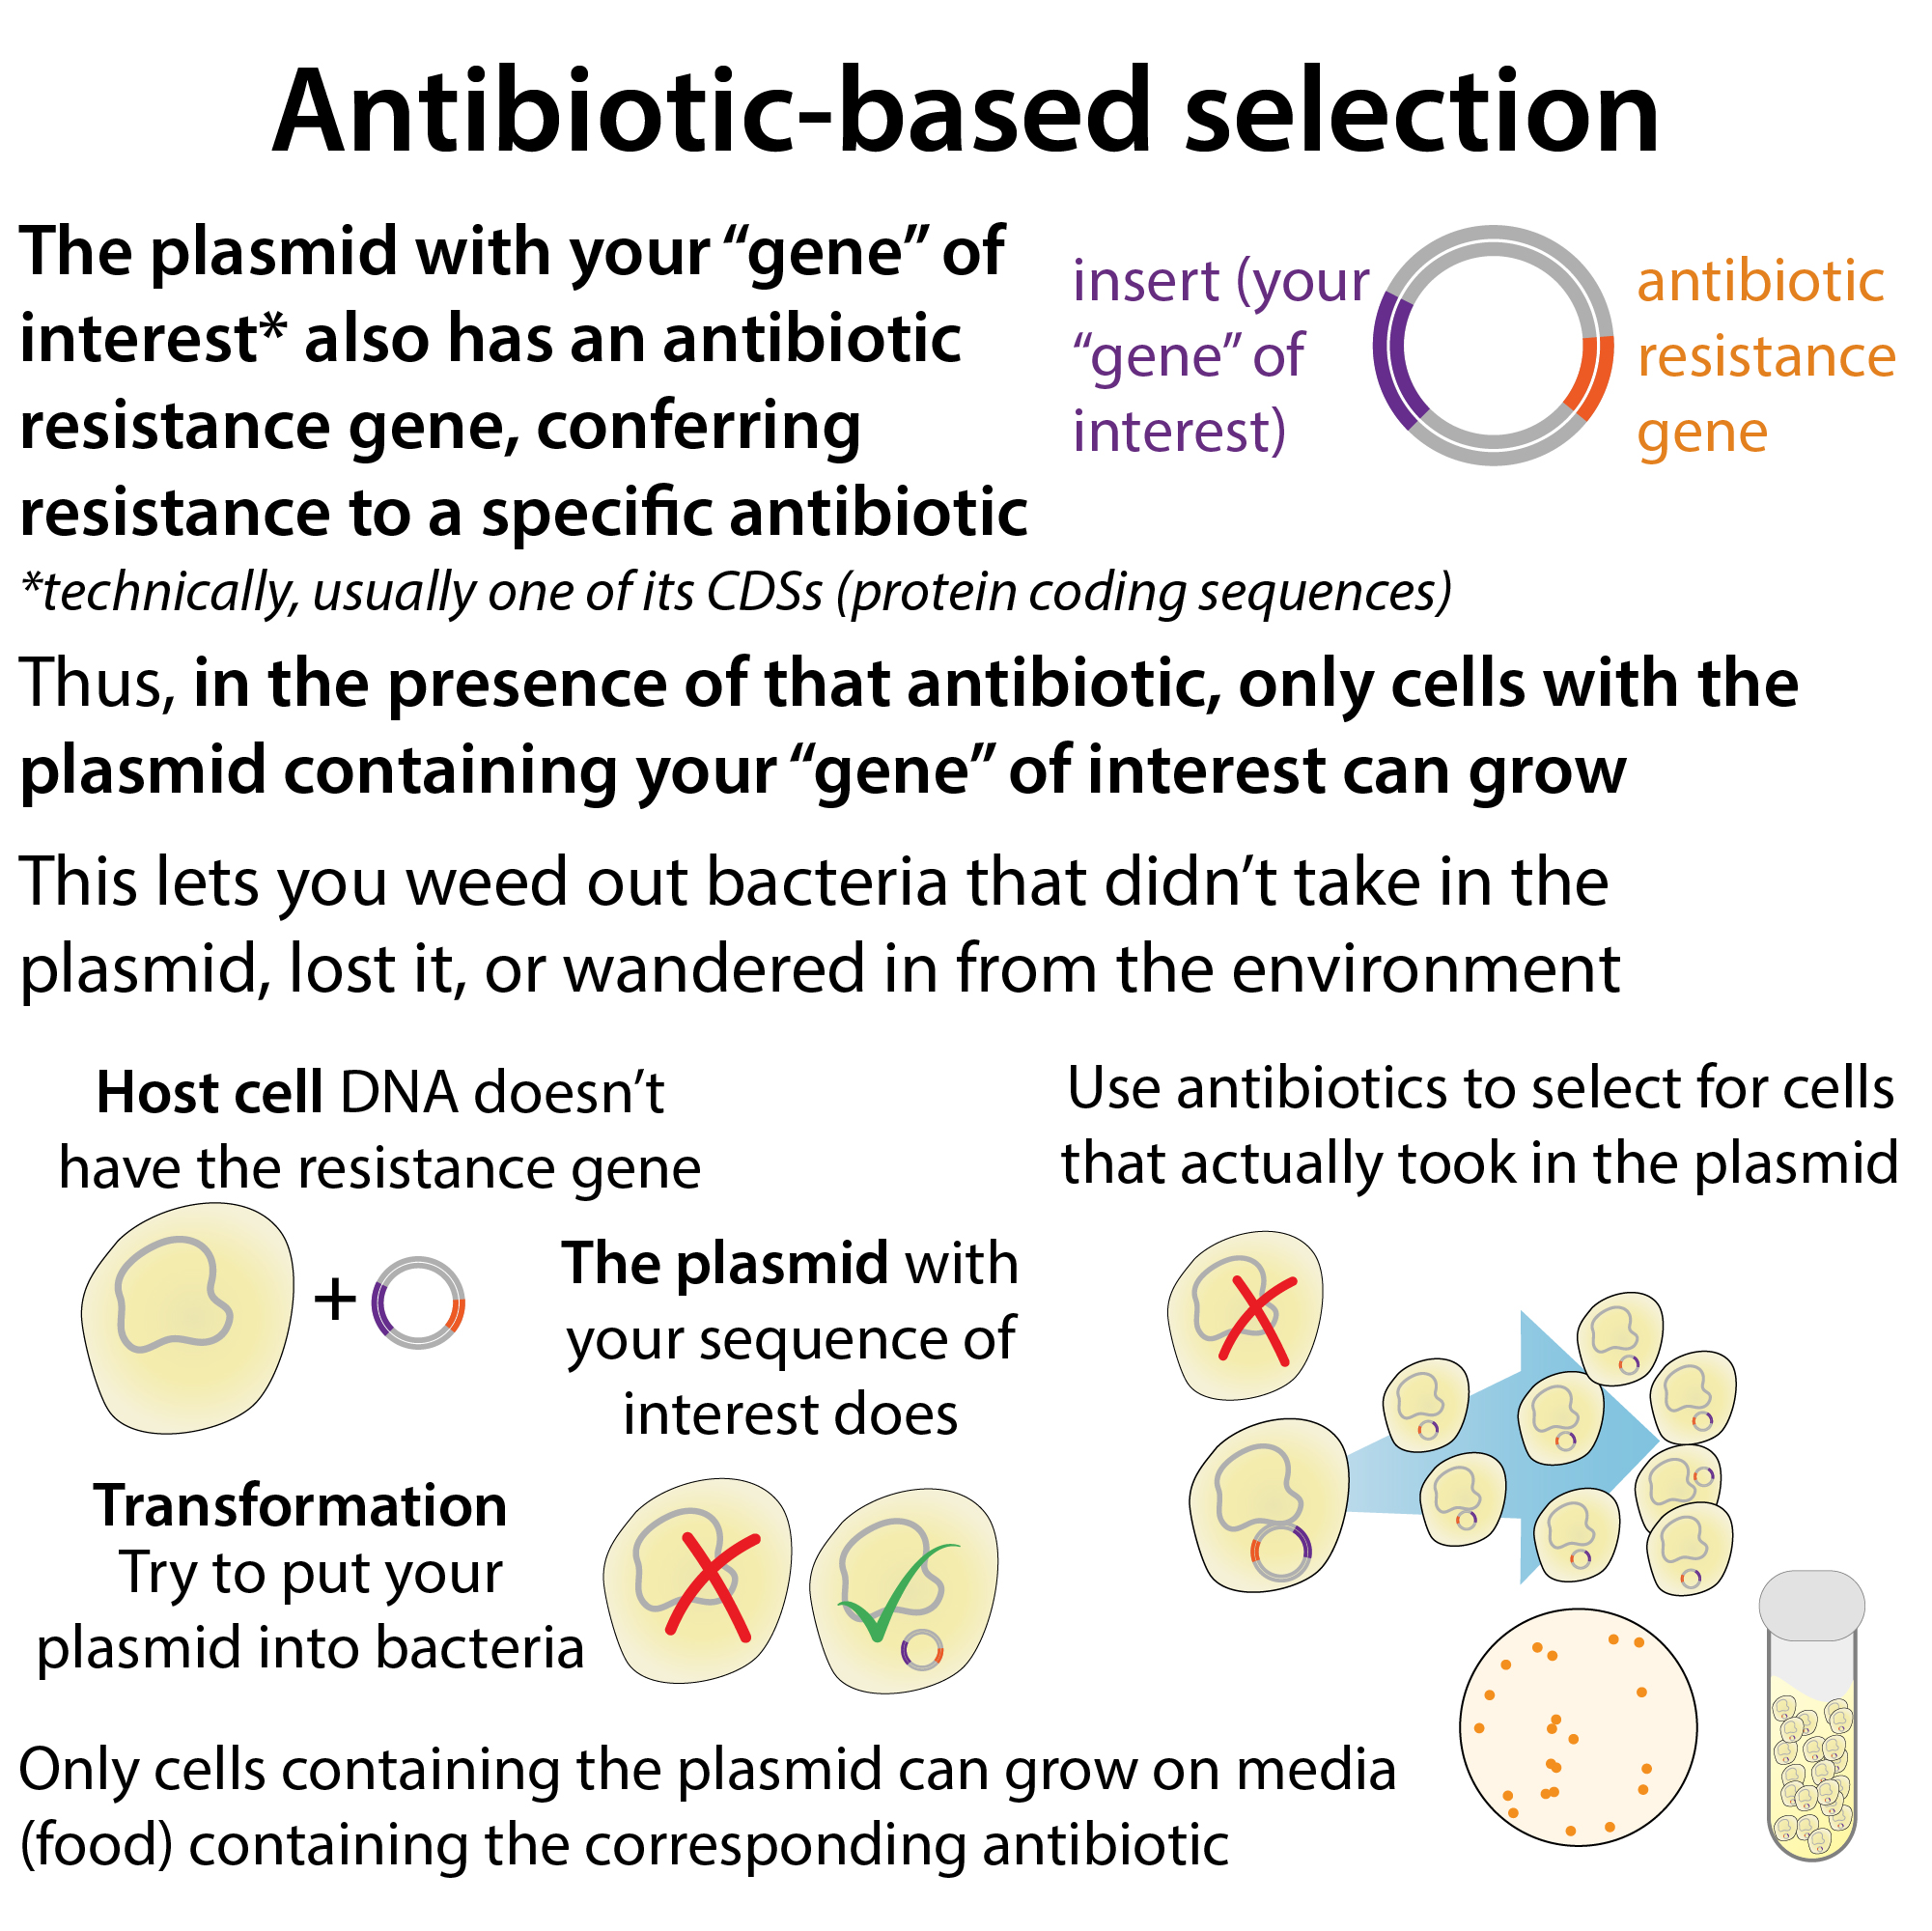
To ensure that only cells that took in the transfected information can grow, scientists often use antibiotic-based selection. In the most common implementation, they insert a specific antibiotic resistance gene (e.g. an anti-ampicillin or anti-kanamycin gene) alongside the gene of interest (e.g., on the same plasmid) and then grow the cells in the presence of the corresponding antibiotic. Only cells that have the antibiotic gene will survive, and cells will only have the antibiotic gene if they have the plasmid, which also contains the gene of interest.
Graphics
This is a placeholder tab content. It is important to have the necessary information in the block, but at this stage, it is just a placeholder to help you visualise how the content is displayed. Feel free to edit this with your actual content.


Checking that the cloning worked
Use of a selectable marker does not guarantee that the sequence you intended to put in the plasmid (the insert) is actually in the plasmid and that it’s typo-free!!!!! It only confirms that the plasmid is there. To ensure the desired sequence is there, you have a few options to see if it’s probably there, but to see if it is typo-free, you’ll need to purify it and send it for sequencing.
- To see if an insert is there:
- Colony PCR: run PCR with informative primers (e.g., ones that will only give you a product if the desired insert is present) directly on the colony, without purifying out the genomic DNA, then run agarose gel electrophoresis* to view the products. Saves you time and is good for screening to see which colonies are worth then purifying the plasmids out of and sequencing.
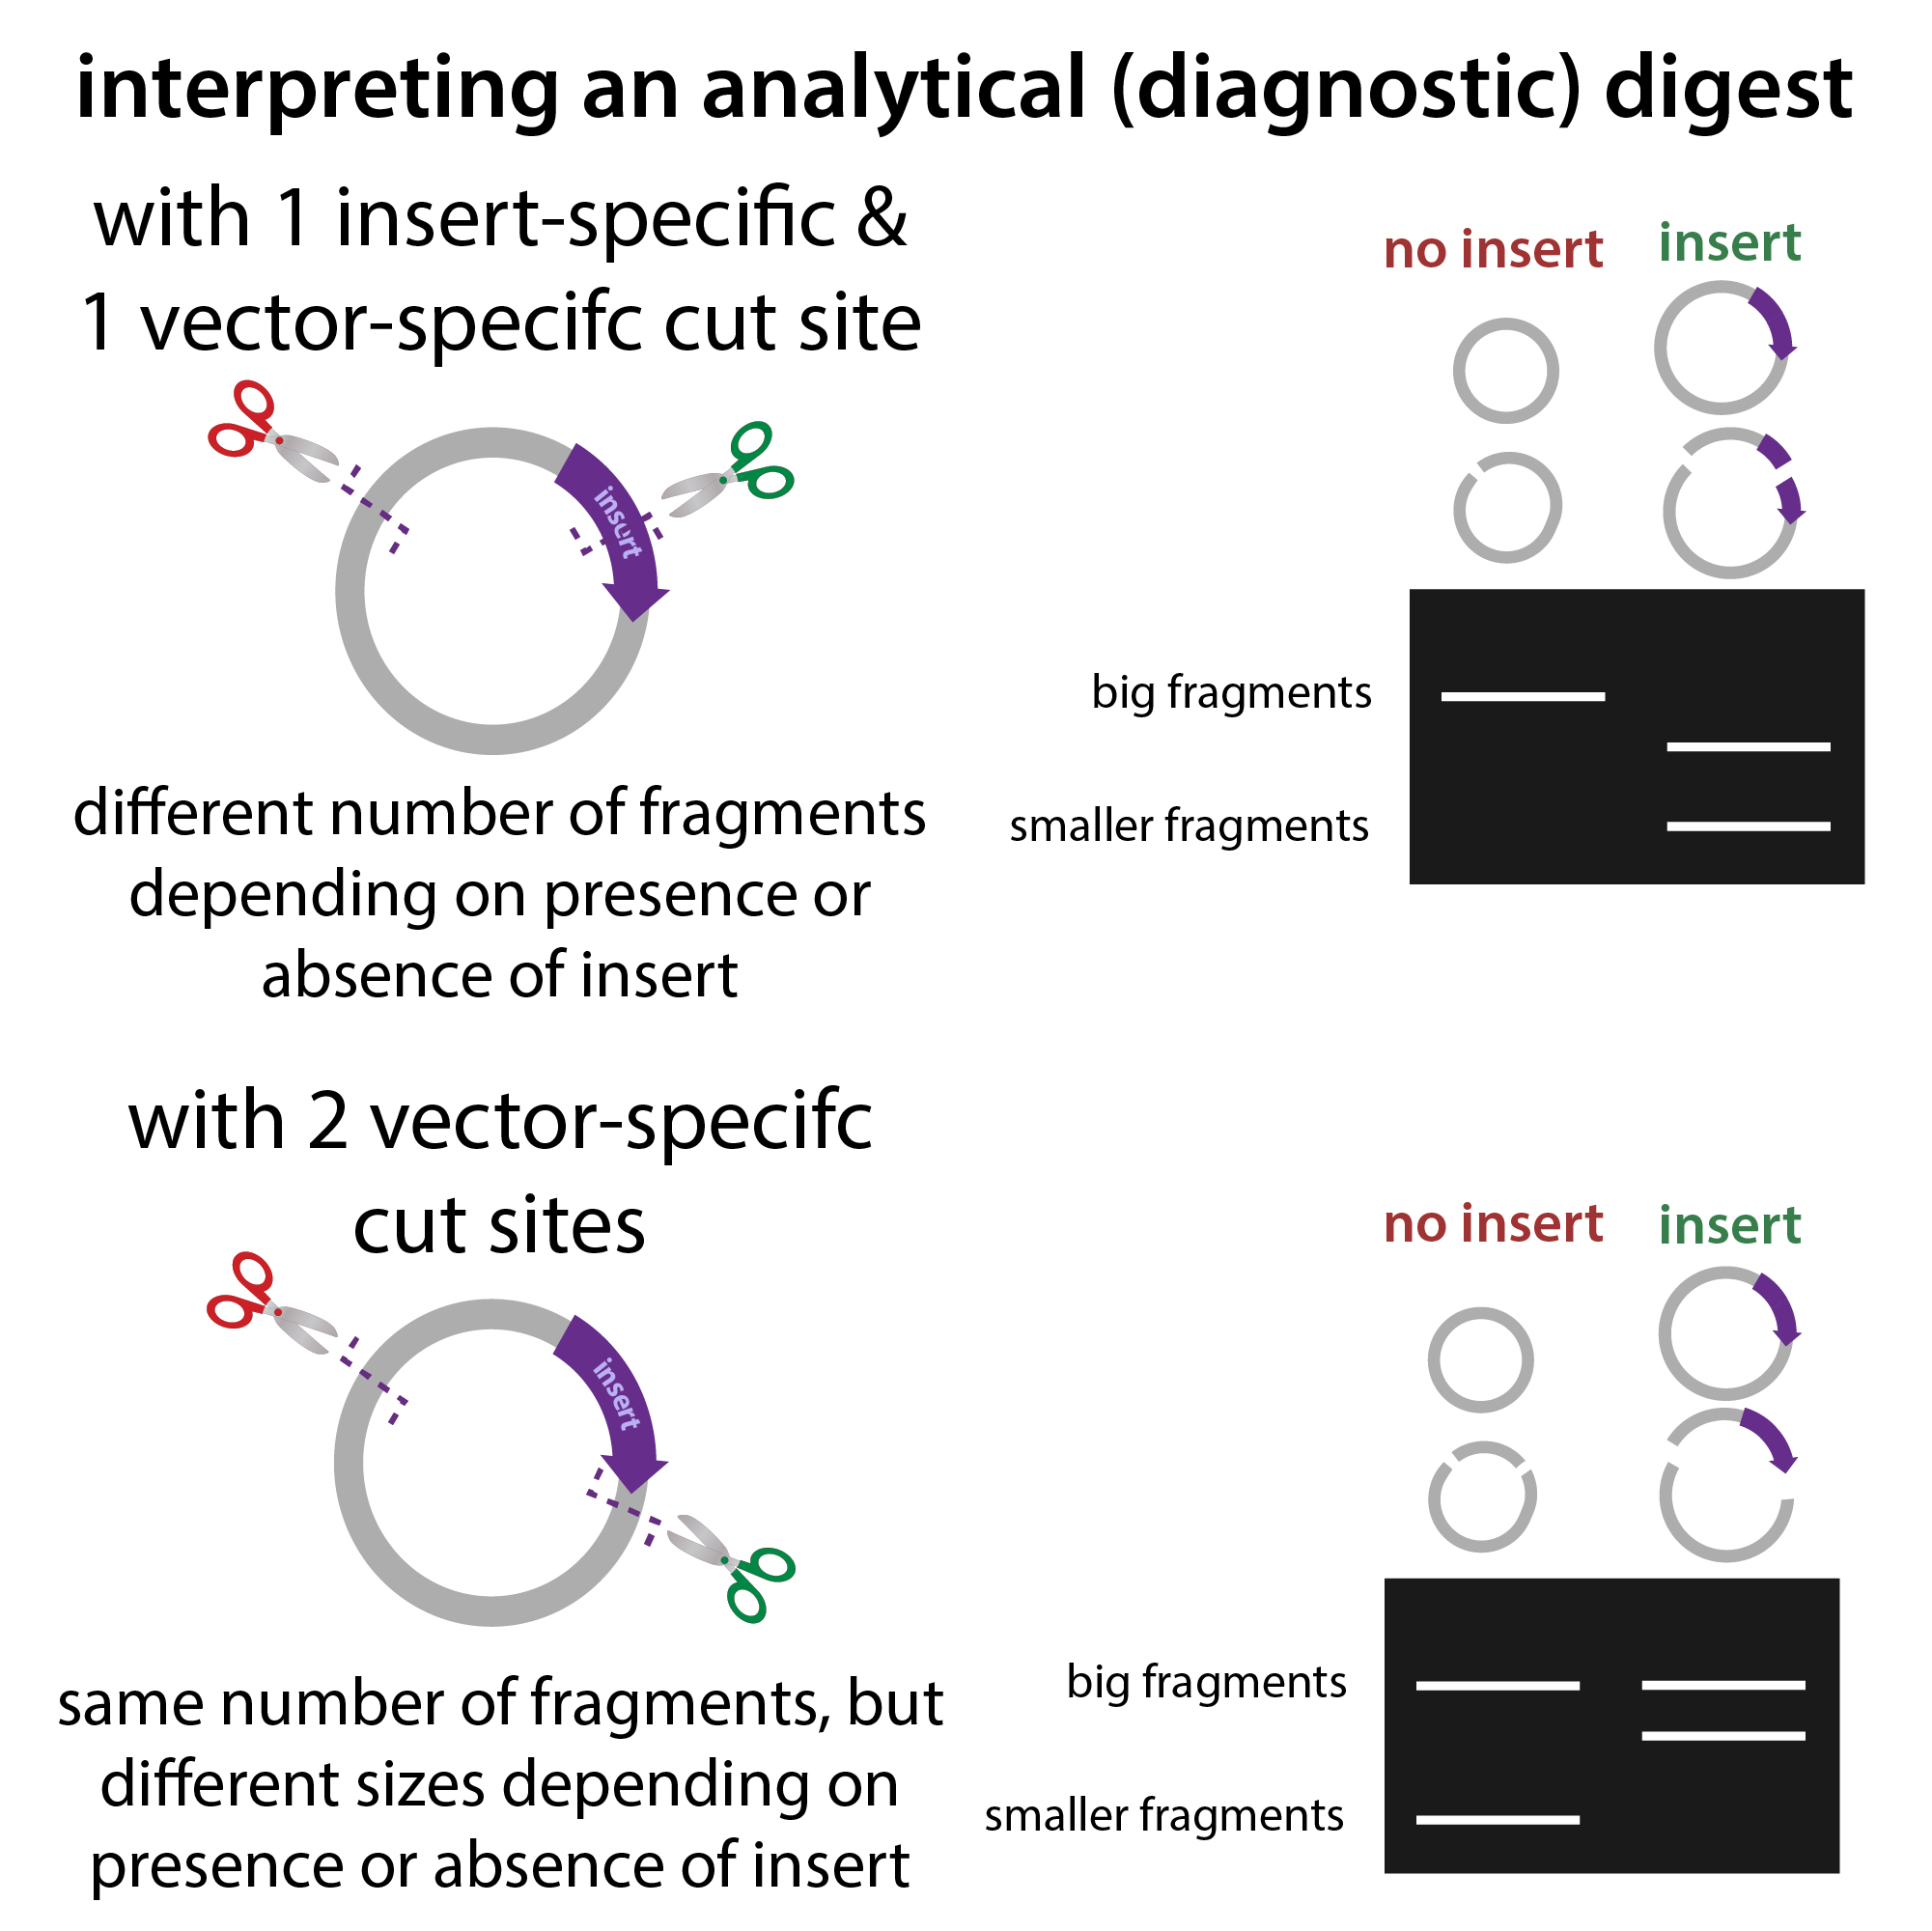
- Analytical restriction enzyme digest: purify out the plasmid and add restriction enzymes that cut or not cut the plasmid depending on whether the insert is present – this will give you different size DNA pieces depending on whether the insert is present, which you can visualize through agarose gel electrophoresis. Compared to colony PCR, this has the downside that you have to purify the plasmid first and it can require using a lot of your purified DNA. But at least you don’t need to order primers!
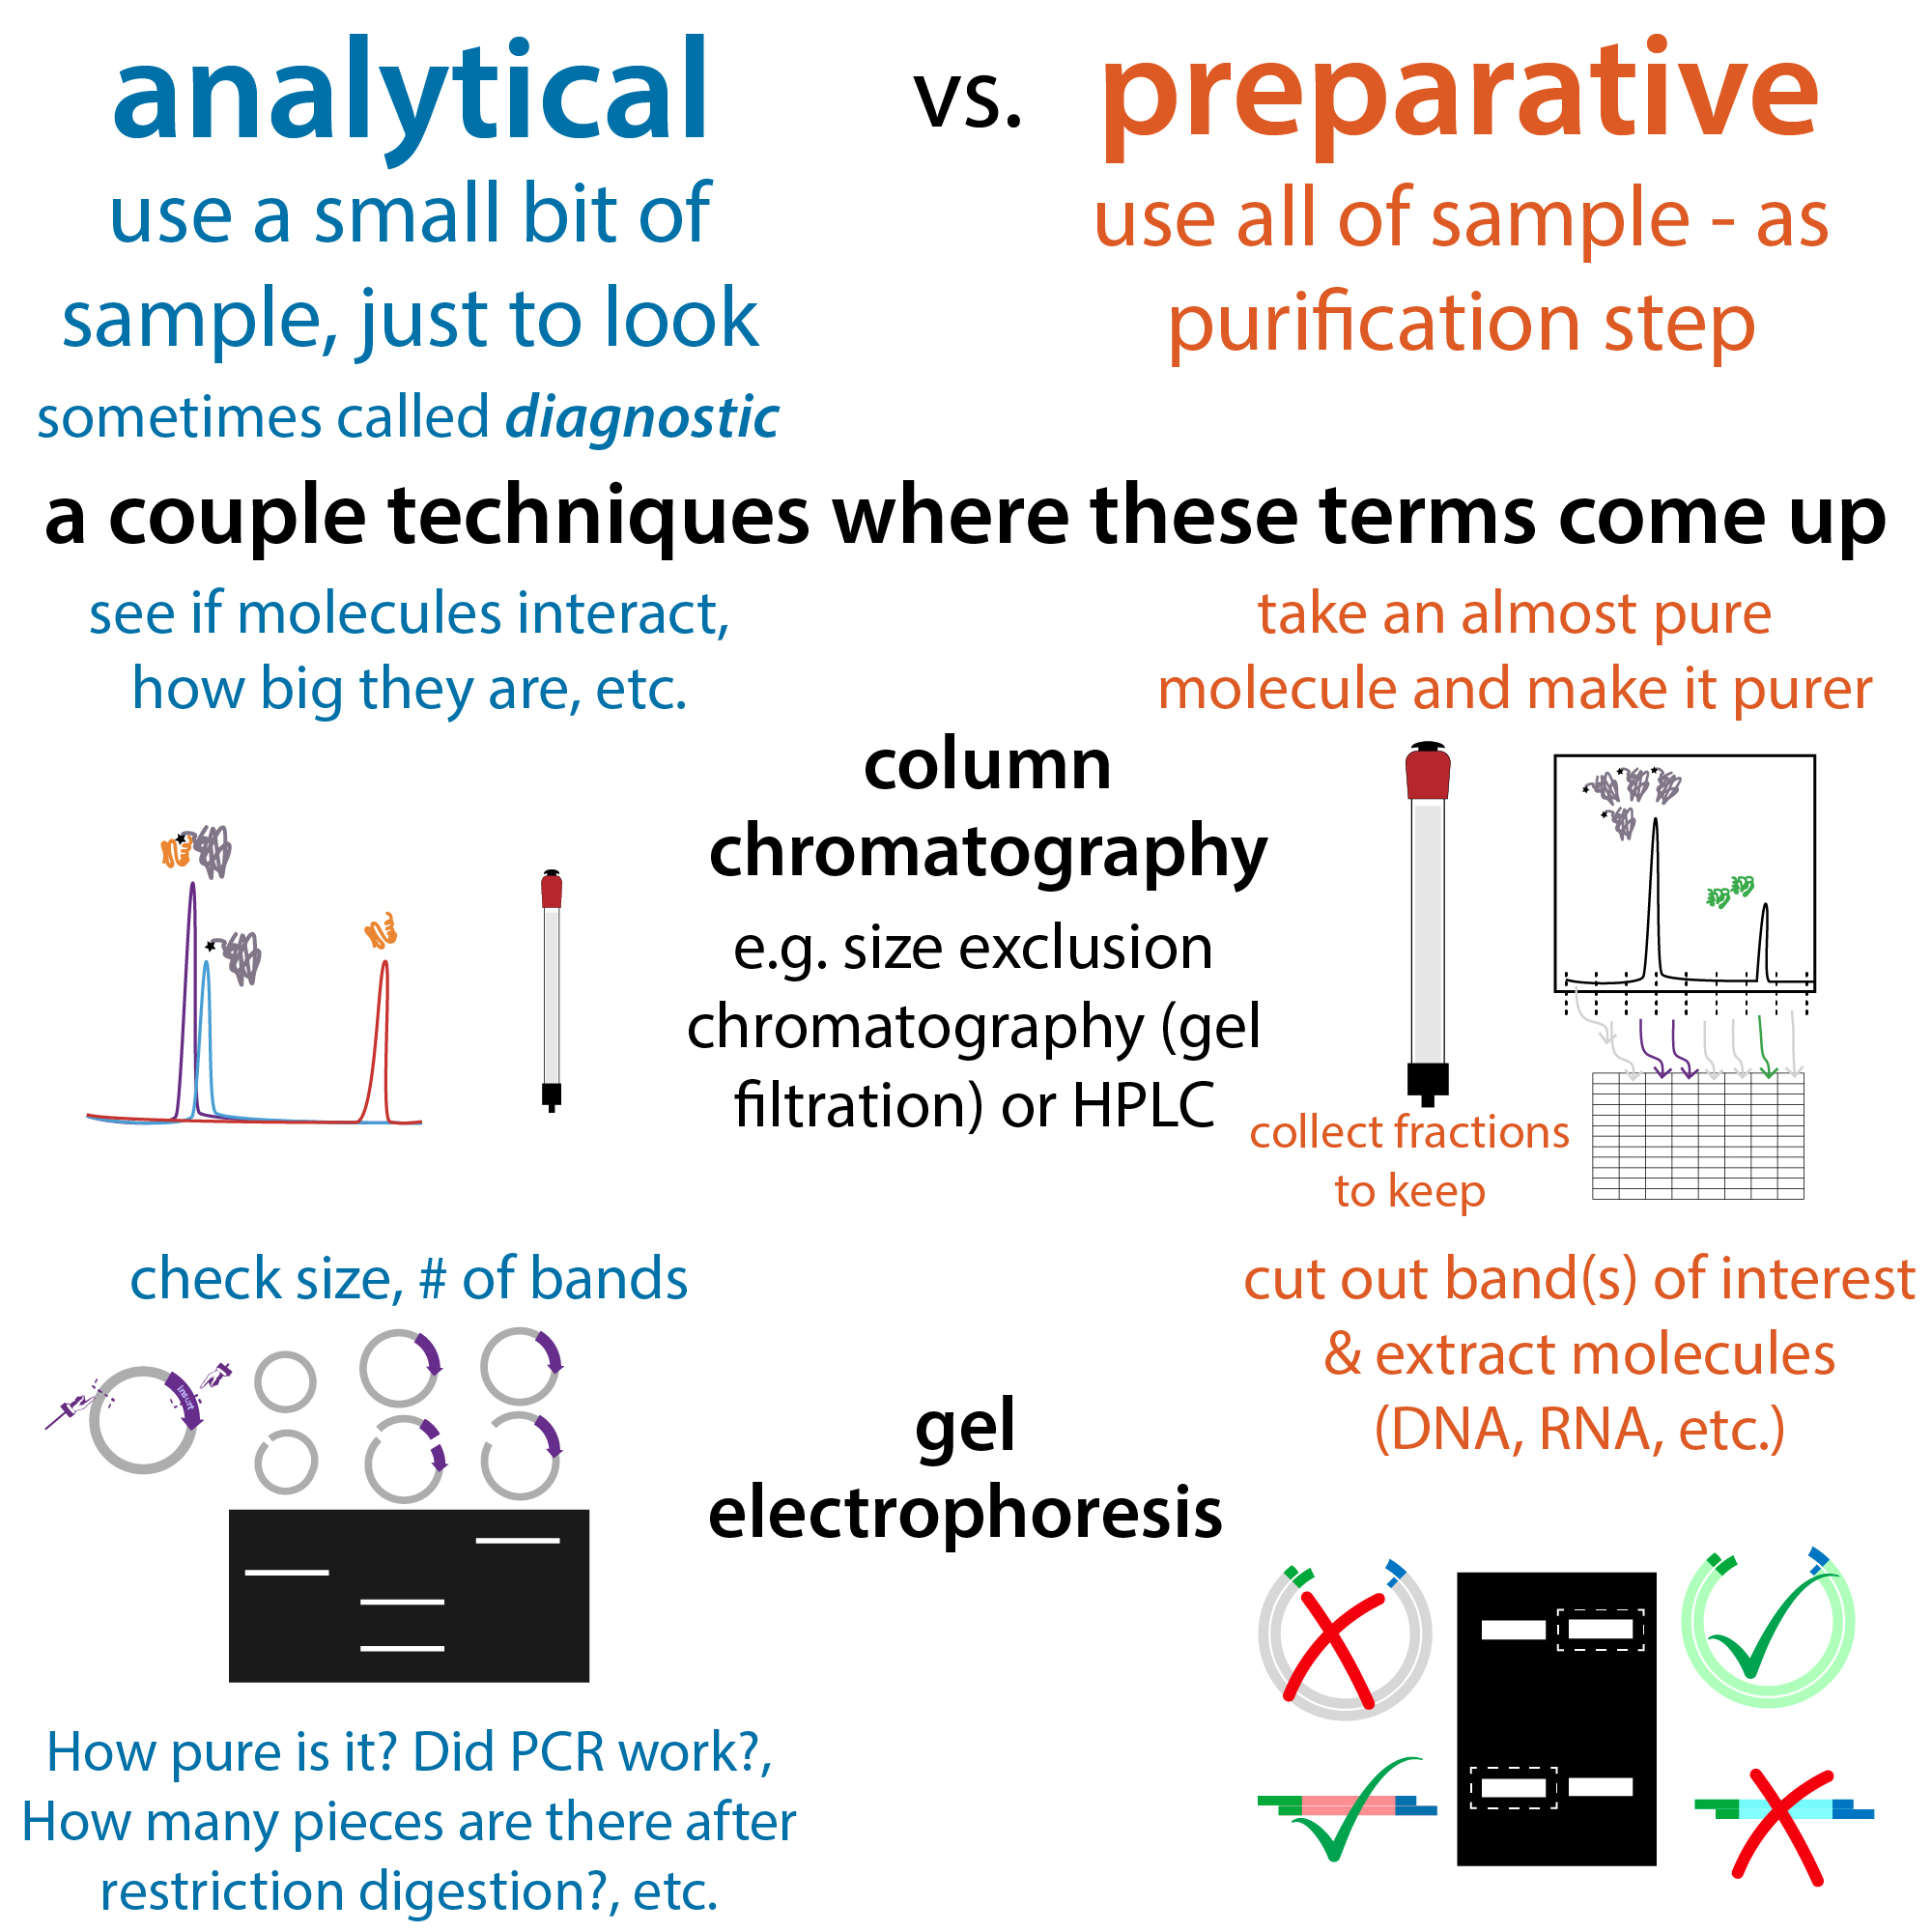
- * Agarose gel electrophoresis is a method to separate DNA fragments based on their length by using electricity to send them traveling through a horizontal slab of gel. The gel’s mesh slows down DNA fragments, with the larger fragments moving slowest. When you turn off the electricity and visualize the fragments (typically with a fluorescent DNA-binding dye) you’ll see bands in the gel indicating the presence of DNA, with the bands corresponding to bigger DNA fragments nearer the top of the gel and the smaller fragments lower down. You can compare the bands from experimental samples to bands of a molecular weight ladder (sample containing DNA fragments of known sizes) to estimate DNA fragment size and see if a band in your sample matches the size you’d expect. You can also assess how pure your sample is based on the number of bands (each of which, remember represents at least one specific DNA fragment – I say at least because it could be multiple of similar size).
Graphics


- To see if the insert is typo-free:
- DNA sequencing is the only way, but you can do it a couple ways.
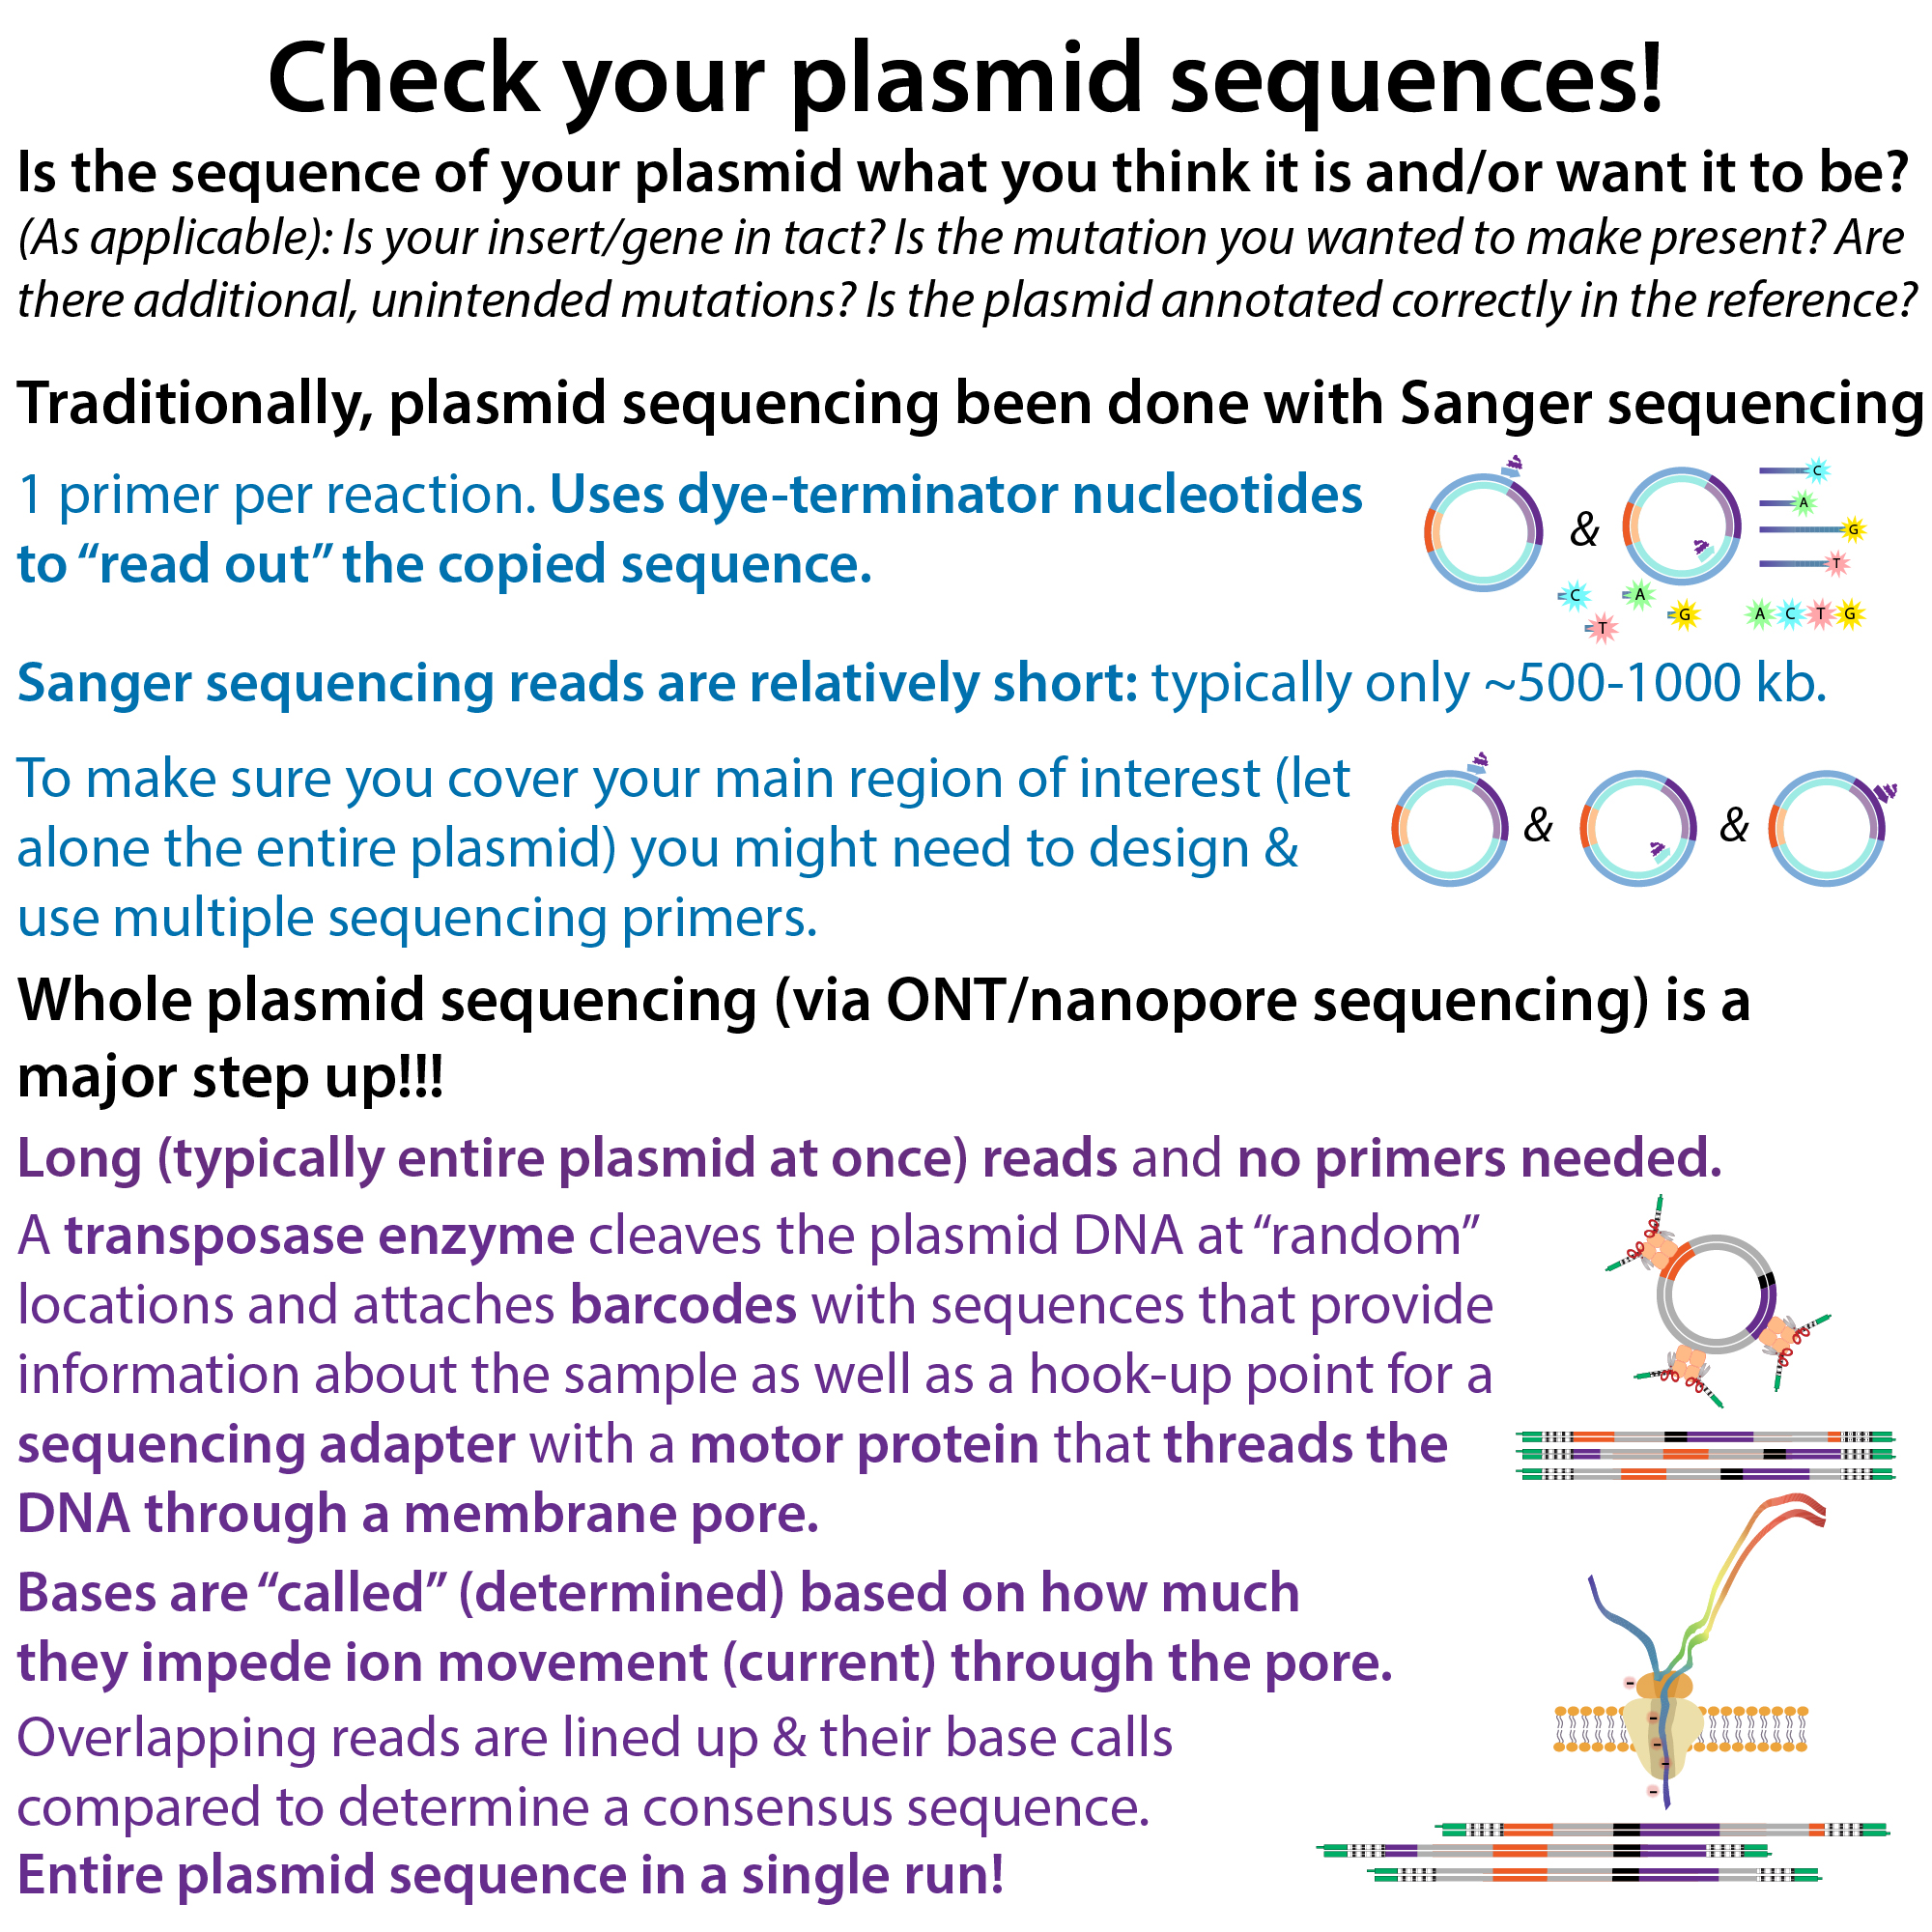
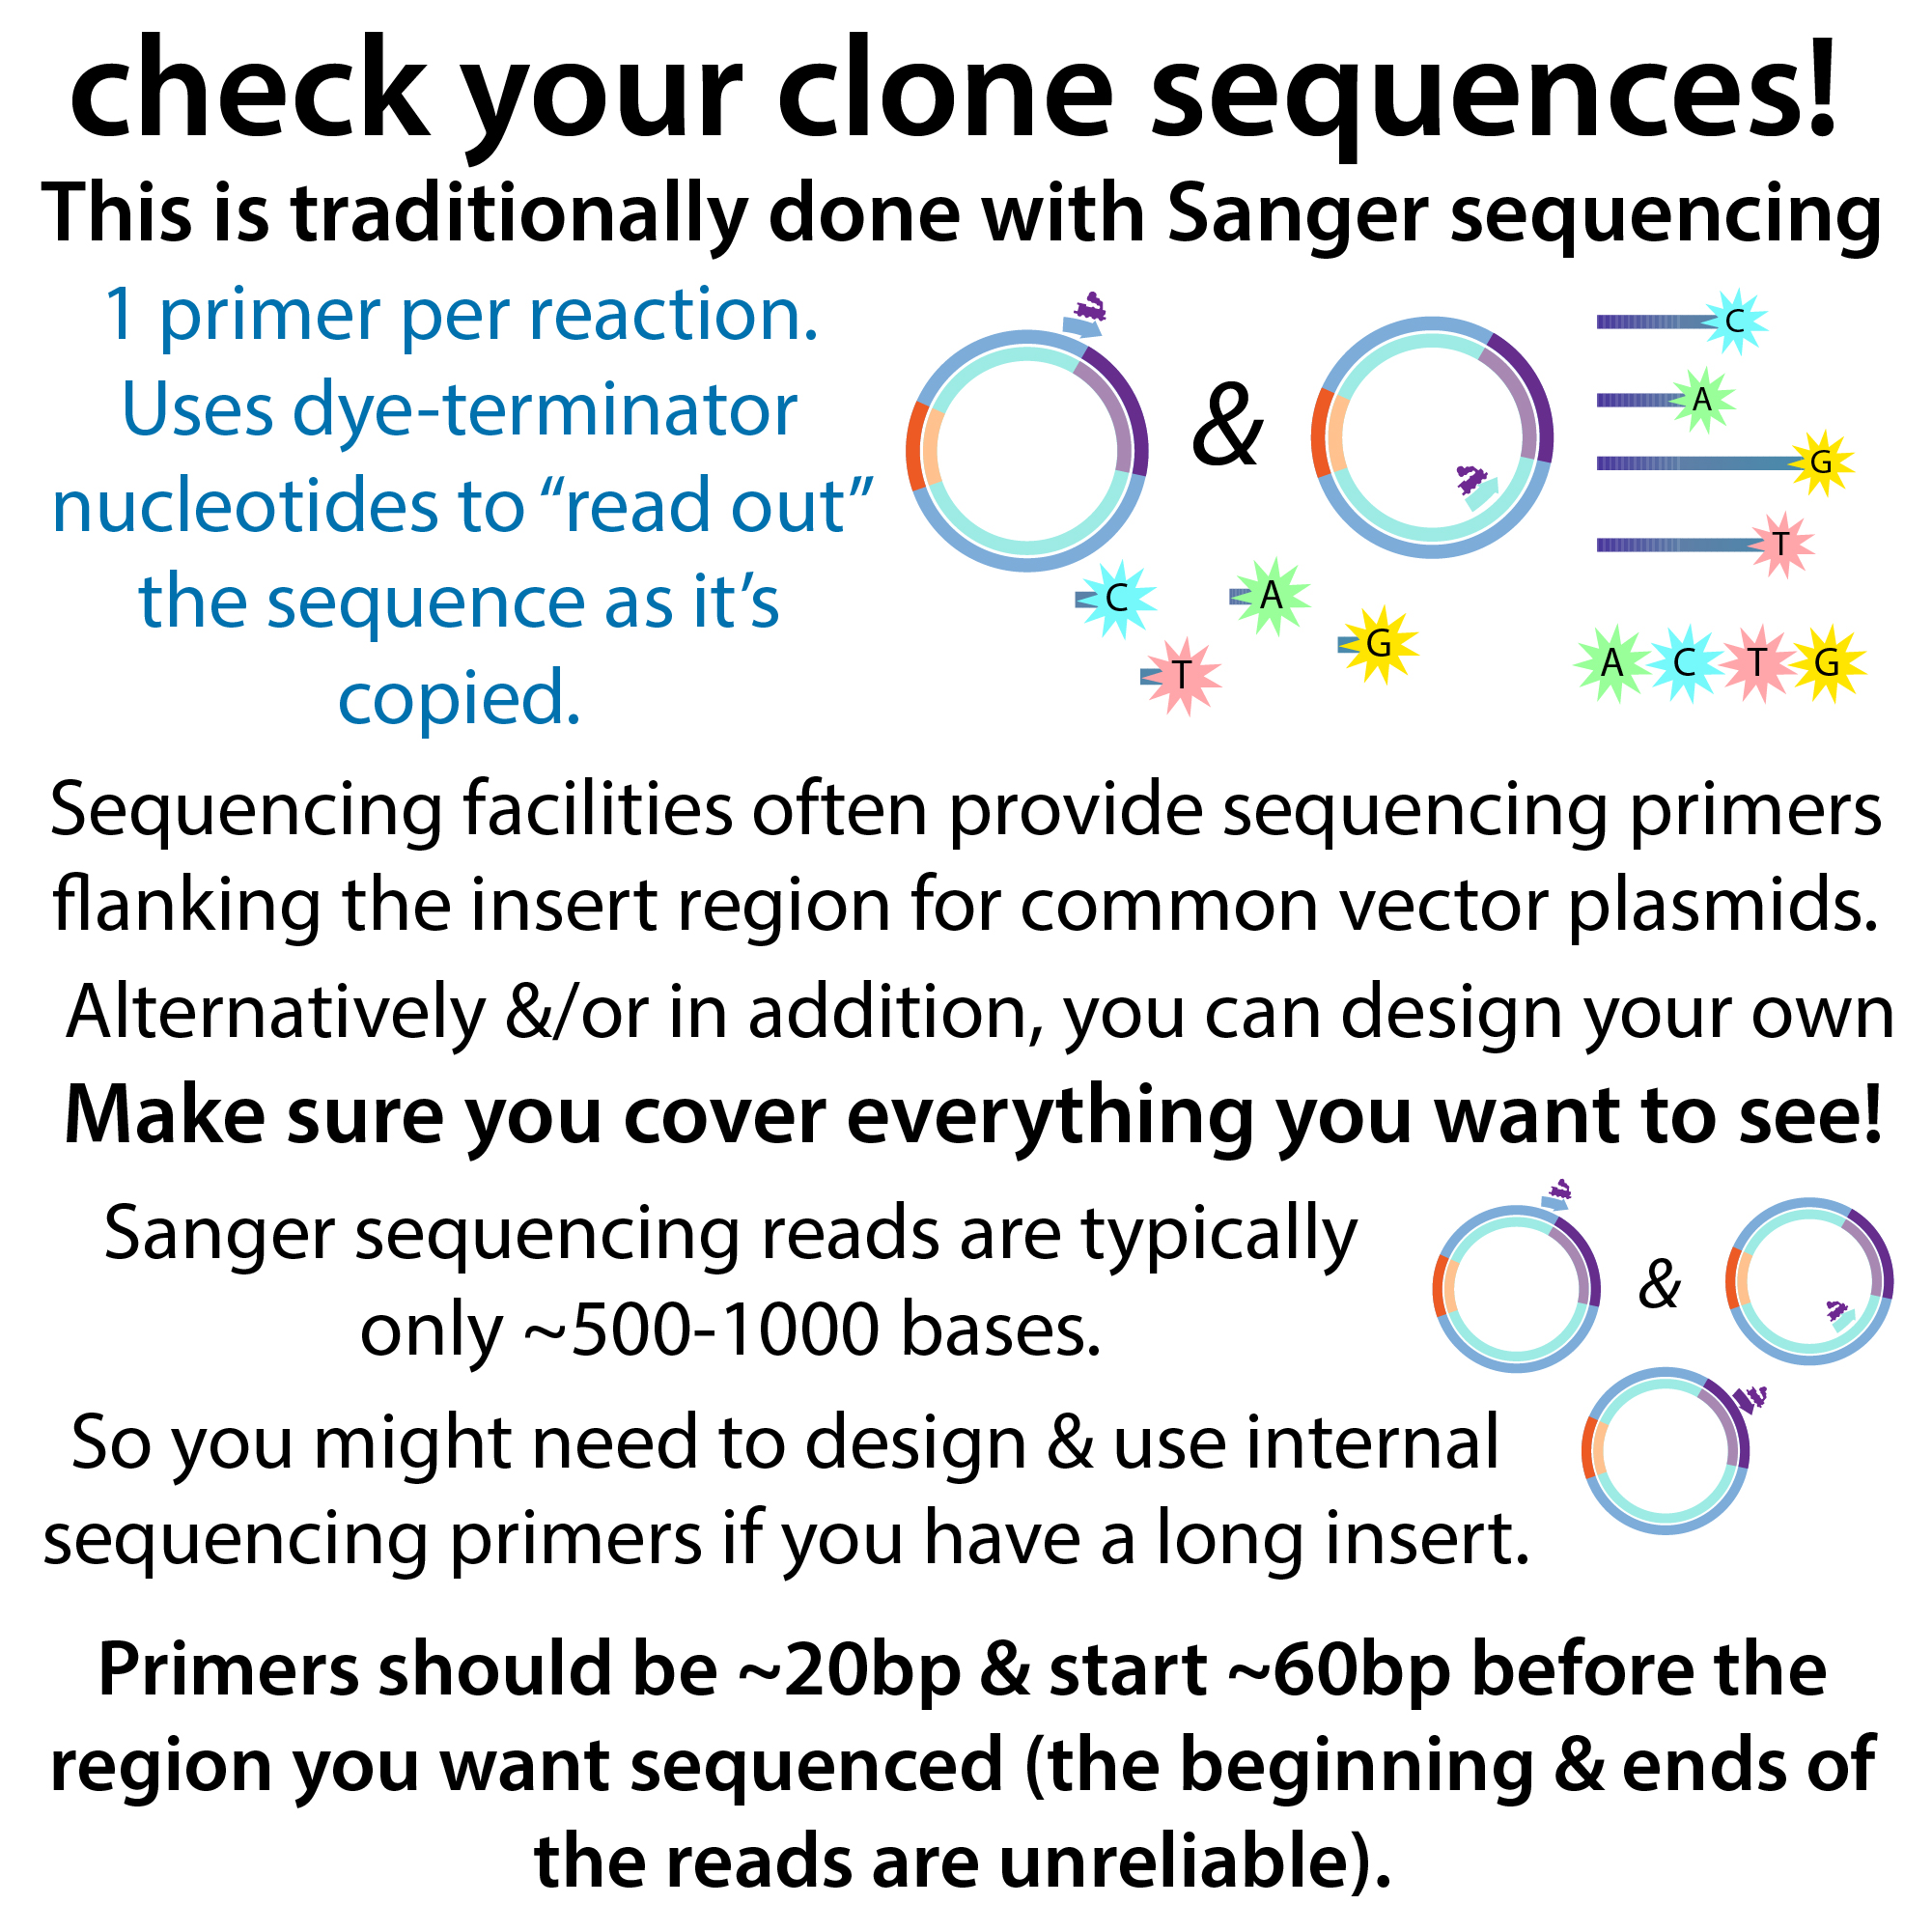
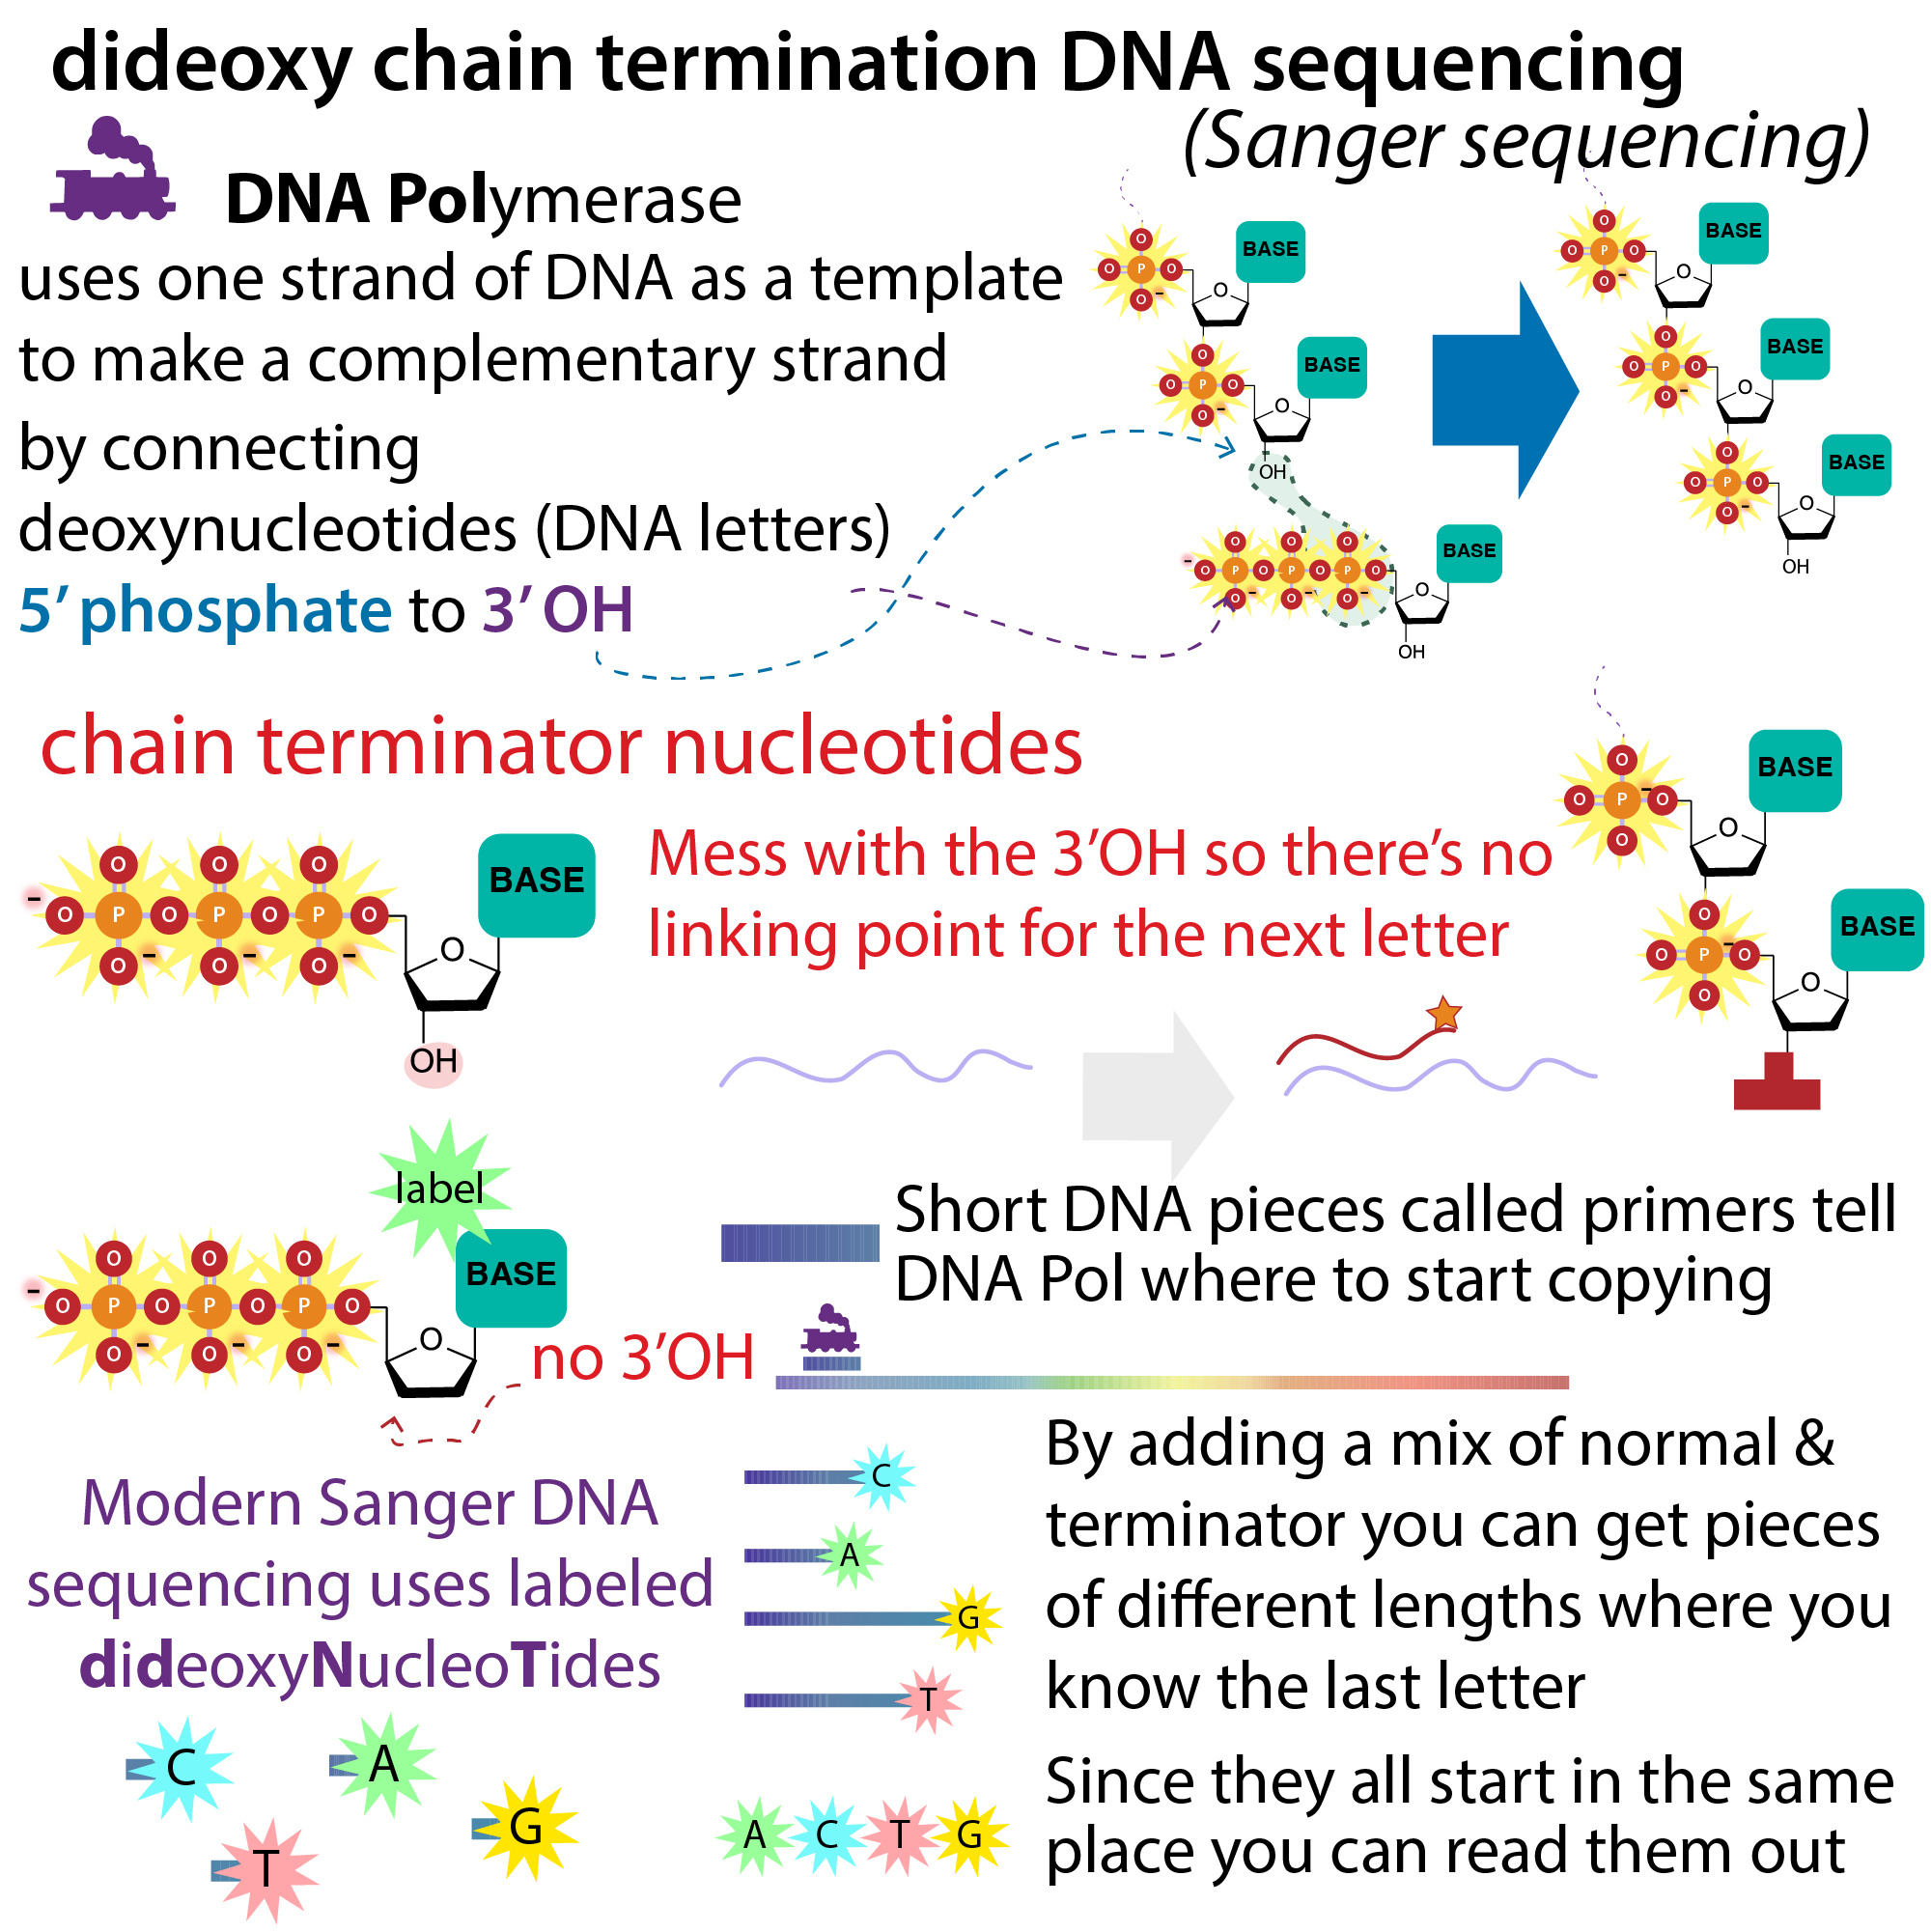
- Traditional dideoxynucleotide “Sanger” sequencing: This requires the use of primers to amplify the insert and read out the sequence as copies are made. You can use (or have the company use) custom primers and/or ones that recognize fairly generic regions of common plasmids and thus are compatible with that plasmid regardless of the insert. You usually then send some of the plasmid for sequencing with primers you provide or request the company use particular ones they keep in stock. A downside is that you typically only sequence the insert this way (and might need to do a couple of different primer sets in order to cover the whole thing). As a result, mutations in the backbone part of the plasmid (the non-insert part) might go unnoticed.
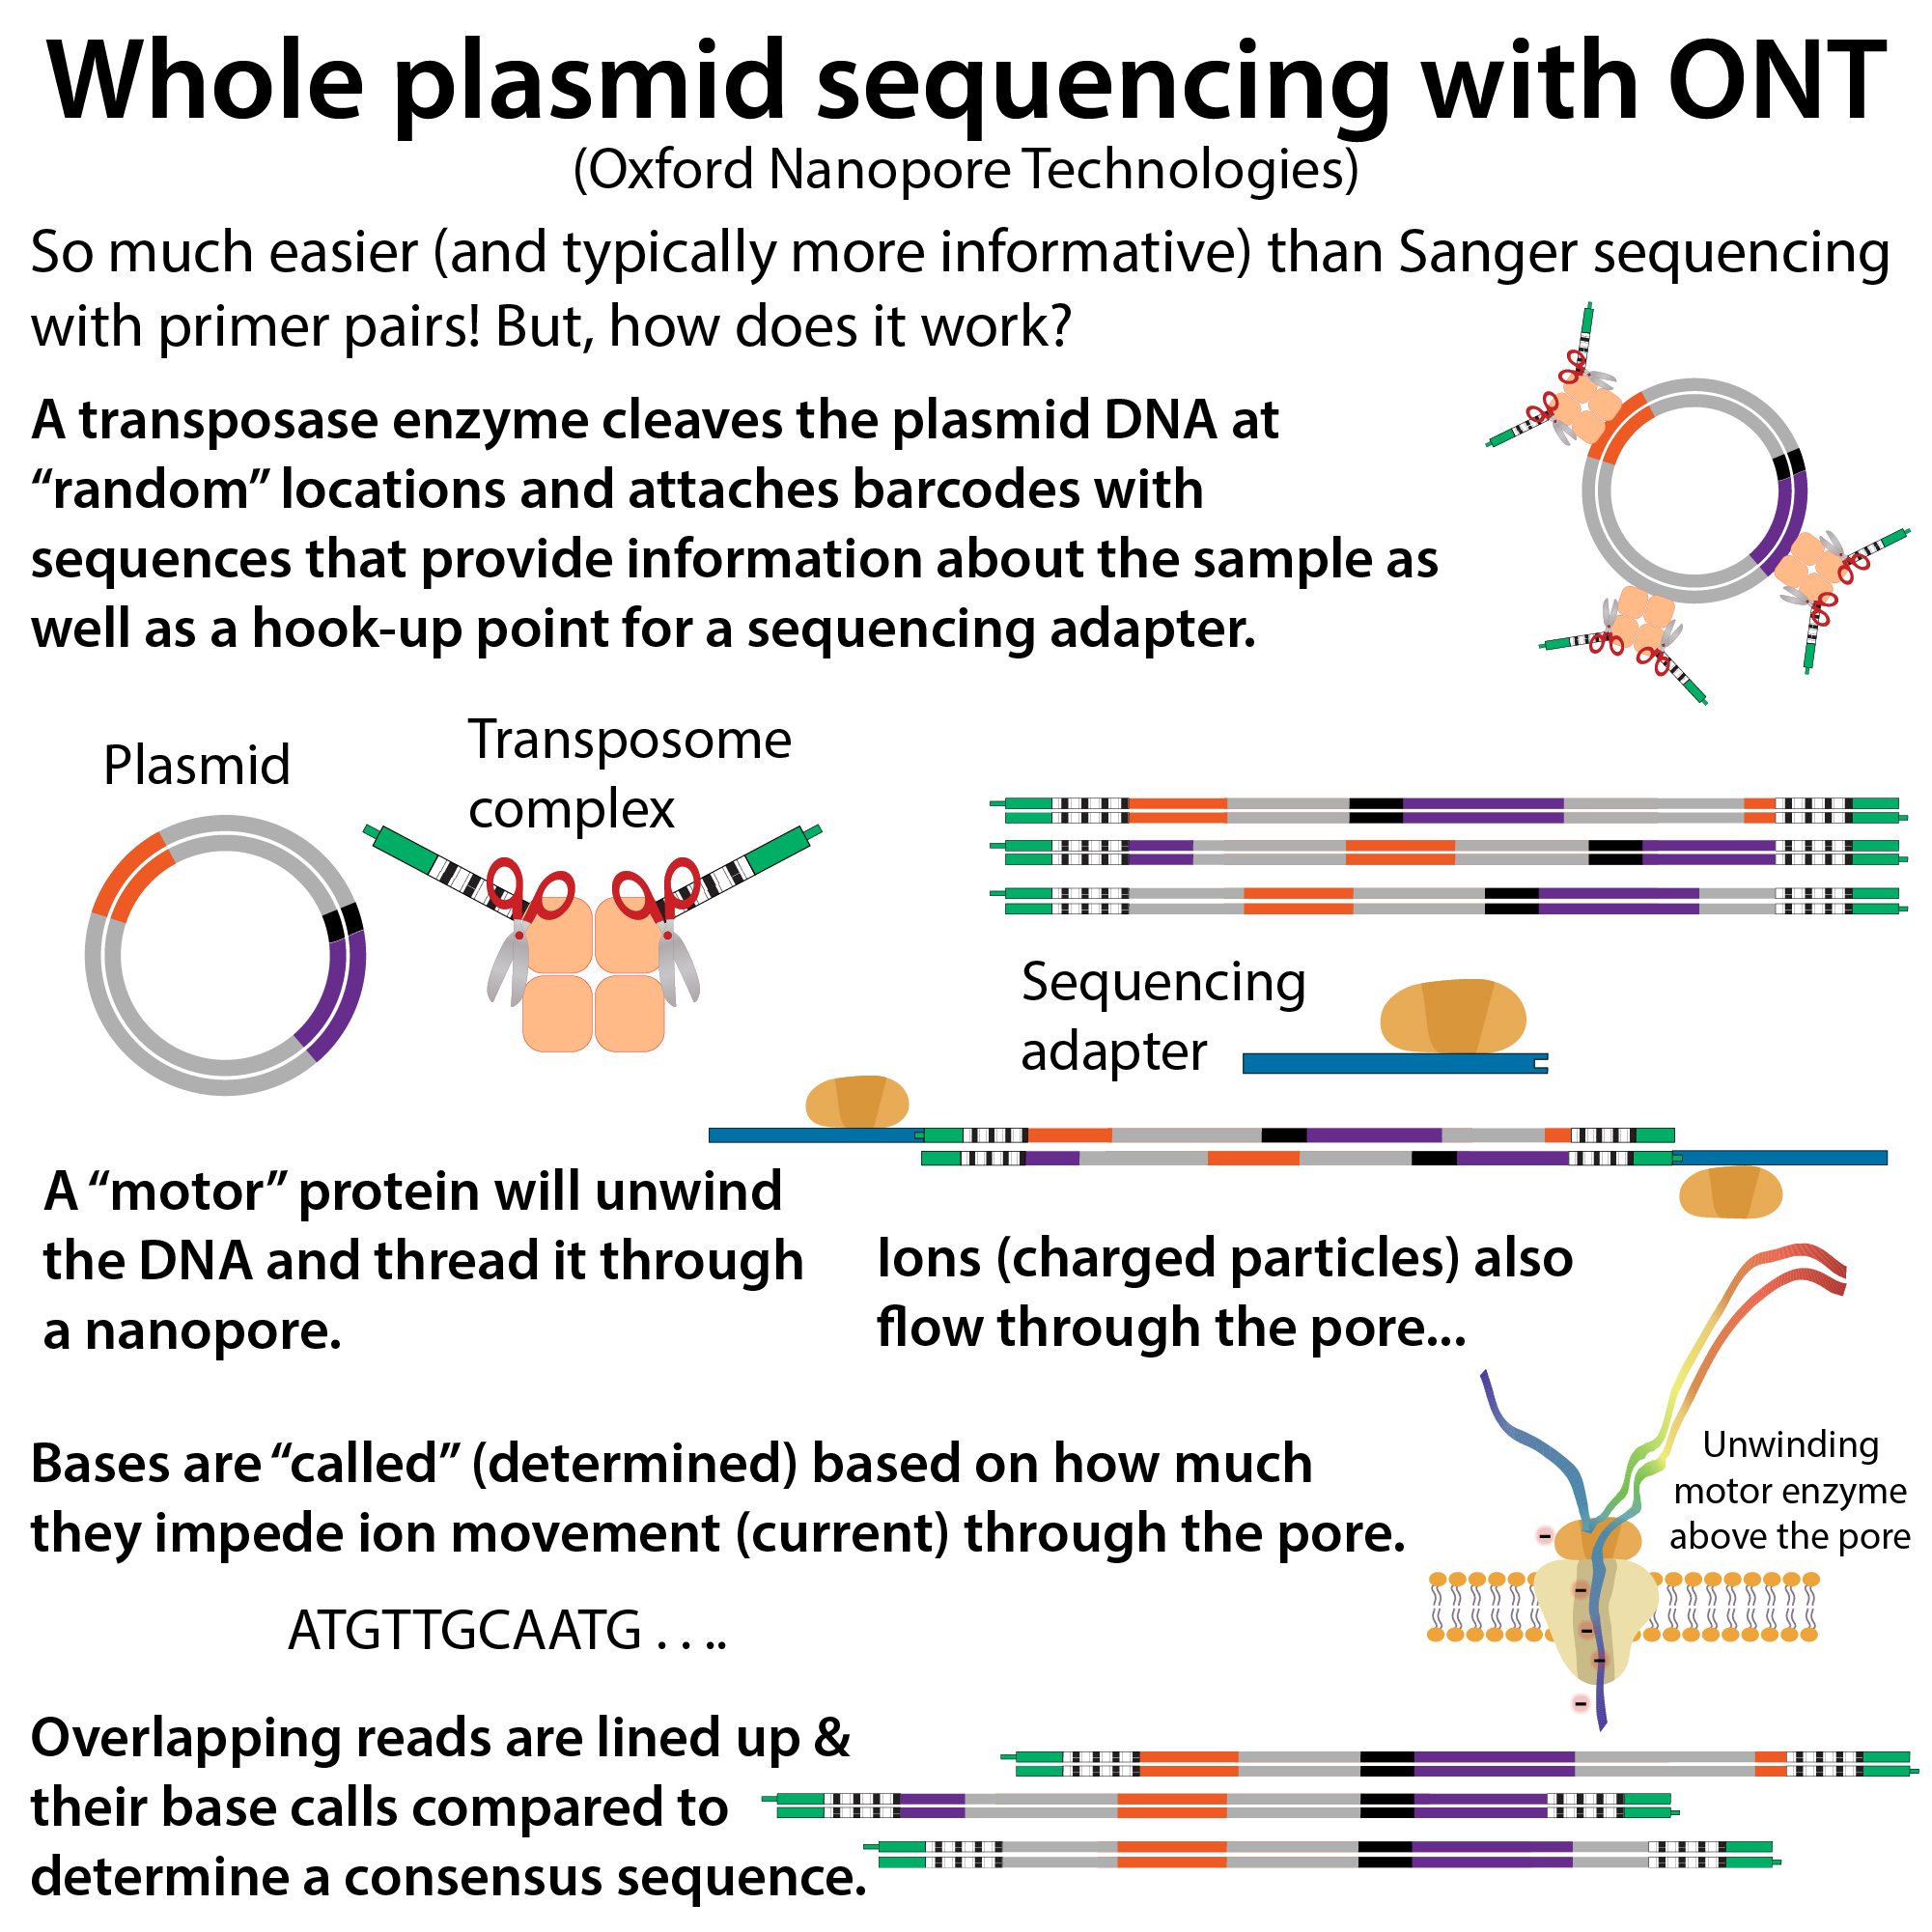
- Whole plasmid sequencing: This is the way I’ve turned to using exclusively. No primers required and it’ll sequence the entire plasmid.
- DNA sequencing is the only way, but you can do it a couple ways.
Graphics
Purifying the plasmid
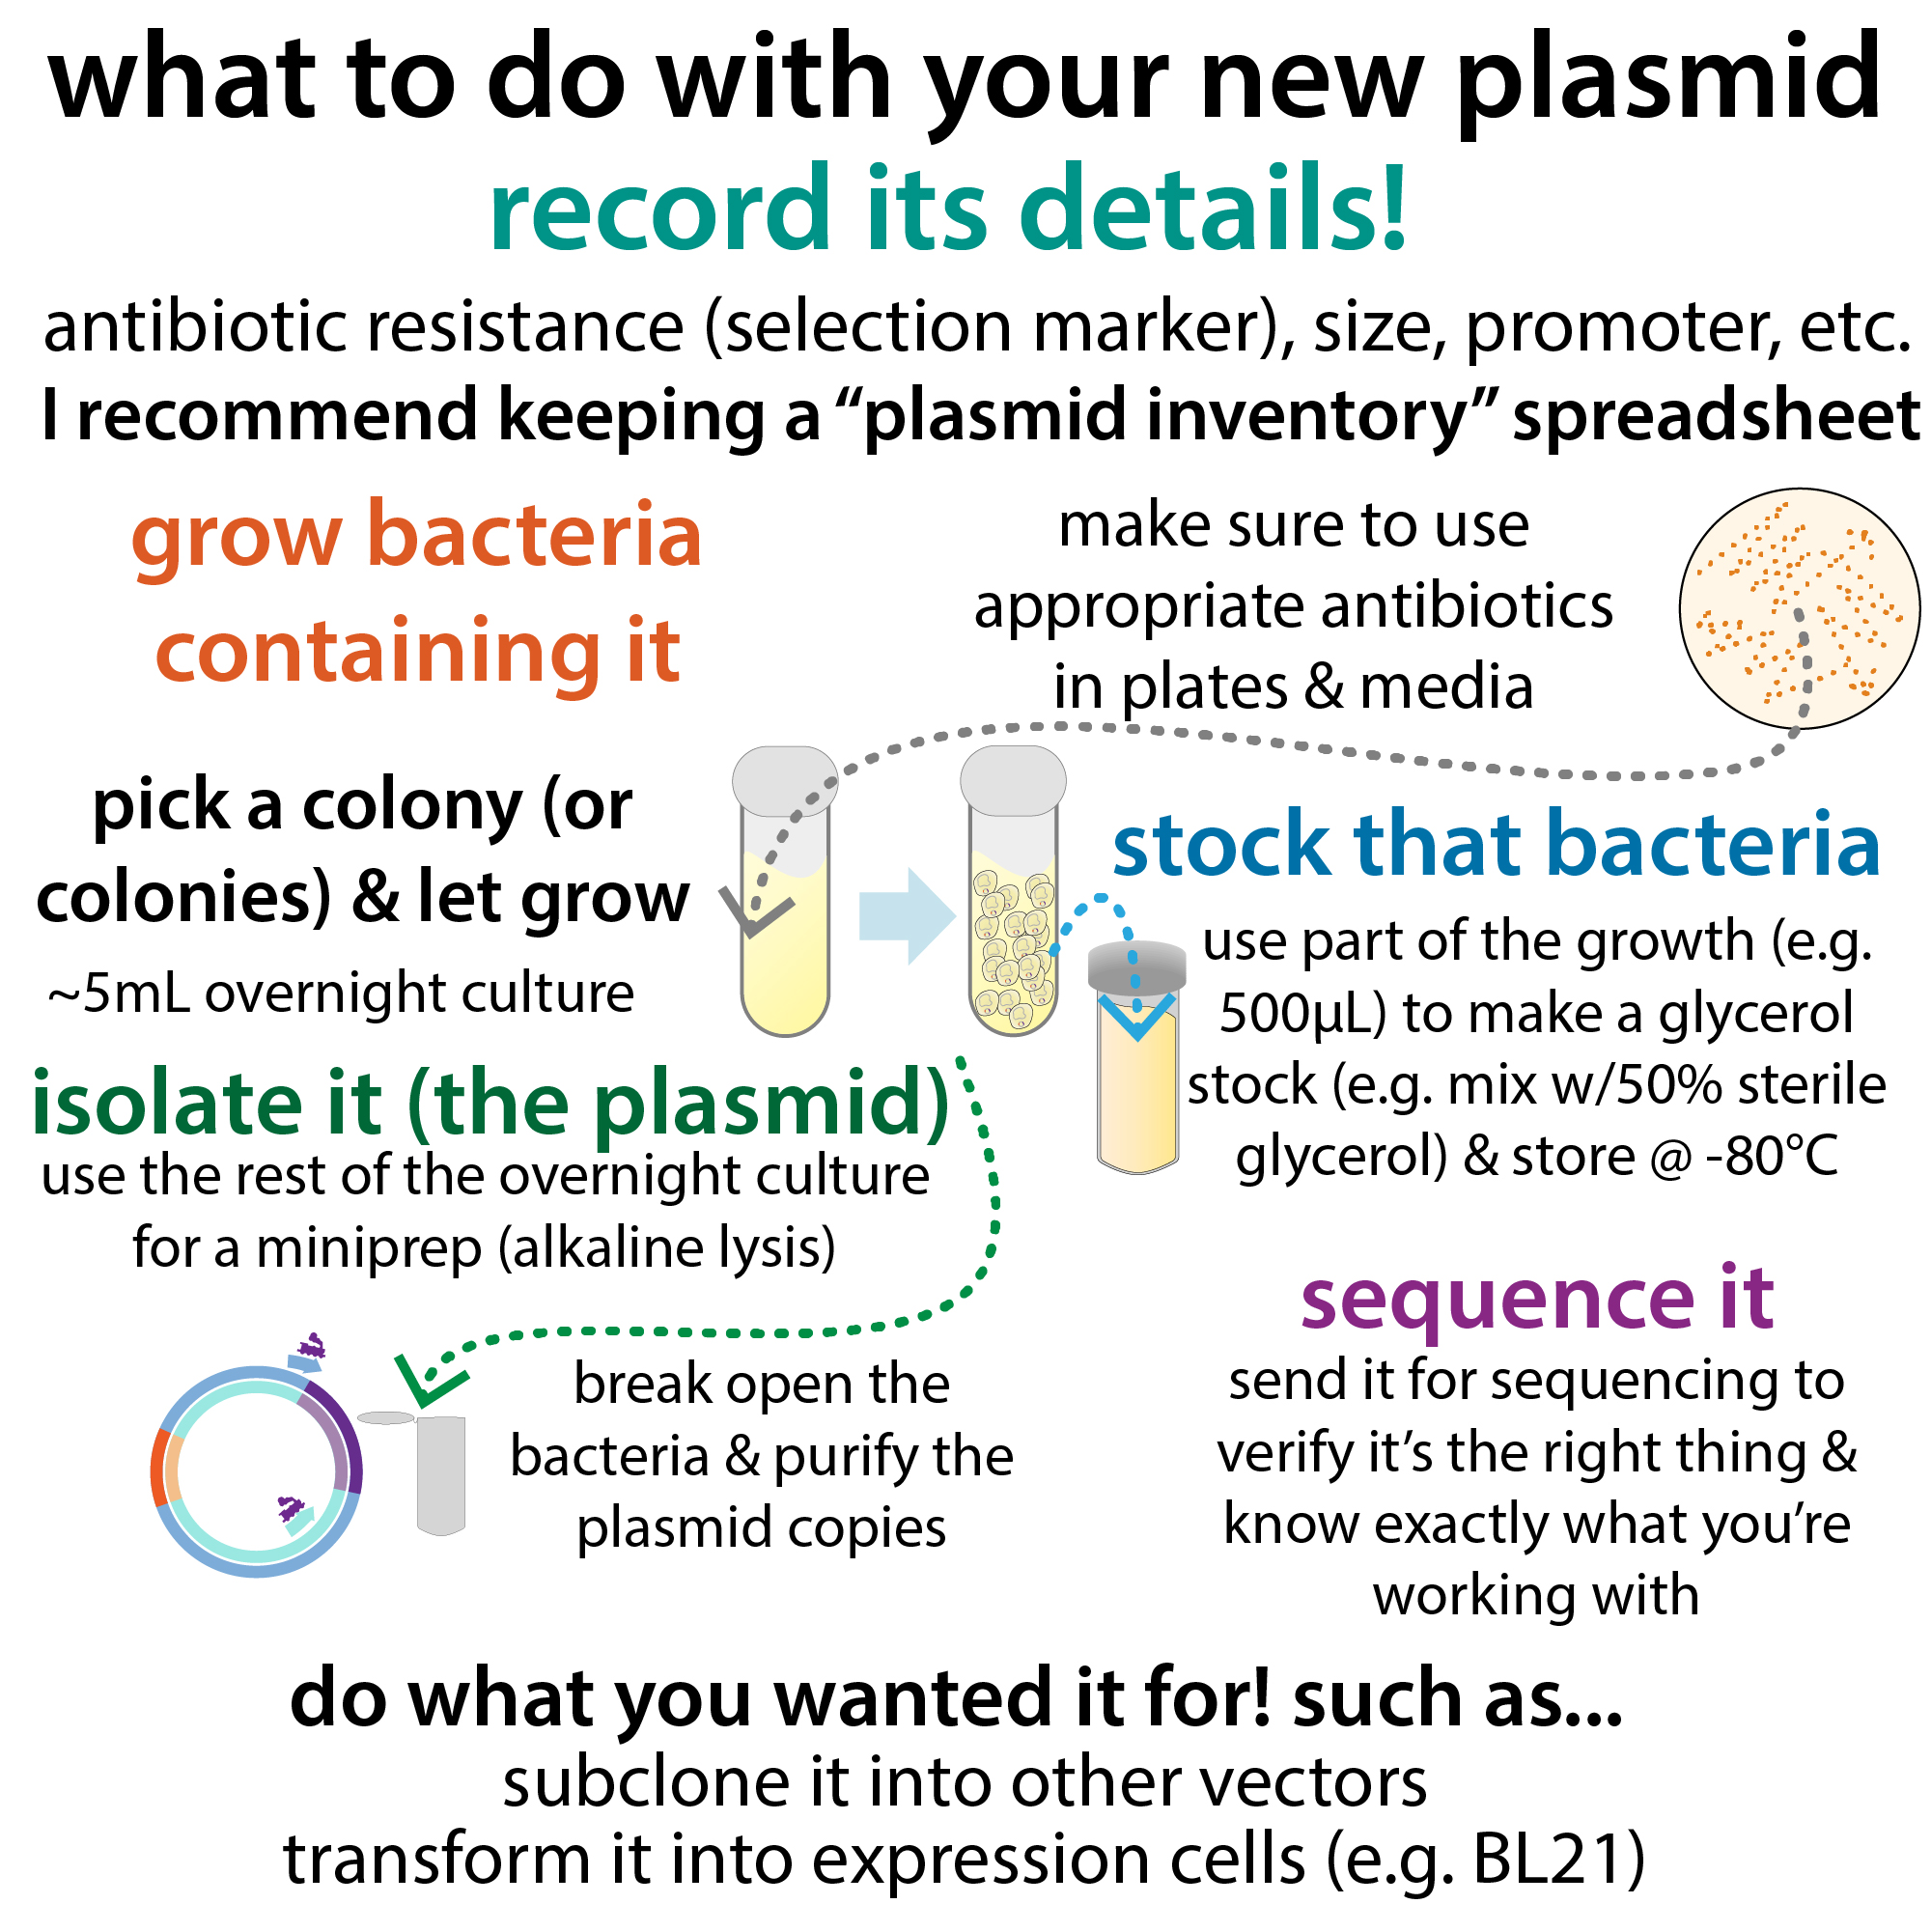
Plasmids can be purified using a form of alkaline lysis, typically in a spin/vacuum column format. Often, these are referred to as “Minipreps,” “Midipreps,” “Maxipreps” etc. depending on the scale of purification (with Minipreps being the most common). Cells are broken open and reagents added to get the proteins and membranes to precipitate out. The precipitated gunk is then pelleted out via centrifugation and the soluble stuff (supernatant) is transferred to a column with a nucleic acid-binding membrane. Centrifugation or vacuum suction is then used to pull the fluid through the column. The plasmid sticks but everything else flows through and then you wash the membrane with some wash buffers, then add water or an elution buffer to get the plasmid to unstick and come off, now free from all that other stuff.
Note: similar spin columns are used to purify other kinds of nucleic acids, such as PCR products. Such kits are available for DNA and protein and are sometimes referred to as “clean-up” kits.
Graphics


Glycerol stocks
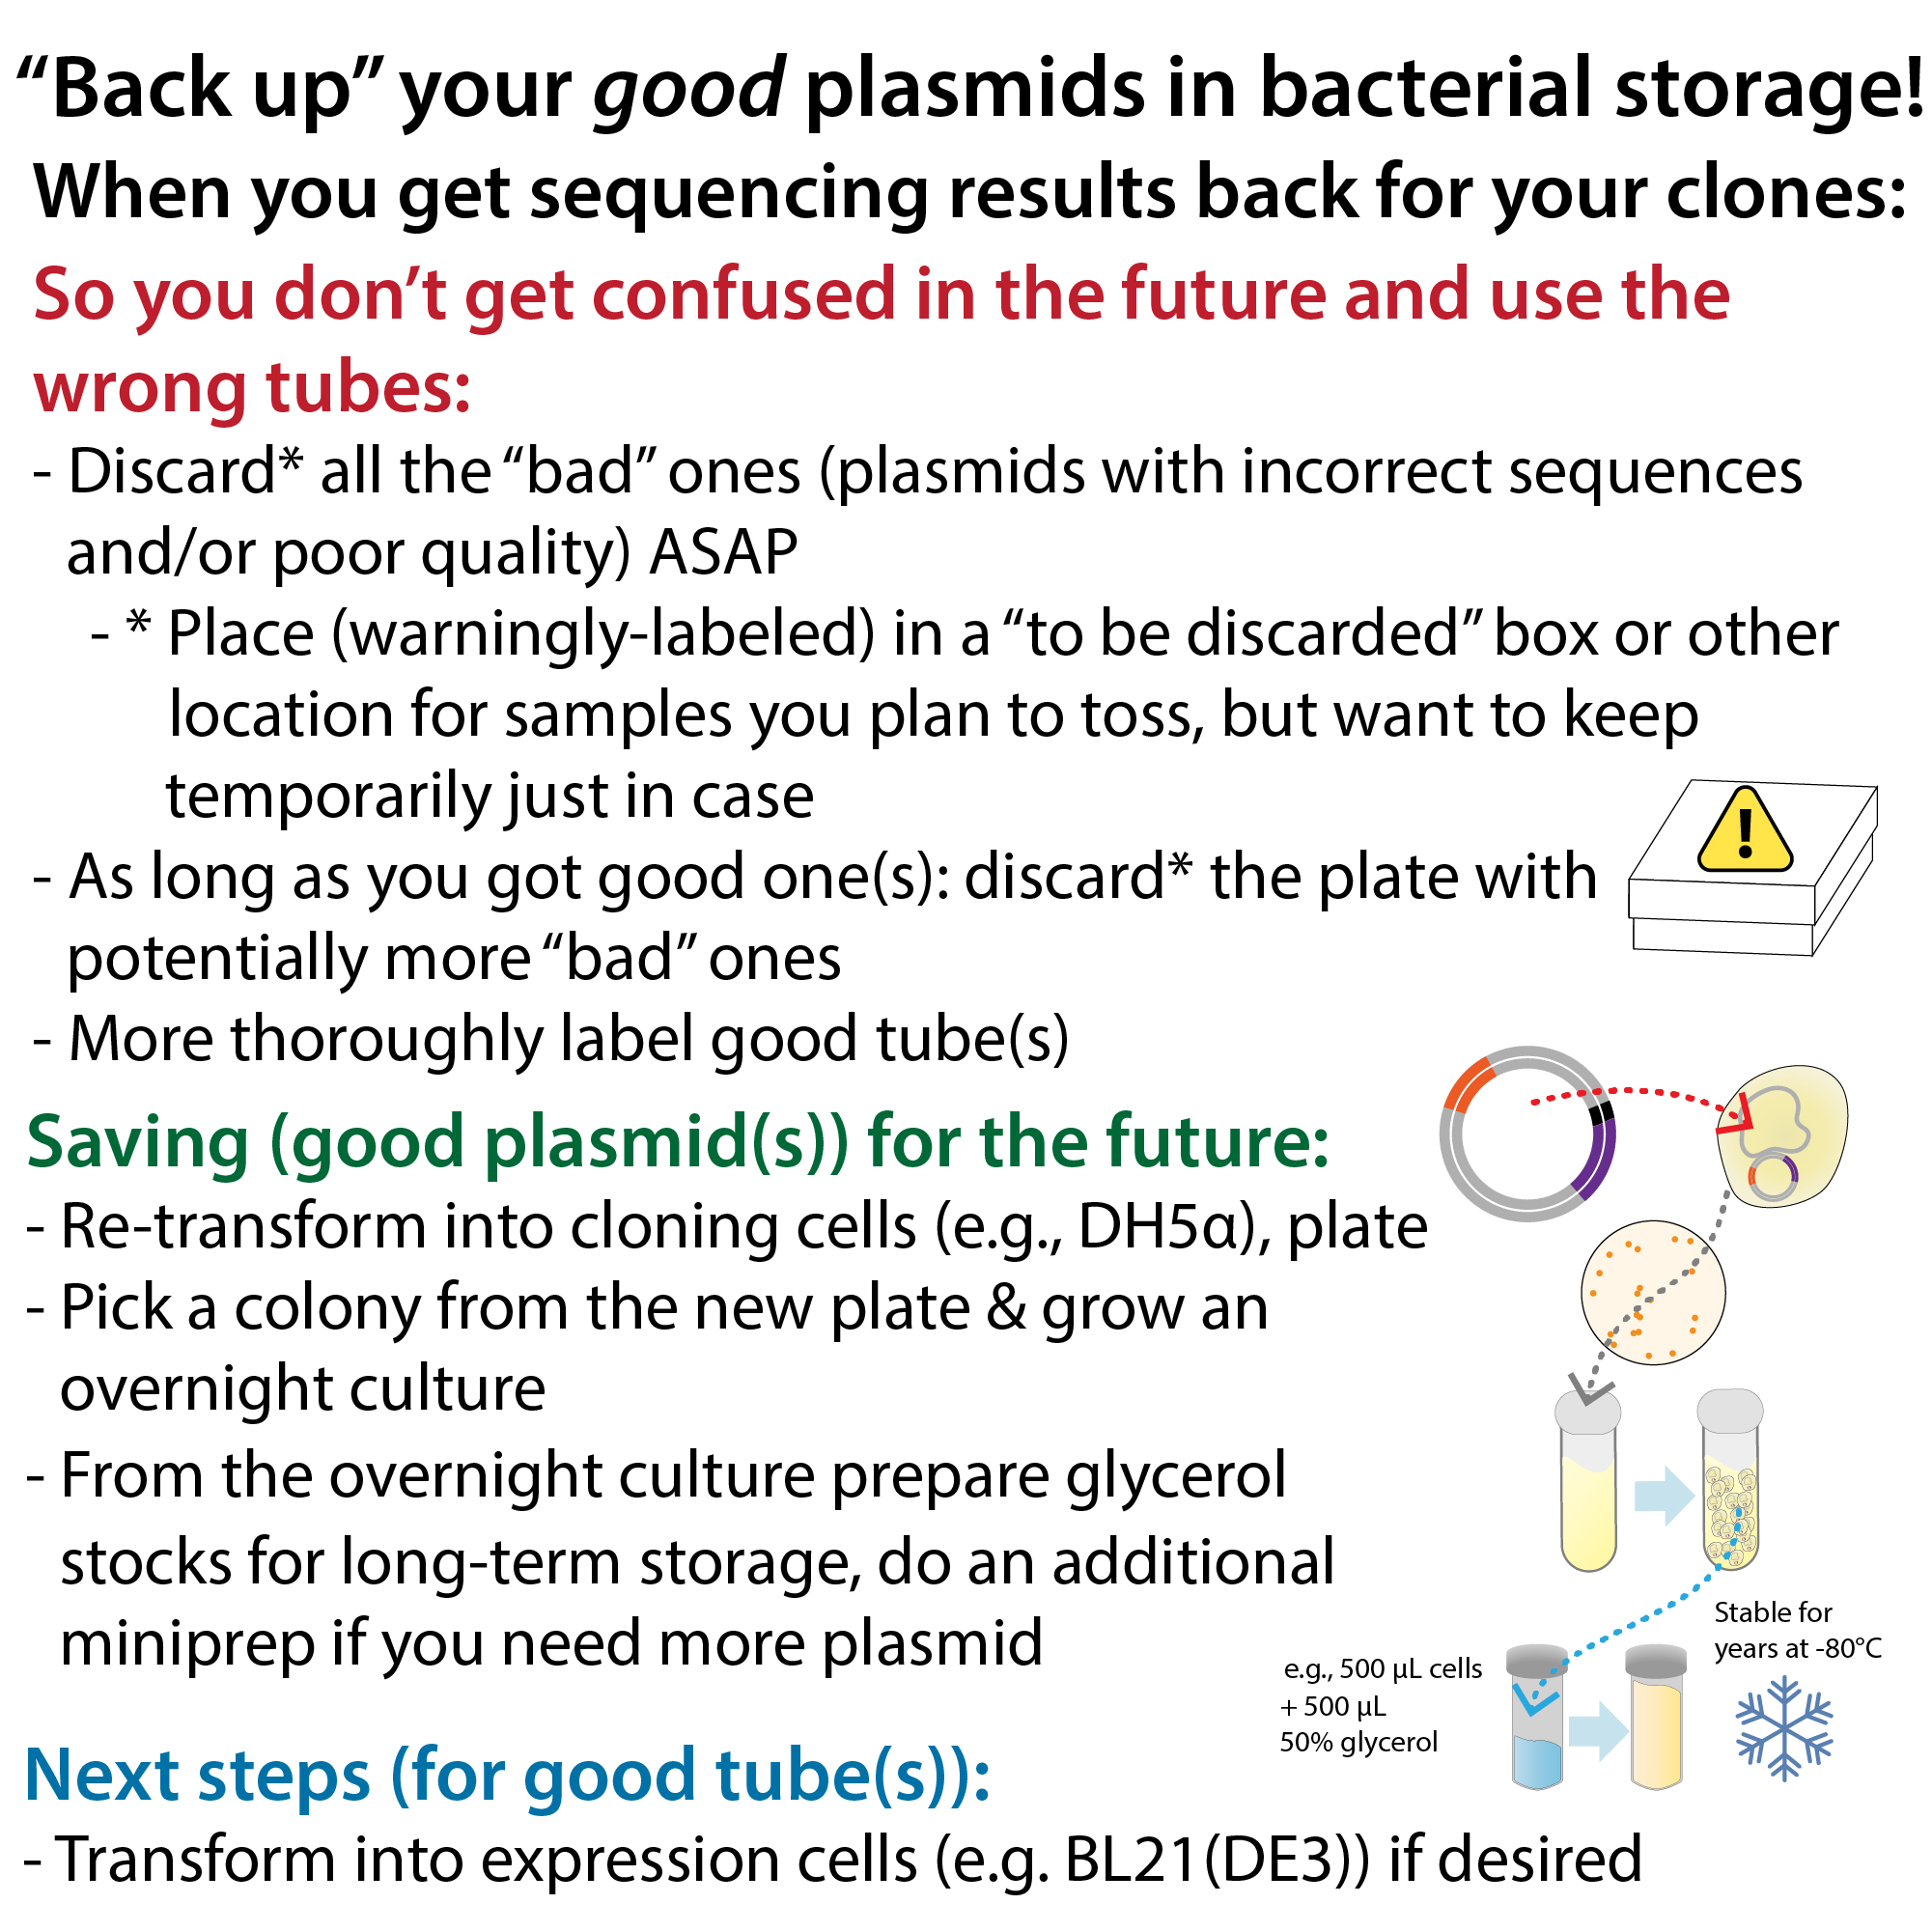
Once you know a plasmid’s good sequence-wise, you often then want to put it in expression cells. So you end up with the cloning cells containing the plasmid and with expression cells containing the plasmid. Both of these can come in handy in the future. If you need more of the plasmid, you can grow more of those plasmid-containing cloning cells and if you need protein you can grow more of those plasmid-containing expression cells. Assuming, that is, that you store some of them! Agar plates are only good for short-term storage. For longer keeping, you can grow a small (e.g. 5 mL) culture of the cells and then mix them with glycerol and freeze them at -80°C for a really long time. Then, when you’re ready to use the cells, you can streak them on a plate, isolate a single colony, and grow more.
Graphics
Associated content & resources
- Molecular cloning
- cDNA (complementary DNA), its uses, & some nuances to take into account when molecular cloning
- Choosing plasmid vectors and subcloning
- What to do when a plasmid comes for you: agar stab to plate to glycerol stock, miniprep, & sequencing
- PCR (Polymerase Chain Reaction)
- SLIC (Sequence and Ligation Independent Cloning)
- Agarose gel electrophoresis
- Site-directed mutagenesis
- Bacterial cloning cells
- Transfection
- Bacterial transformation – heat shock & chemically-competent cells
- Antibiotic selection
- Minipreps/alkaline lysis:
- Colony PCR
- Analytical/diagnostic restriction enzyme digests
- Traditional DNA sequencing
- Whole plasmid sequencing
- Glycerol stocks
External resources:
- Addgene blog, especially Plasmids 101: everything you ever wanted to know about plasmids and molecular cloning including details and comparisons of various techniques.
- OpenWetWare Protocols: this is a wiki with tons of protocols including recipes for making reagents that typically come in kits so you can DIY it. The site has other features as well, but I’ve only used it for the protocols.
- Pipette Jockey Reagents/Recipes/Protocols: more DIY stuff
Protein expression
Overview/outline, with graphics (click to enlarge)
Choosing an expression system
You need to choose what type of cells you will use to make your protein. This depends on factors such as:
- How “complex” the protein is – the more complex the protein, the more complex the system you’ll need
- Is it big and floppy or small and well-behaved?
- Does it need help from chaperone proteins to fold properly?
- Does it get post-translationally modified?
- How much of the protein you need
- What your lab has
- How much money your lab has
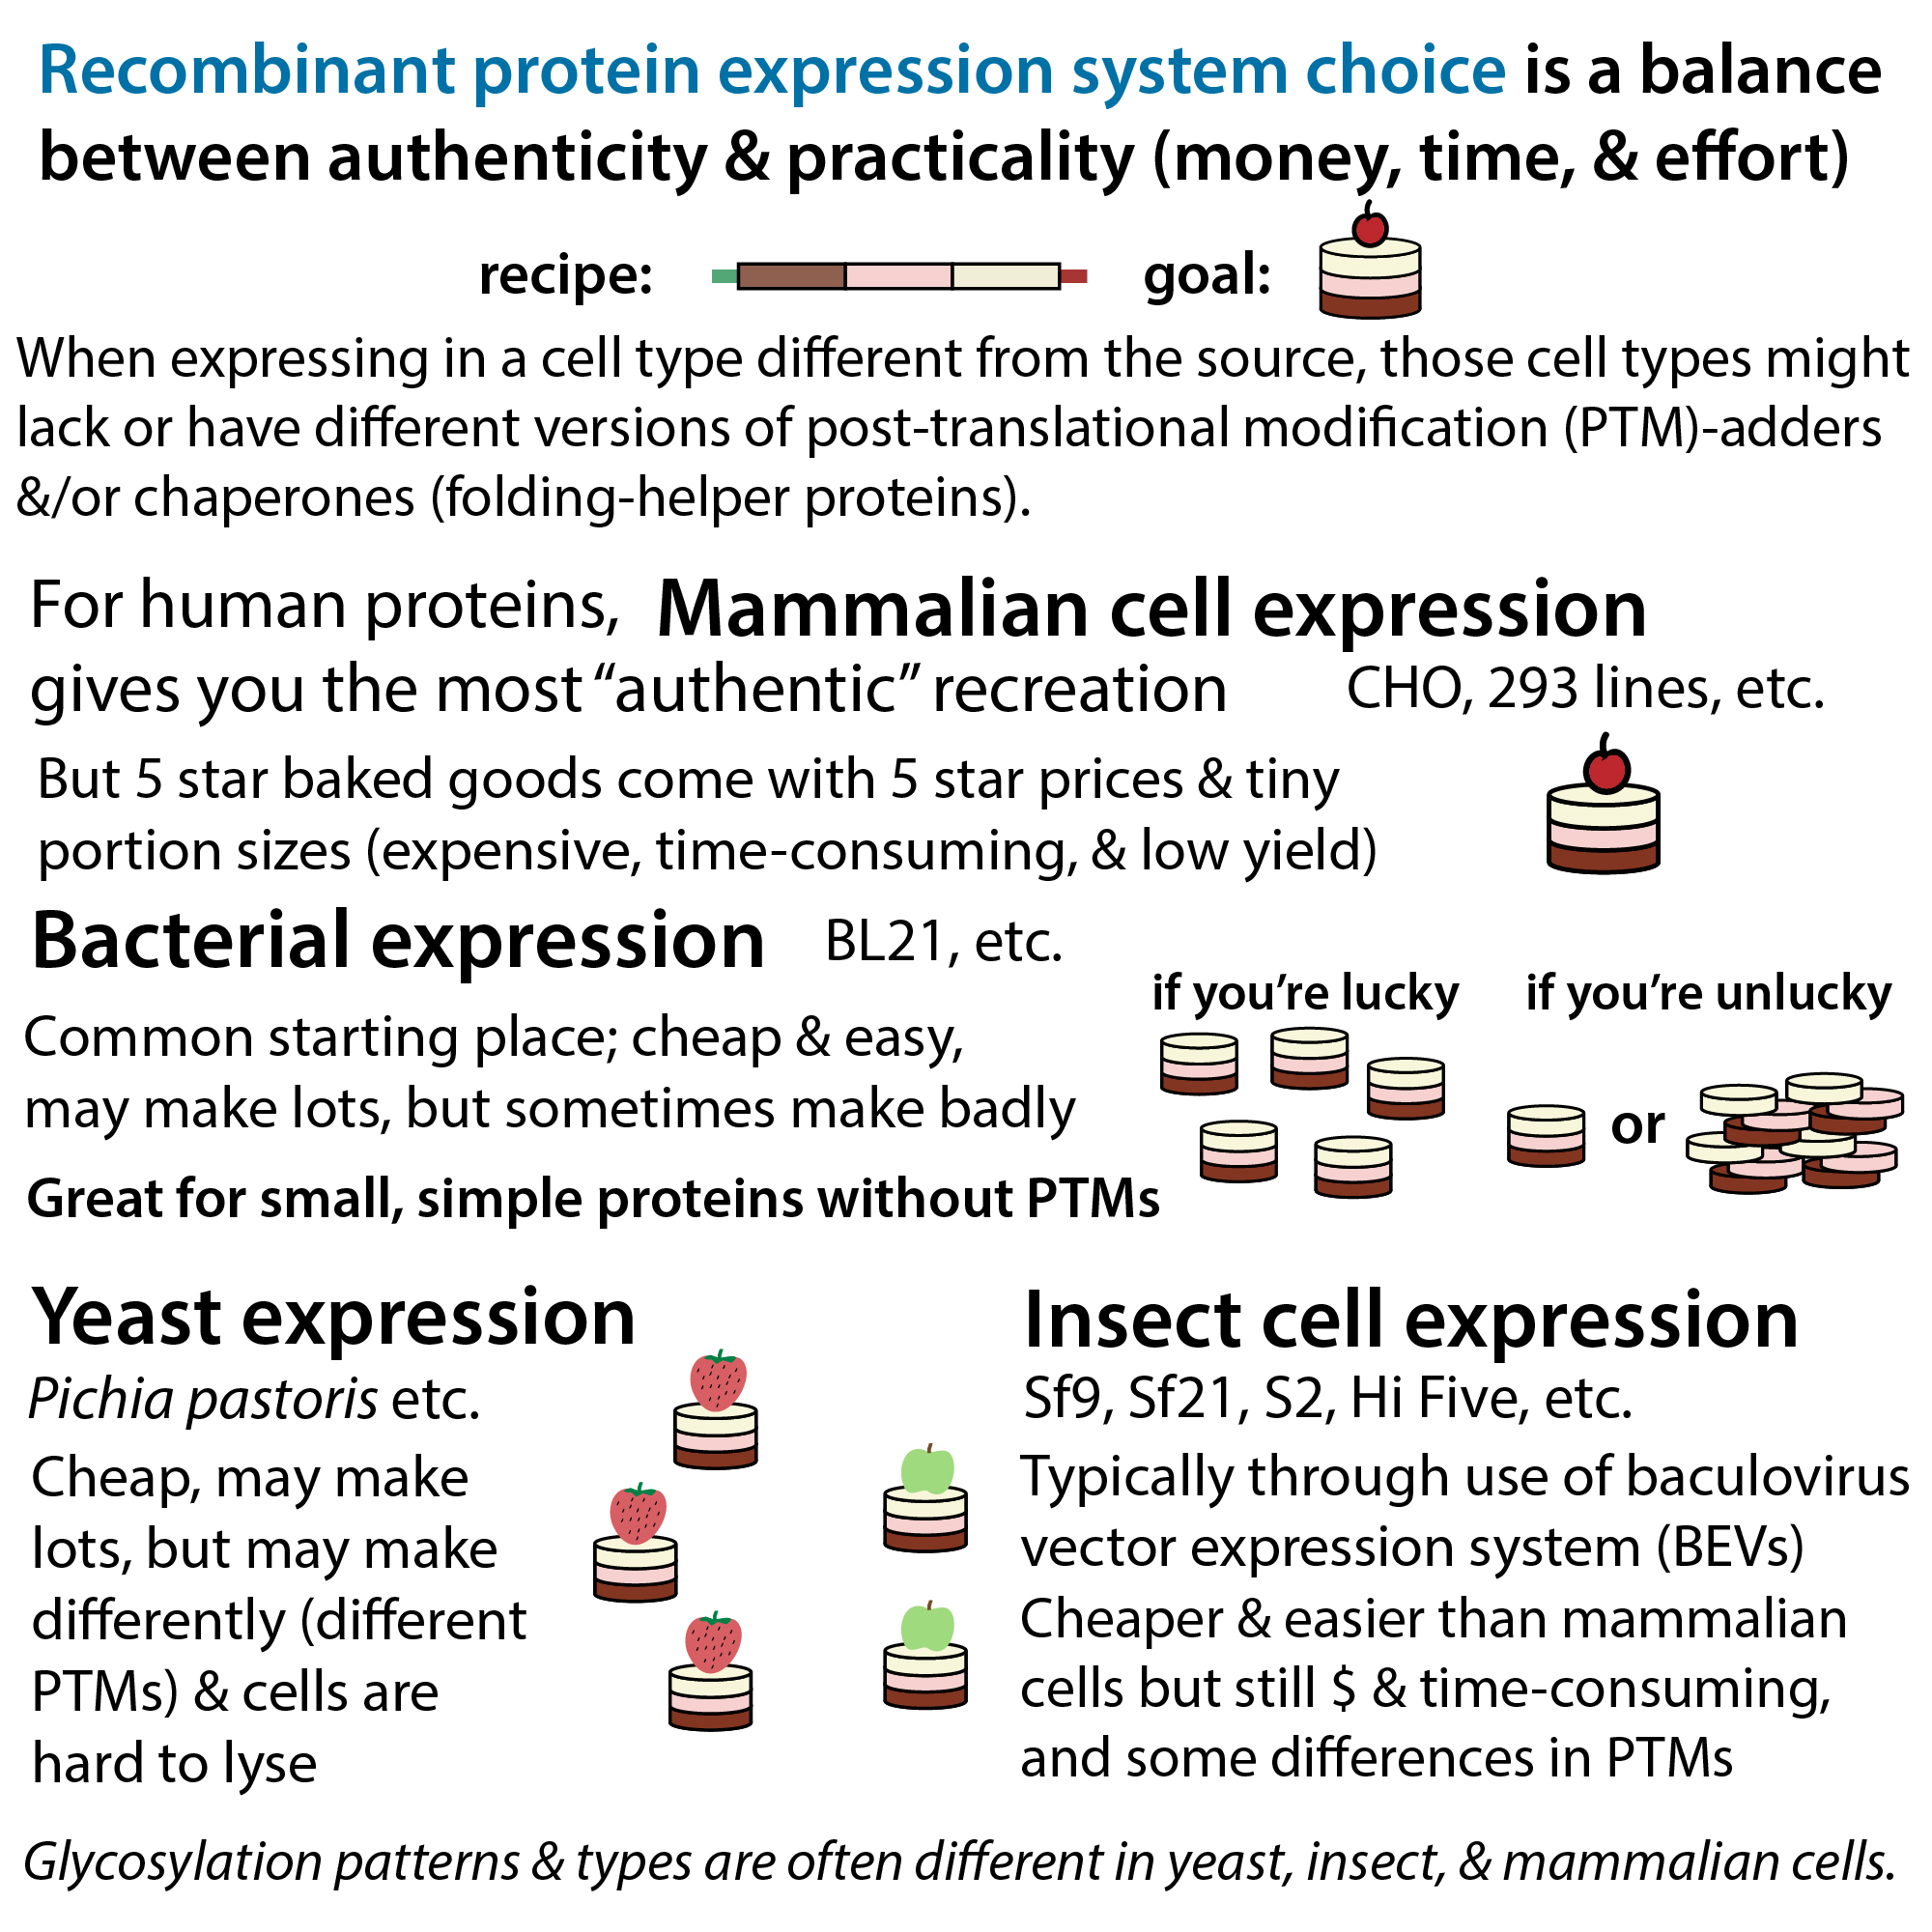
Commonly used cellular expression systems, listed in order of increasing complexity (but increasing “authenticity” for studying human proteins):
- Bacterial cells – (typically some form of harmless E. coli)
- Yeast cells – simplest eukaryotic system for expression
- Insect cells (Sf9, Hi5, etc.) – using a Baculovirus Expression Vector System (BEVS)
- Mammalian cells – examples include CHO (Chinese Hamster Ovary) and HEK (human kidney) cells
There are also cell-free expression systems, such as the “PURE” system and lysate-based systems. These can be good for introducing non-canonical/unnatural amino acids and/or for studying the process of translation. But they’re (at least currently) only good for small-scale expression.
Graphics

Expression in bacterial cells
If your protein is small, well-behaved, water-soluble, and doesn’t need post-translational modification, simple expression in bacterial cells is typically the fastest, easiest, and cheapest, way to go. You can grow liters at a time, often with high levels of expression.
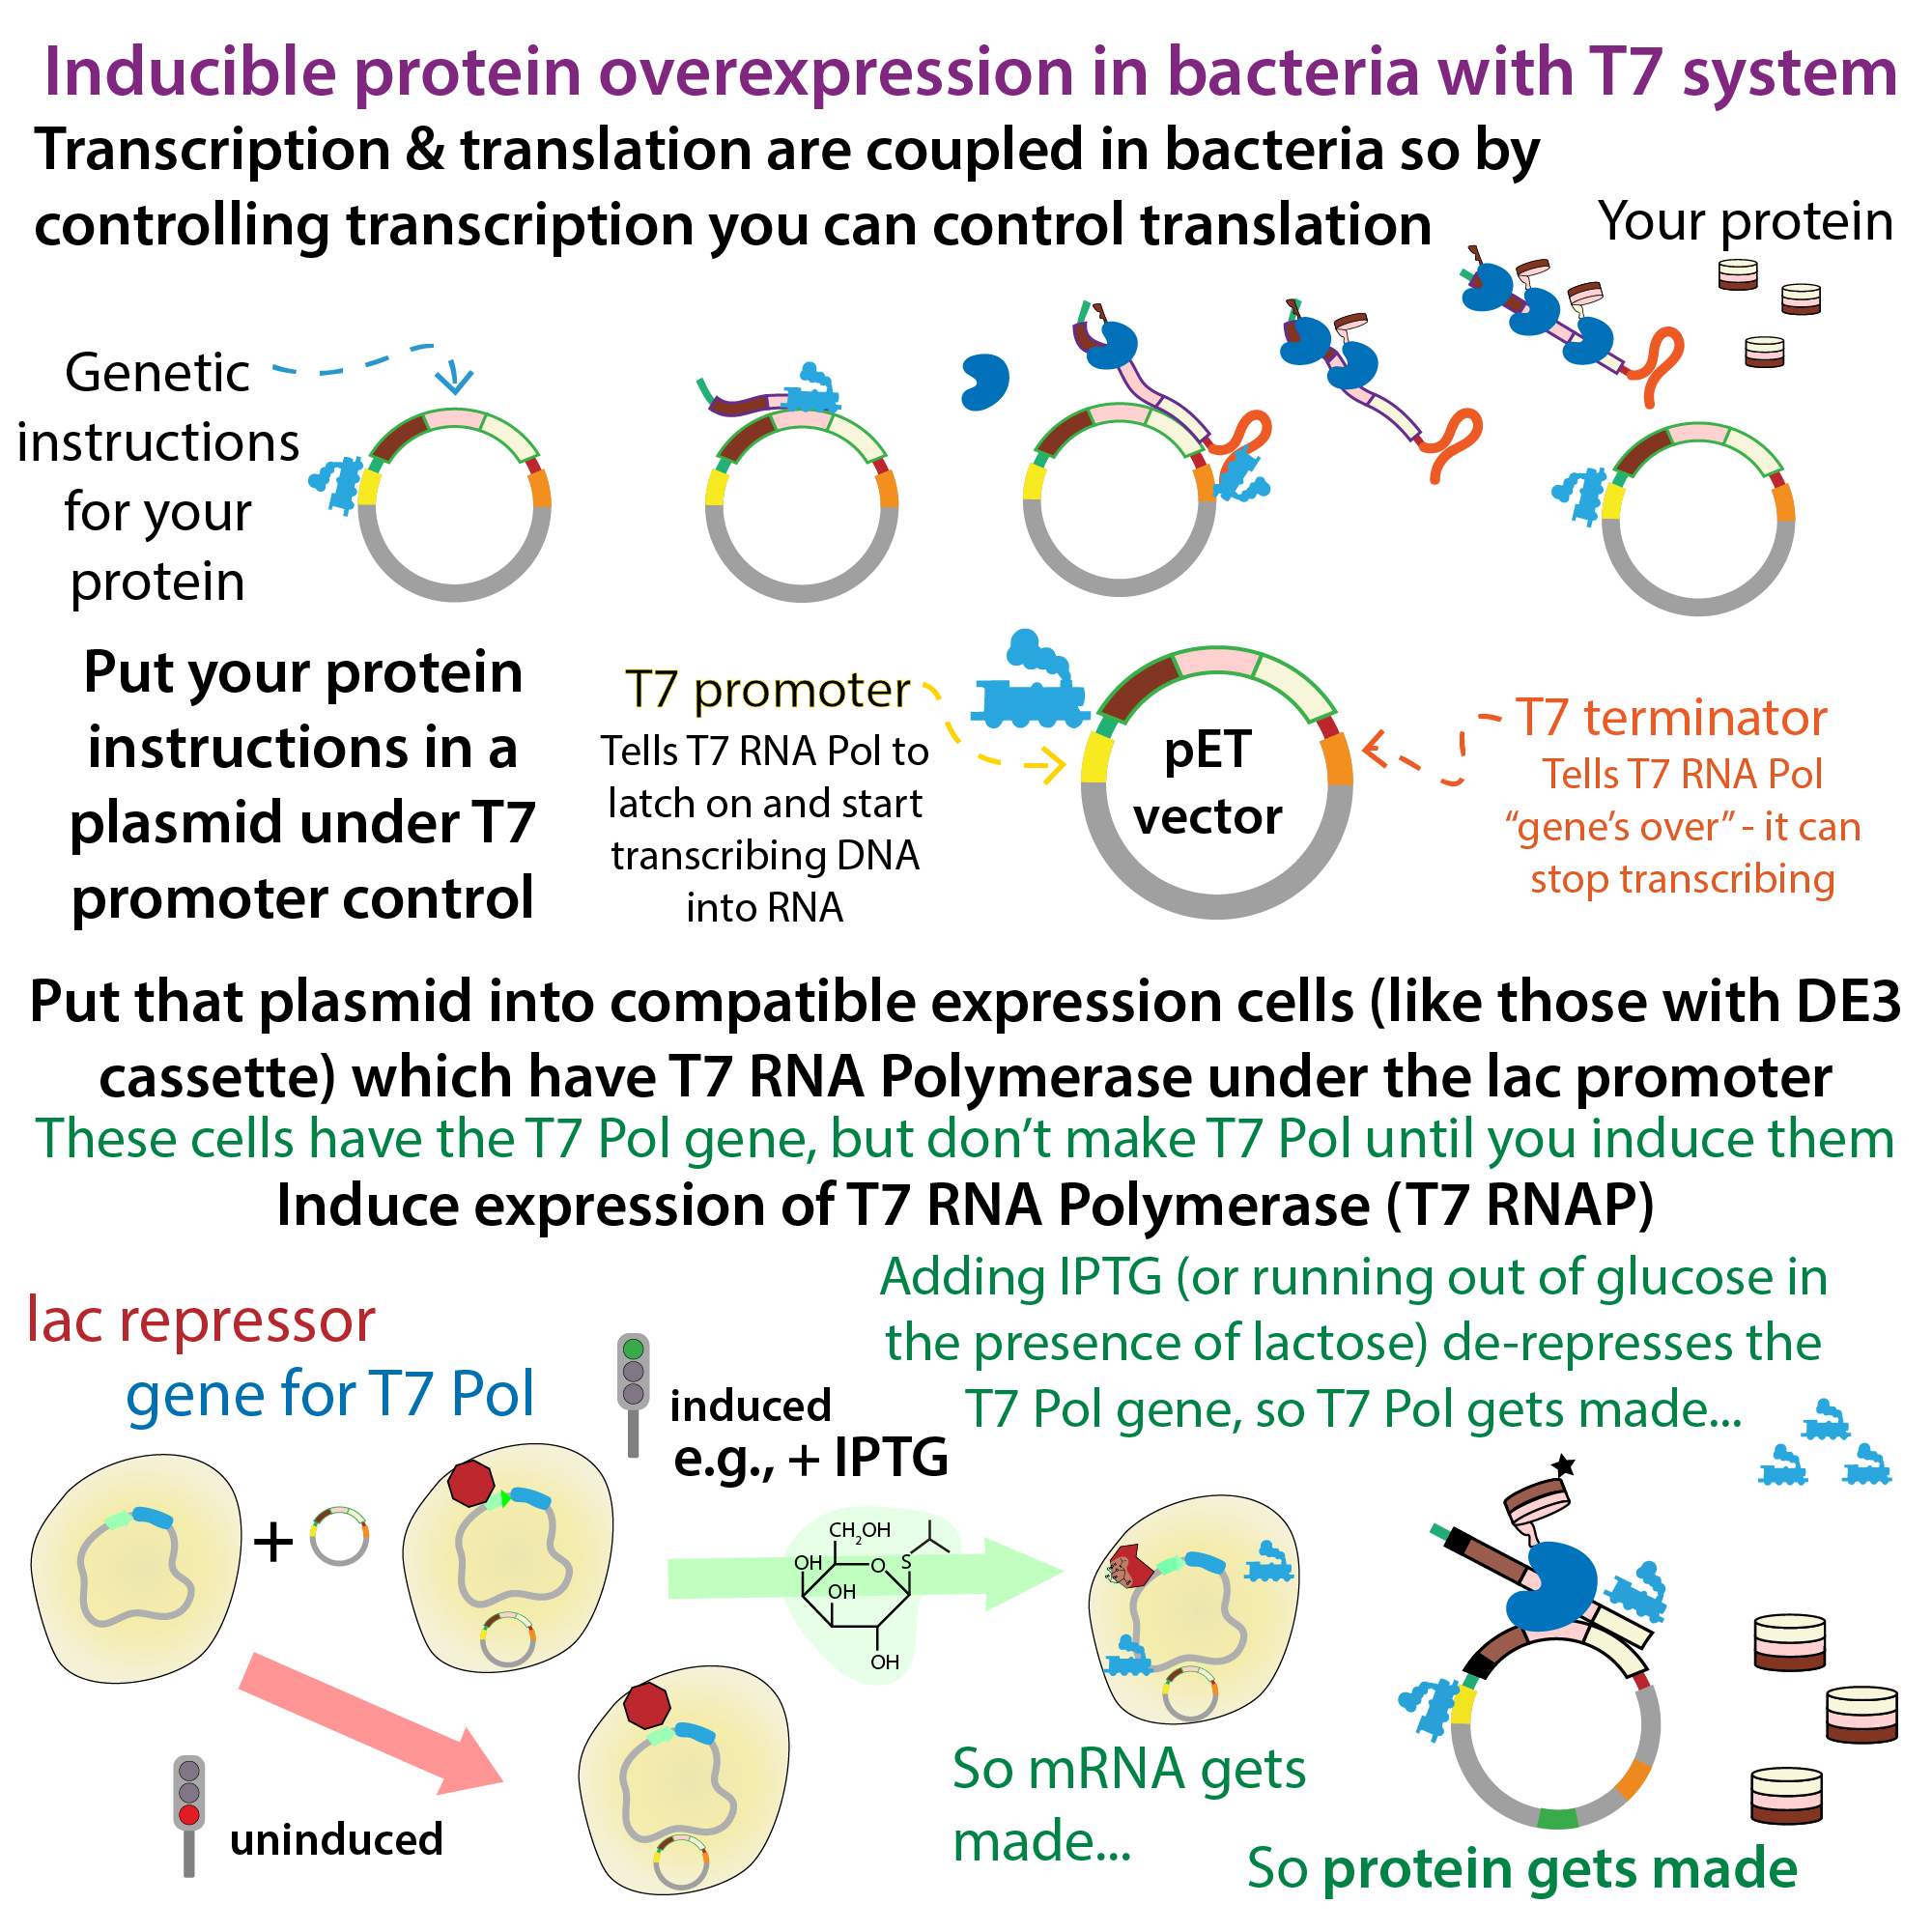
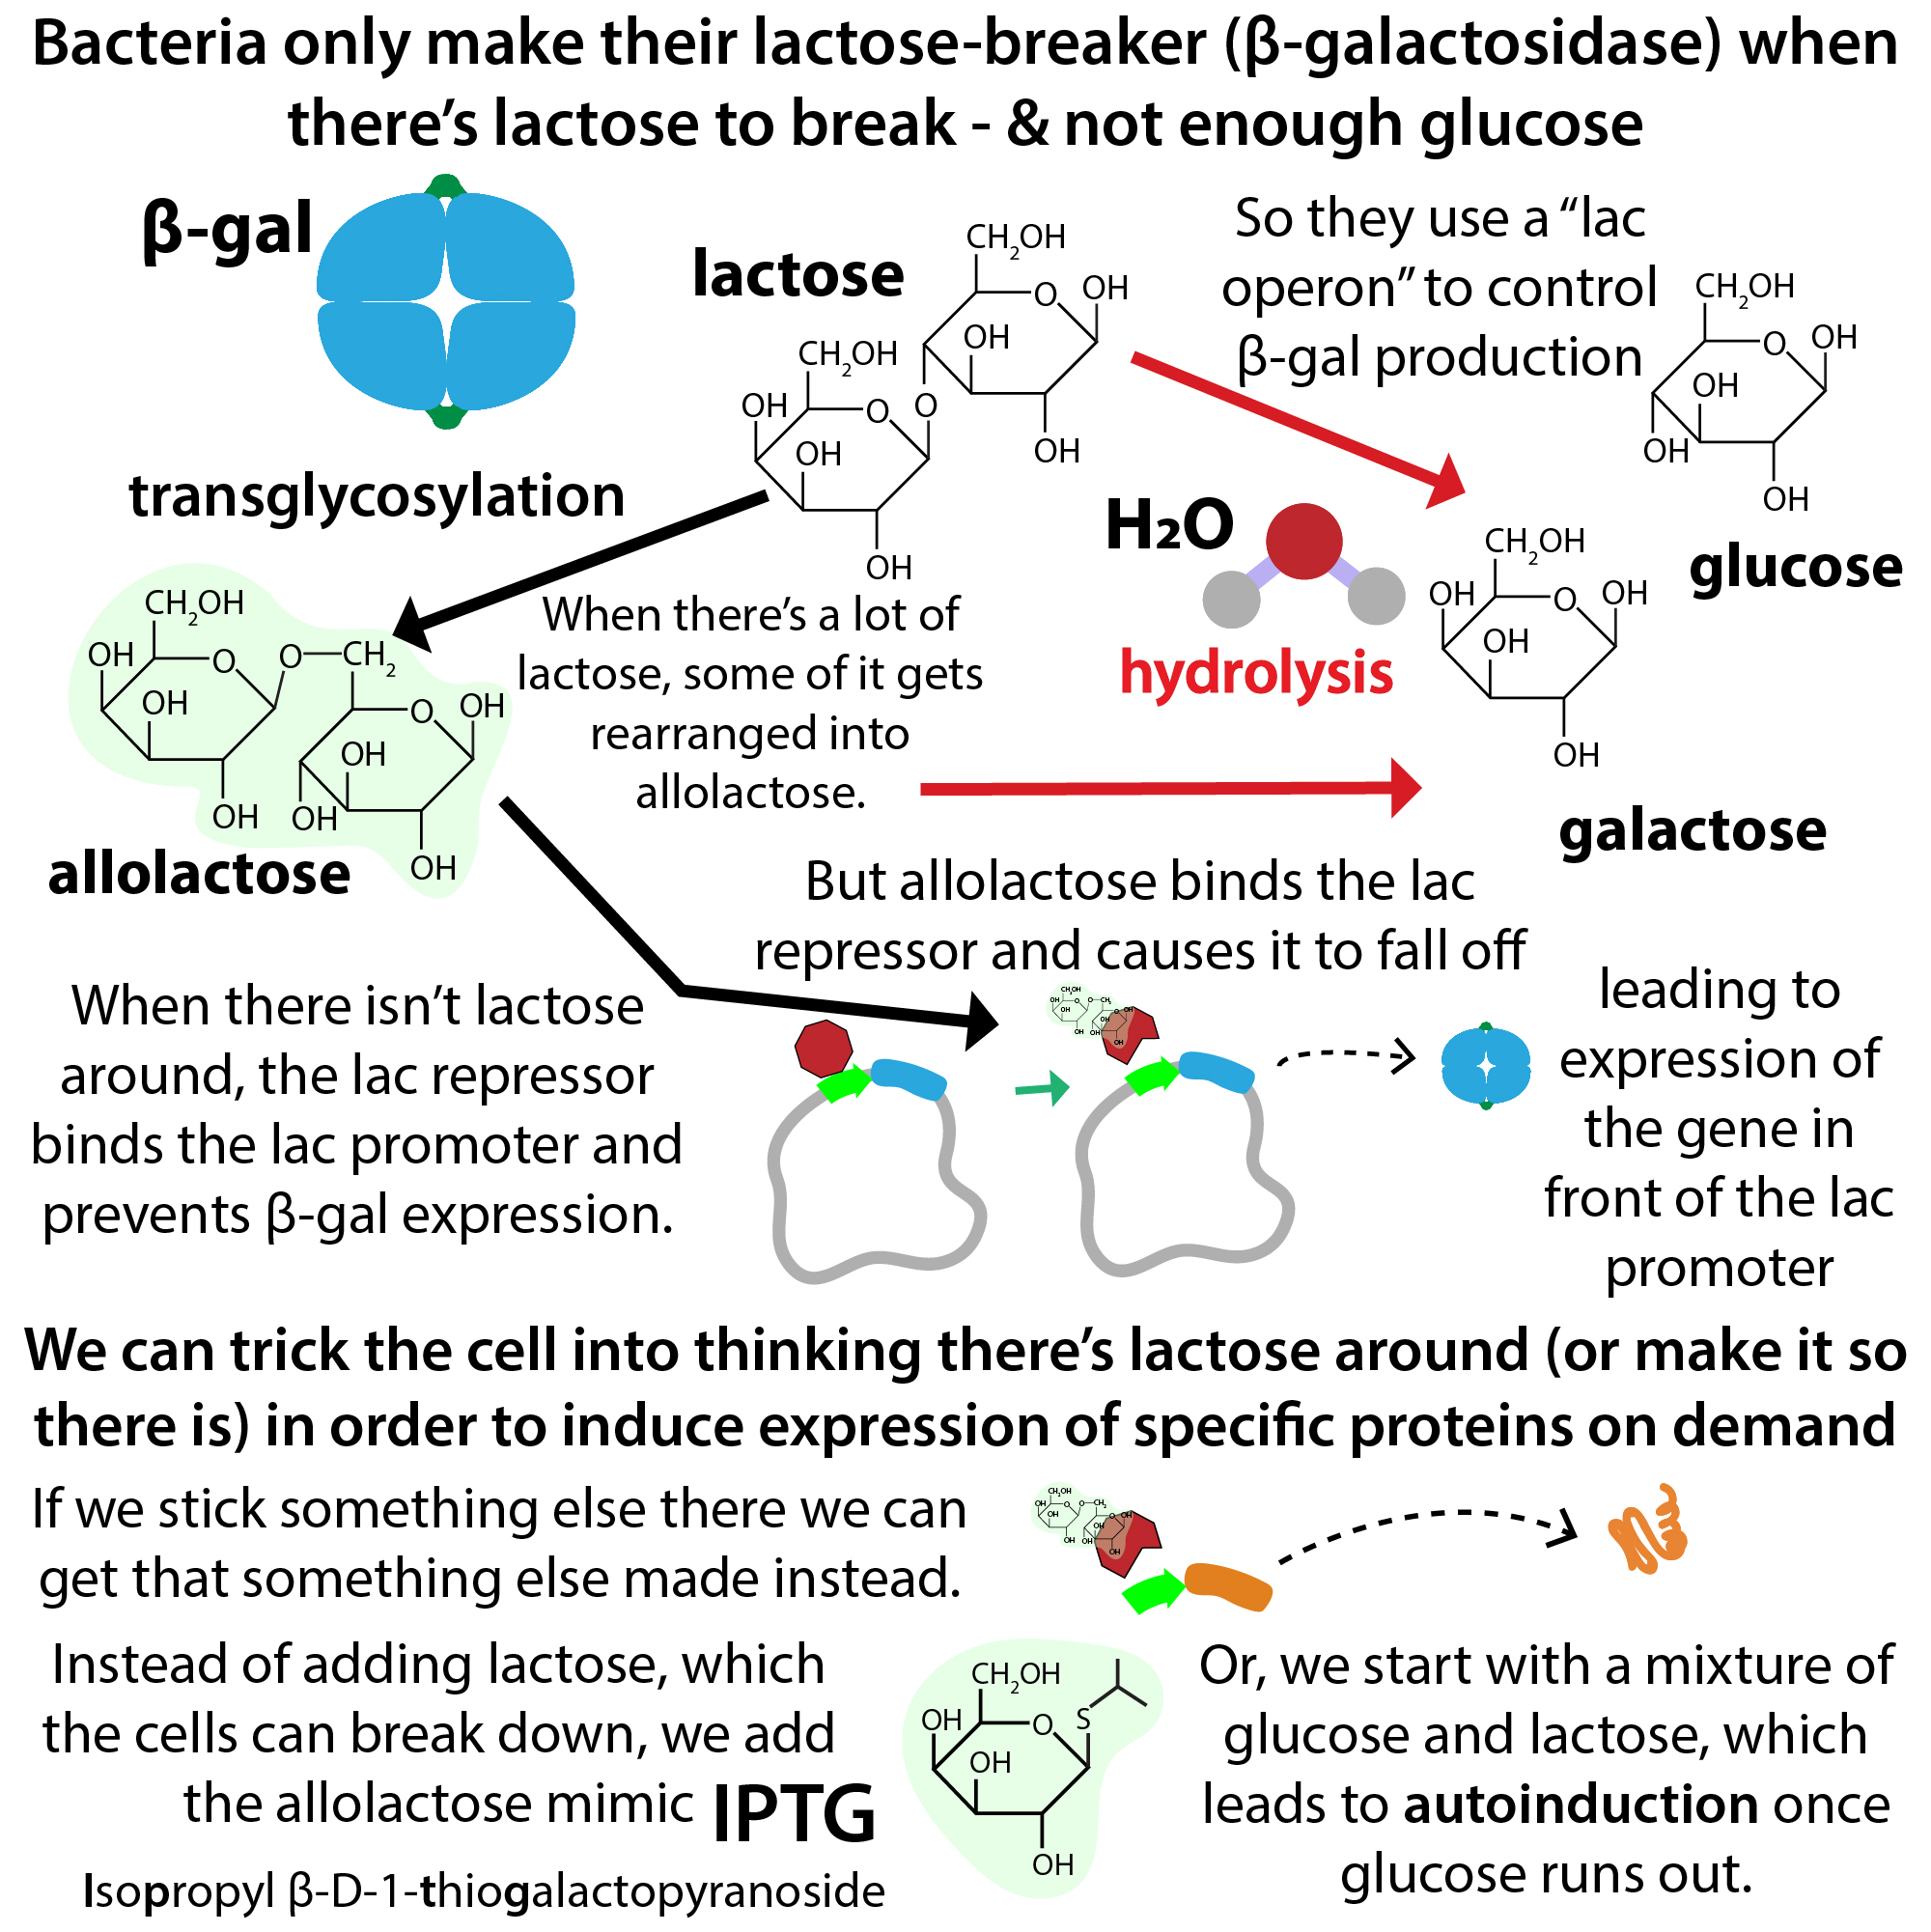
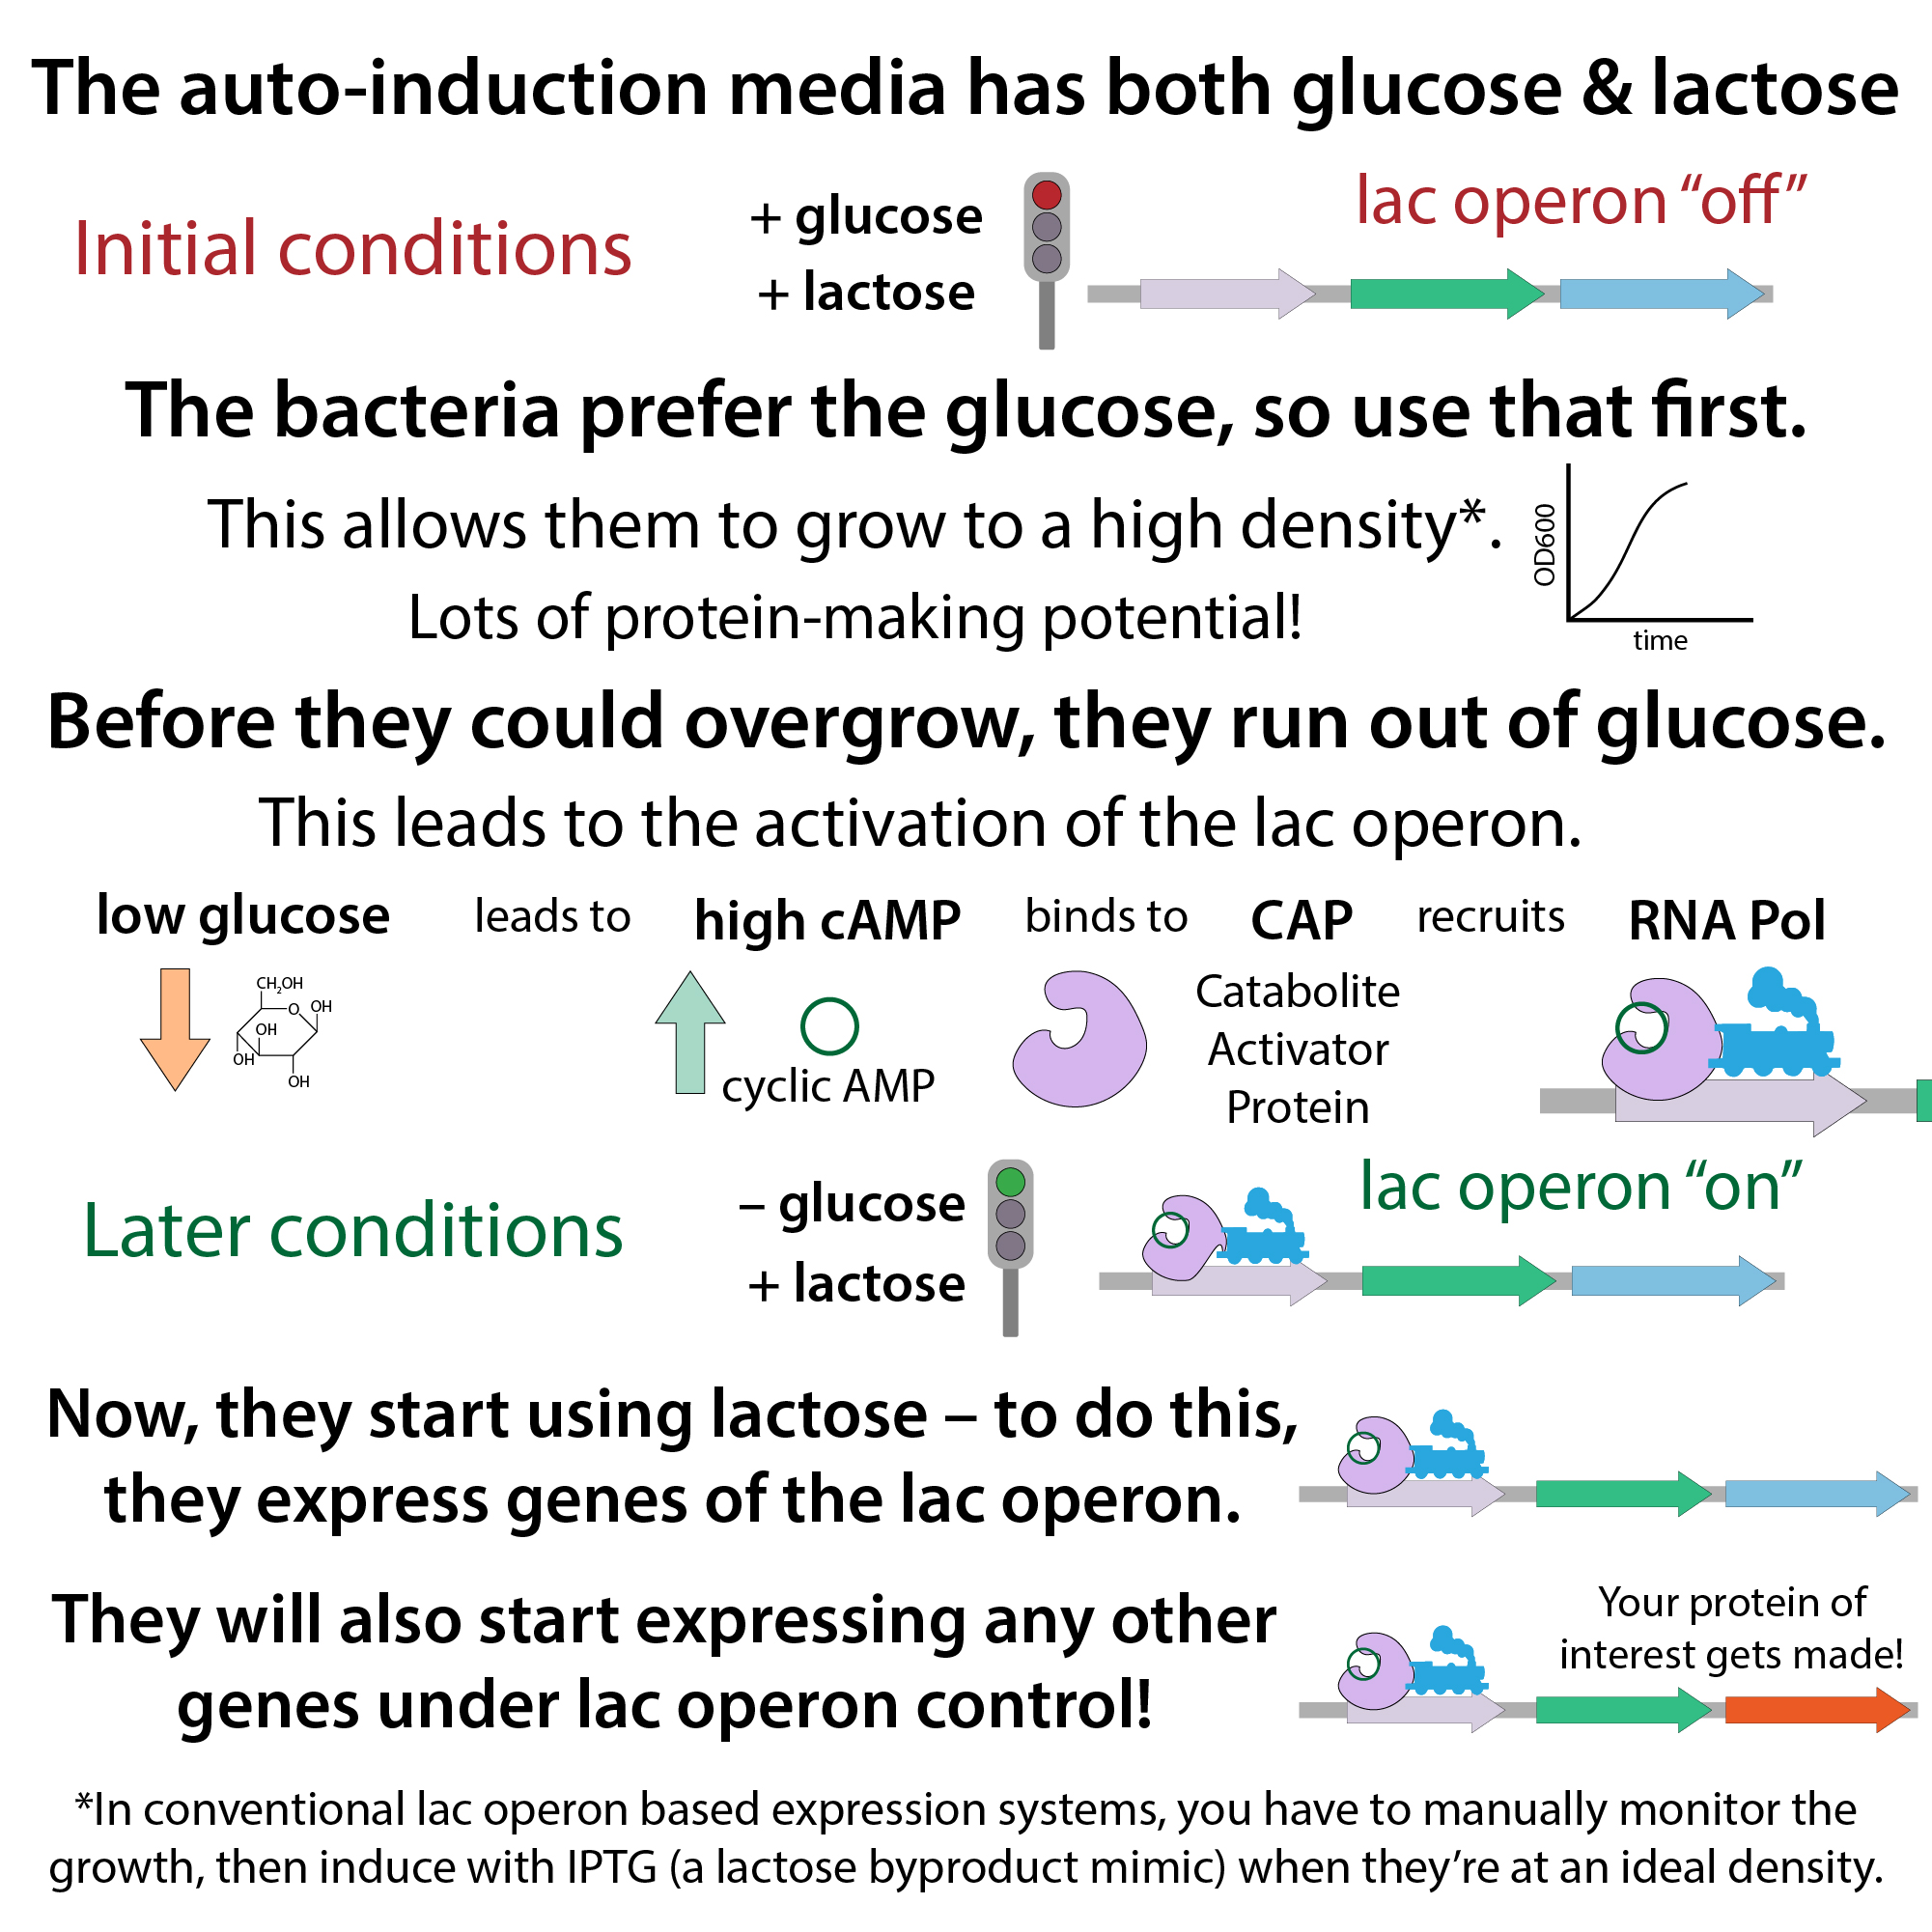
Typically, you use inducible expression, where the cells only make the protein when you tell them to (via induction). This lets you grow the cells to high concentrations (lots of protein-making capacity) before you get them to devote their resources to protein-making (at the expense of growing/reproducing). This is often done under the control of T7 DNA polymerase (a bacteriophage (phage)(a bacteria-infecting virus) protein, provided via a “DE3” insertion in the host cell DNA) and the lac promoter. In such systems, you put a T7 polymerase promoter in front of your protein of interest and control the expression of that polymerase using a lac promoter/operon. When you add IPTG (or in the case of autoinduction, the cells run out of glucose and switch to using lactose), the lac repressor falls off the lac promoter, causing the T7 DNA polymerase to get made. That polymerase then transcribes mRNA for your protein of interest, which ribosomes then translate into protein. Because the bacterial proteins are under the control of bacterial promoters, not the T7 promoter, your protein will be made almost exclusively after you induce (hence needing to wait until you had a lot of cells). Conventionally, this is done using IPTG addition, but that requires monitoring cell growth. Autoinduction media offers an alternative, using a carefully concocted sugar blend that mimics natural lac operon usage.
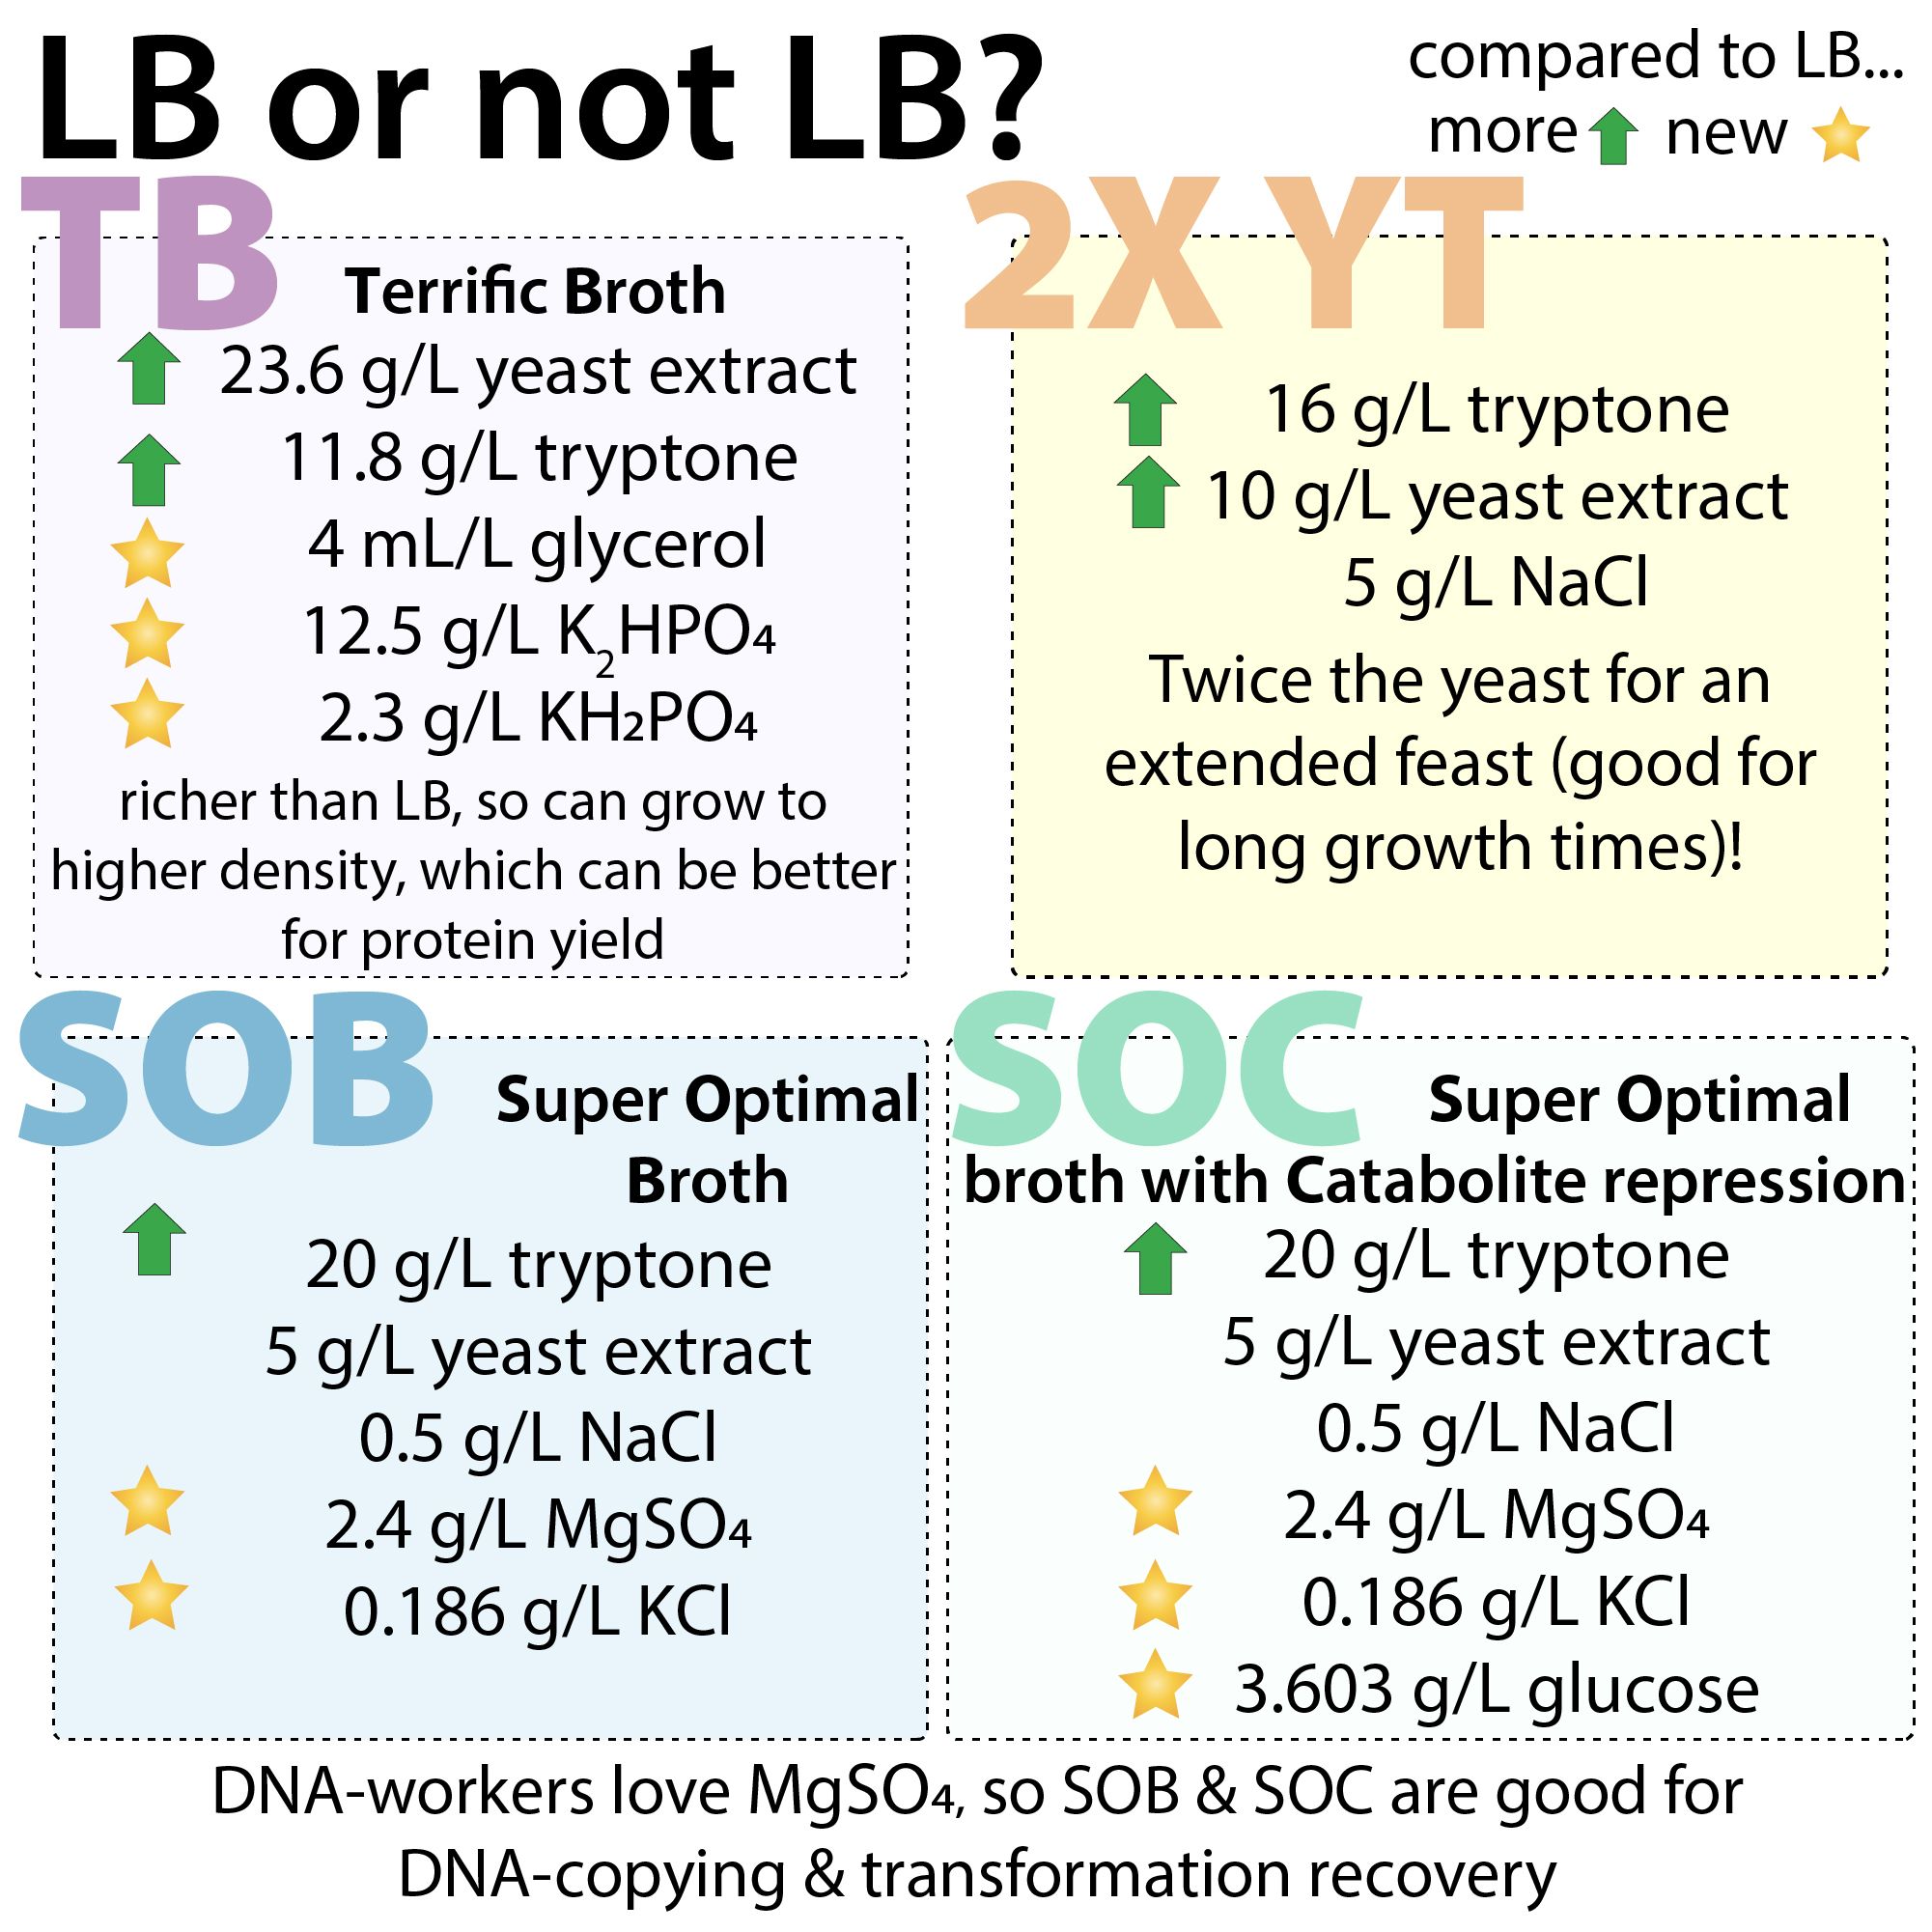
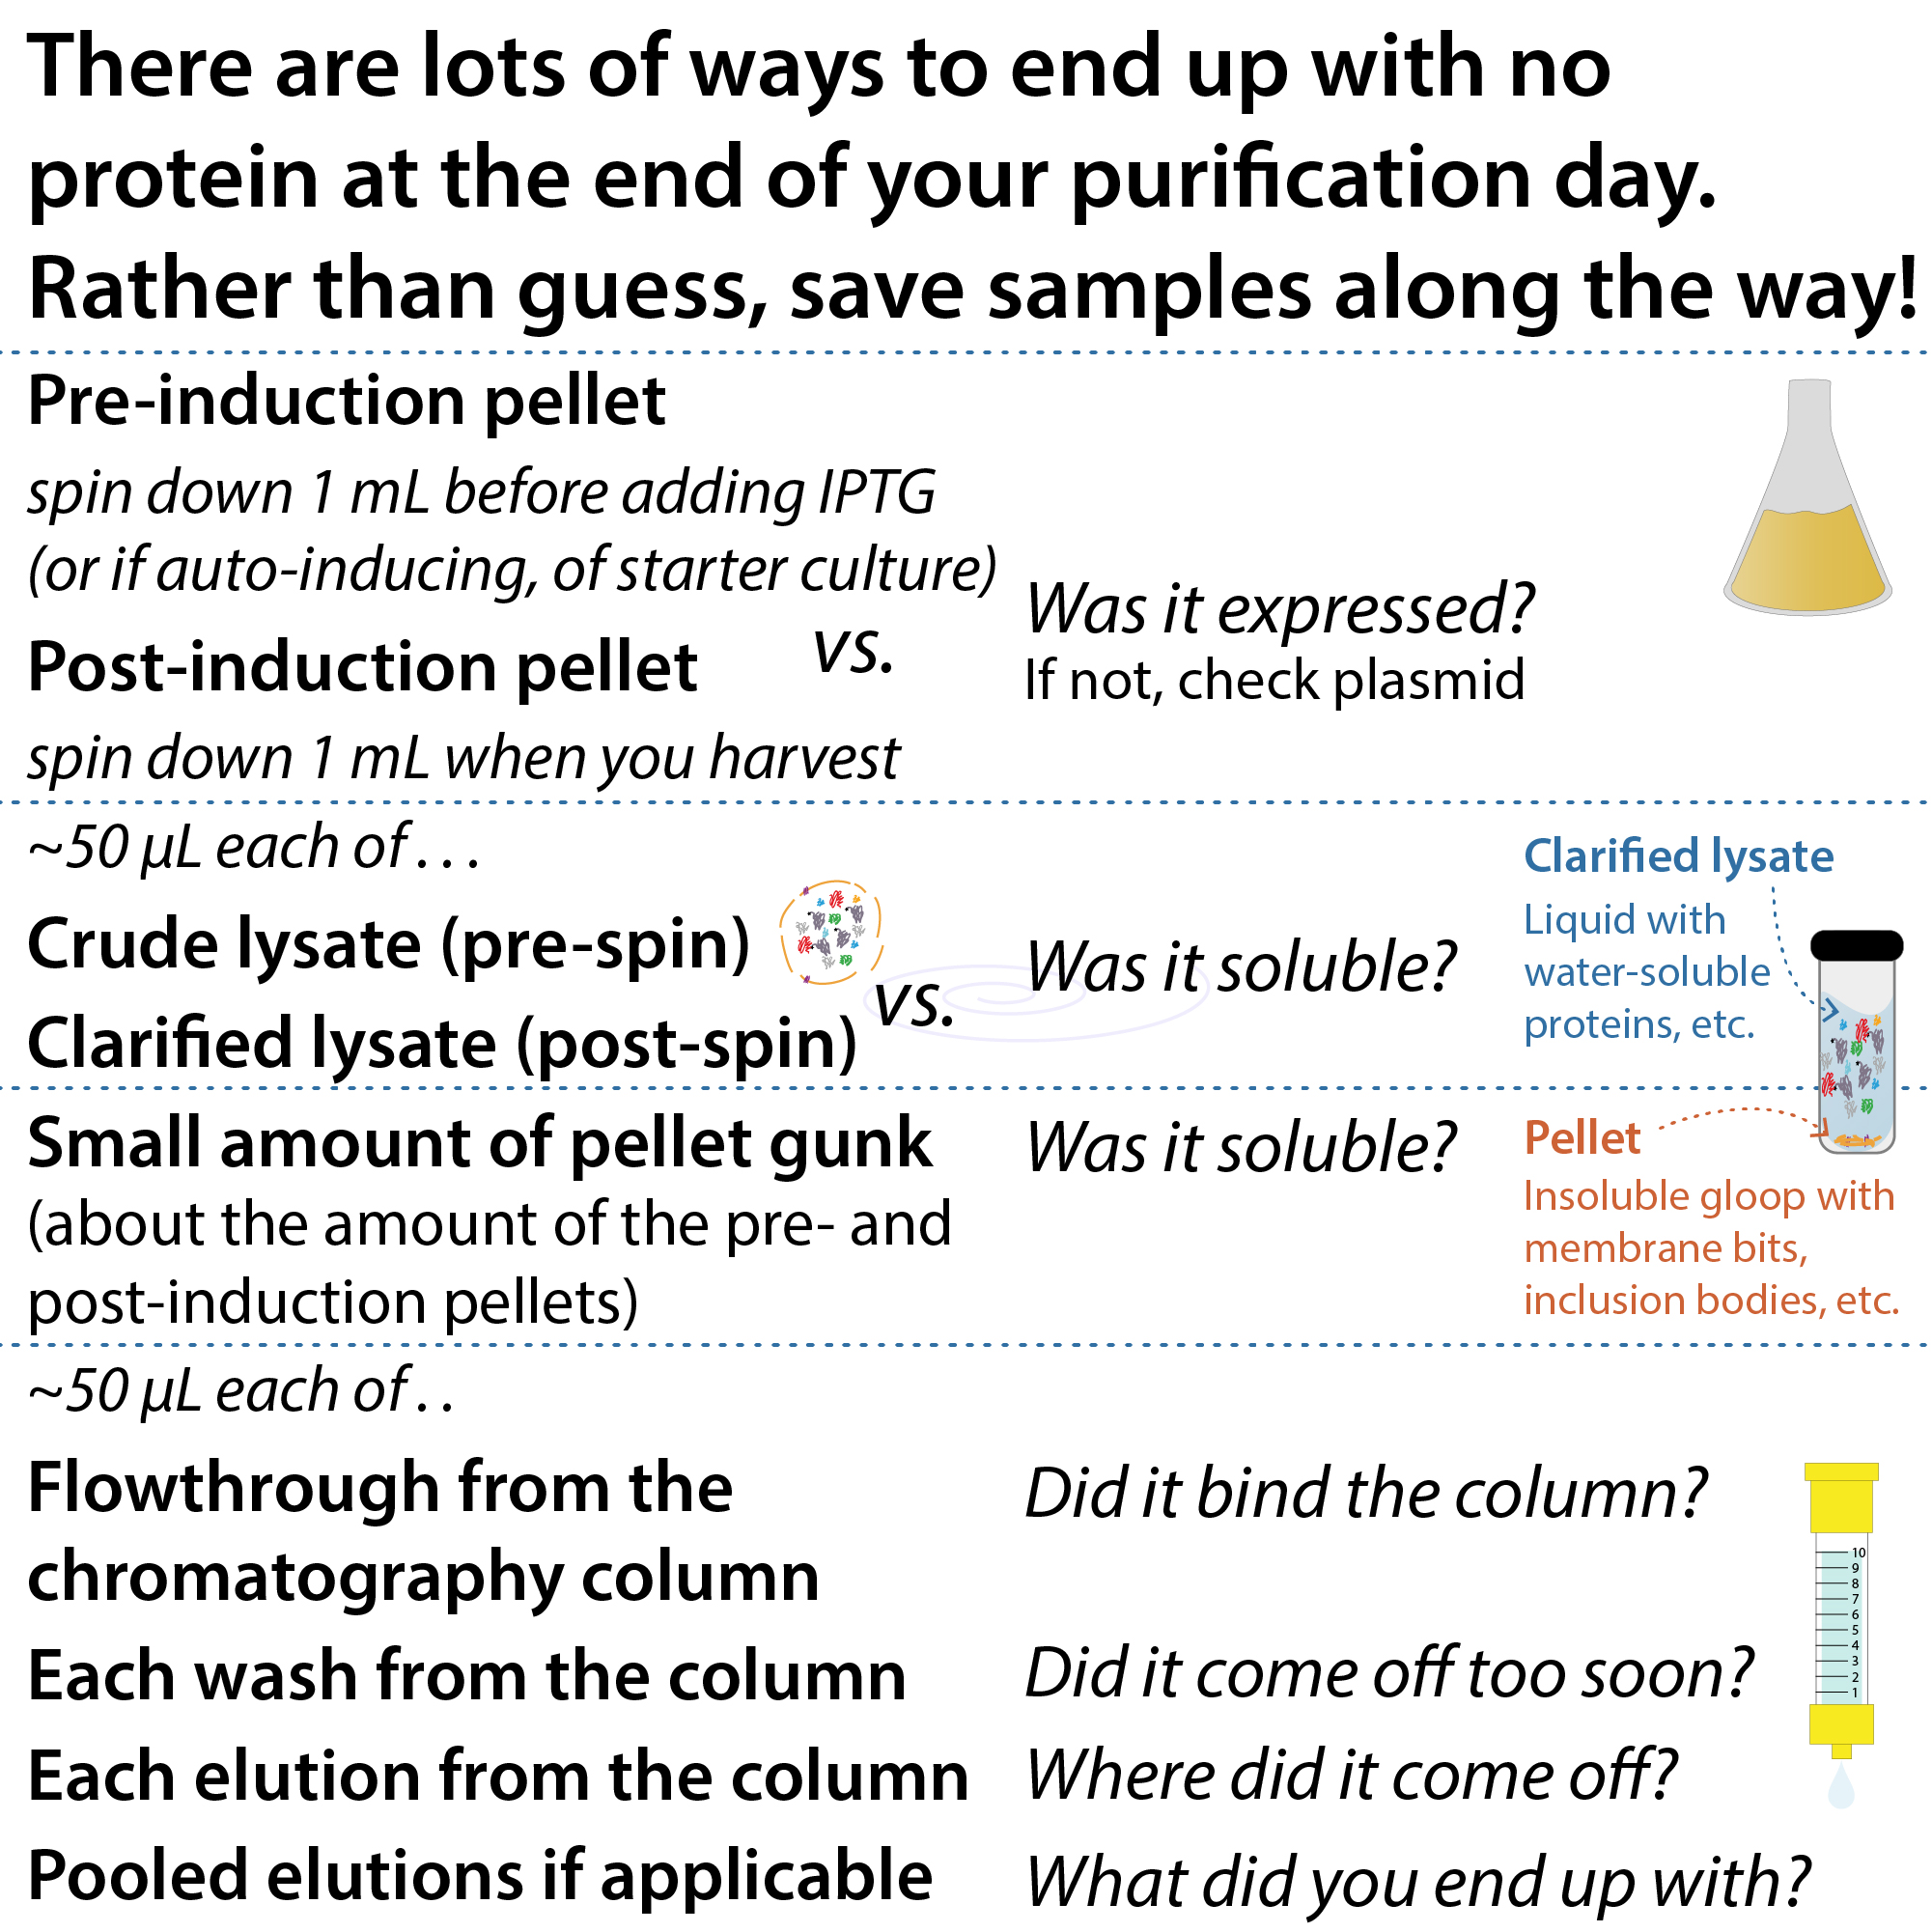
You usually start a small starter culture from a colony of “expression” strains of bacteria (e.g., BL21, BL21 (DE3), K-12, Origami) in a liquid media like LB or TB (be sure you added the corresponding antibiotic to select for your bacteria), let that grow overnight, and then use it to inoculate a larger portion of (antibiotic-containing) media.
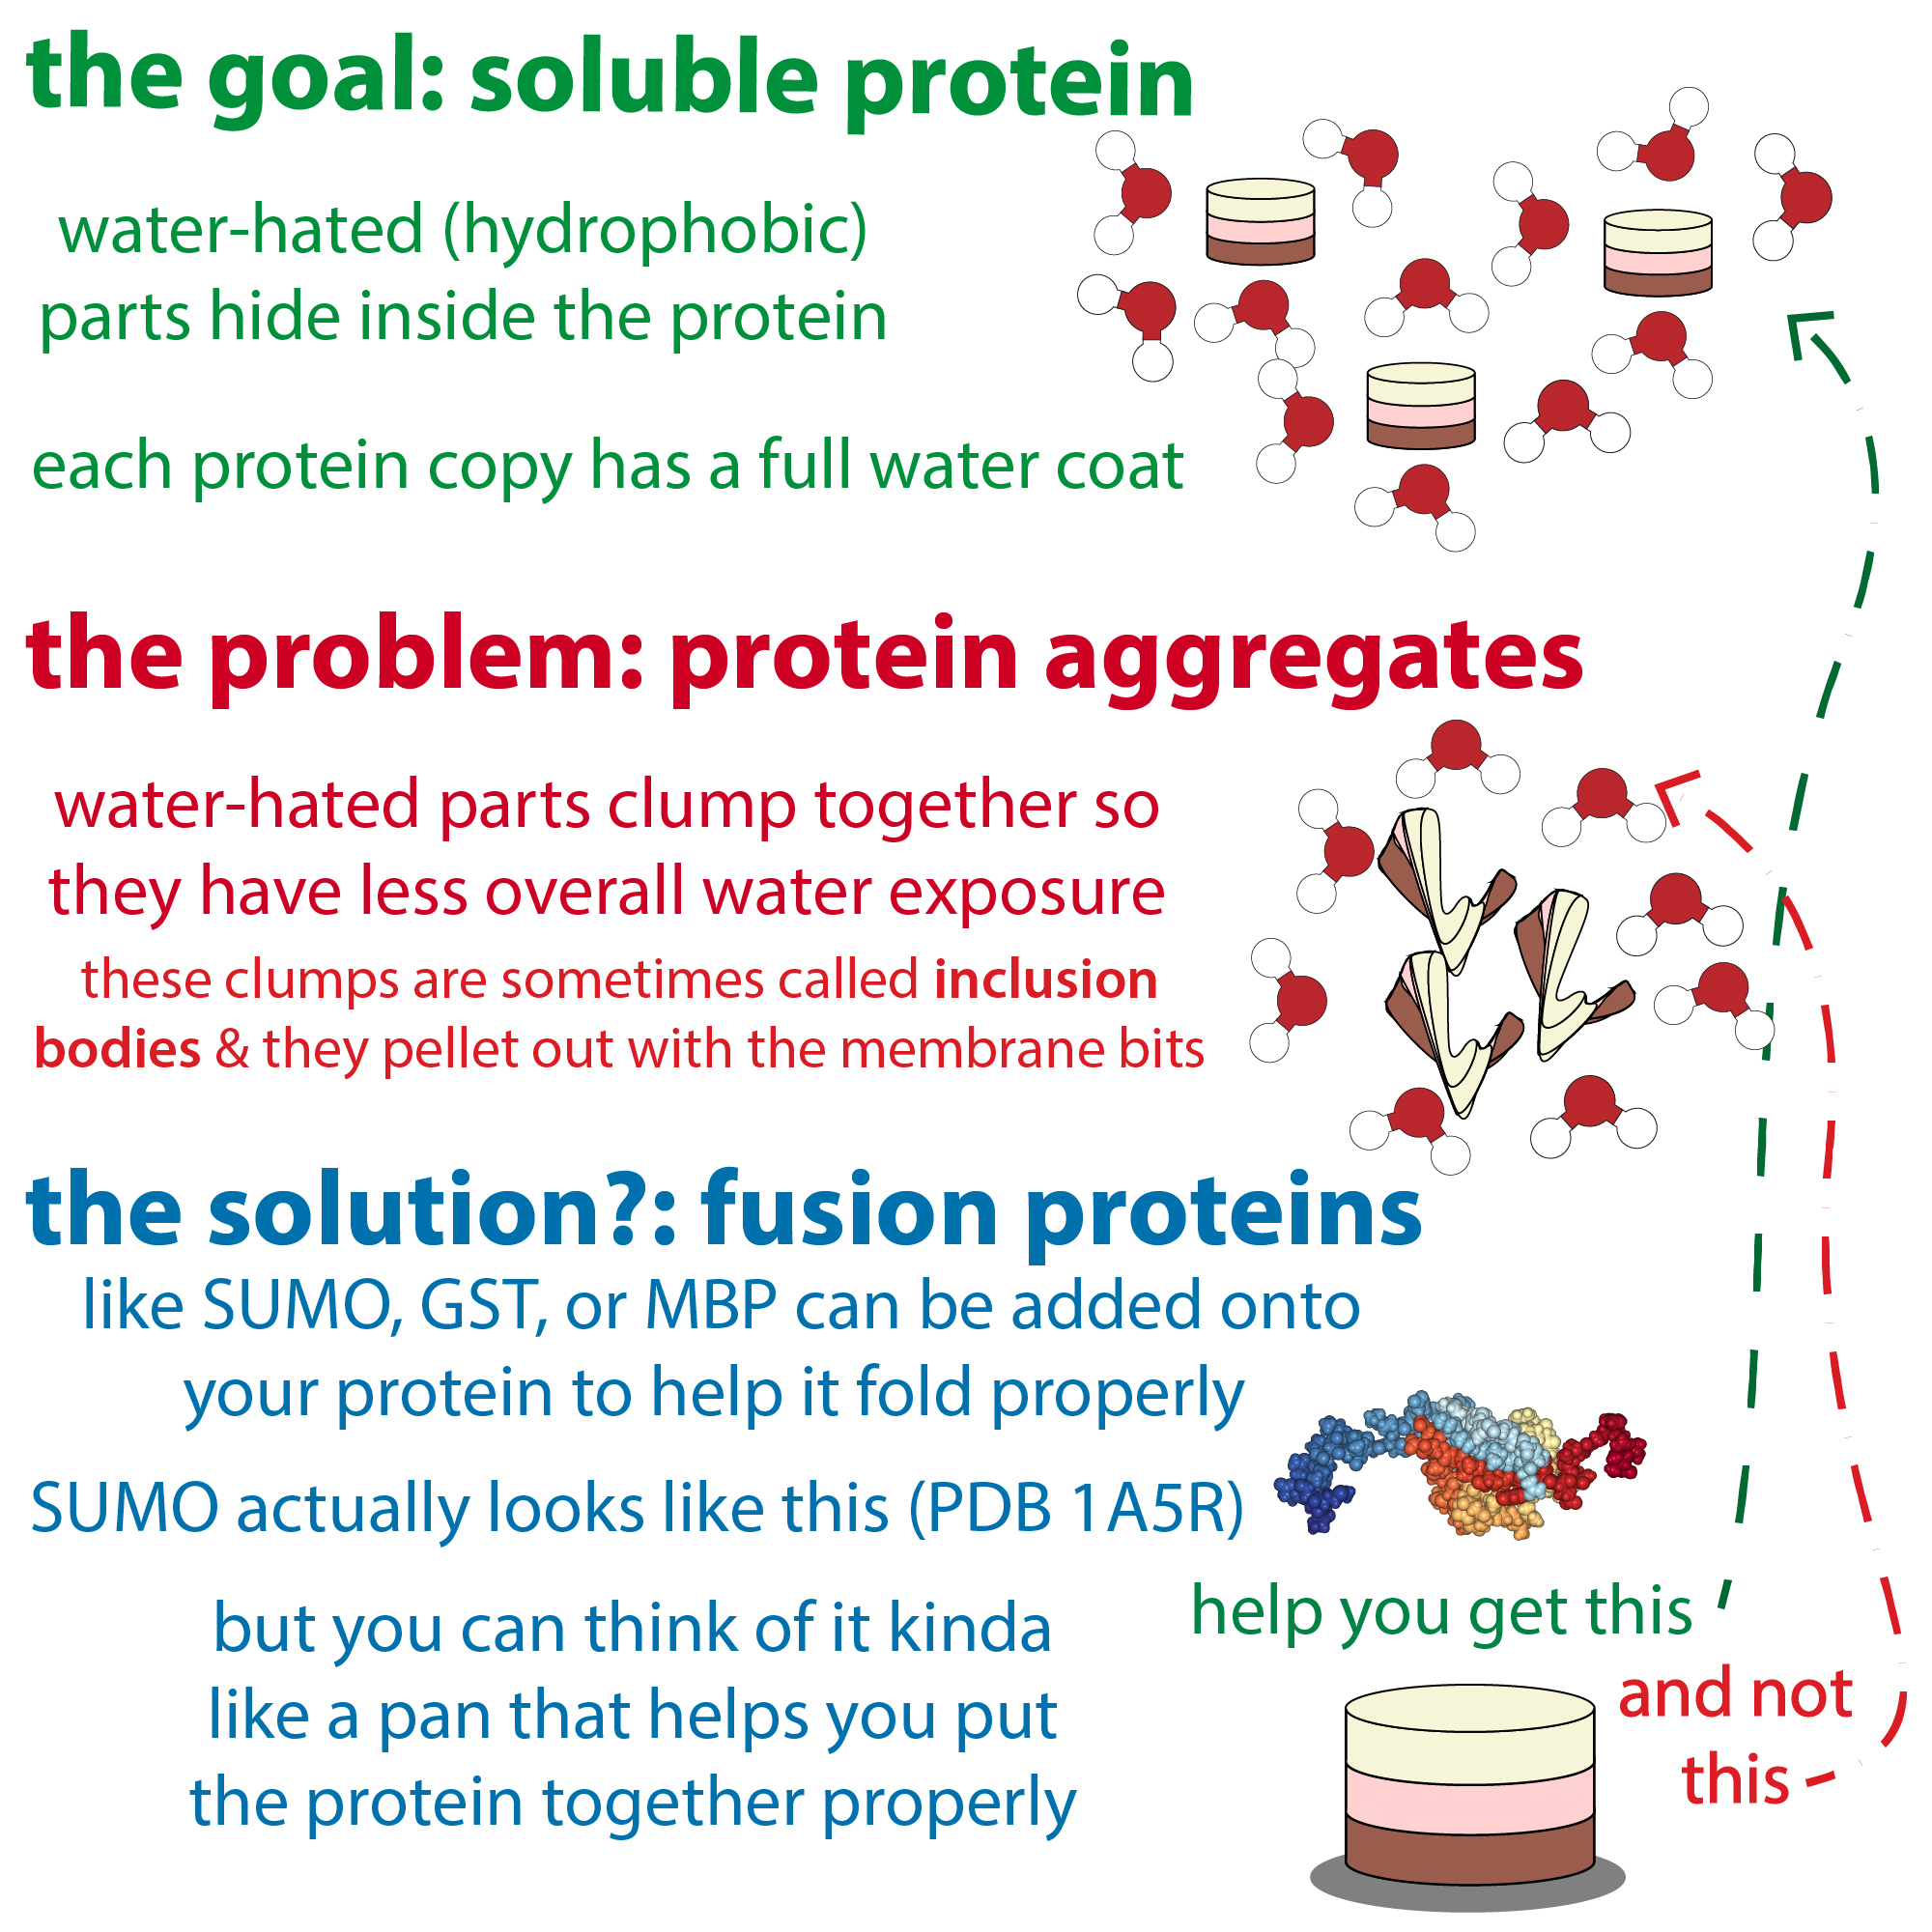
Although it’s the simplest, bacterial expression systems might not play nice with your desired protein – at least at first. Your protein may not get made (or at least not much of it), it might get degraded (such as by proteases), and/or it might misfold, perhaps then ending up in insoluble aggregates called inclusion bodies. You can do a number of things to try to optimize the system including:
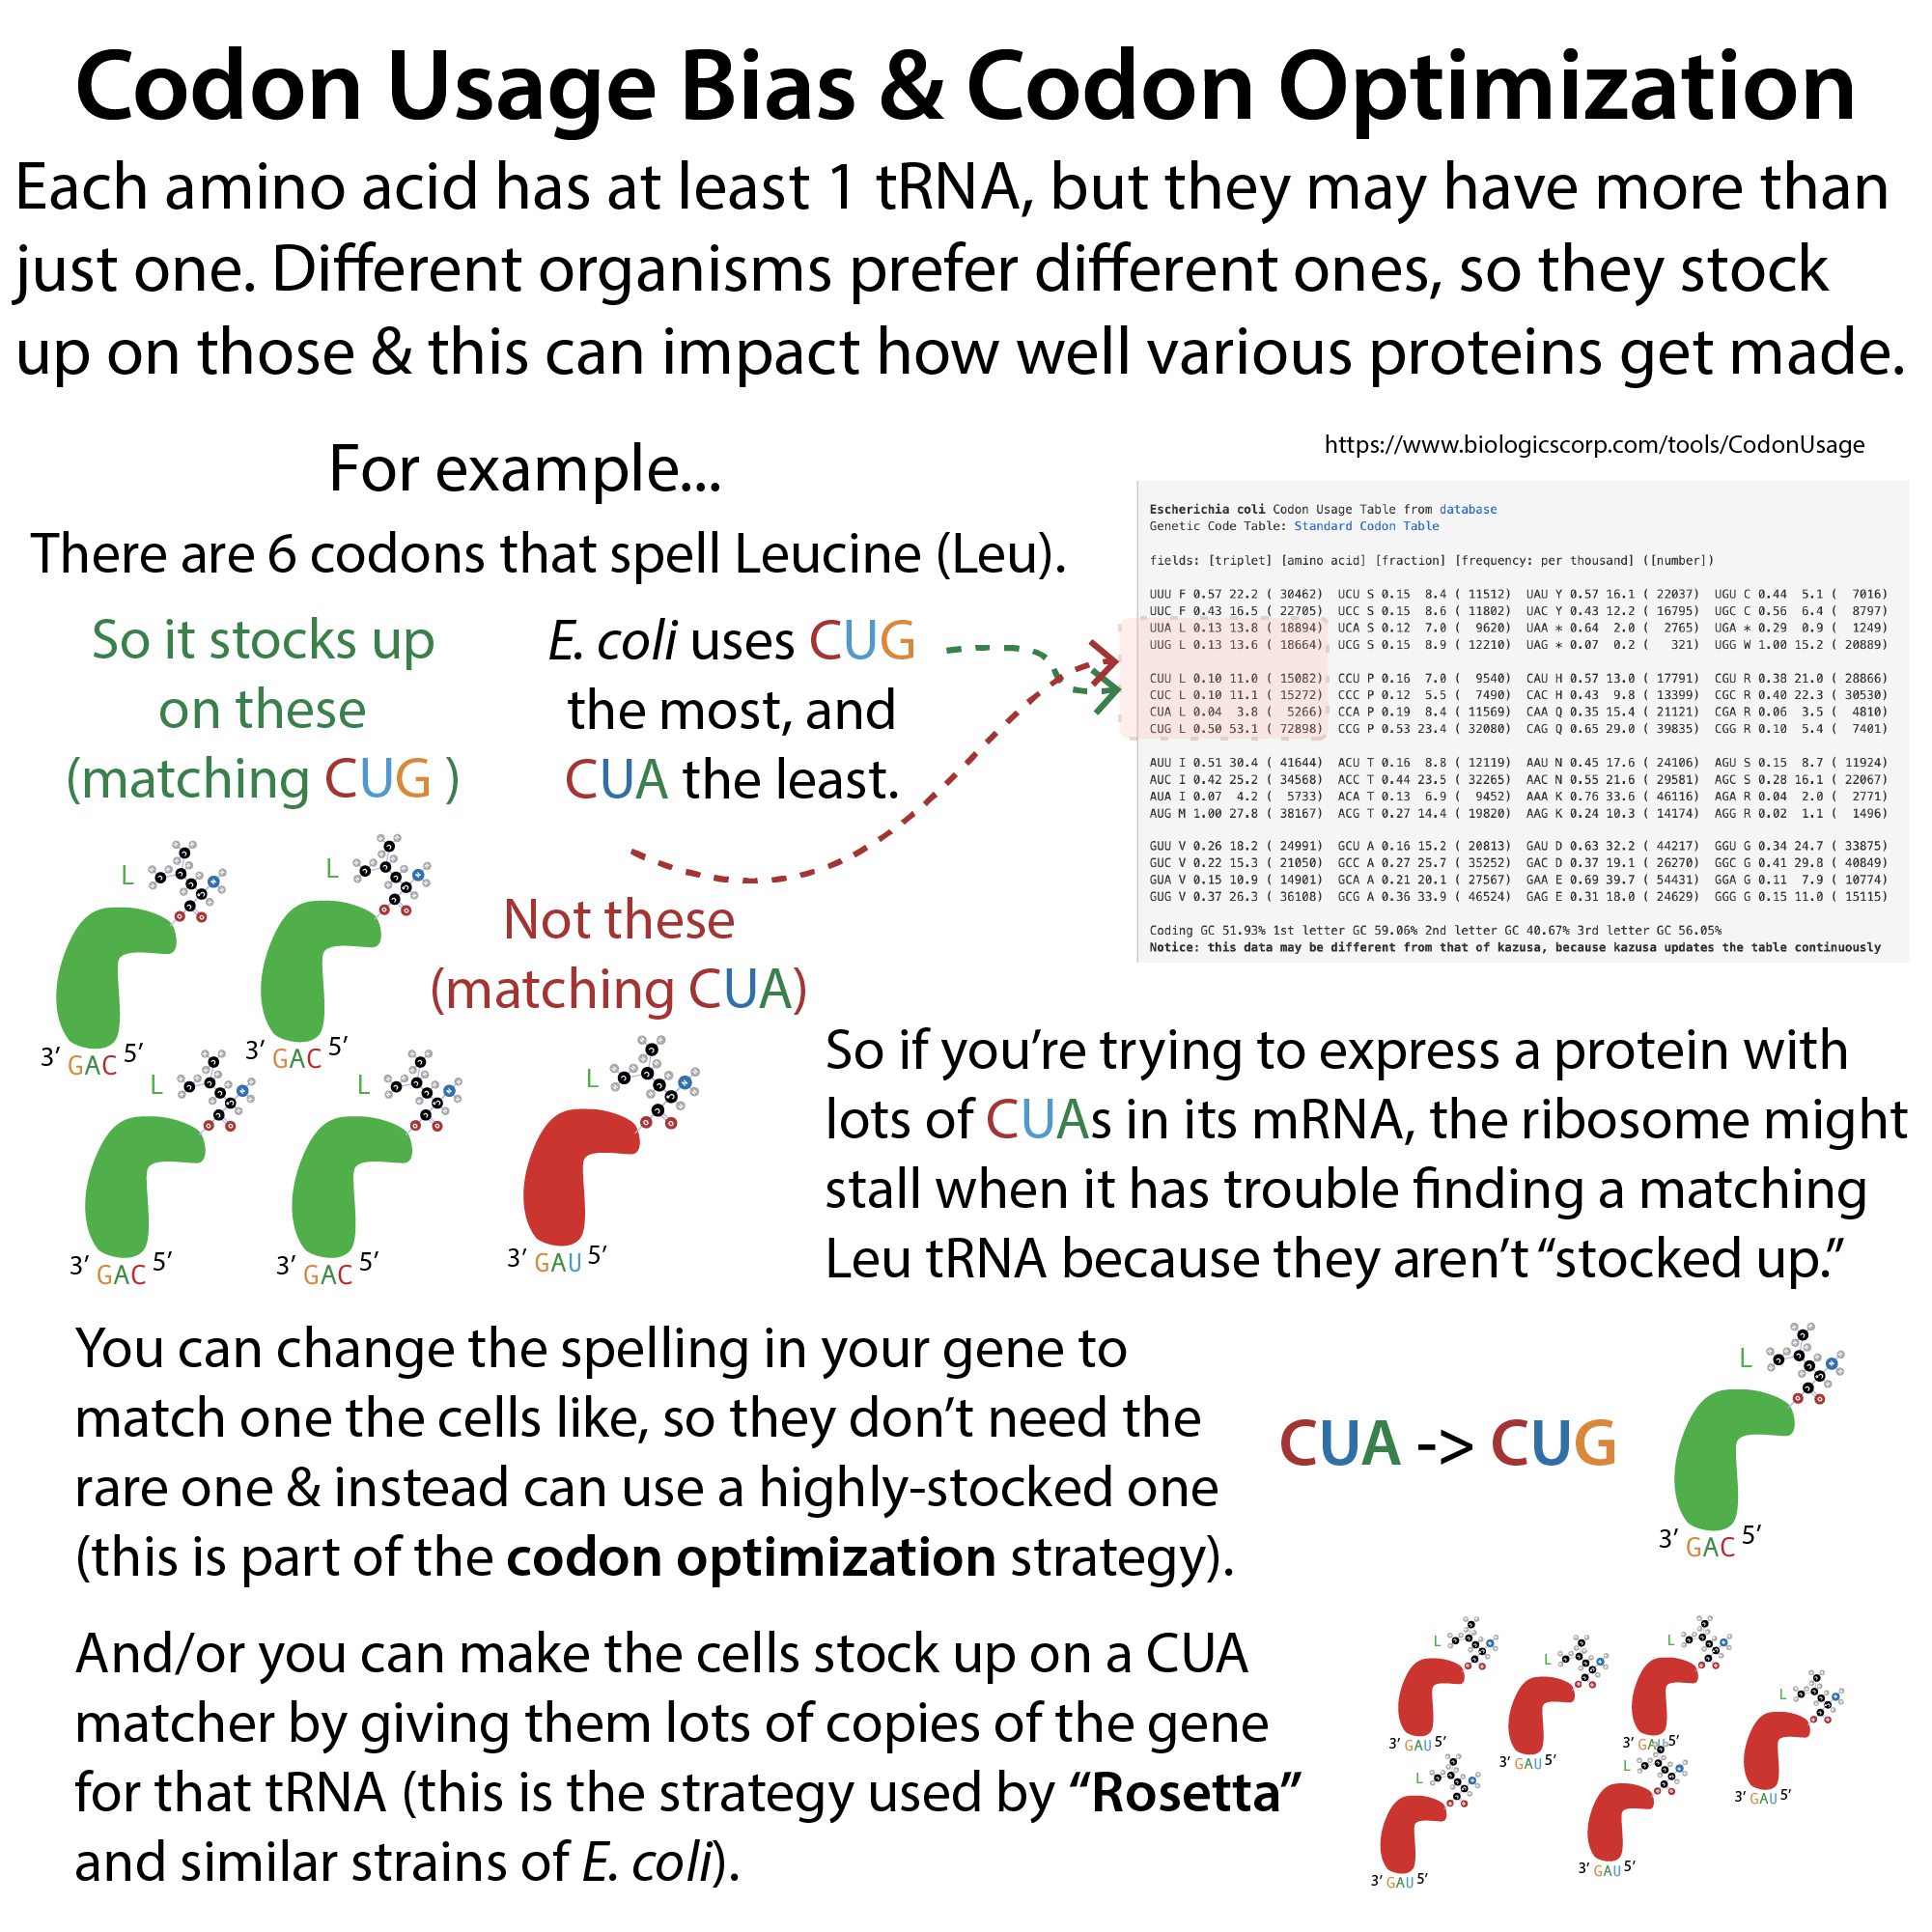
- Optimizing the sequence to get it to be expressed well – such as through codon optimization to use codons the cells are most used to using (and thus stock up tRNAs for).
- Optimizing the sequence to make the protein more stable – such as through shortening the genetic instructions to truncate (cut off) floppy ends, etc., perhaps only studying one domain at a timeUsing a different type of expression cells, such as ones with extra genes for rare codons
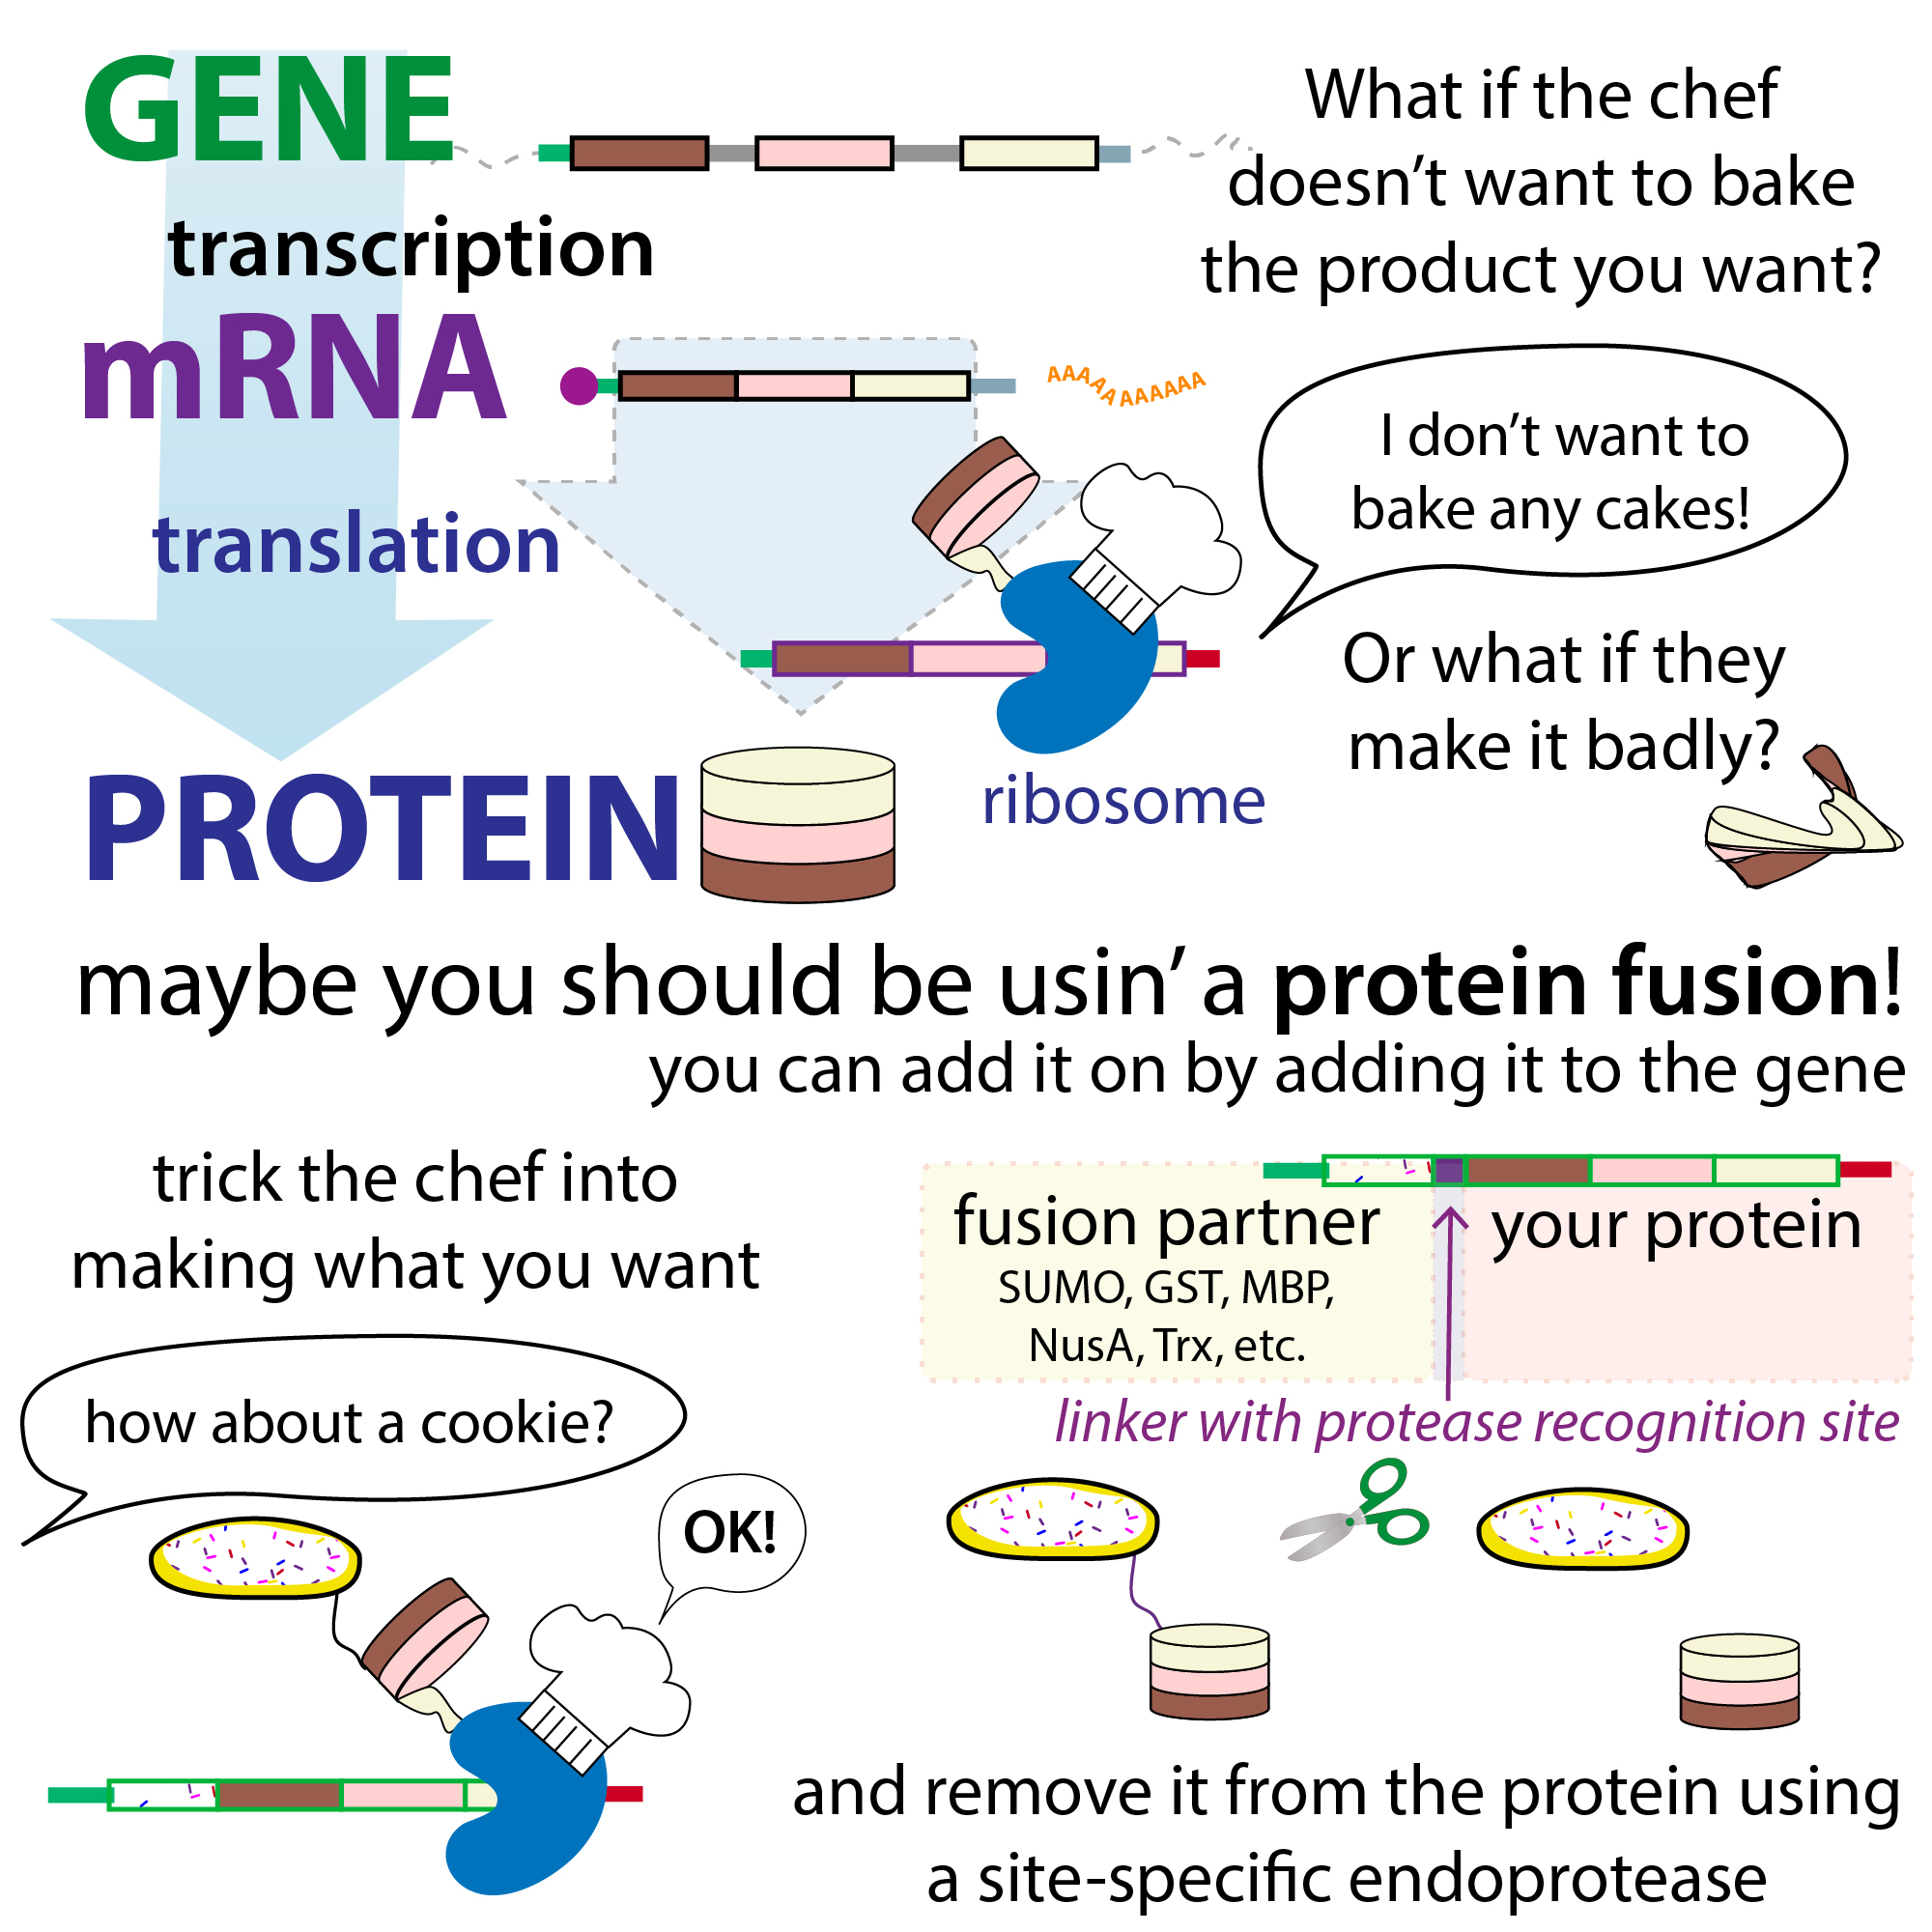
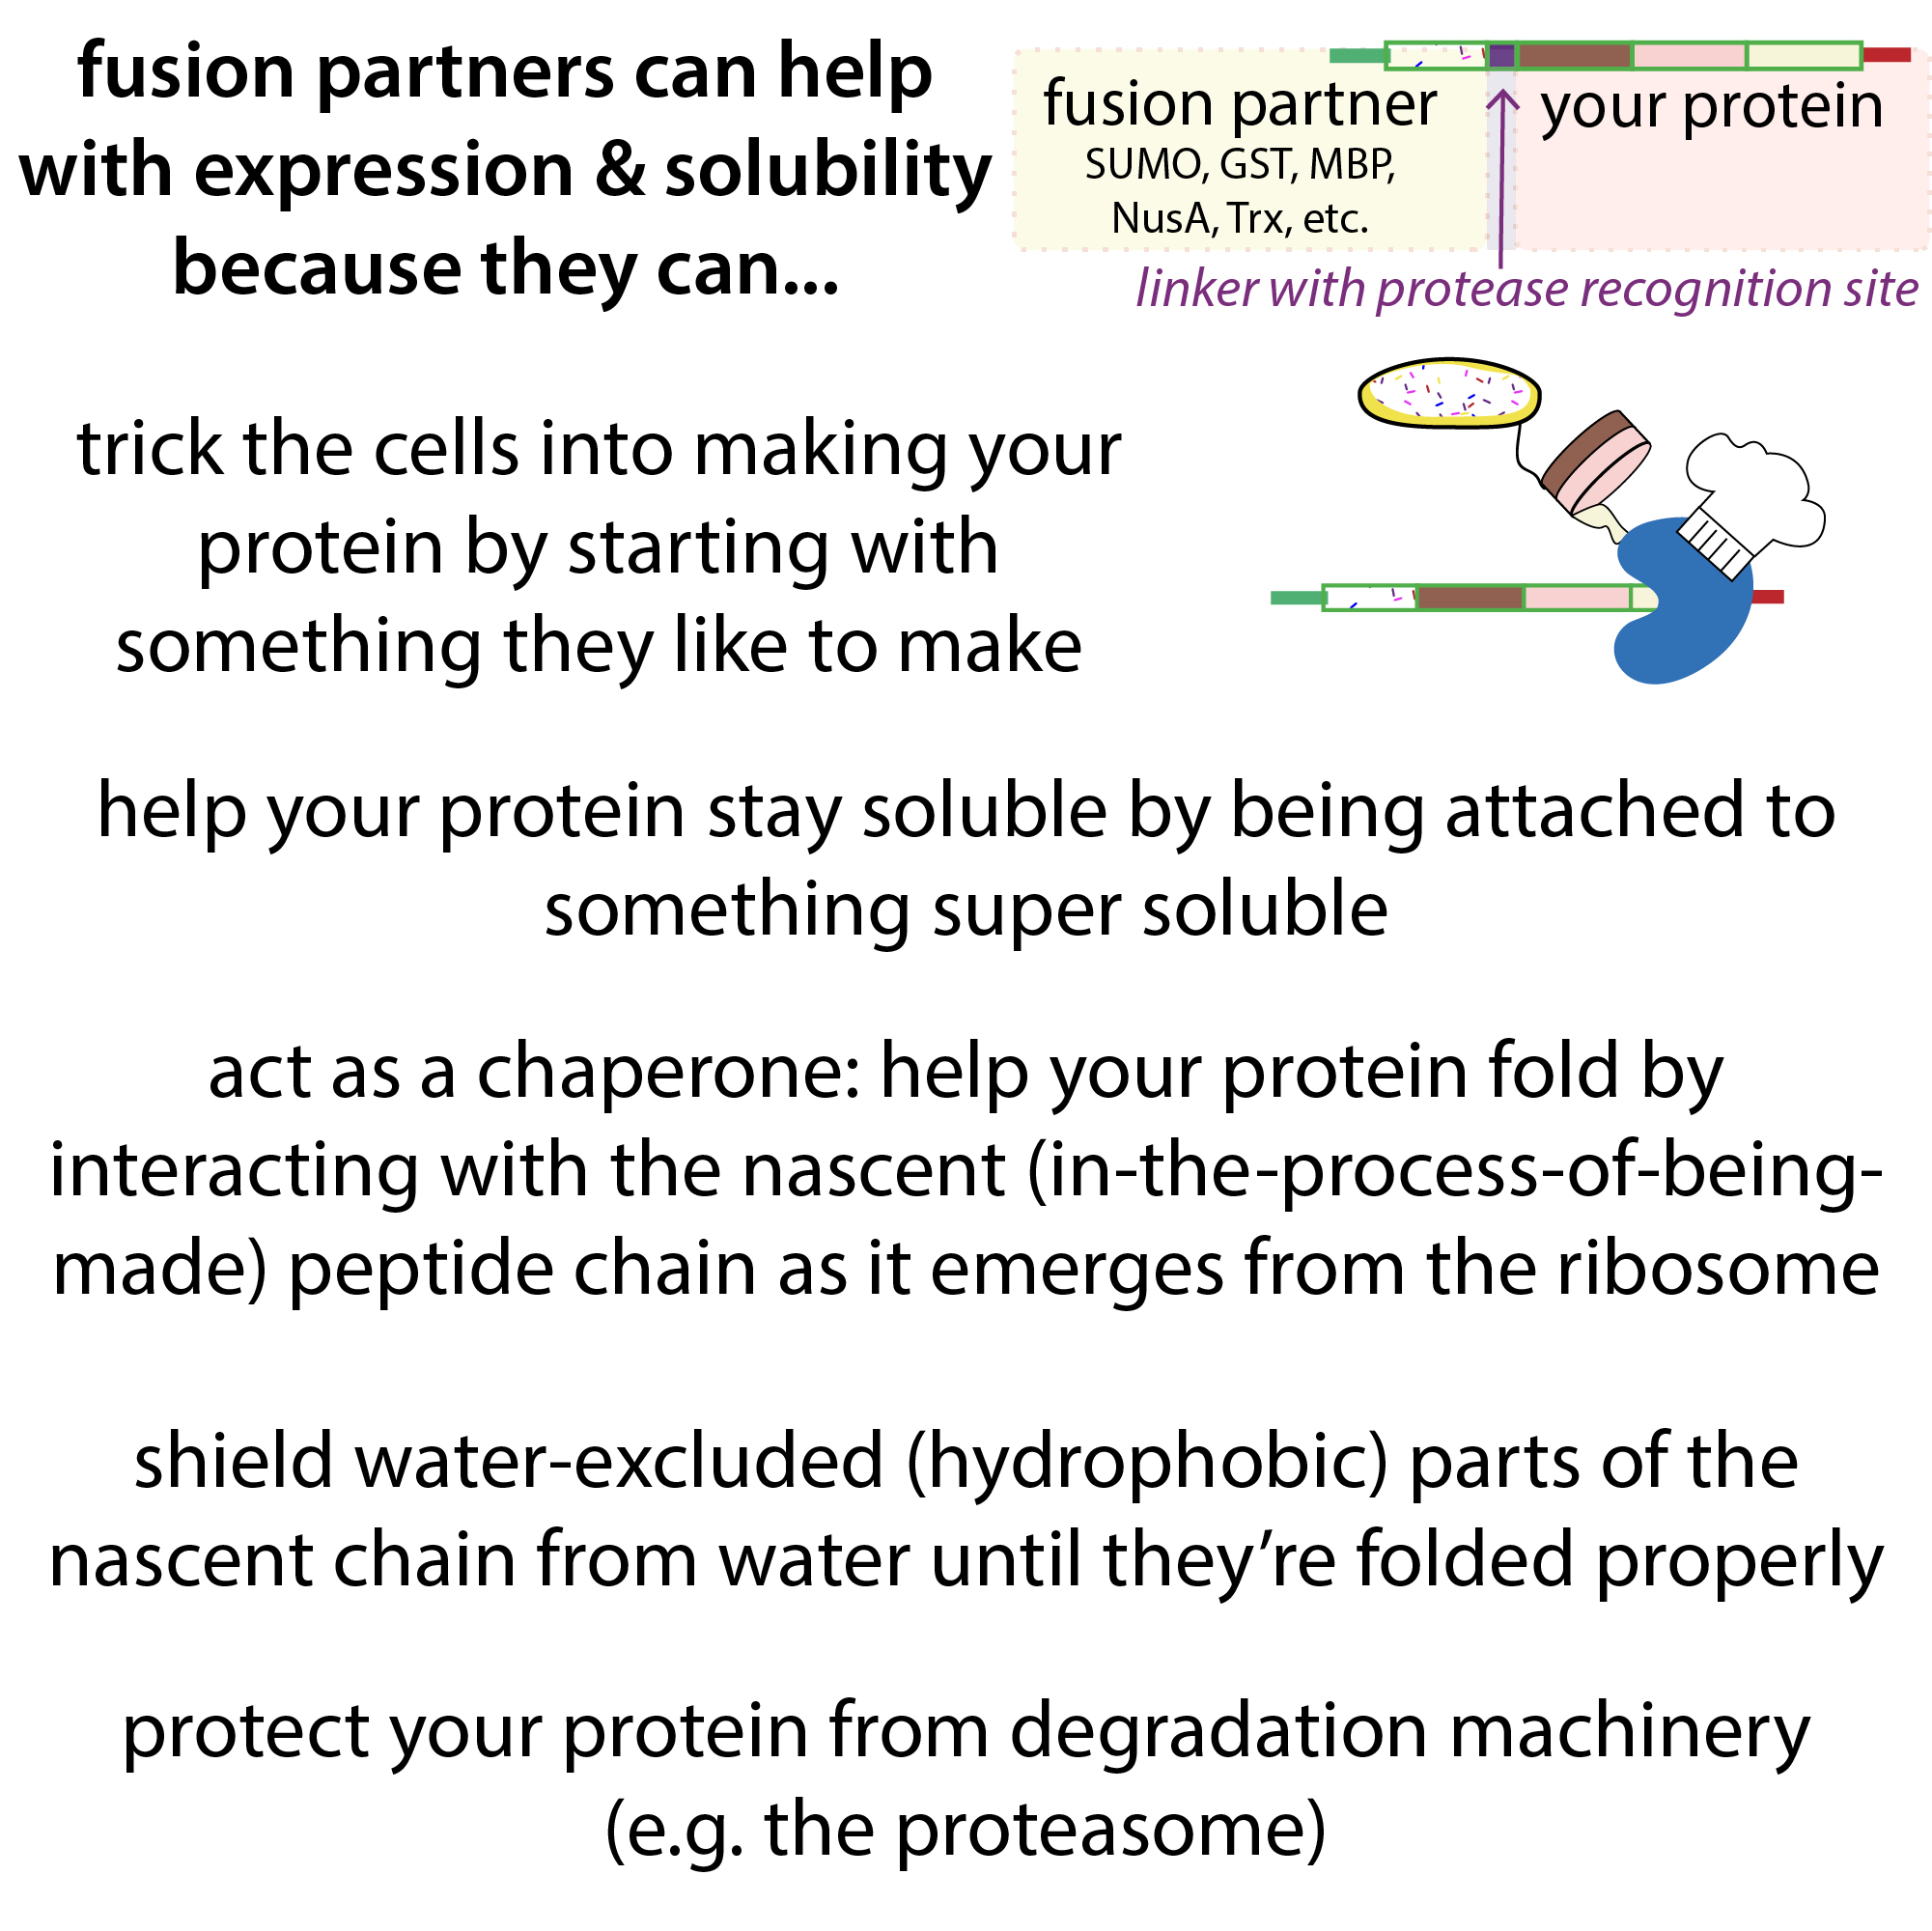
- Adding a fusion partner – sticking the genetic instructions for making a small, highly-cooperative and soluble, protein (such as SUMO, GST, or MBP) onto the end of the instructions for making your protein can trick the cells into making your (attached) protein. And, the fusion partner can help your protein stay soluble.
Graphics





Expression in insect cells
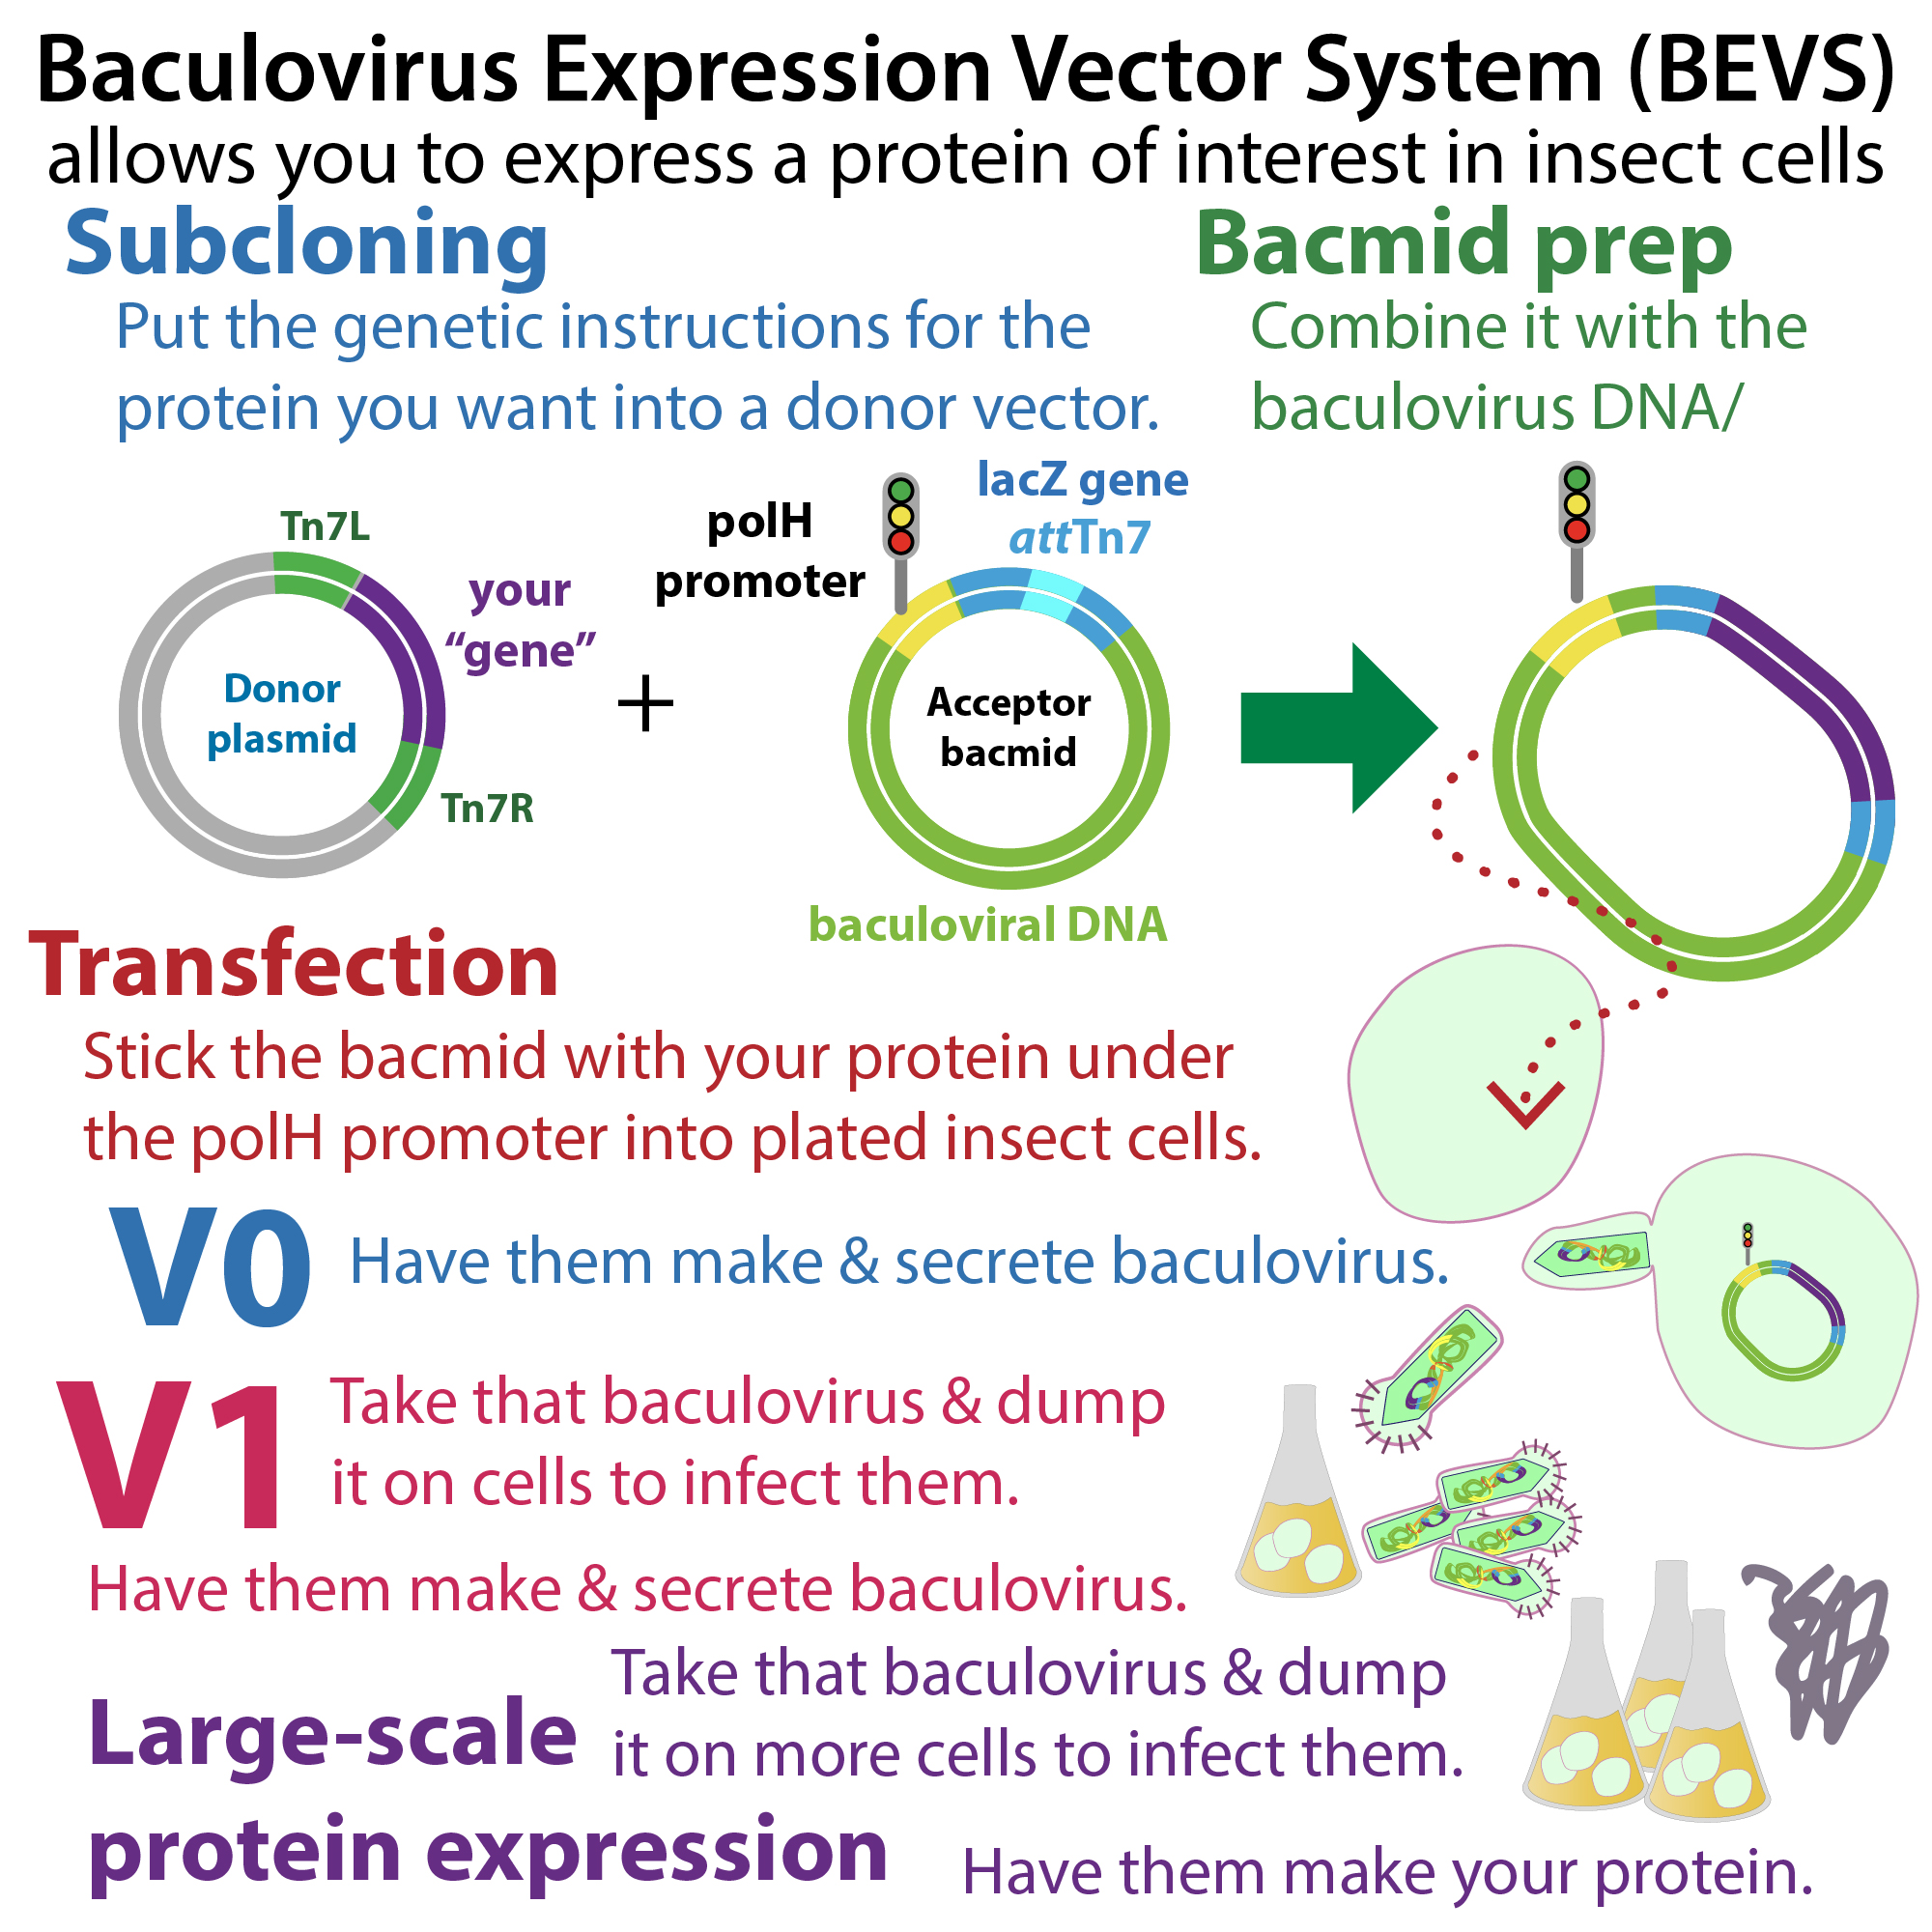
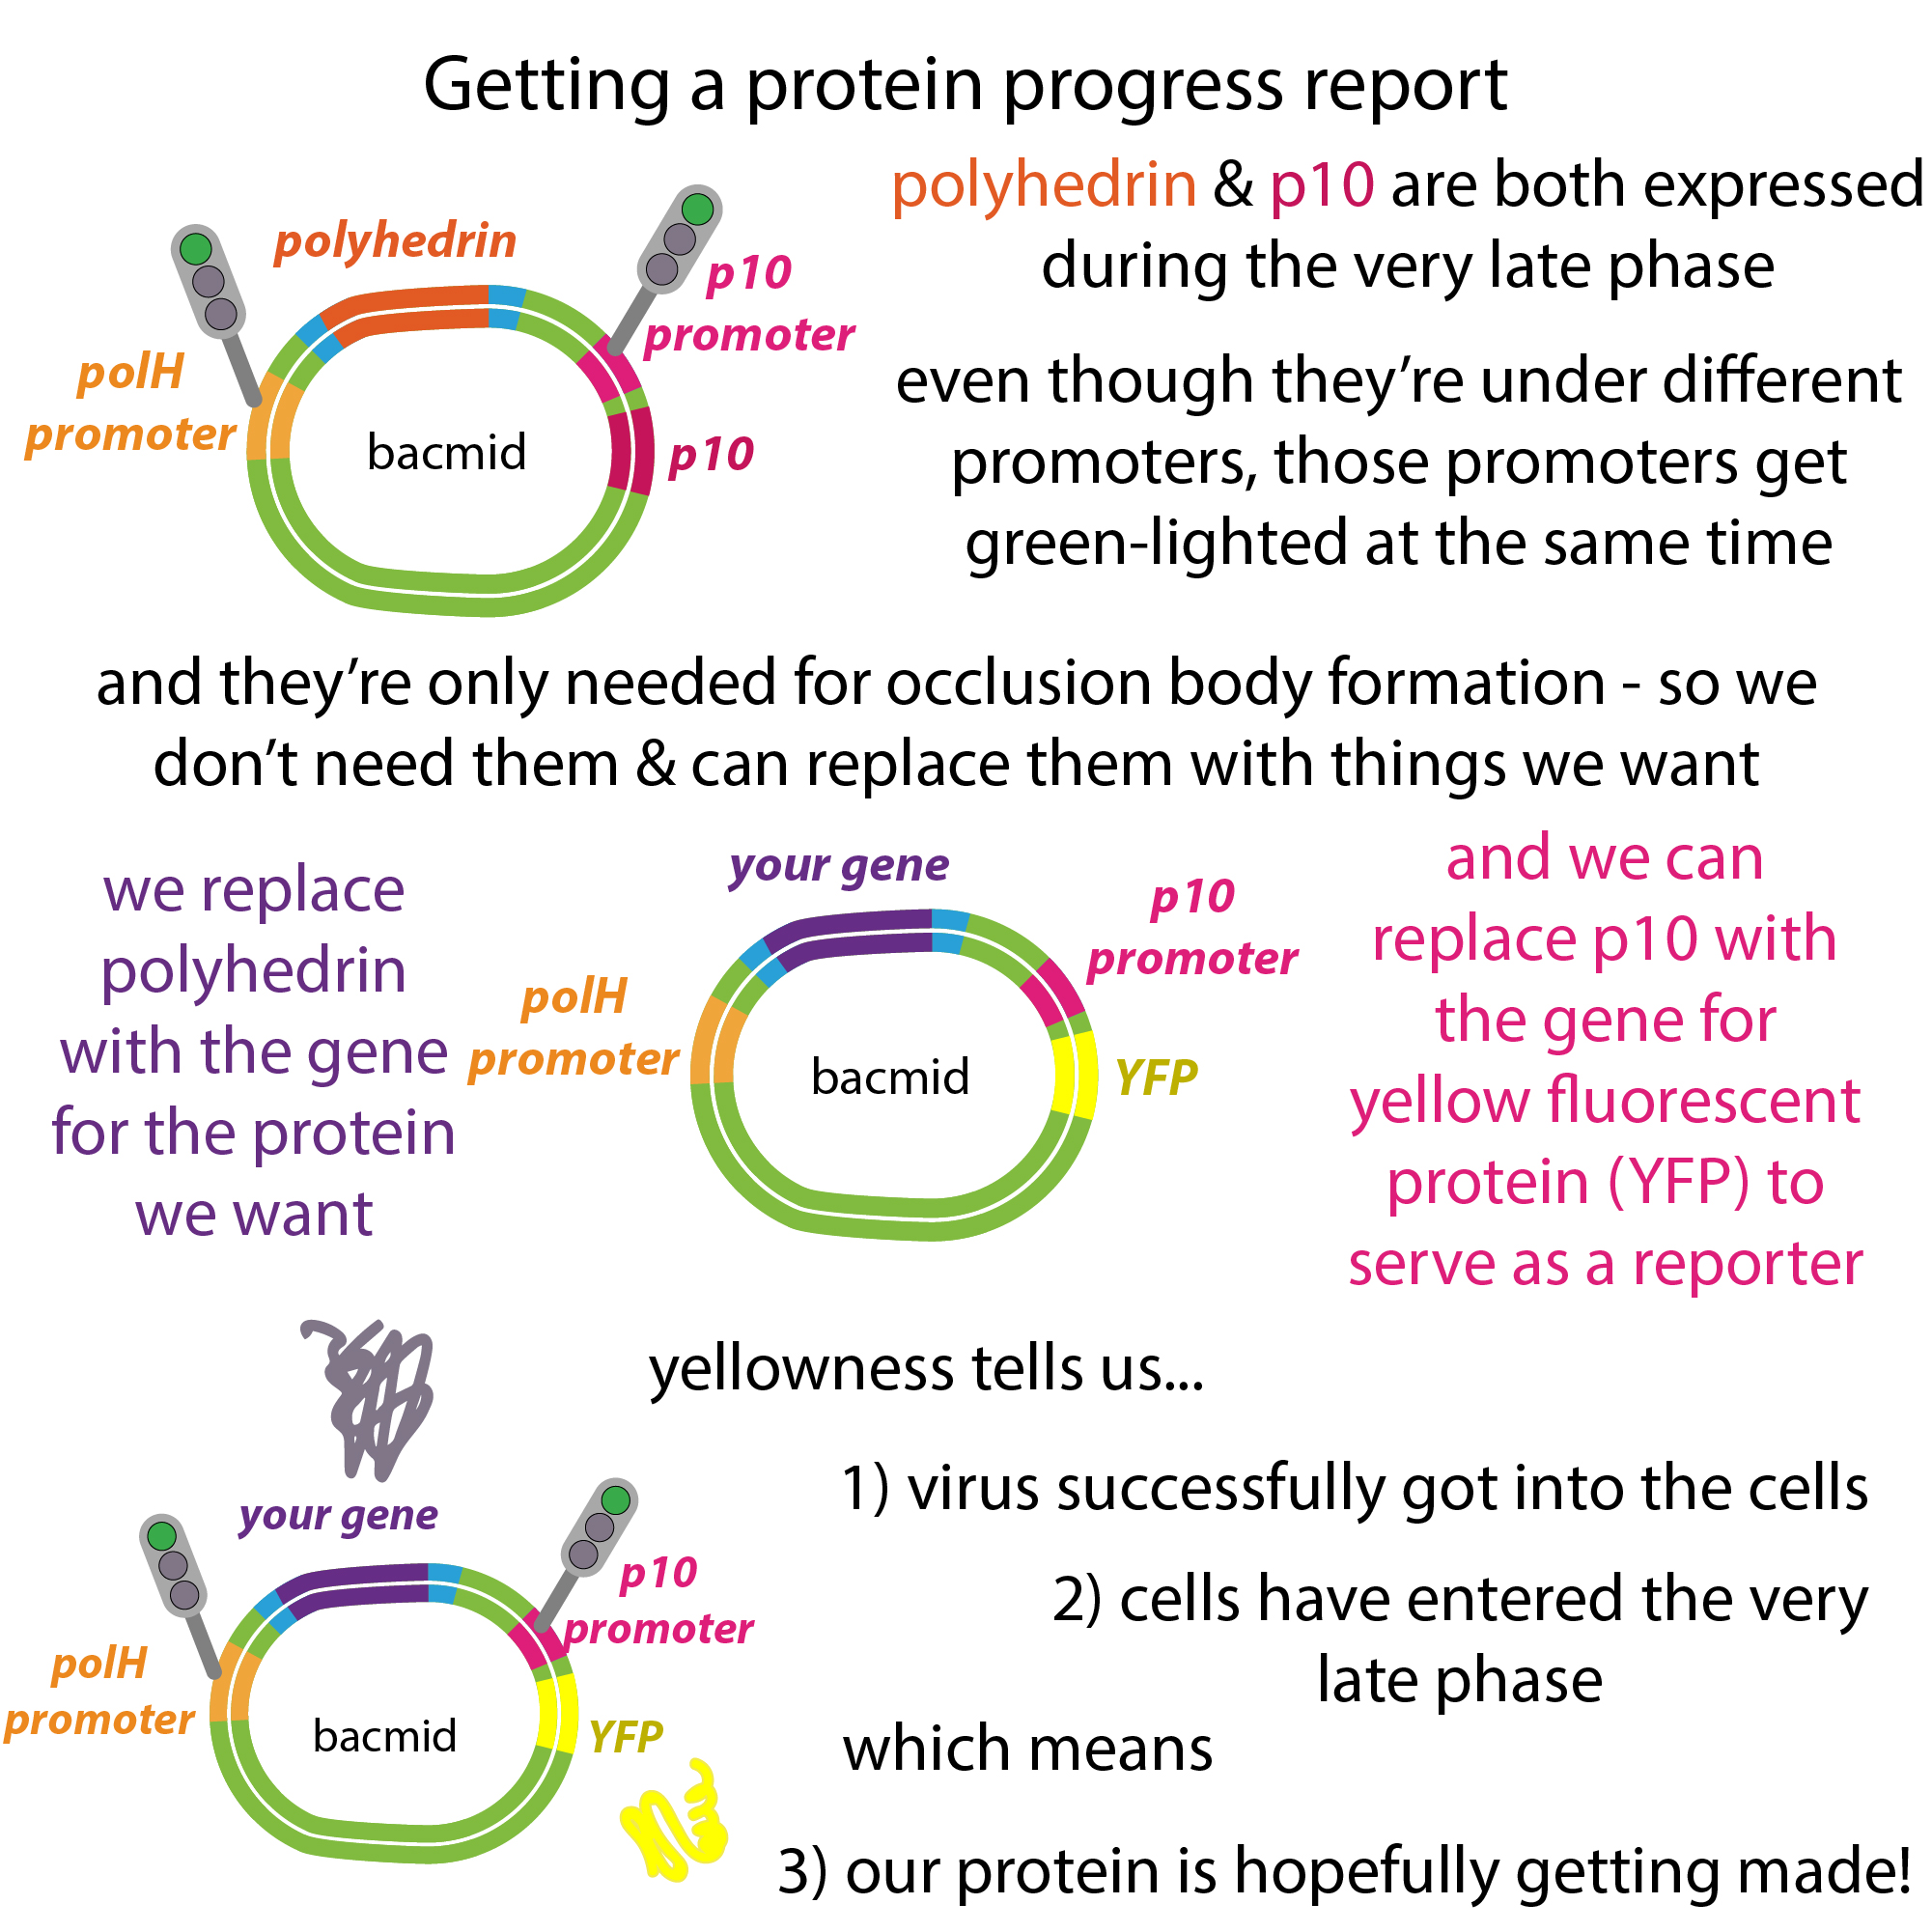
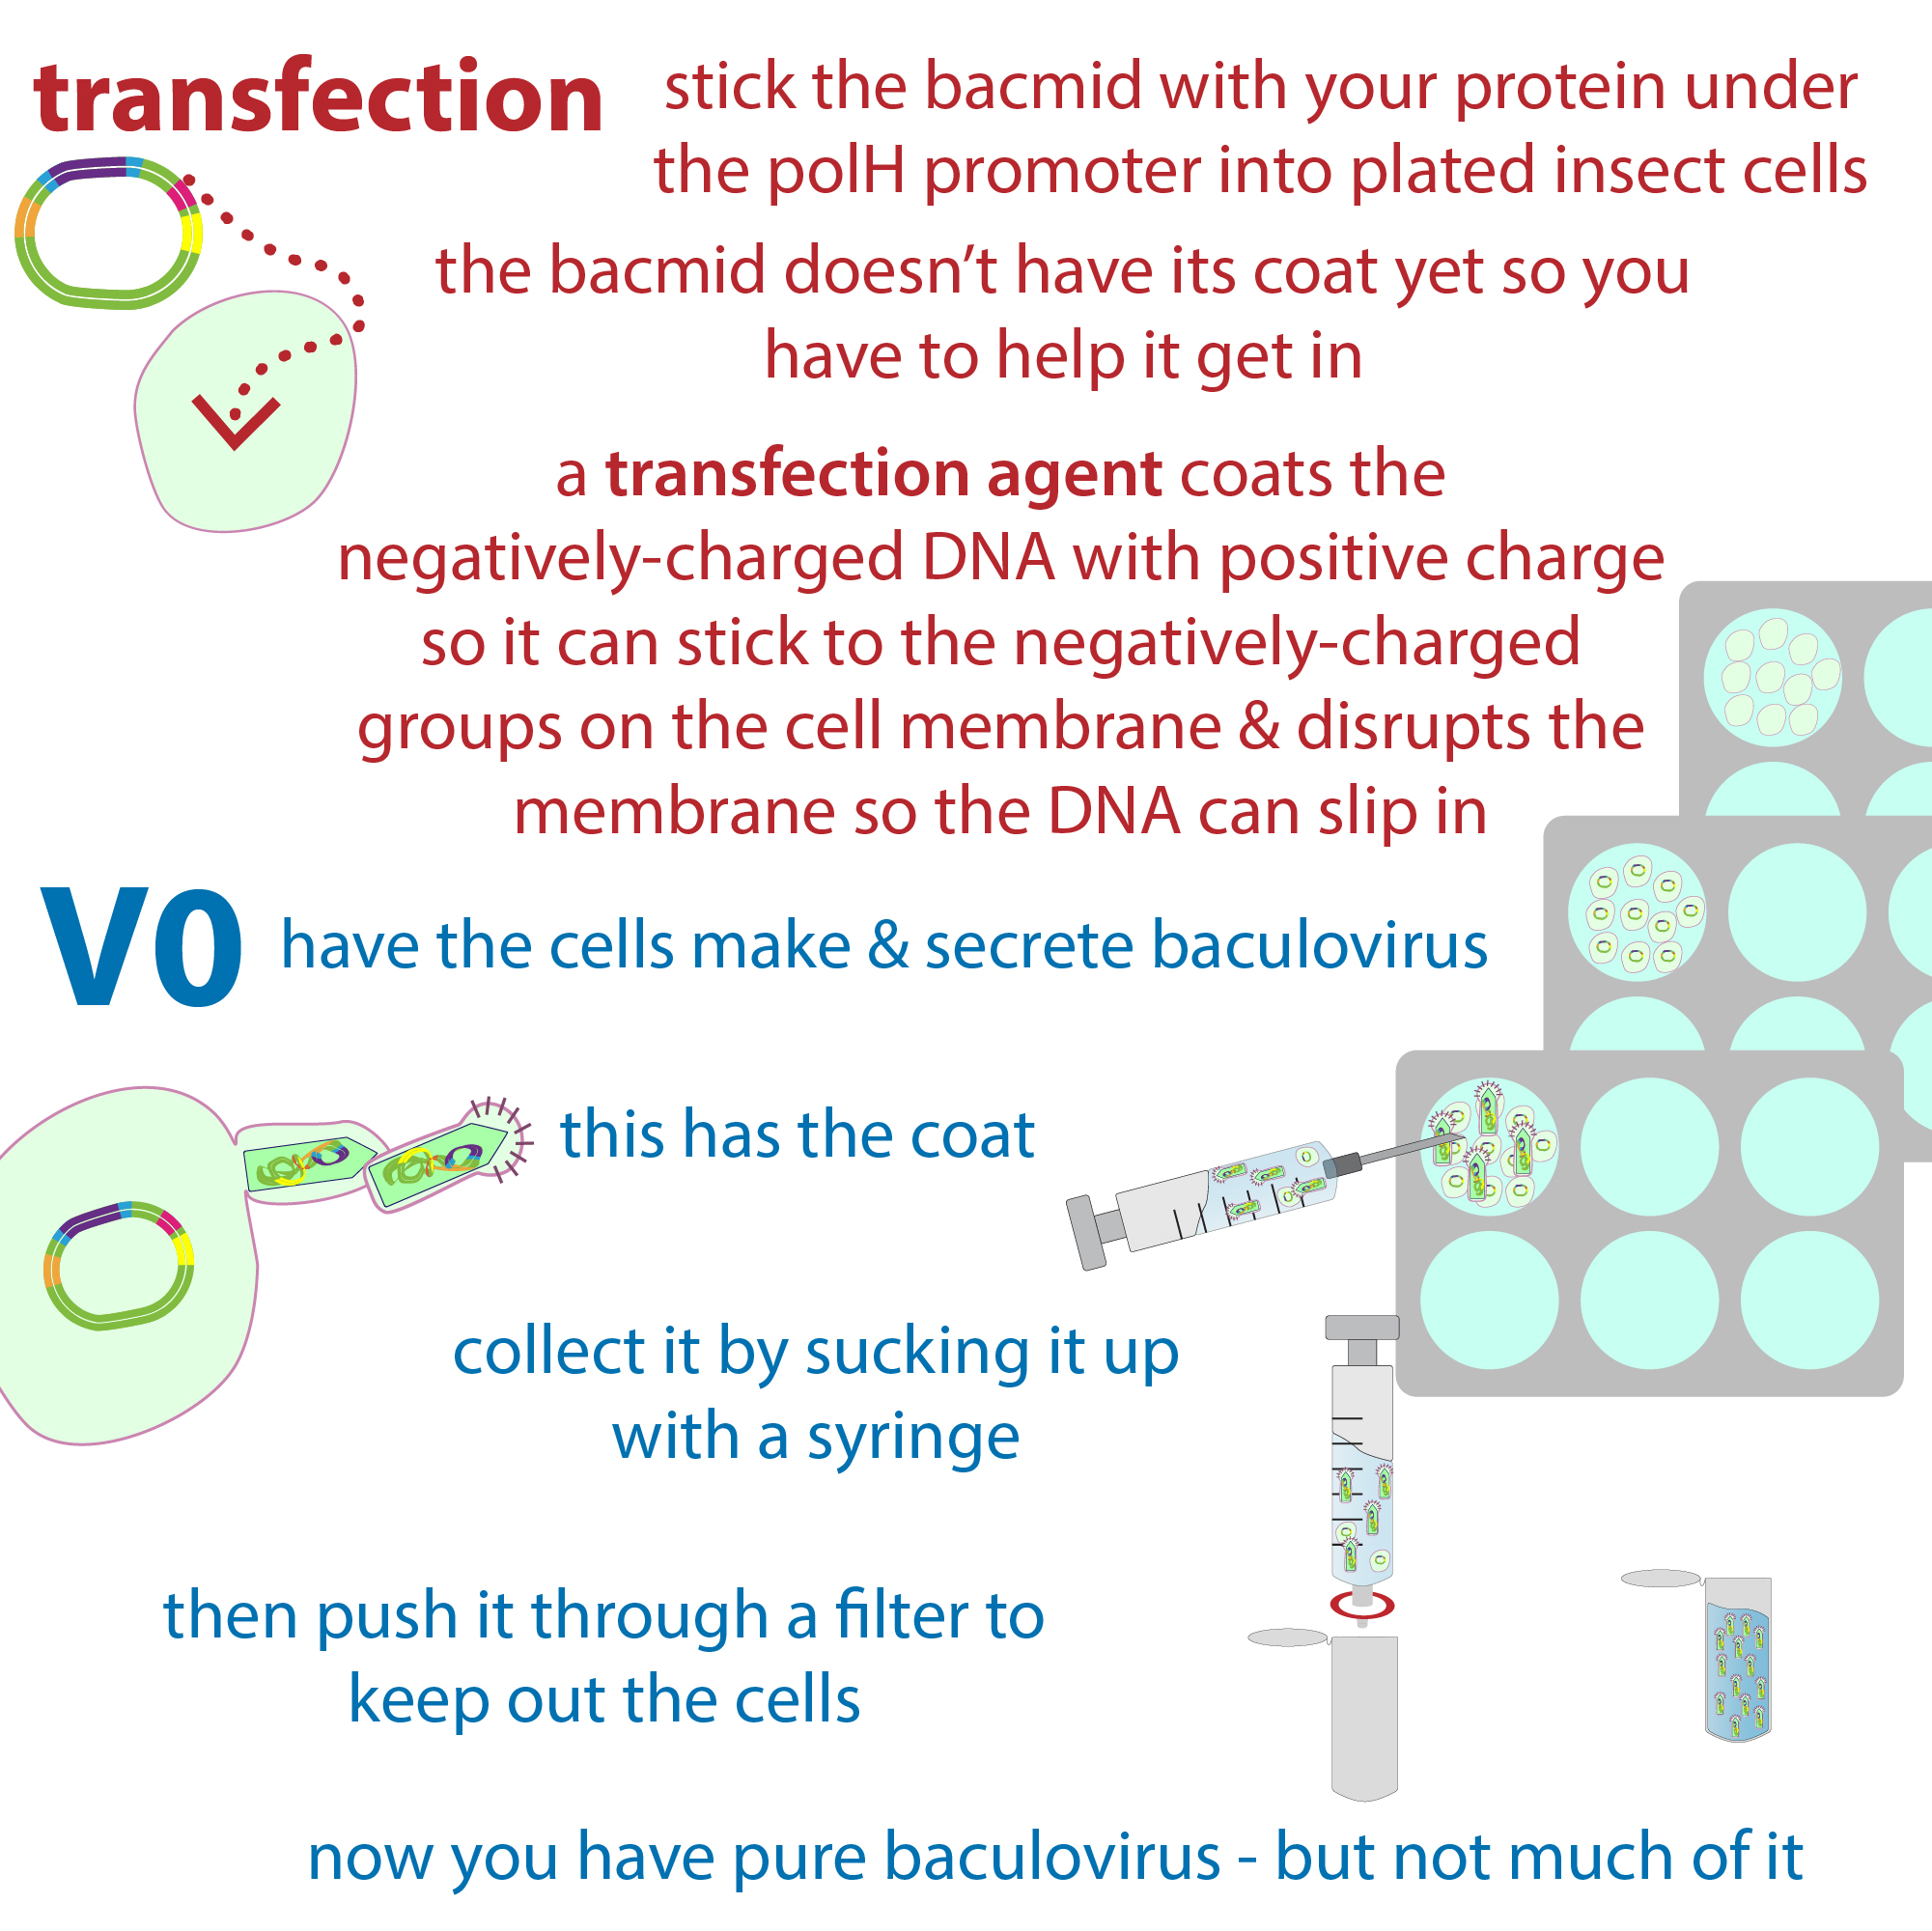
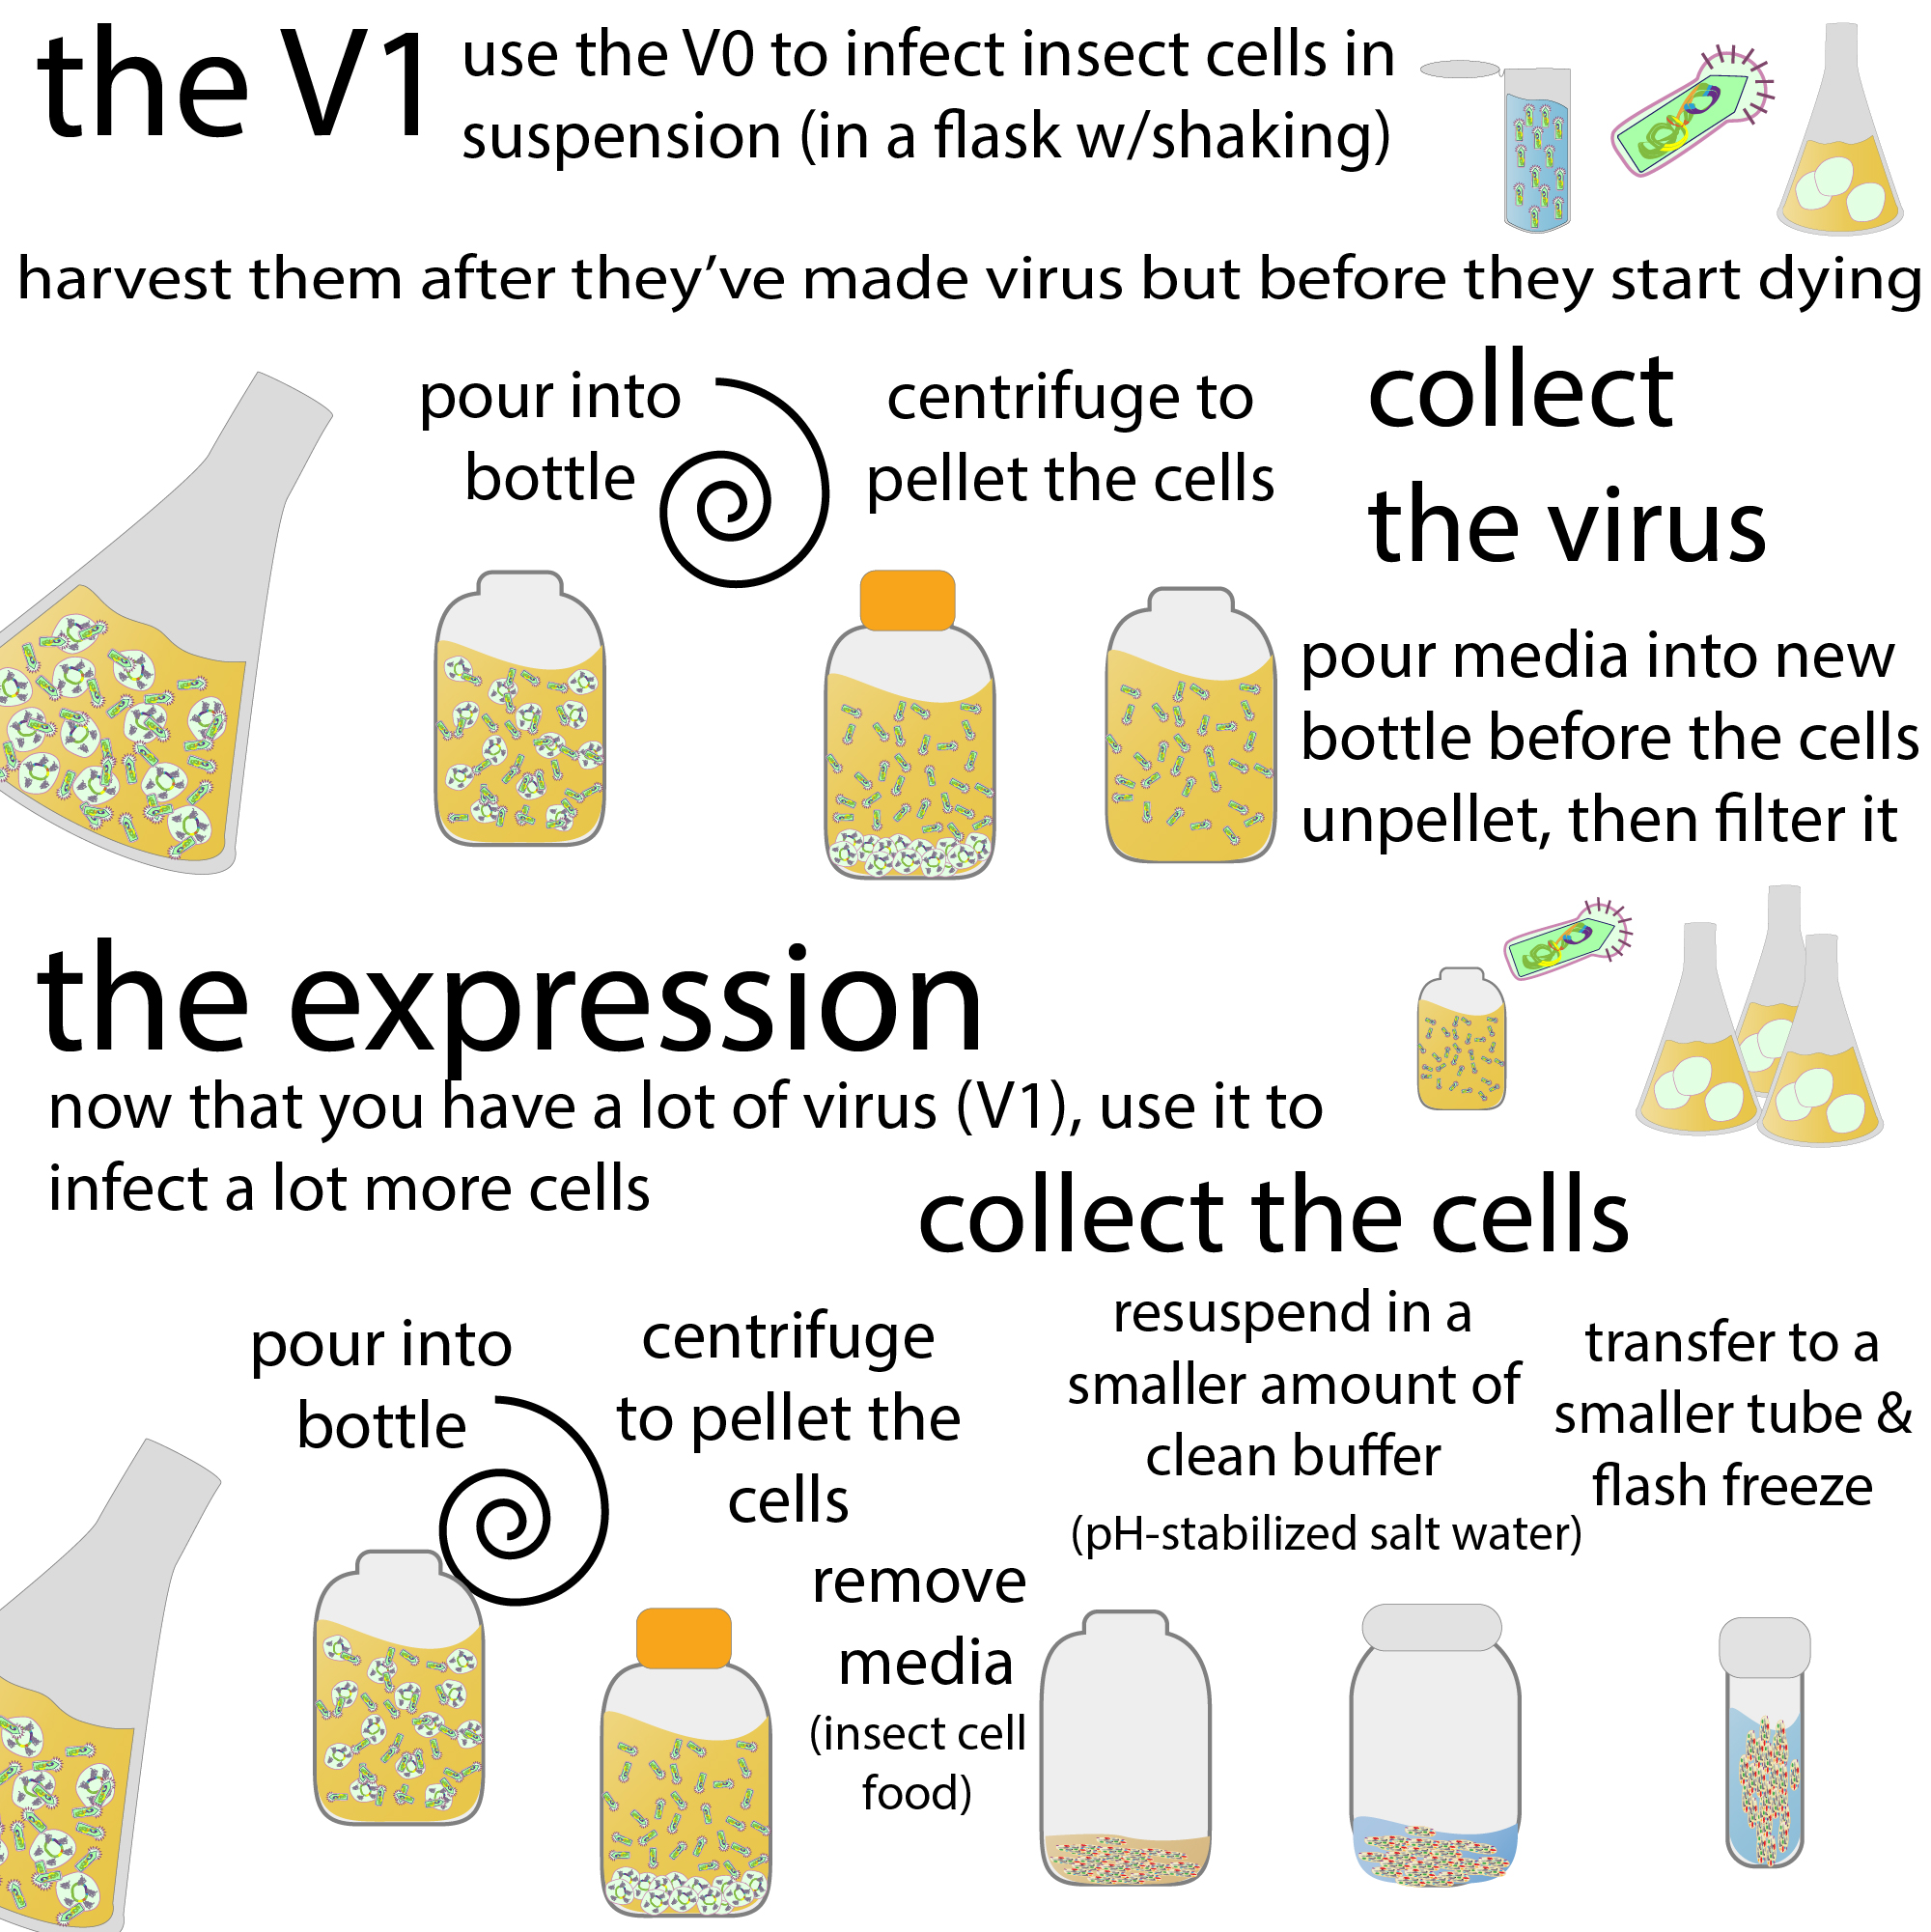
This uses something called a baculovirus expression vector system (BEVs). It starts similarly to the bacteria way, but instead of cloning our cDNA into a normal plasmid, you clone it into a bacmid. A bacmid is a plasmid that can replicate in both bacteria and insect cells, and it can cause insect cells to make baculovirus (a coated virus containing that bacmid). So you can grow it up in bacteria, getting the bacteria to make lots and lots of copies of the bacmid, and then purify that bacmid and stick it into insect cells. Those insect cells will make and secrete baculovirus from the bacmid instructions, and that baculovirus can then be collected & used to infect large quantities of insect cells, which will then start making the protein you want.
Graphics



Expression in mammalian cells
For this, you can use various modified vectors including viral vectors, which use harmless viruses, such as some modified adenoviruses, to get the DNA inside of cells. Or, you can use non-viral methods such as electroporation to get DNA into the cells.
Warning: this is very expensive!!
Once you’ve expressed a protein, you need to harvest the cells and later lyse them
Cell harvest
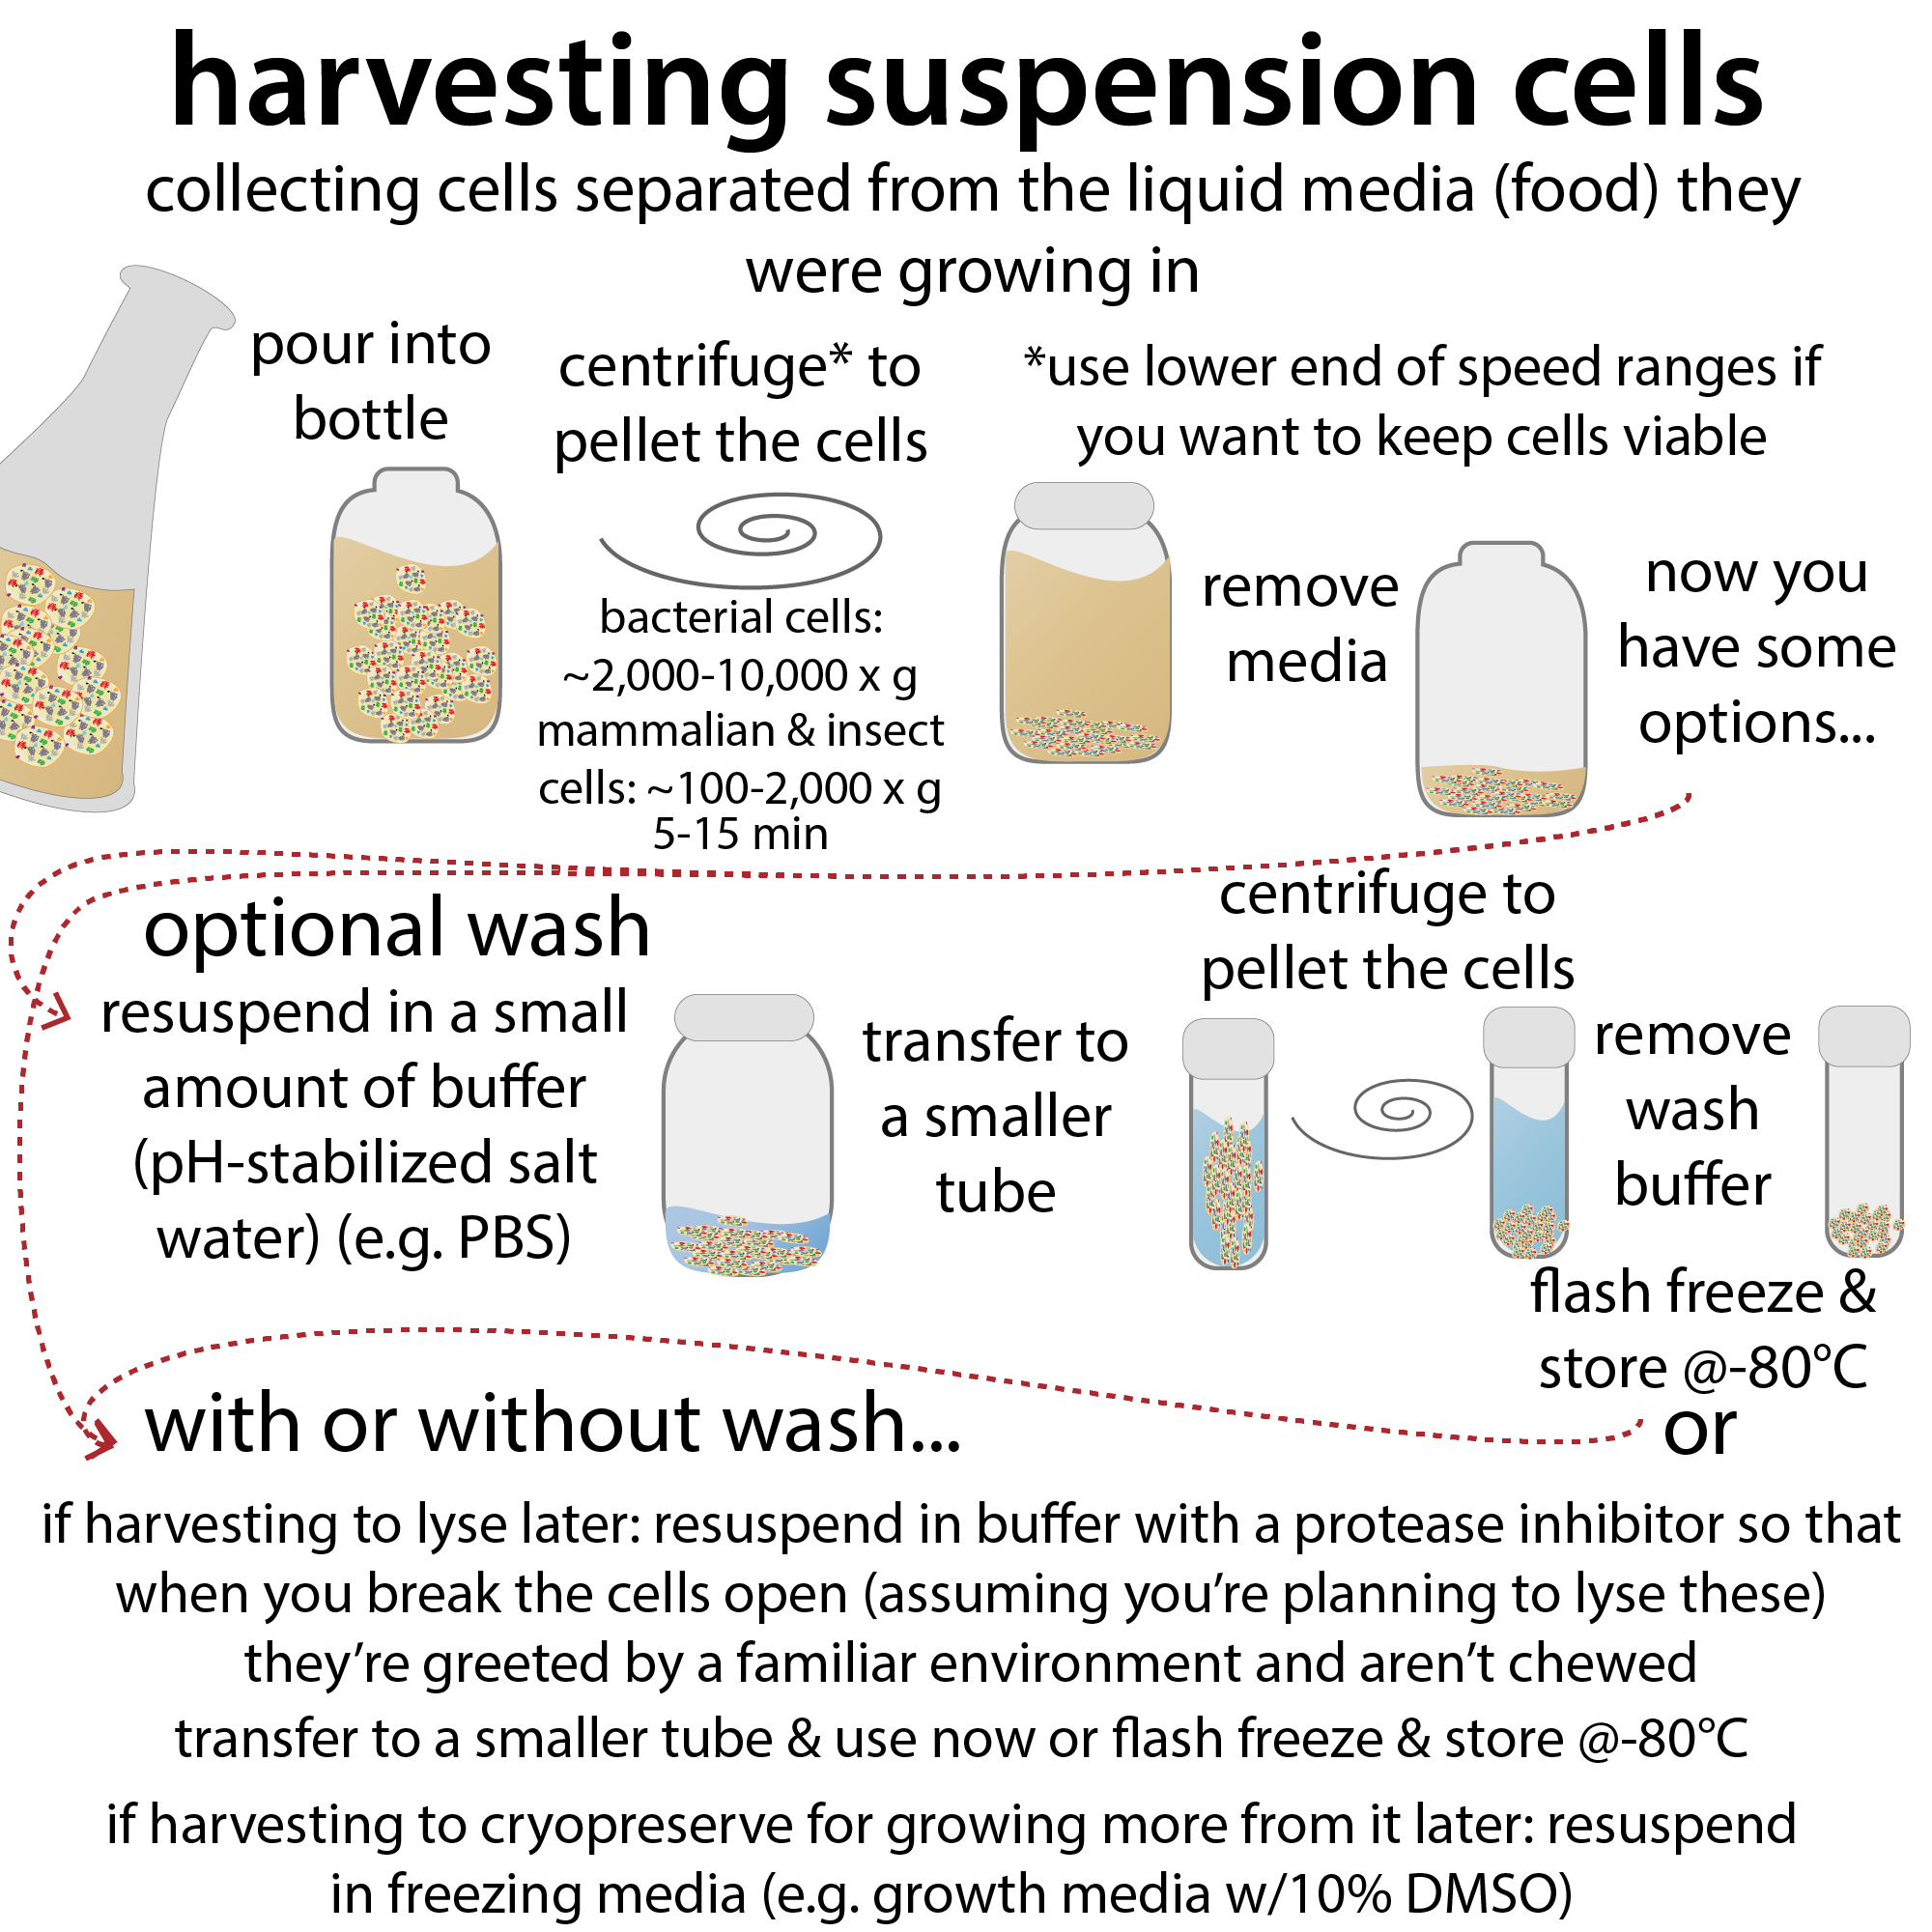
This is where you remove the liquid media (cell food) from the cells after they’ve made your protein, but leave the cells intact. You do this by pouring the cell-filled media from the flasks you’ve grown them in into bottles and centrifuging them (spinning them really fast) – the cells are heavy so the sink to the bottom, forming a pellet. Then you can pour off the liquid (supernatant) and resuspend the cells in a (much smaller amount of) cleaner liquid – add your resuspension buffer and vortex and/or pipet up and down a lot to get the cells un-clumped and evenly distributed. Now flash freeze these in liquid nitrogen & store them in the -80C freezer until you’re ready for the next step
Graphics
This is a placeholder tab content. It is important to have the necessary information in the block, but at this stage, it is just a placeholder to help you visualise how the content is displayed. Feel free to edit this with your actual content.
Associated content & resources
- Choosing an expression system
- Bacterial protein overexpression
- Autoinduction for recombinant protein overexpression
- Picking colonies and starting starter cultures
- Bacterial growth media
- Bacterial expression strains – with emphasis on BL21 strains with plasmids containing tRNAs for rare codons:
- Baculovirus Expression Vector System (BEVS) aka insect cell-based expression
- Cell-free protein expression & the biochemistry of the PURE expression system
- Unnatural/non-canonical amino acid incorporation
- Codon usage bias and codon optimization
- Fusion partners for improving solubility & expression of recombinant proteins – SUMO, GST, MBP, etc.
- Troubleshooting and optimization
- Harvesting cell culture
Protein purification
Overview/outline, with graphics (click to enlarge)
Cell lysis
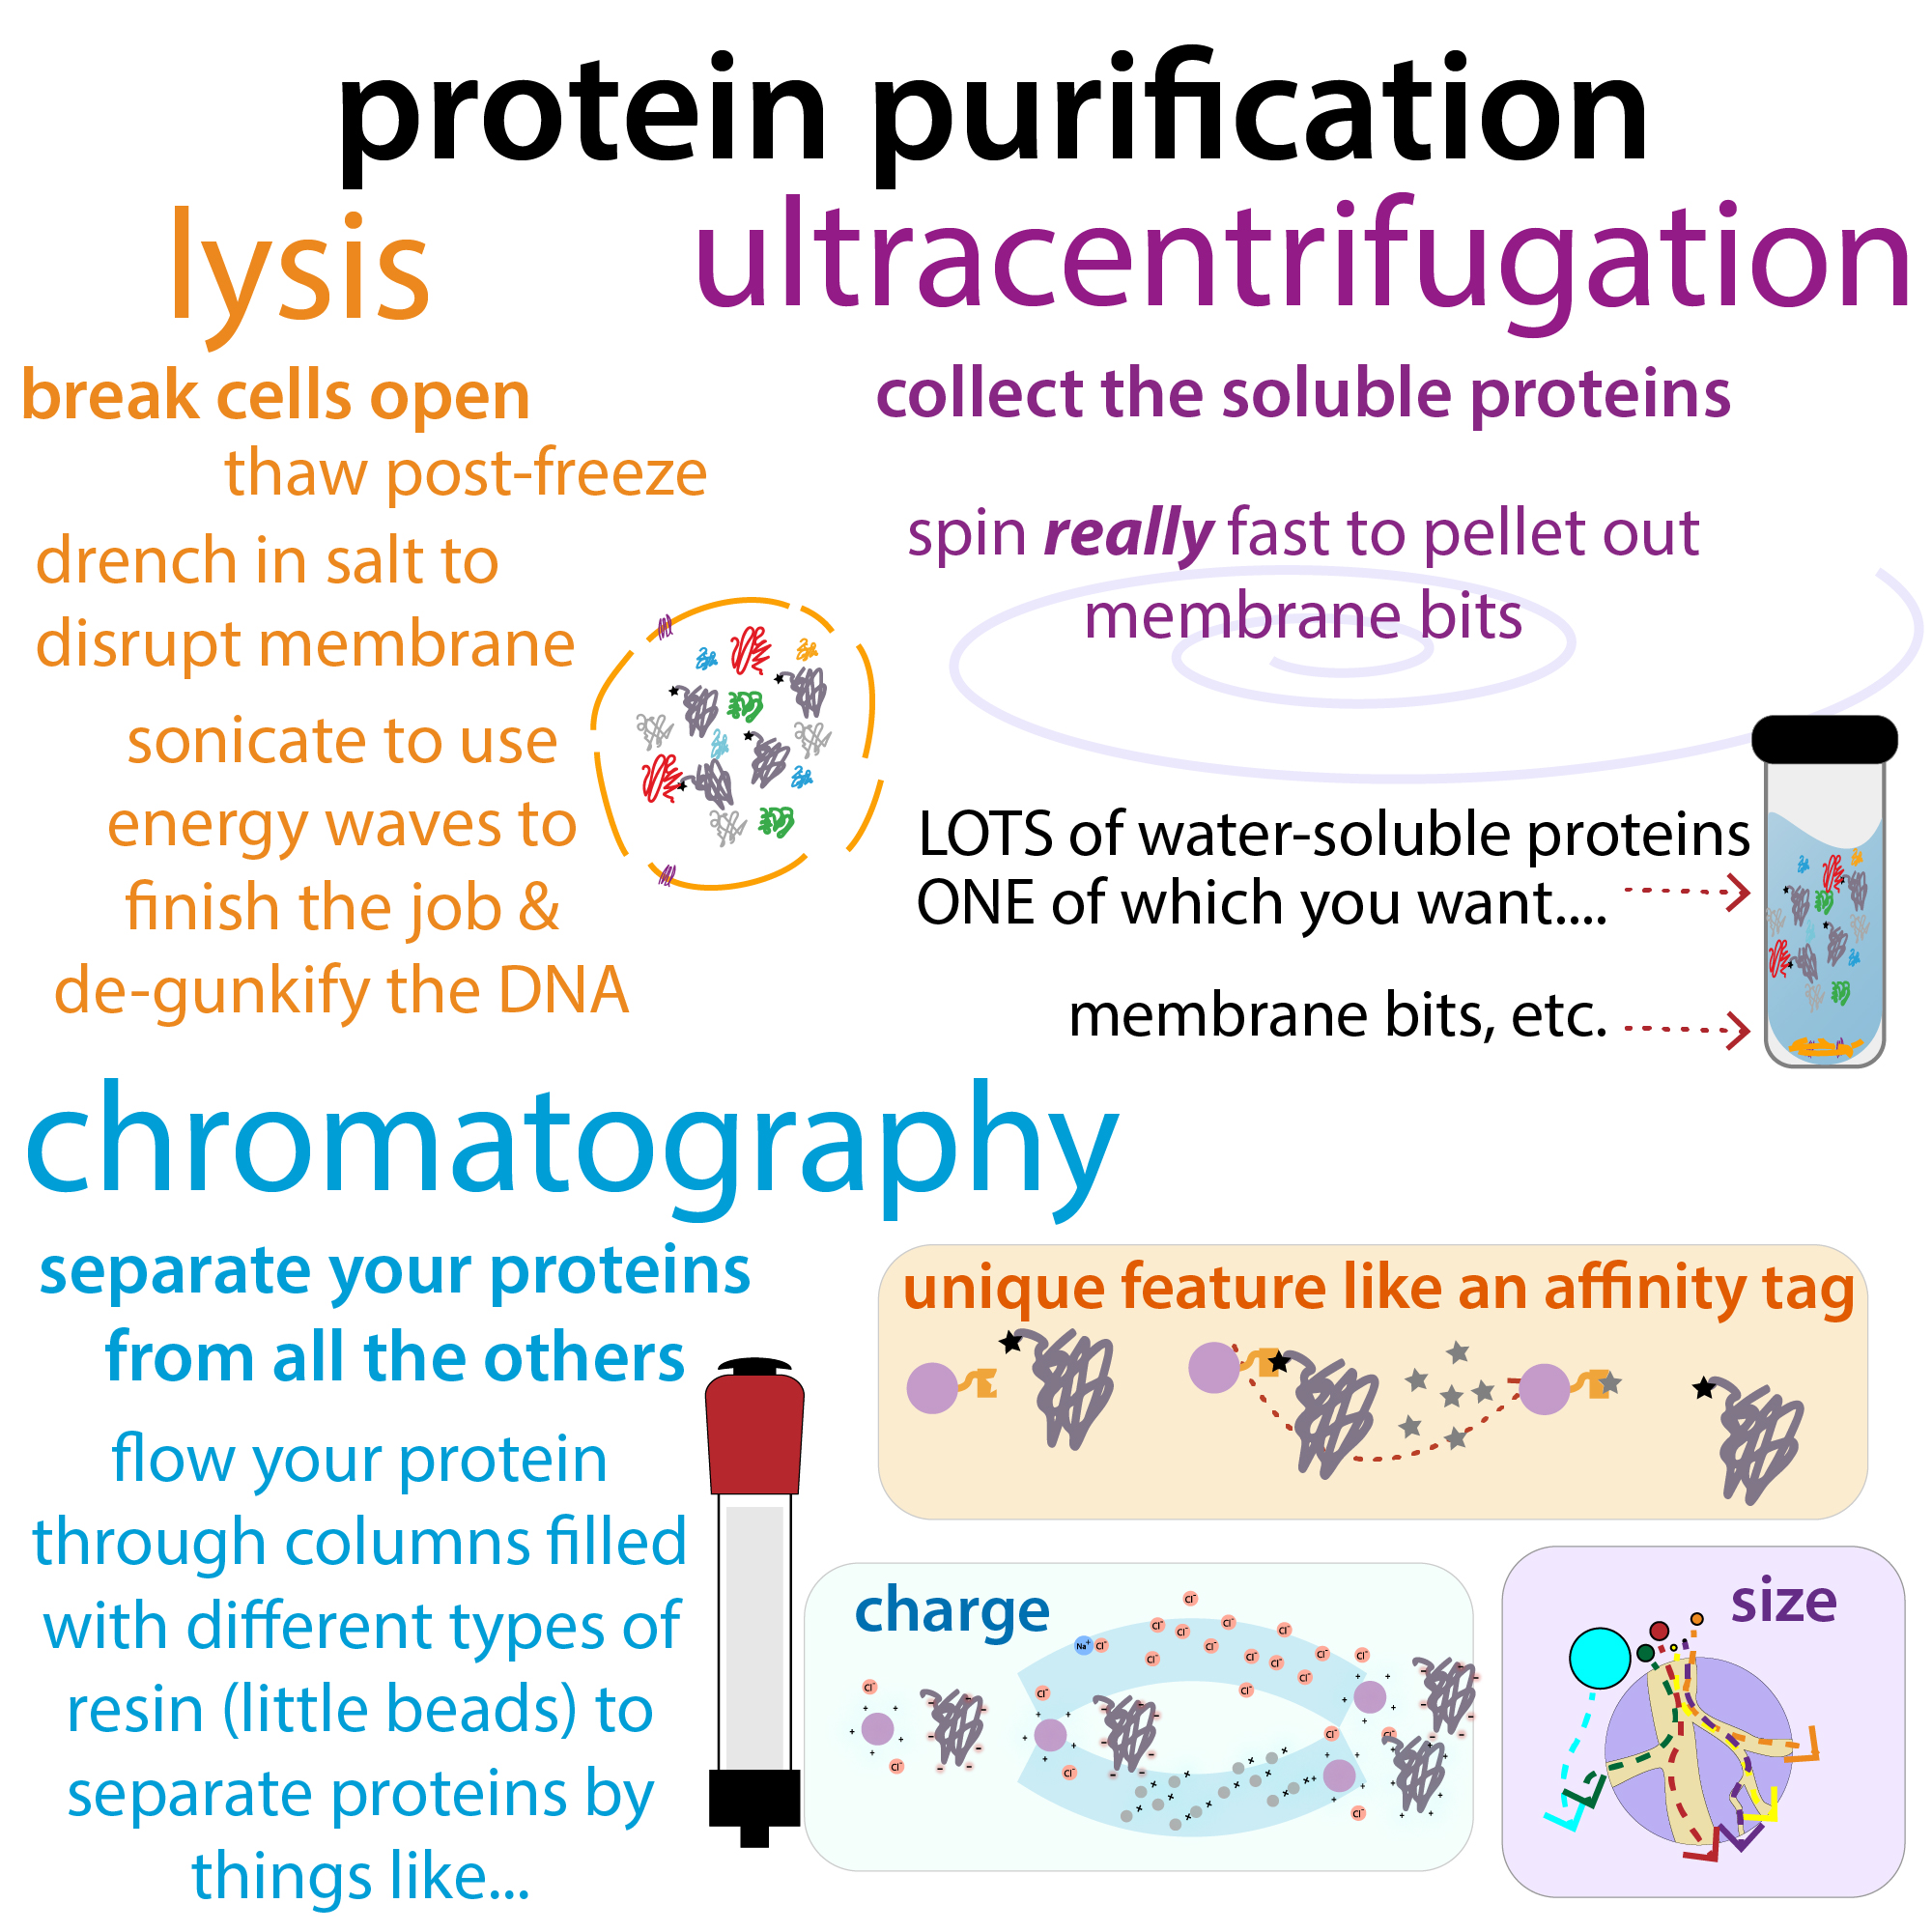
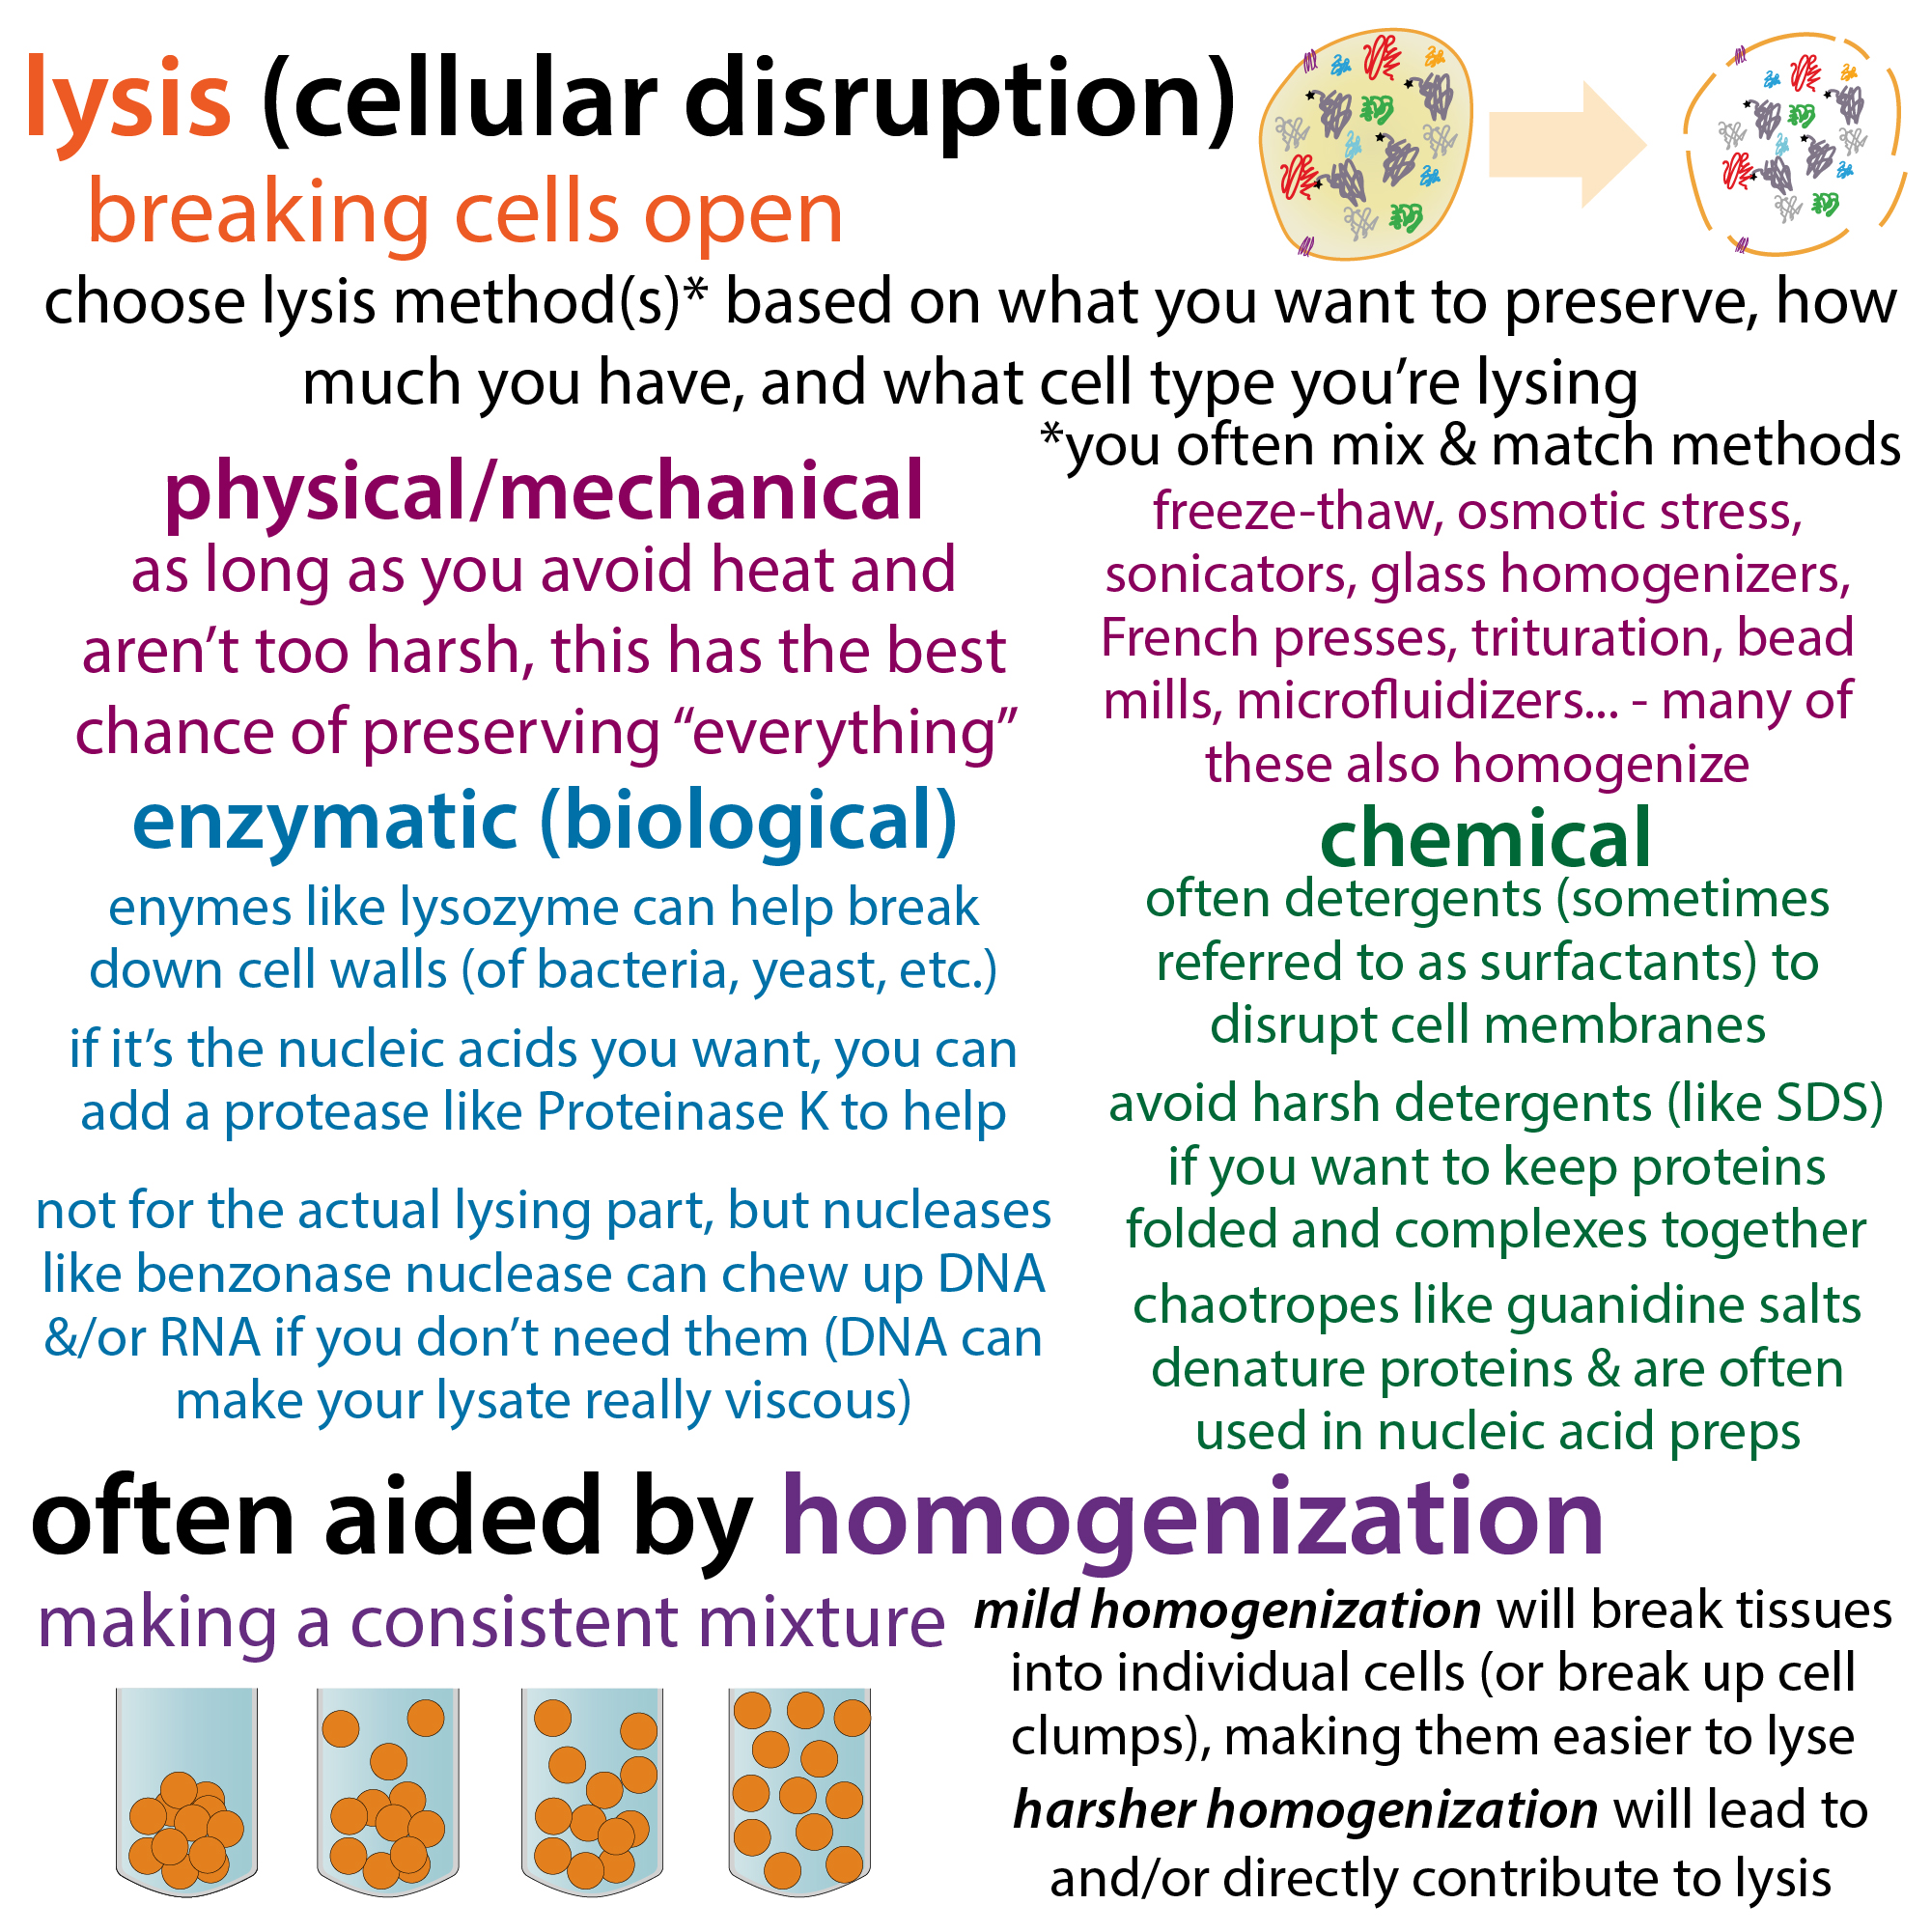
This is where we actually break open cells containing our protein – we thaw the pellet, sometimes add lots of salt to disrupt the membranes, and ultrasonicate them to use waves of energy to break up the DNA so it doesn’t gunk stuff up. Insect cells are more fragile and easier to lyse, but bacteria are hardy (they have cell walls that are resistant to your efforts to break them) so with bacteria I usually use multiple freeze-thaw cycles with ultrasonication spurts in between. I also use enzymes to help – a nuclease to chew up DNA and RNA and lysozyme to help break down the bacterial cell walls. To protect our protein in the process, we add a protease inhibitor (or a cocktail containing multiple protease inhibitors) to prevent protein-chewers from going to business).
Graphics

Ultracentrifugation
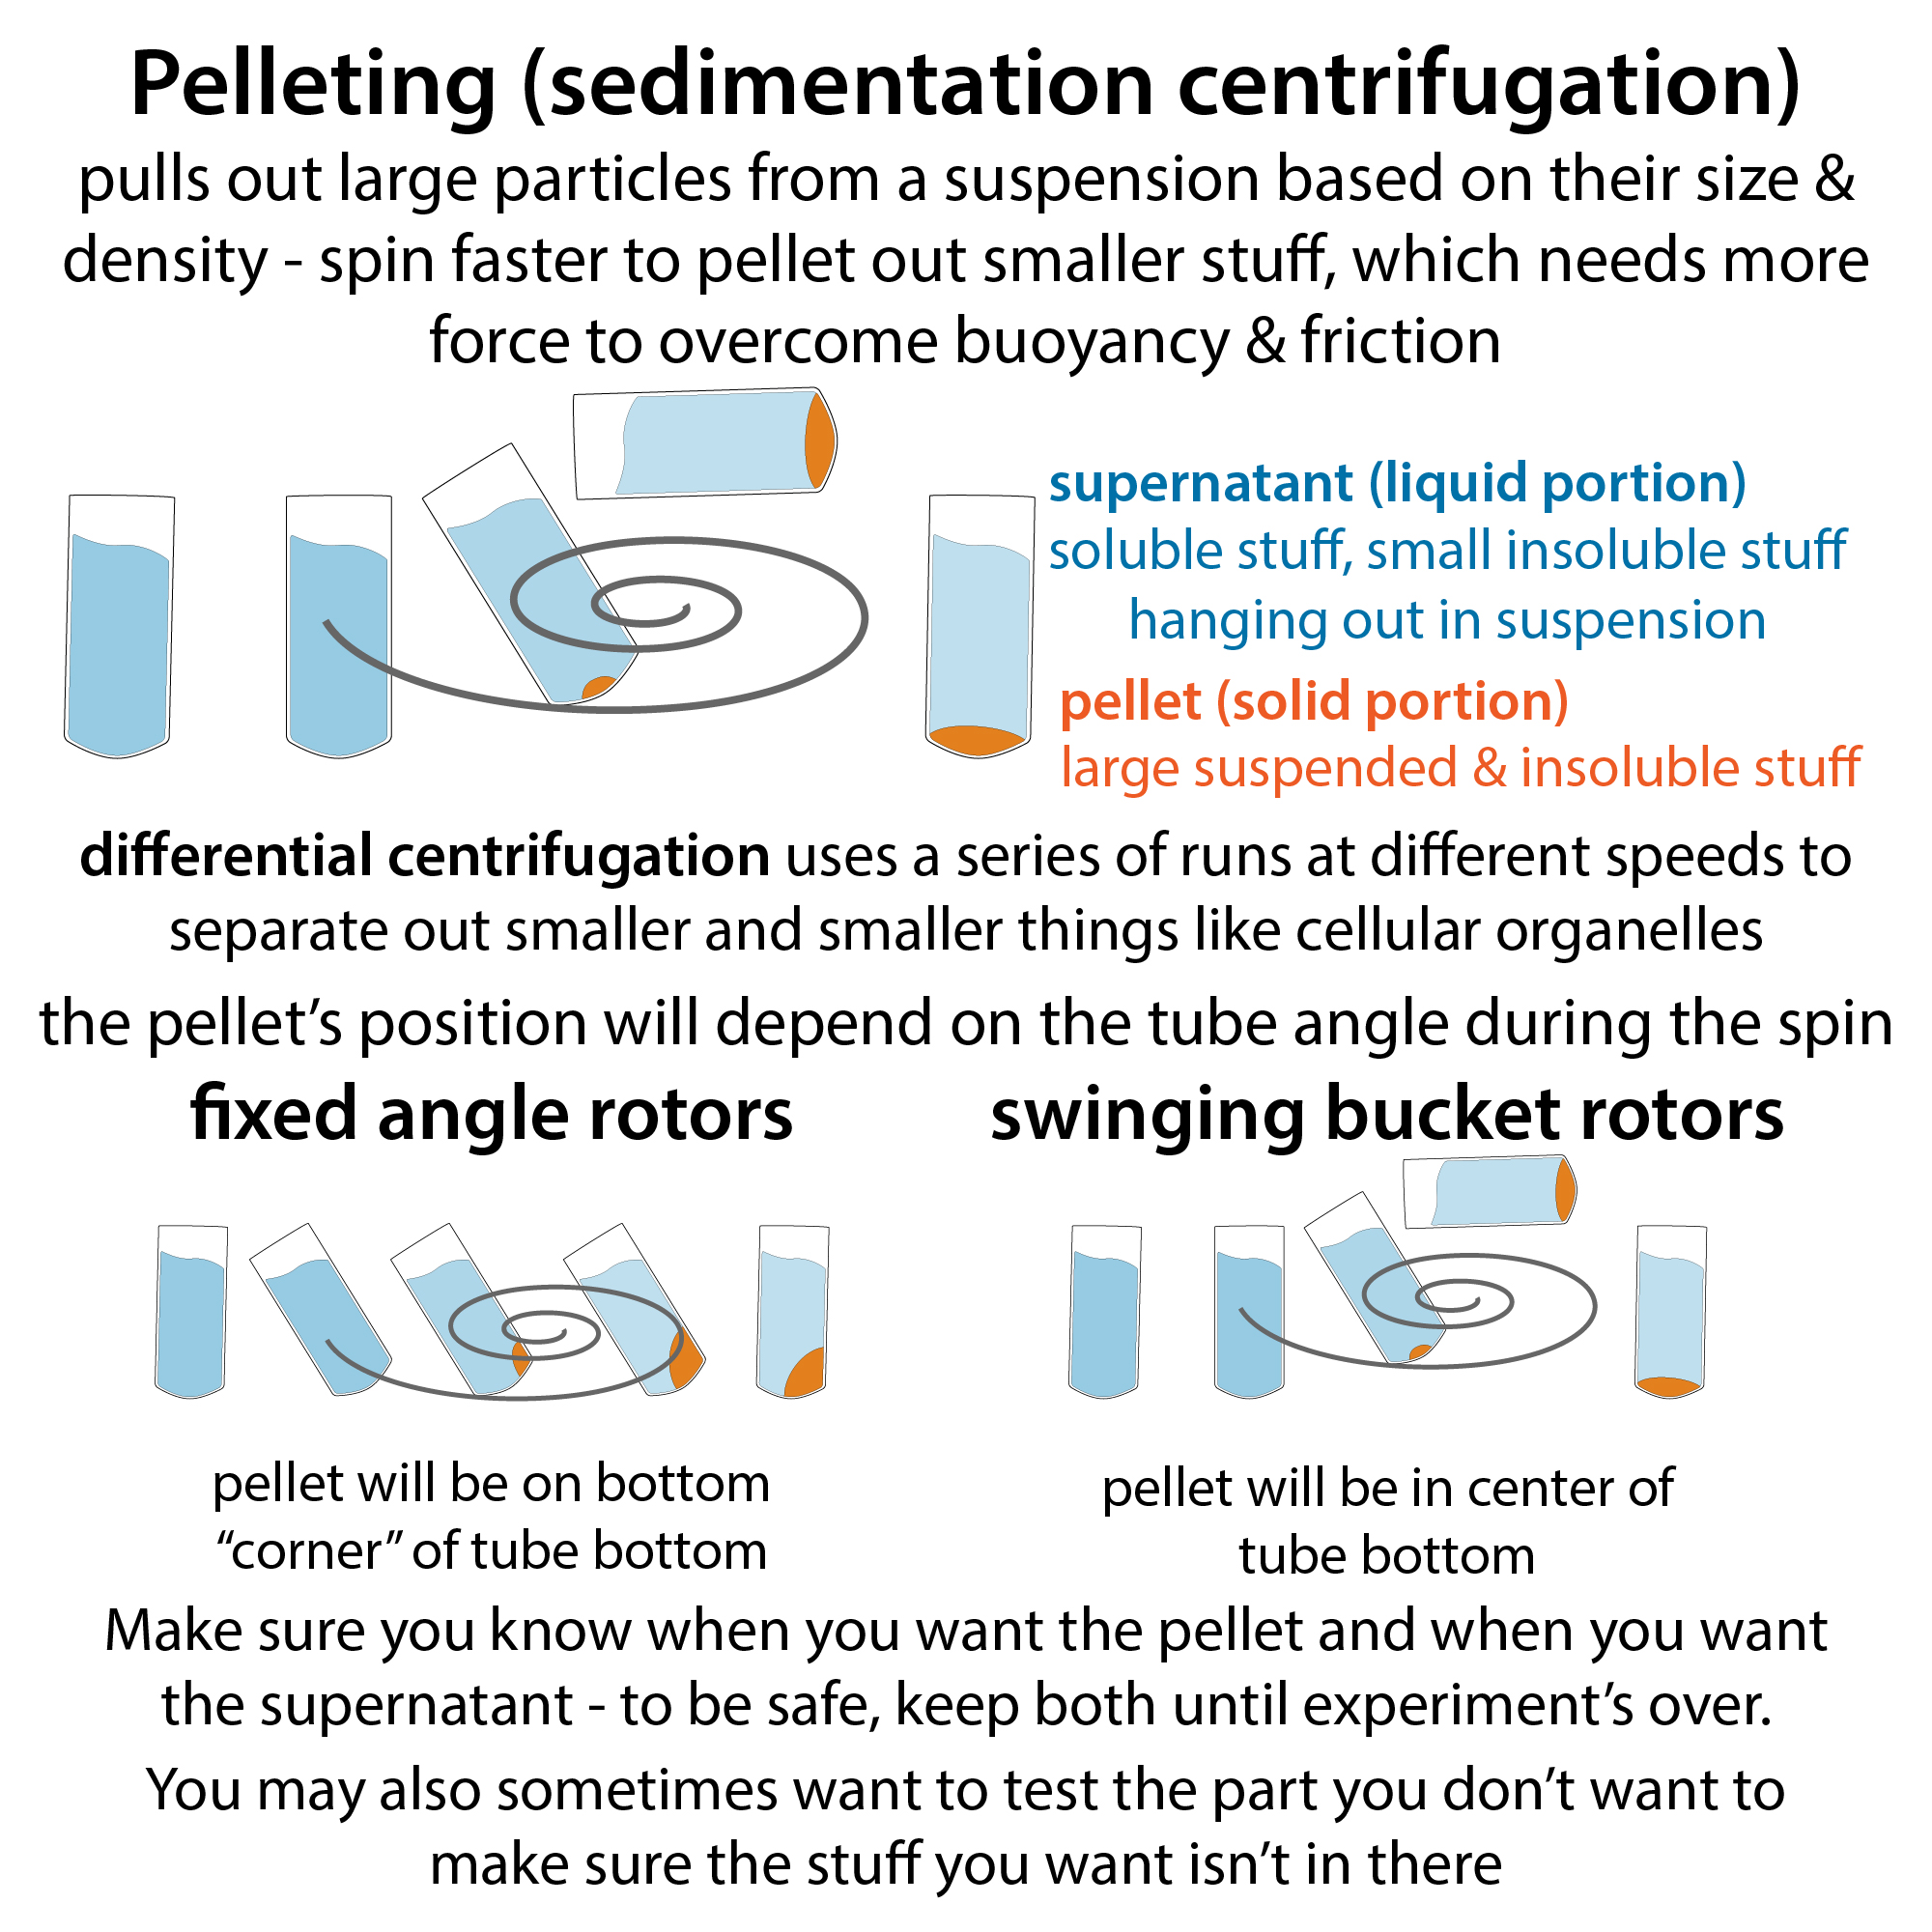
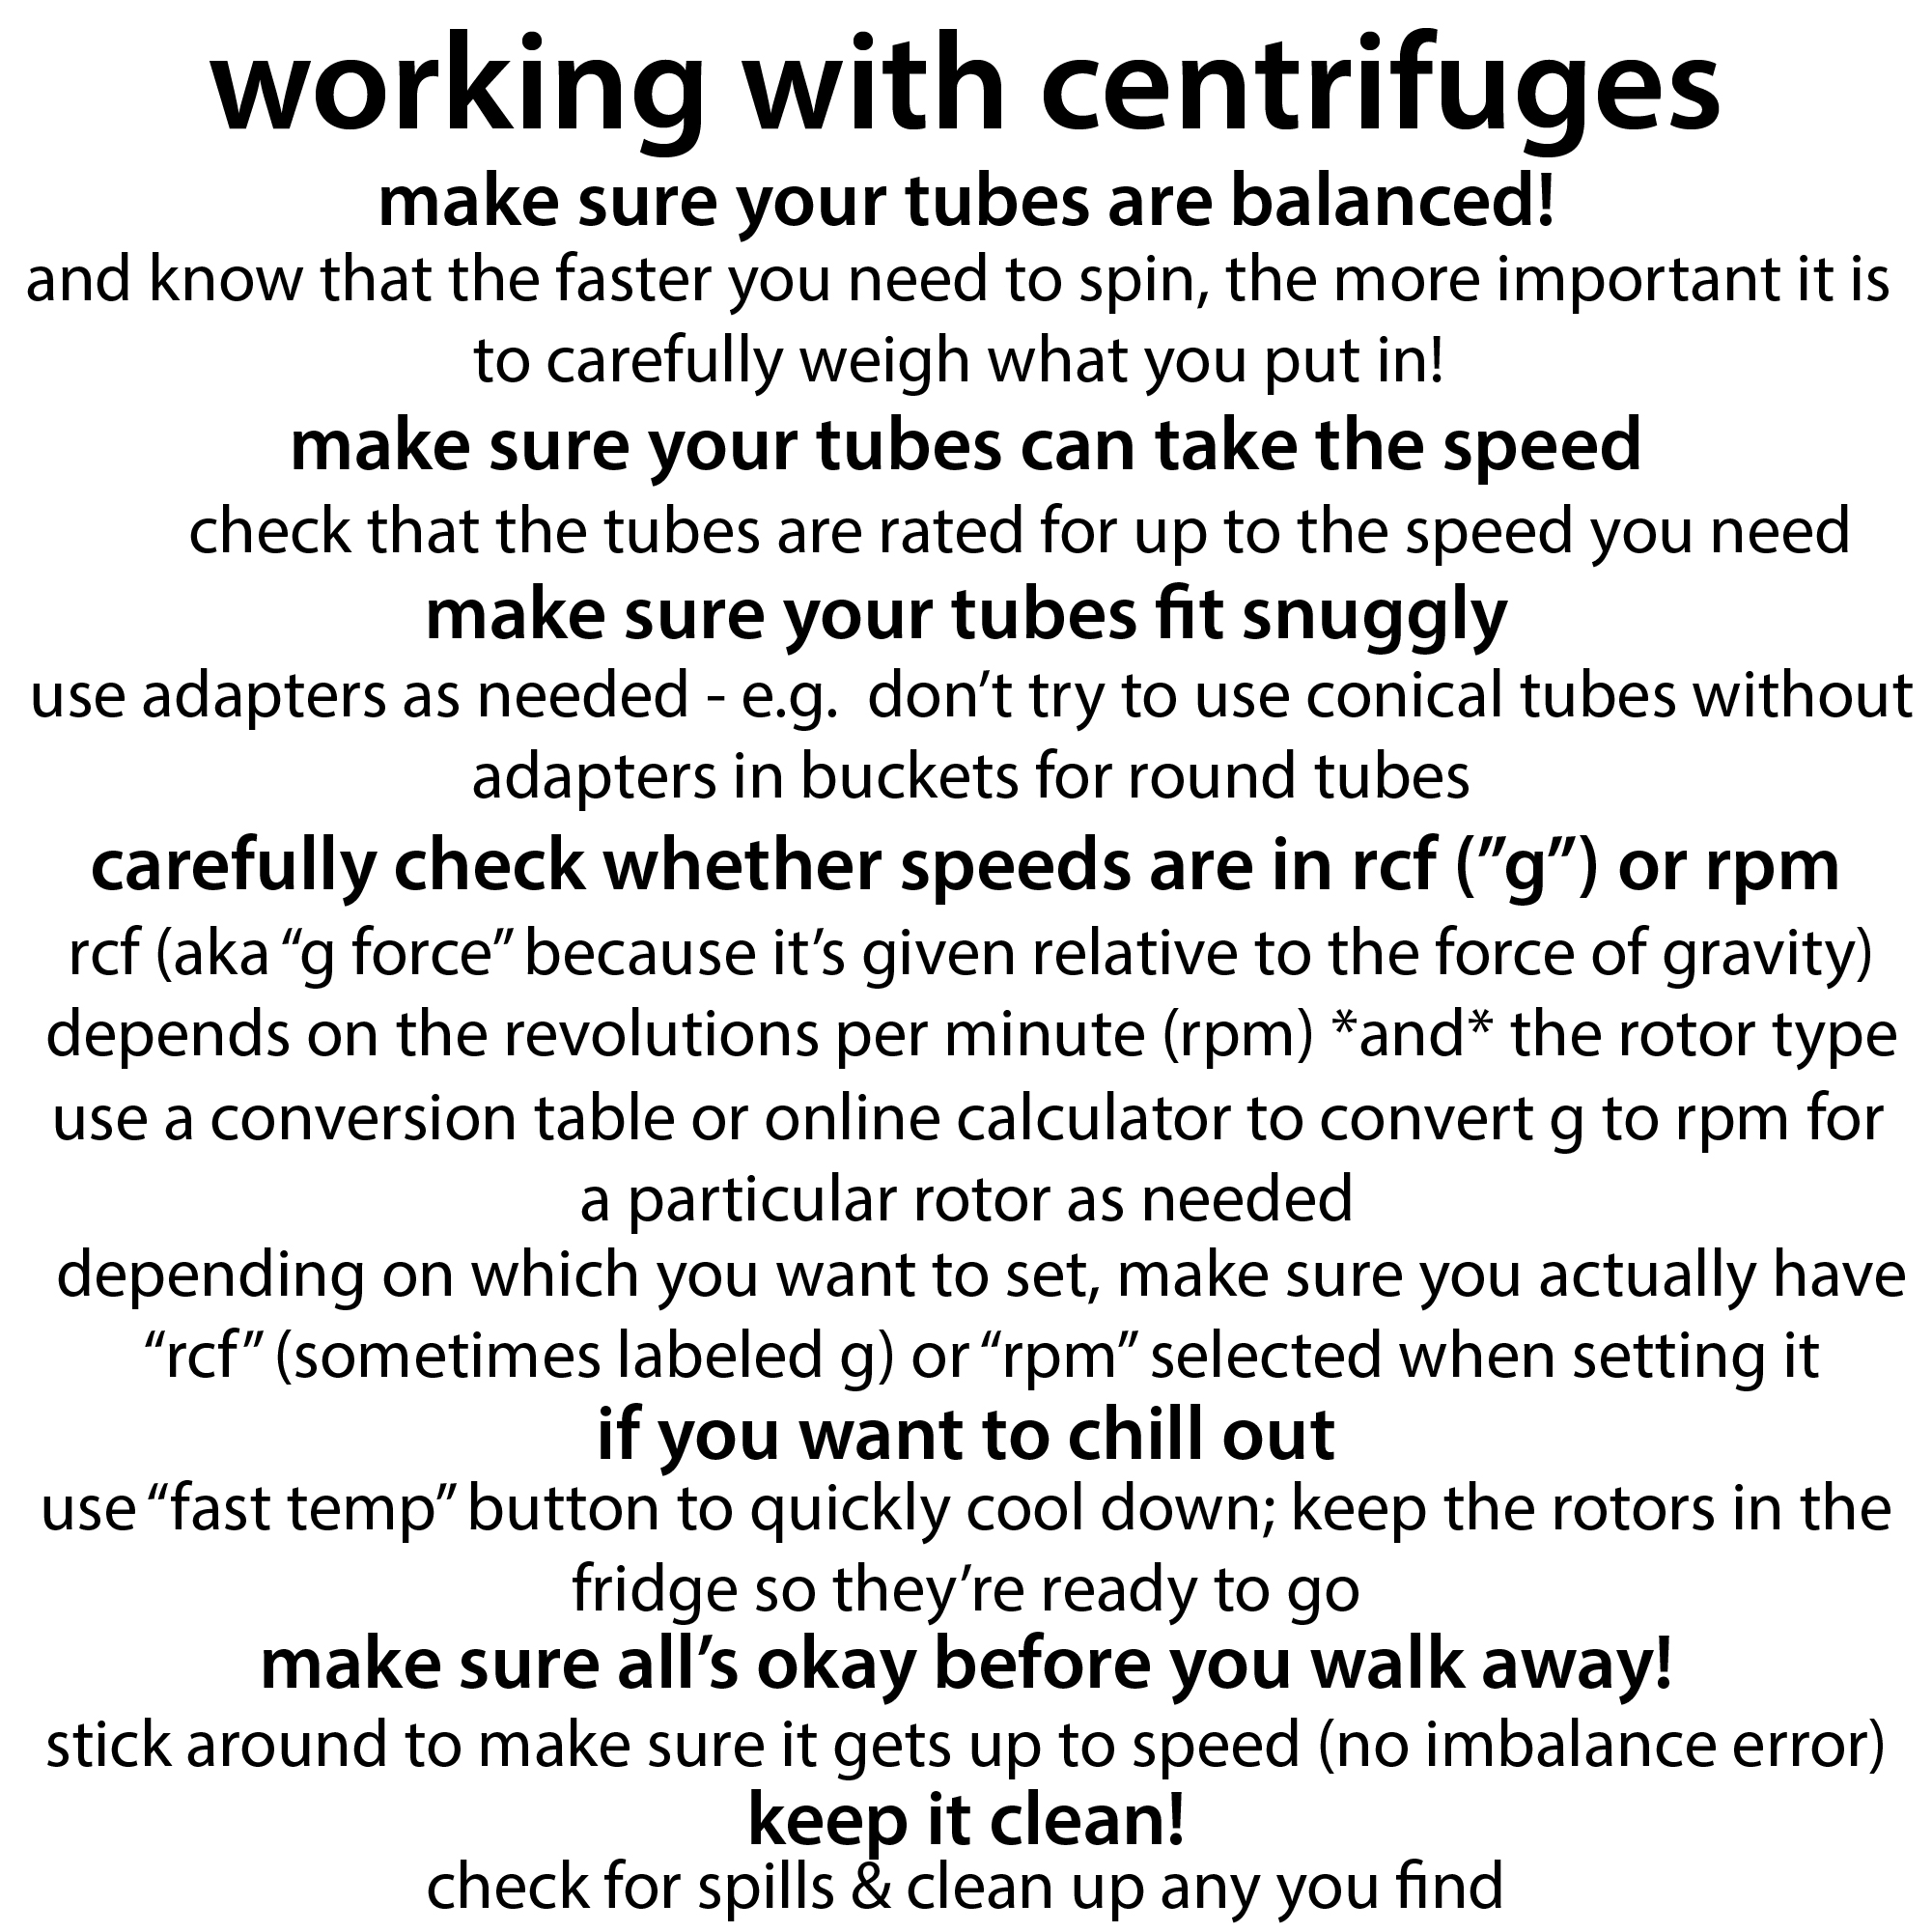
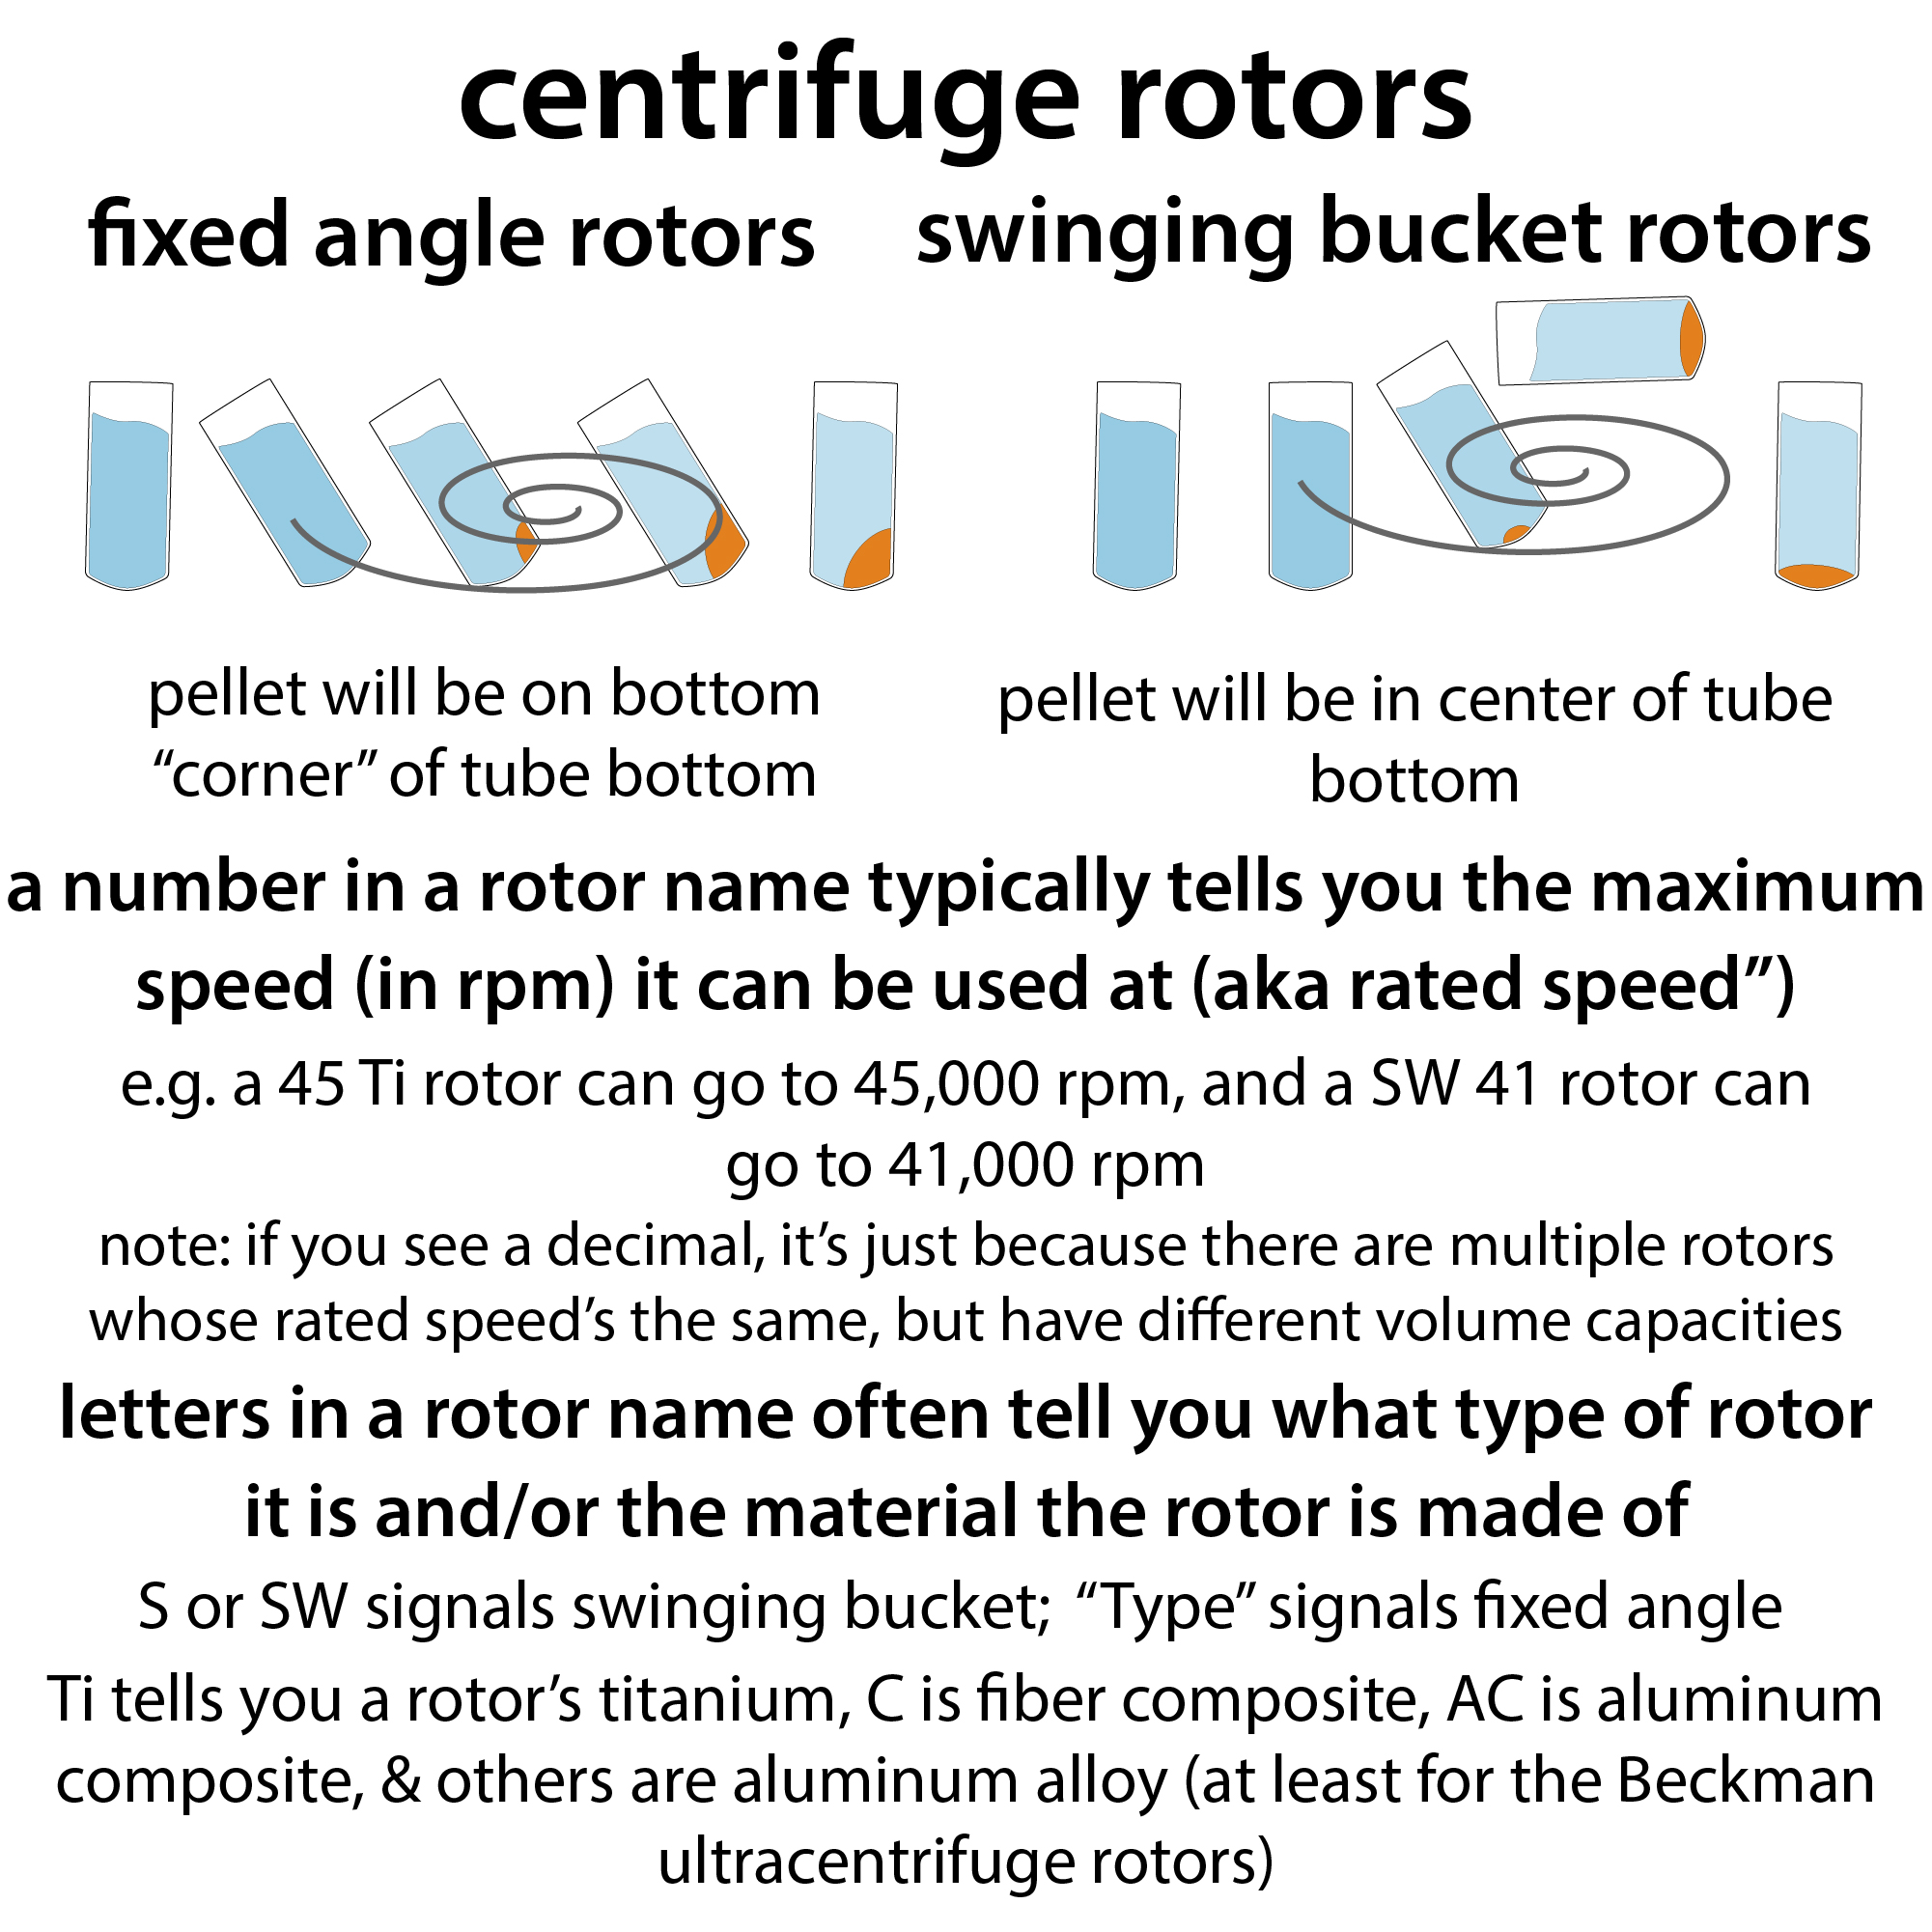
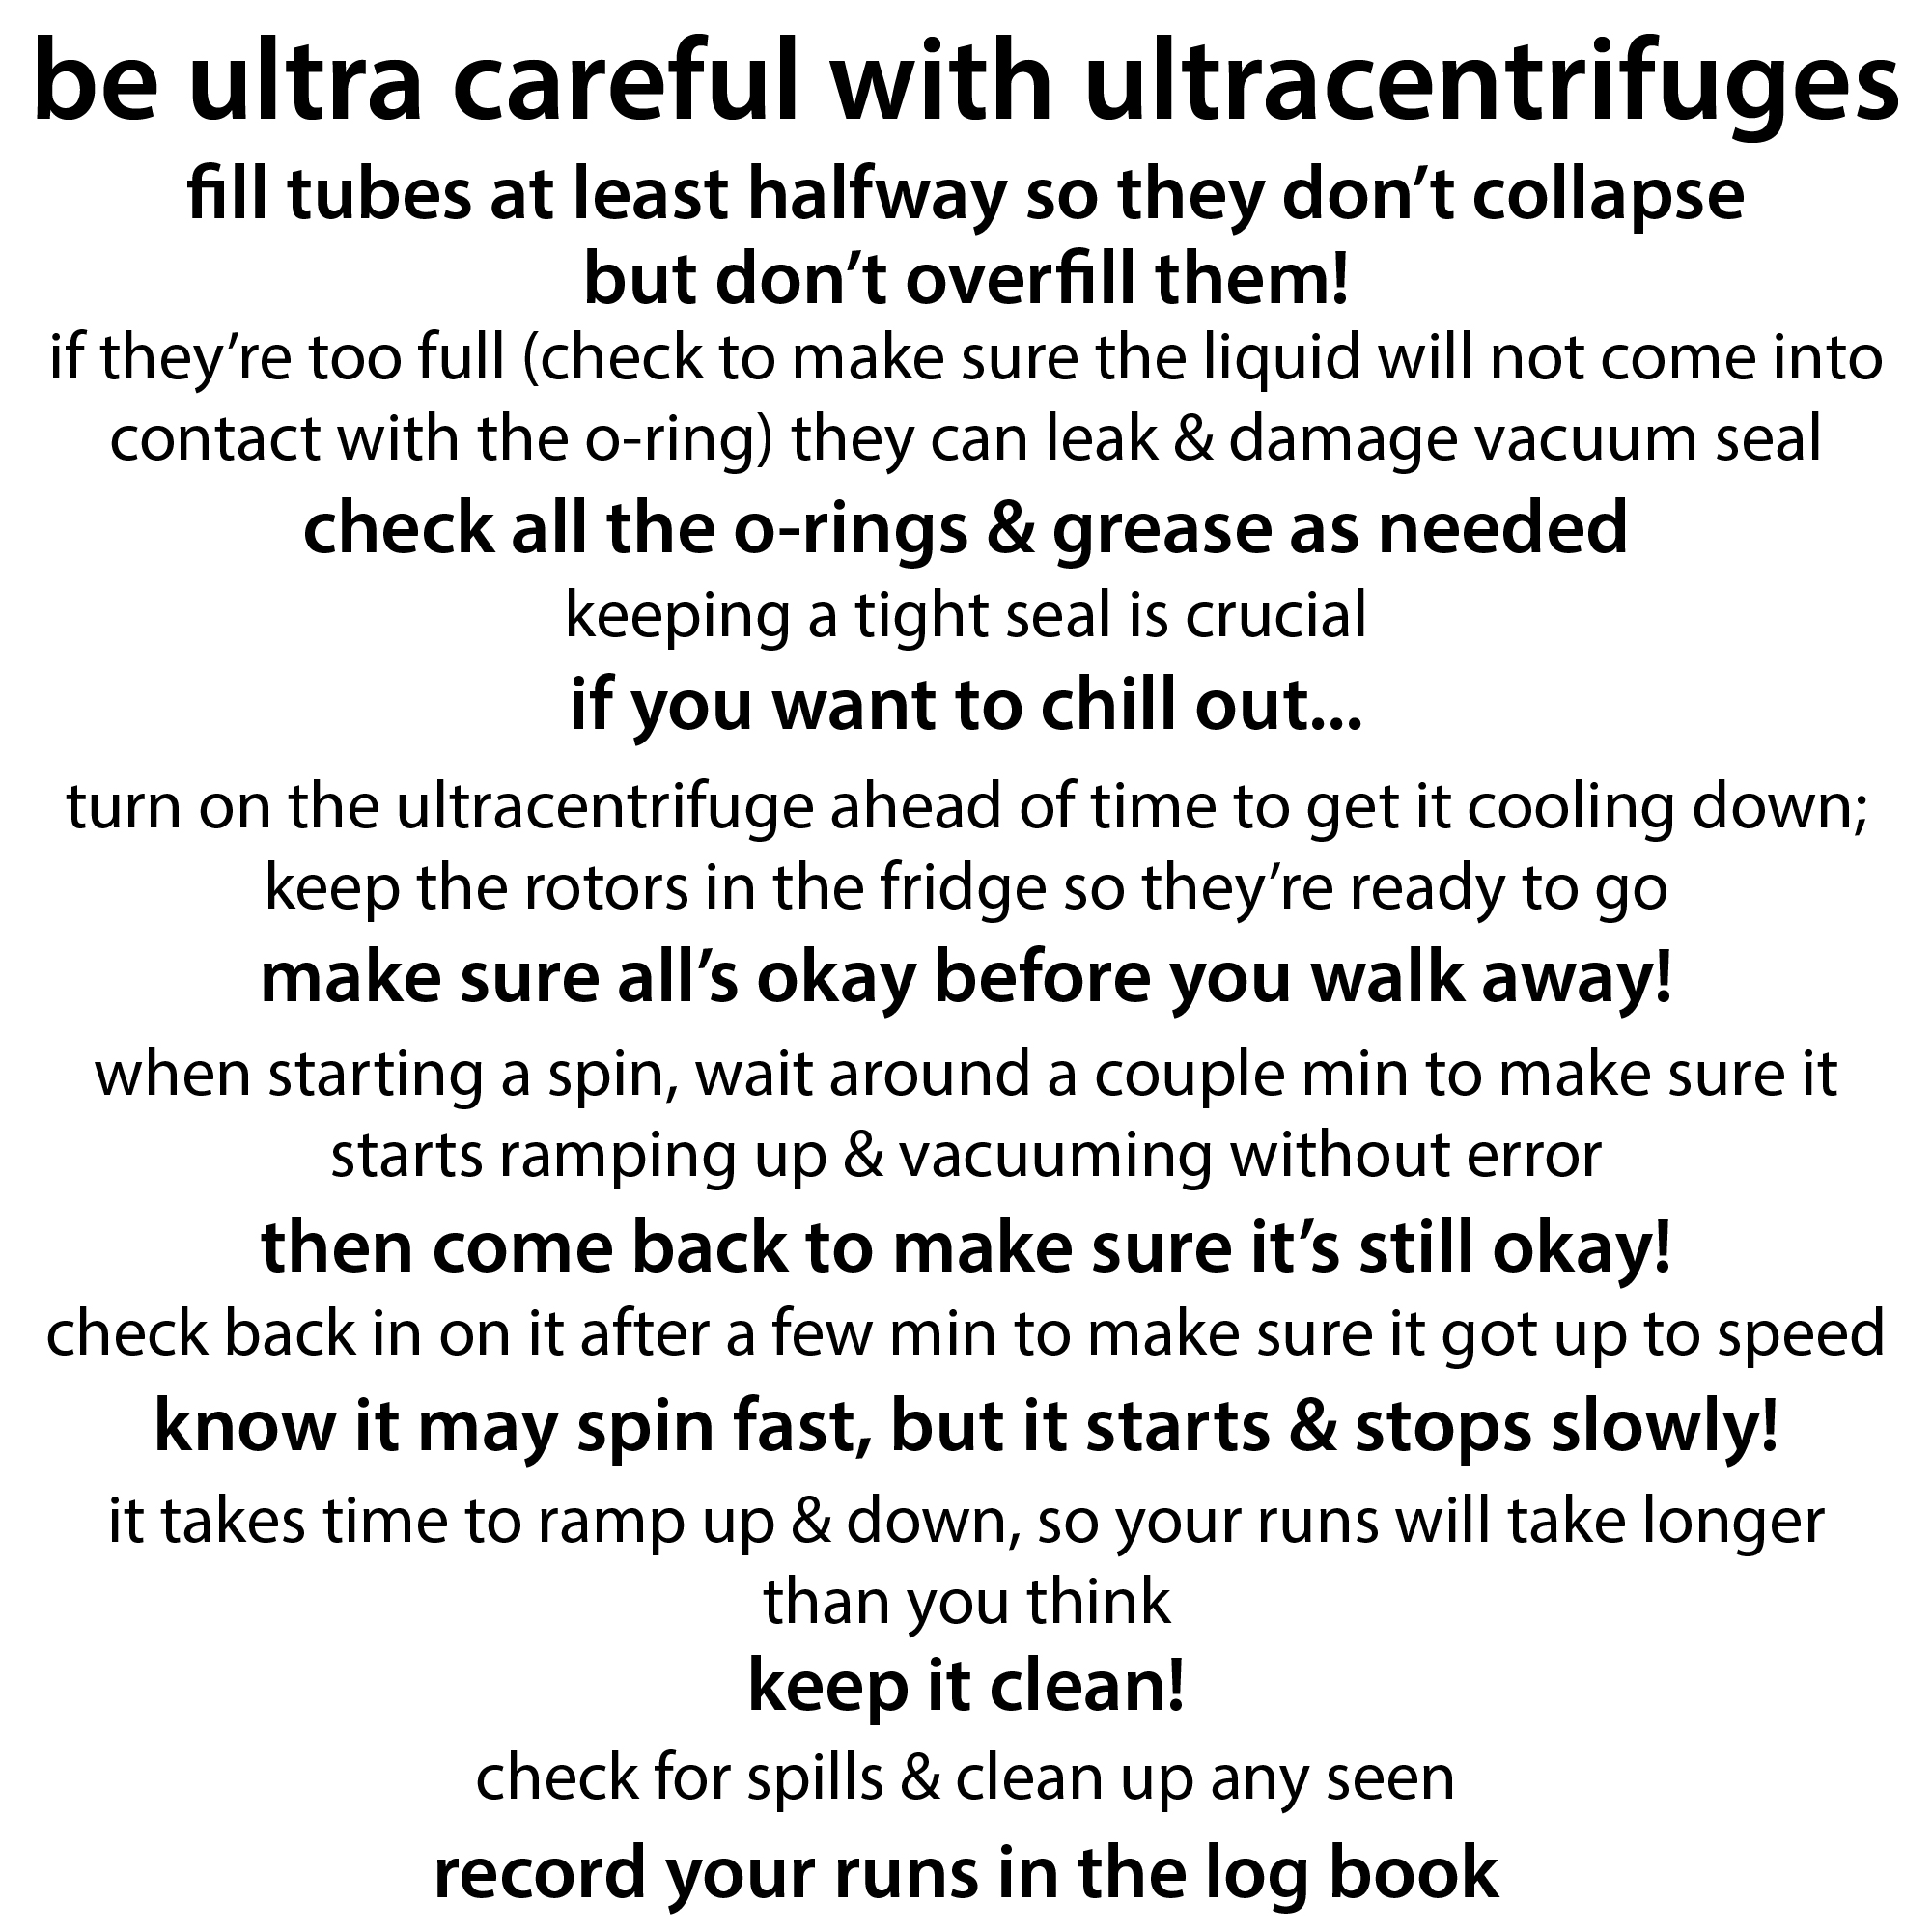
This is where we separate the membrane pieces from the soluble stuff. It uses much higher speeds than the centrifugation we did before. We need these higher speeds because the membrane pieces are much lighter than the whole cells were. But the membrane pieces are still heavier than the dissolved proteins so the membrane bits pellet while your protein remains in the liquid part (supernatant). So here you want to keep that supernatant (assuming you’re purifying a water-soluble protein. At this point, we call the supernatant the lysate. And it has your protein, but also a lot of other proteins.
Graphics
Column chromatography
At the heart of most protein purification is column chromatography, in which solutions containing protein to be purified are flowed (by means of gravity or pumps) through columns filled with little beads called resin. Different types of resin have different properties (differences in charge, pore size, hydrophobicity, specific bound groups, etc.) and different proteins have different properties (differences in charge, size, hydrophobicity, affinity tags, etc.), so the proteins travel differently through the resin (moving faster, slower, or even getting (temporarily) stuck). We can take advantage of this to separate and isolate proteins based on their properties, getting them to elute (come off/out) of the resin/column at different times (typically hopefully by themselves).
Column chromatography can be performed using gravity flow (relying on gravity for liquid to flow through a column); or aided by a pump – either a small-scale benchtop pump or a fancy FPLC (Fast Protein Liquid Chromatography) machine (commonly an AKTA). It, or steps of it, can also be done in “batch” mode, in which the resin is in centrifuge tubes and you allow the resin and solution to interact (often with end-over-end rotation), then centrifuge the tubes to separate the beads (and bound proteins) from the unbound stuff.
Columns can be manually packed or bought pre-packed, with different sizes depending on how much protein you want to separate and, in the case of size exclusion chromatography (described below), how well you want to resolve things (the skinnier and taller the better).
There are a number of general types of chromatography (affinity chromatography, ion exchange chromatography, hydrophobic interaction chromatography, and size exclusion chromatography (aka gel filtration), and each of those has a number of variations.
Graphics
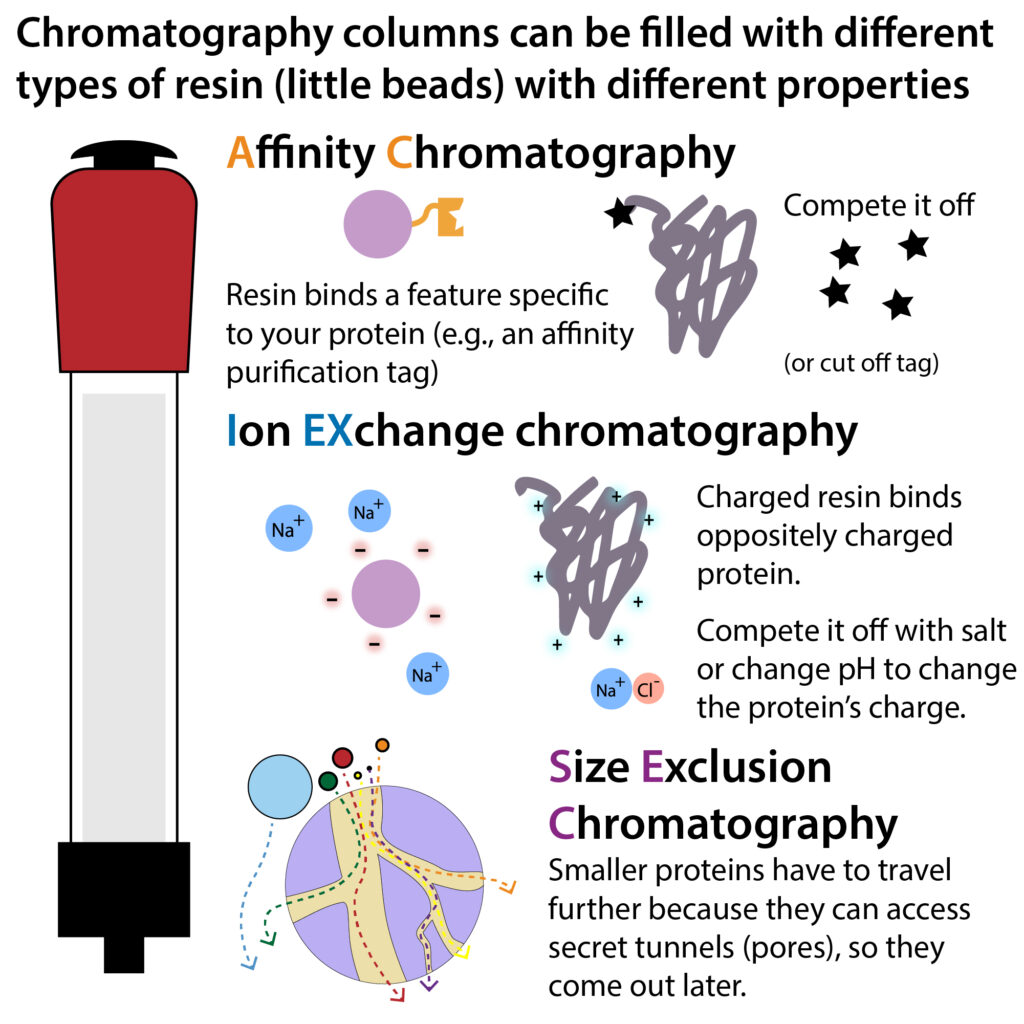
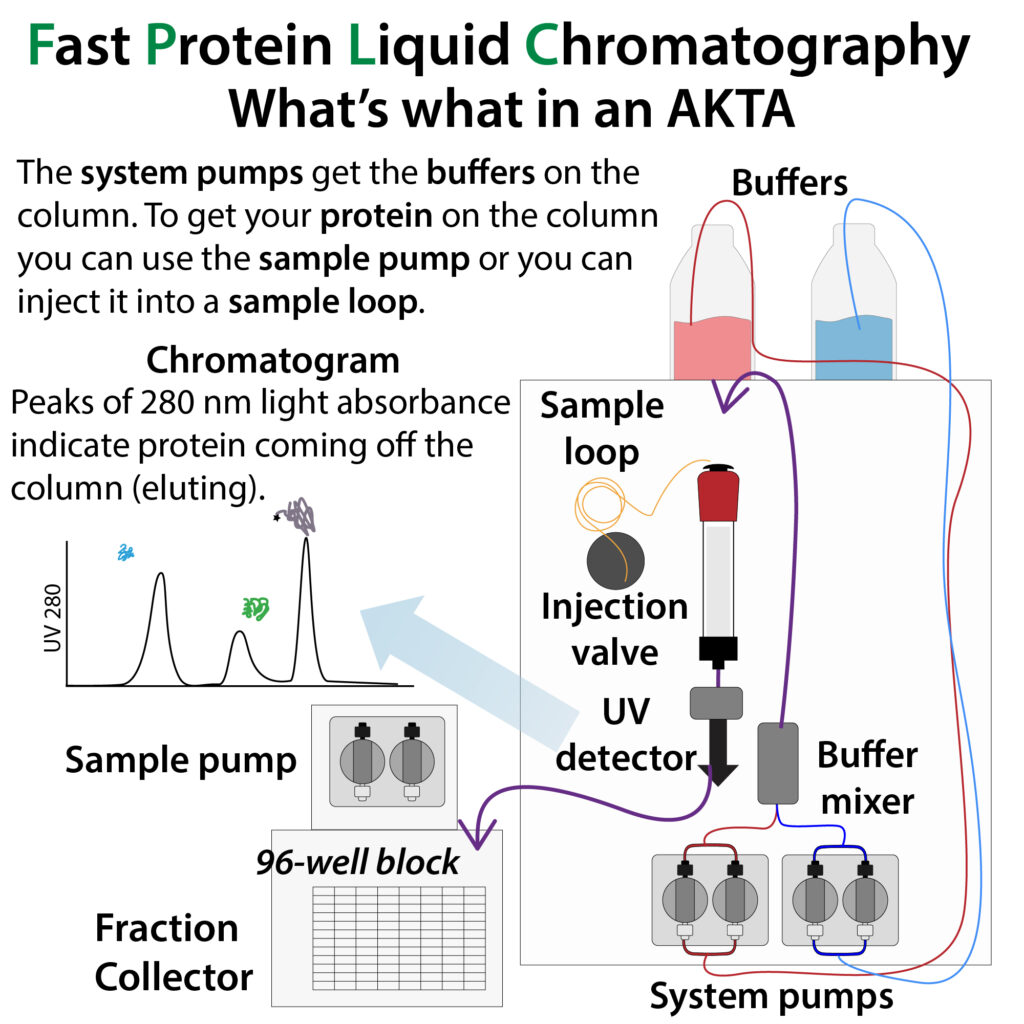


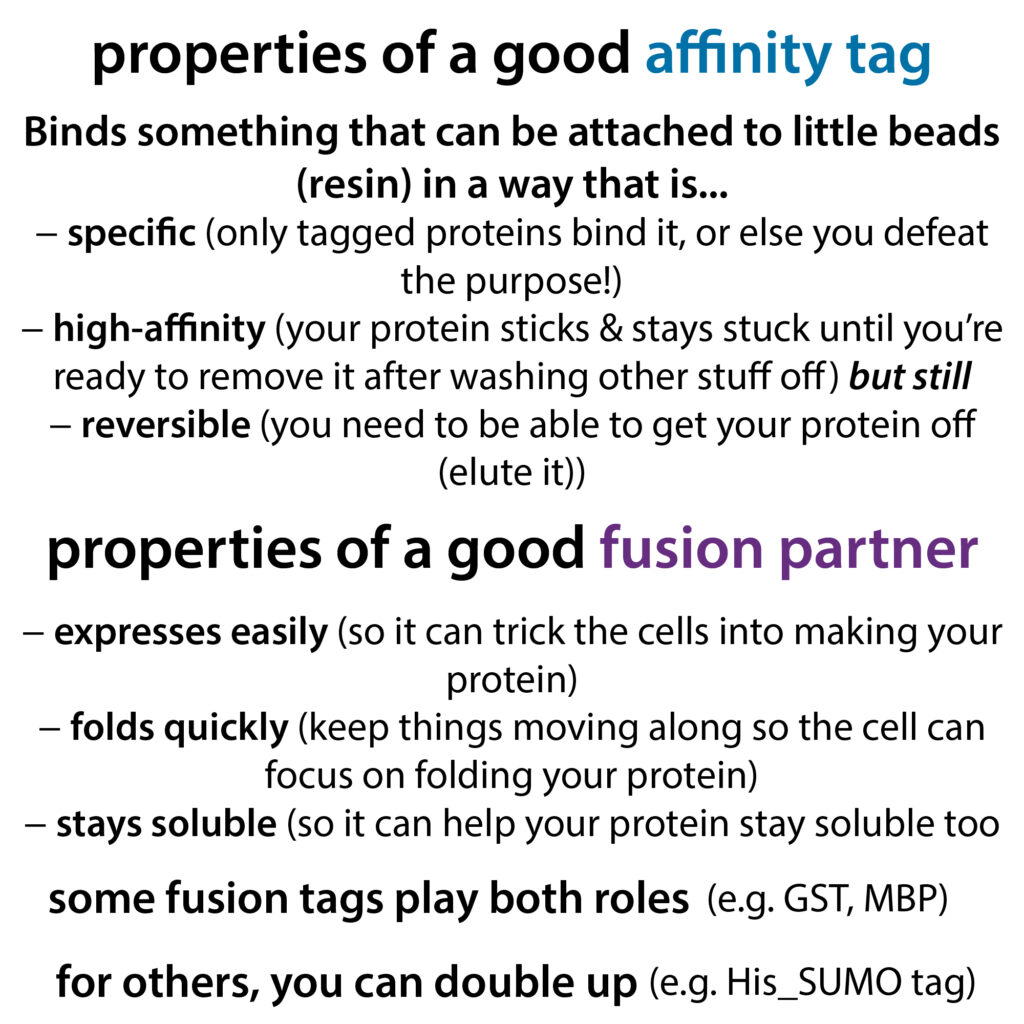
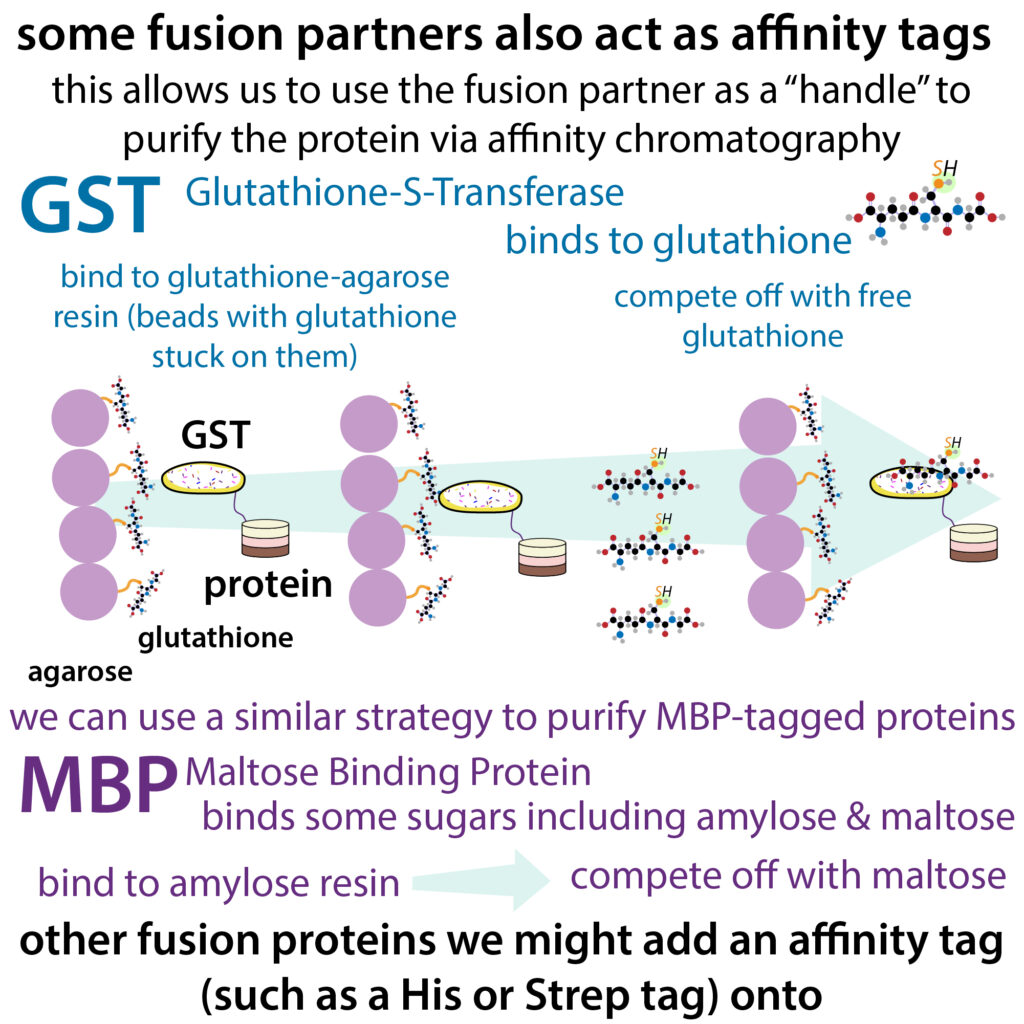
Affinity chromatography: Used to isolate proteins based on the presence of a very specific feature, such as an affinity tag that was genetically engineered to be added onto the end of the protein as the protein got made. The protein with that feature will bind specifically, other proteins will flow on by. Then, the isolated-but-stuck-to-resin protein will get “pushed” off the resin by an added competitor that mimics the feature that allowed the protein to stick. (Alternatively, the tag may be cut off by a sequence-specific endoprotease such as TEV or PrecisionPlus or thrombin if a corresponding cleavage site has been placed in the linker between the tag and the protein.)
Common affinity tags and their corresponding resin and competitor:
| Tag | Resin | Competitor |
| His-tag (often 6X or 8X, referring to having 6 or 8 histidines in a row, respectively) | IMAC (immobilized metal affinity chromatography), a variety of variations including Ni-NTA (here, NTA is a linker, typically linking the nickel to agarose resin, HisTrap (proprietary name for some version of Ni resin), Talon (uses cobalt) | Imidazole |
| StrepTag or StrepTag II or Twin StrepTag (this is a short sequence designed to be overall neutral so as not to impact overall protein features) | StrepTactin or StrepTactin XT (e.g. as the proprietary StrepTrap or StrapTrap XT) | Desthiobiotin (StrepTactin) or Biotin (StrepTactin XT) |
| FLAG (this is another short sequence, DYKDDDDK, with several in a row sometimes used) | Anti-FLAG (resin conjugated (attached covalently to) anti-FLAG antibodies | FLAG |
| GST (Glutathione-S-Transferase) (This is a whole little (26 kDa) protein stuck on the end of your protein, thus a “fusion partner.” It doubles as a solubility aid.) | Glutathione resin | Reduced glutathione (GSH) |
| MBP (Maltose Binding Protein) (Like GST, this is a whole little protein stuck on the end of your protein, thus a “fusion partner.” It doubles as a solubility aid.) | Amylose resin | Maltose |
- In the above instances (most common), affinity chromatography is used with engineered features. However, other forms of affinity chromatography take advantage of natural features of a protein. Some examples . . .
- Protein A, G, A/G or L – these proteins bind to the generic/constant region of antibodies. So, if you’re trying to purify antibodies, you can use columns containing resin conjugated (attached to) these proteins to capture the antibodies.
- Heparin-conjugated resin can be used to purify nucleic acid binding proteins.
- Antibodies specific for a protein or a specific feature of a class of proteins can be bound to resin (often by binding to Protein A, etc. in a sort of sandwich) to allow you to isolate proteins with desired features. This is typically only used at small-scale (such as in immunoprecipitation (IP) assays) due to cost and the need for antibodies (which contributes more to cost, as well as time, etc.).
Graphics
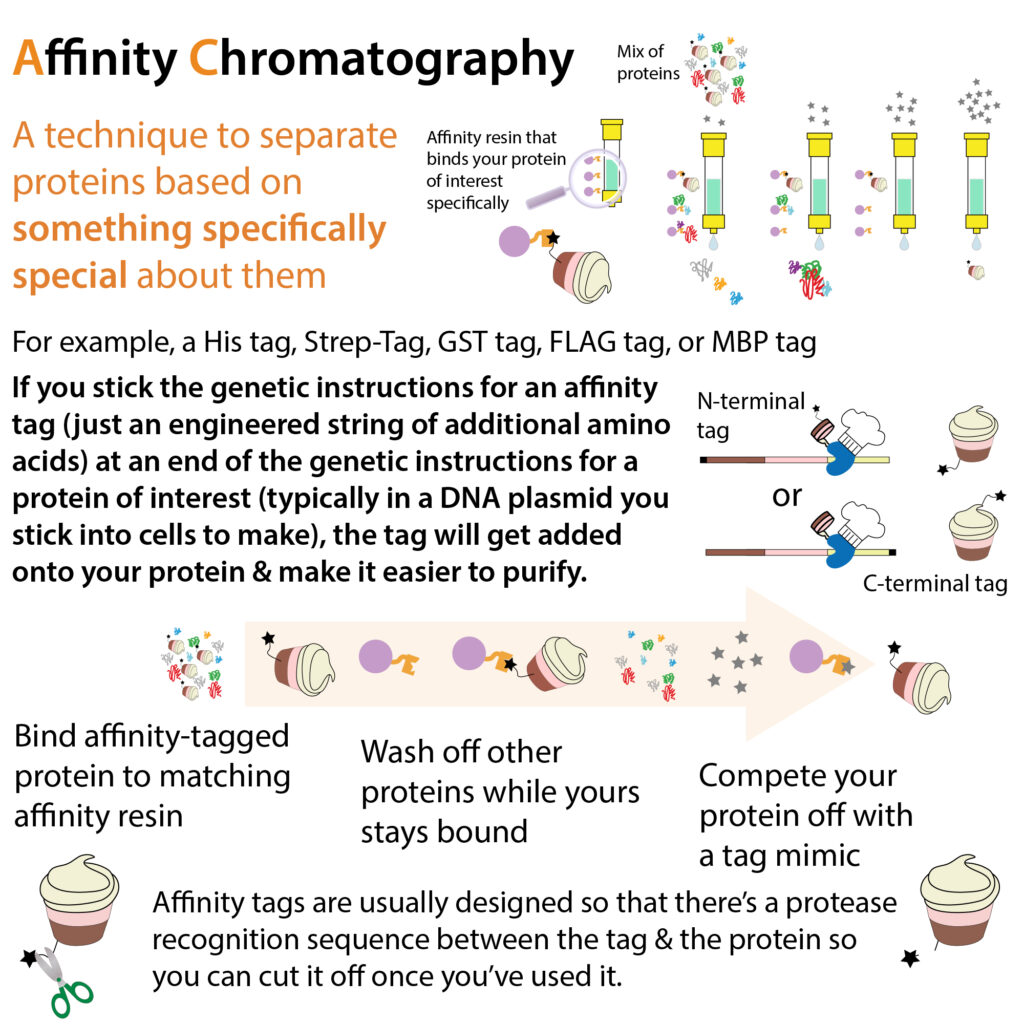
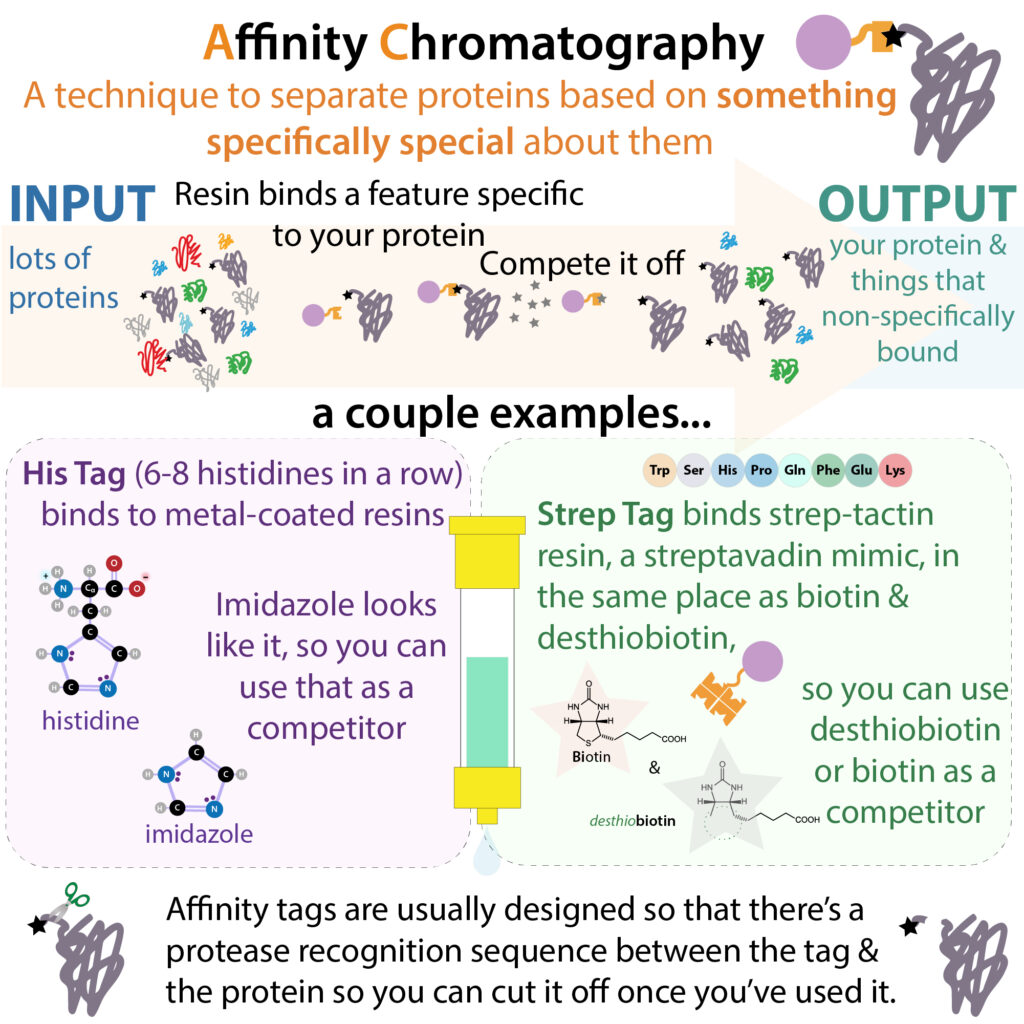
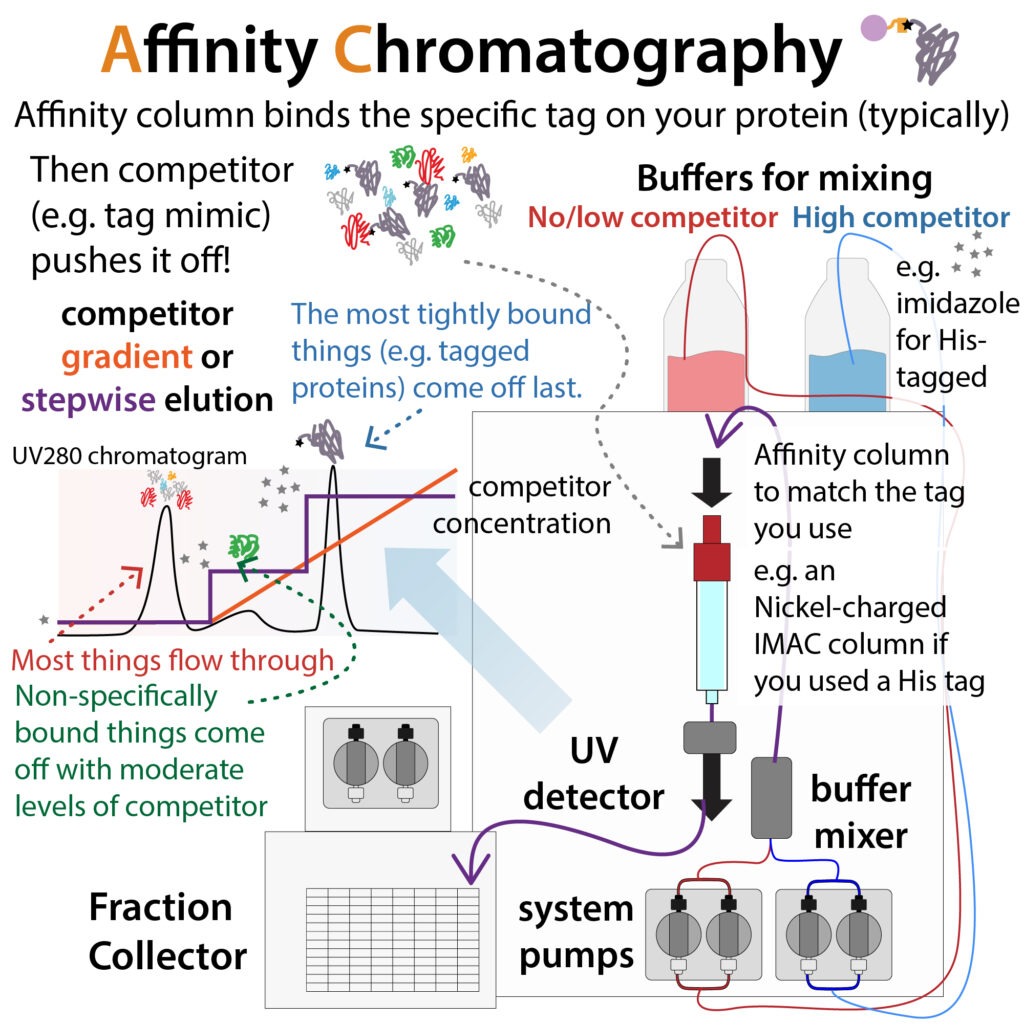
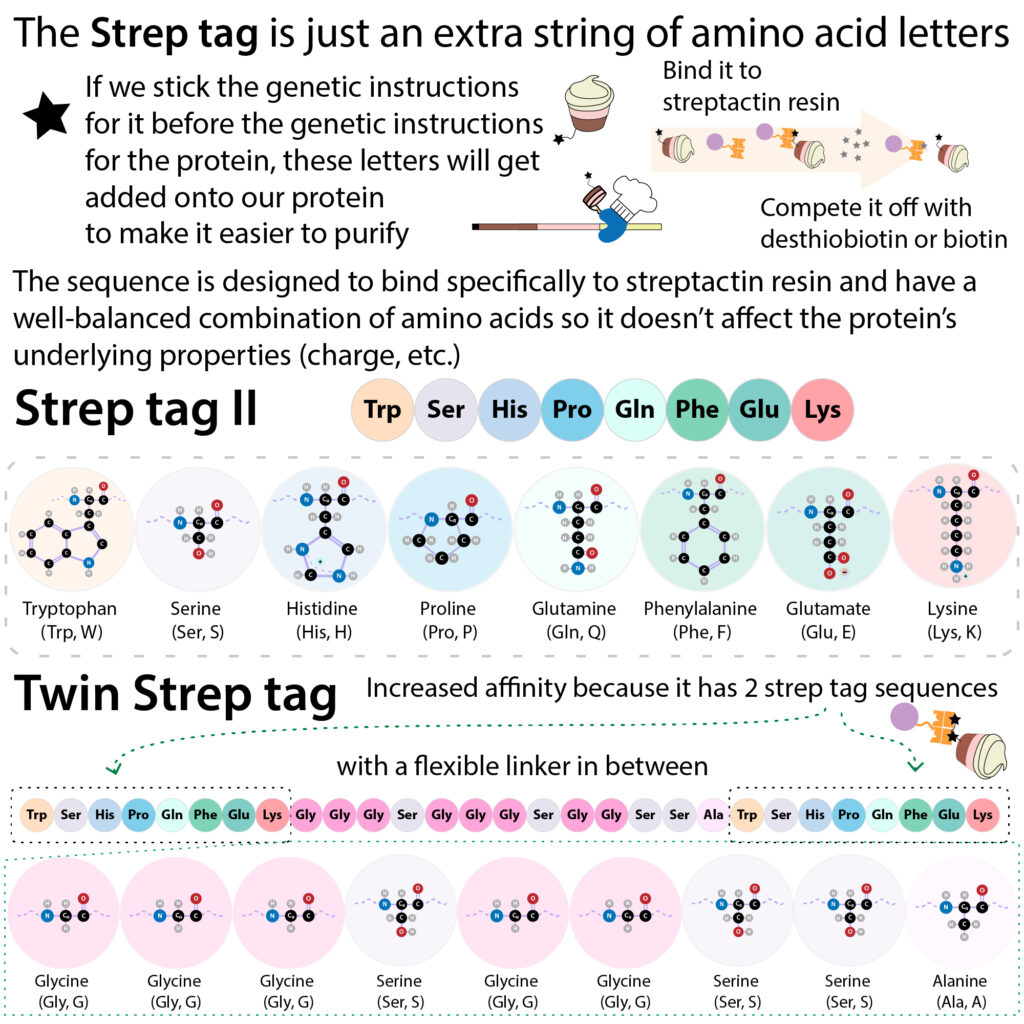
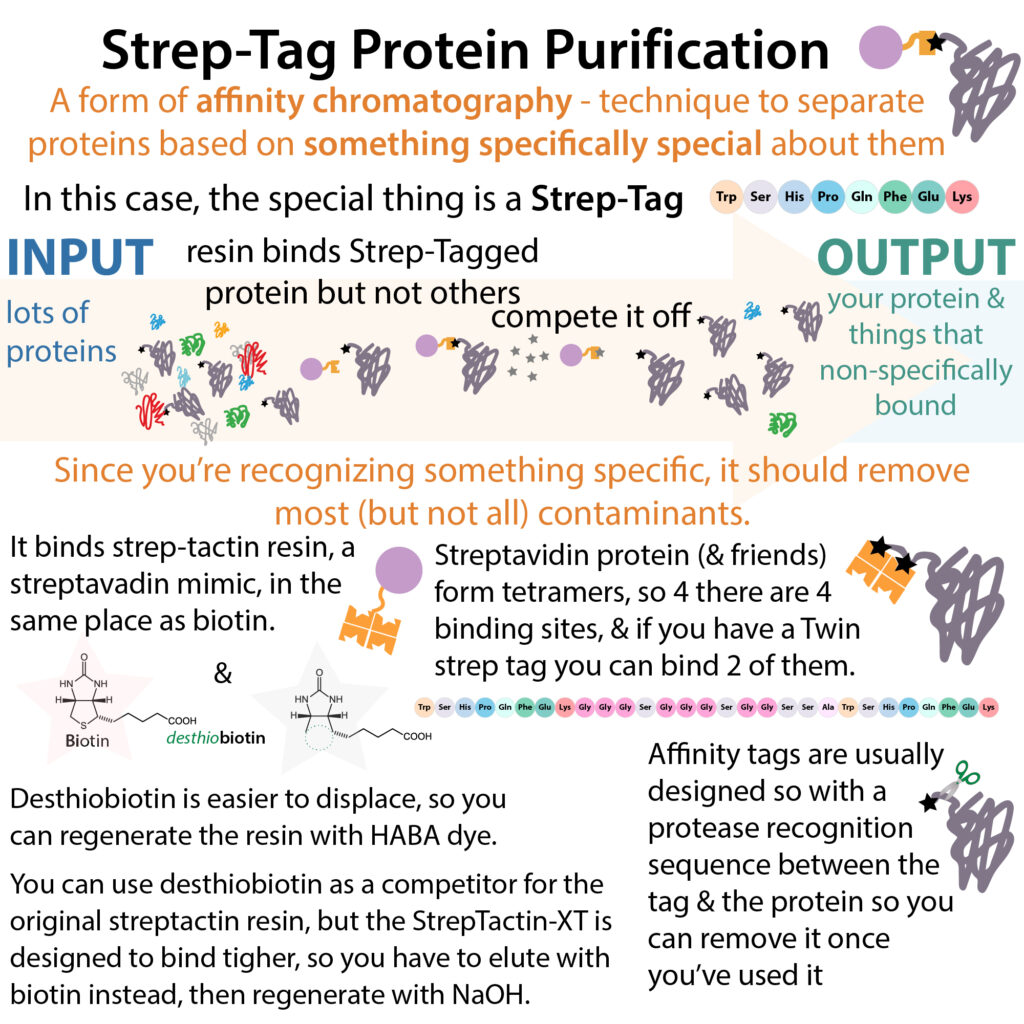
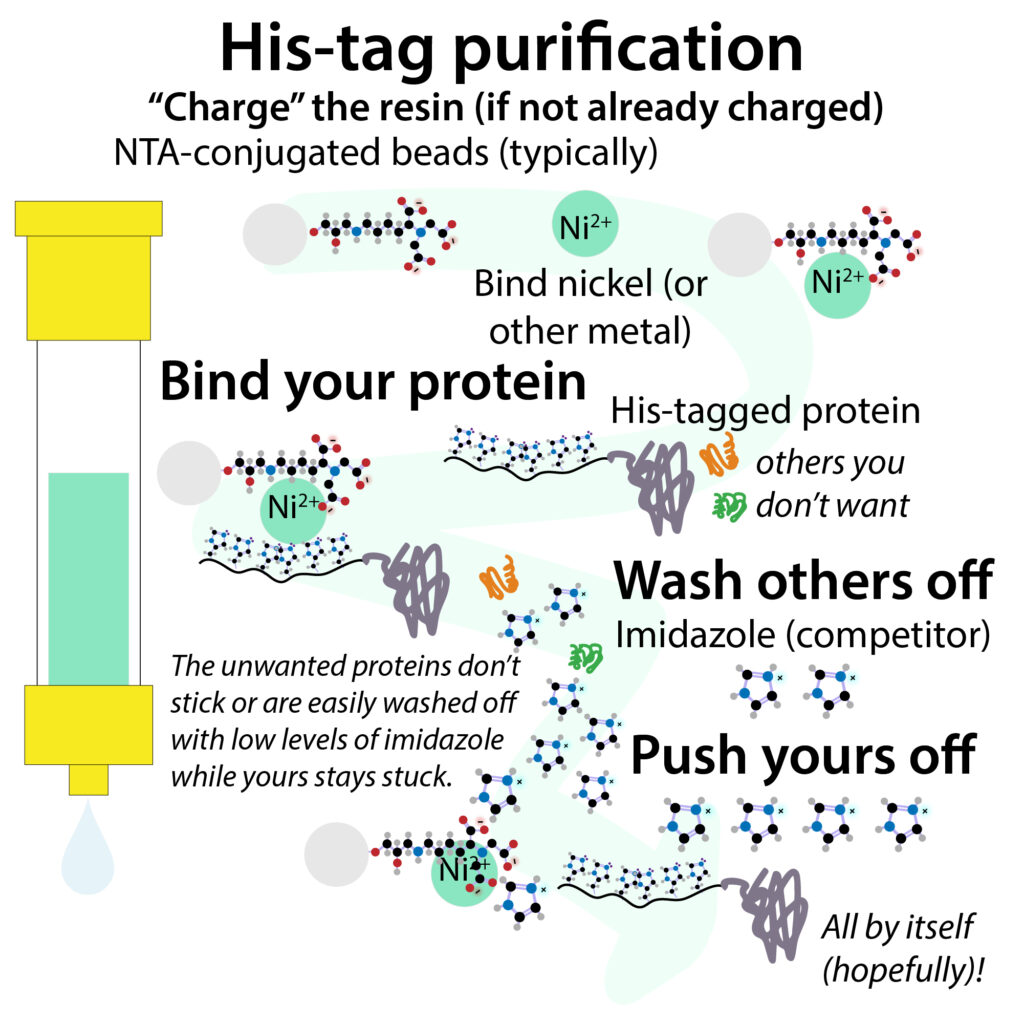
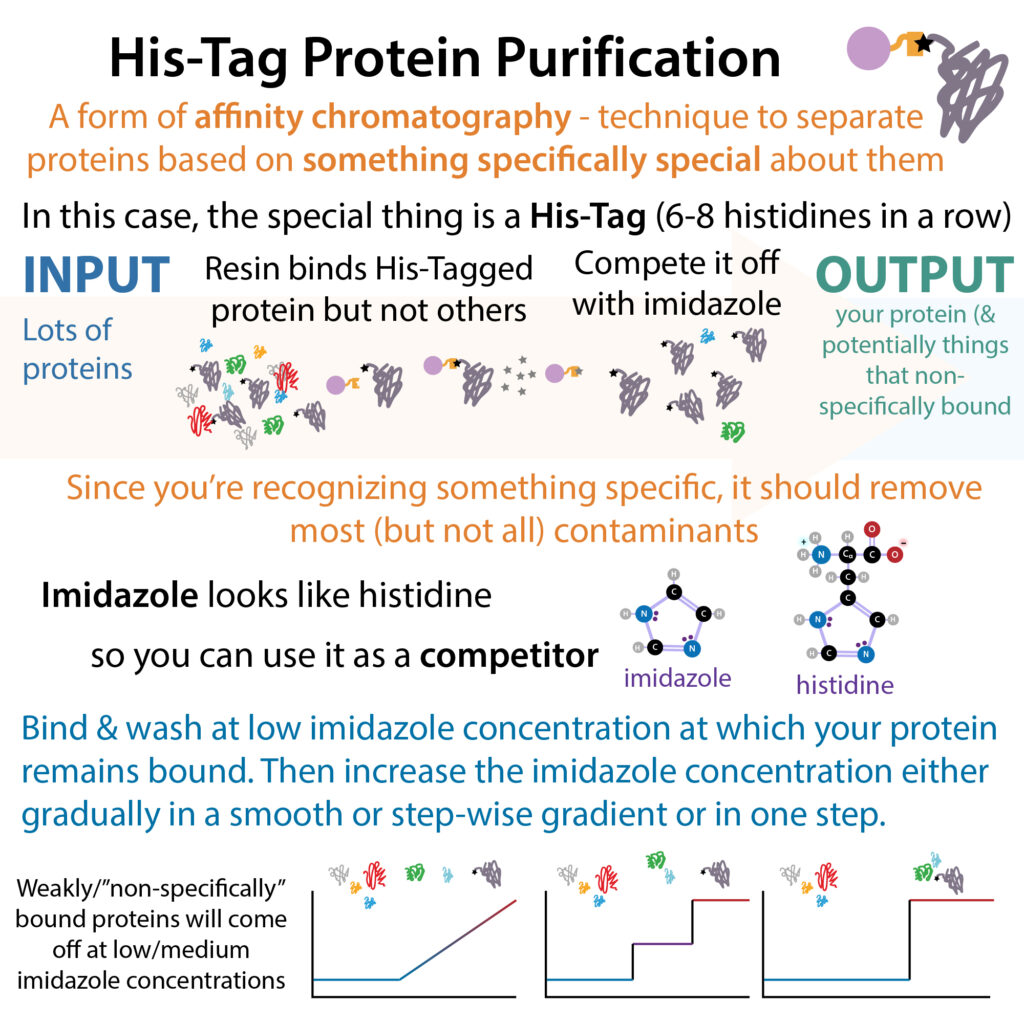

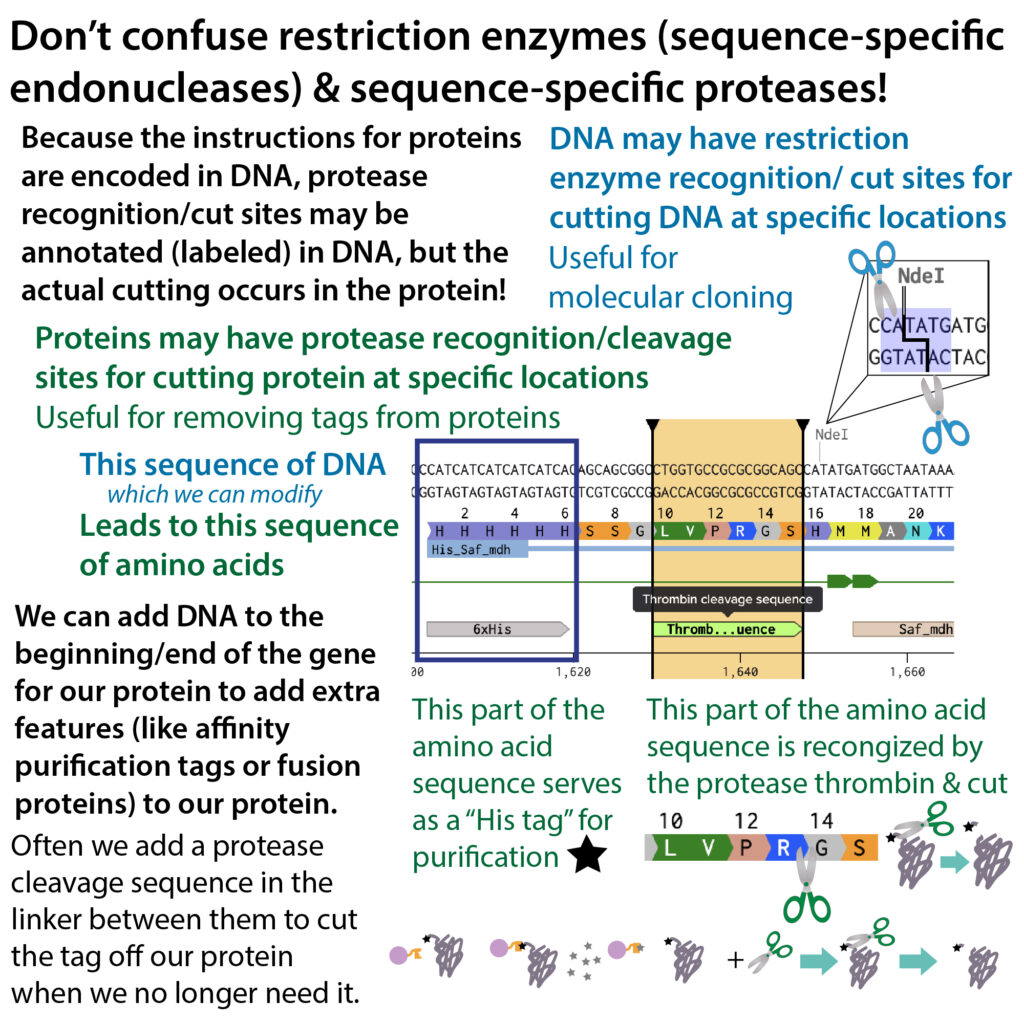
These below forms of chromatography can be used on either tagged or un-tagged proteins and are often performed after affinity chromatography (sometimes after tag removal via a site-specific endoproteases (on or off-column)).
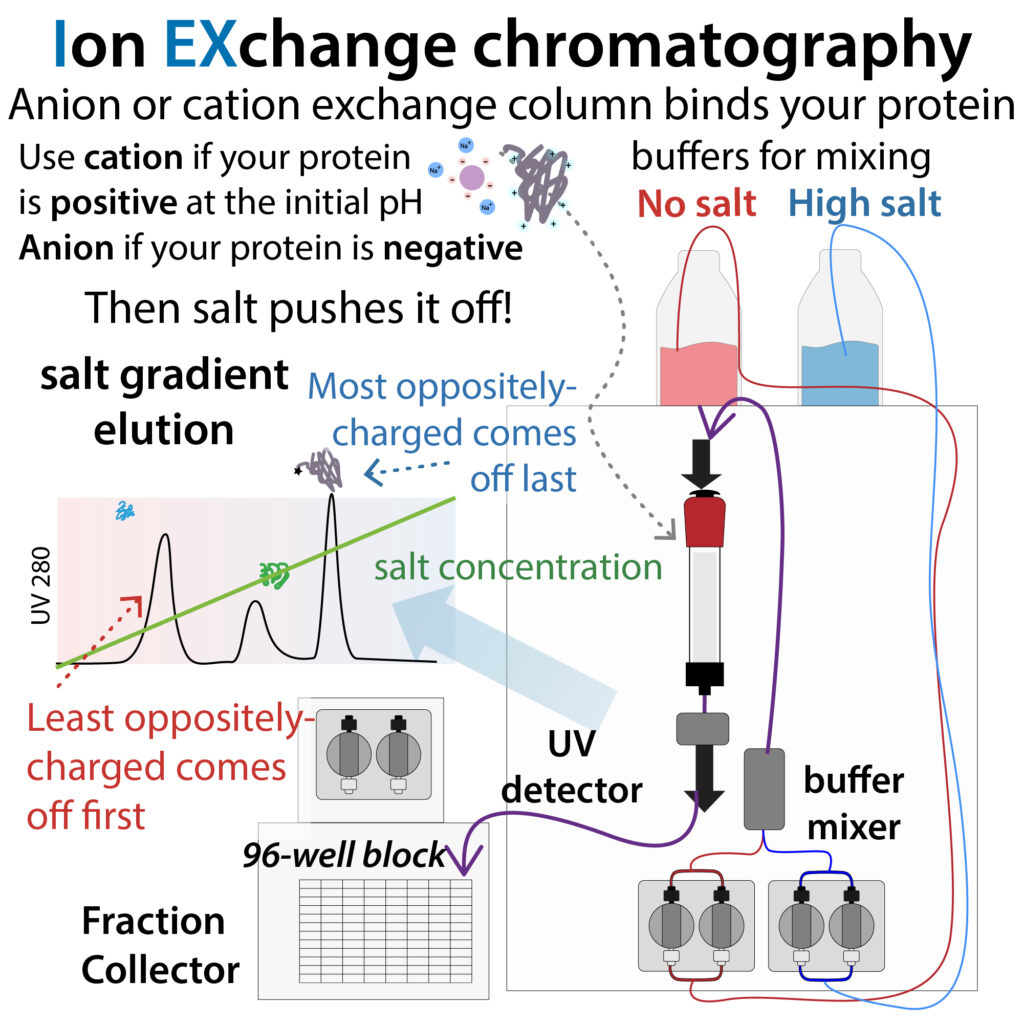
- Ion-exchange chromatography: uses positively-charged or negatively-charged resin to separate proteins based on their surface charges. Proteins with an opposite charge to the resin will stick and the more oppositely-charged, the more strongly they’ll stick. They can then be competed off by (typically gradually) changing the salt concentration or pH.
- Cation exchange chromatography: negatively-charged resin binds positively-charged proteins
- Use a buffer with a pH above the precited pI (isoelectric point) of your protein. At these lower, more acidic pHs, there are more protons around and thus your protein will have a greater positive charge.
- e.g., “S” columns
- Anion exchange chromatography: positively-charged resin binds negatively-charged proteins
- Use a buffer with a pH above the precited pI (isoelectric point) of your protein. At these higher, more alkaline/basic pHs, there are fewer protons around and thus your protein will have a greater negative charge.
- e.g., “Q” columns
- Cation exchange chromatography: negatively-charged resin binds positively-charged proteins
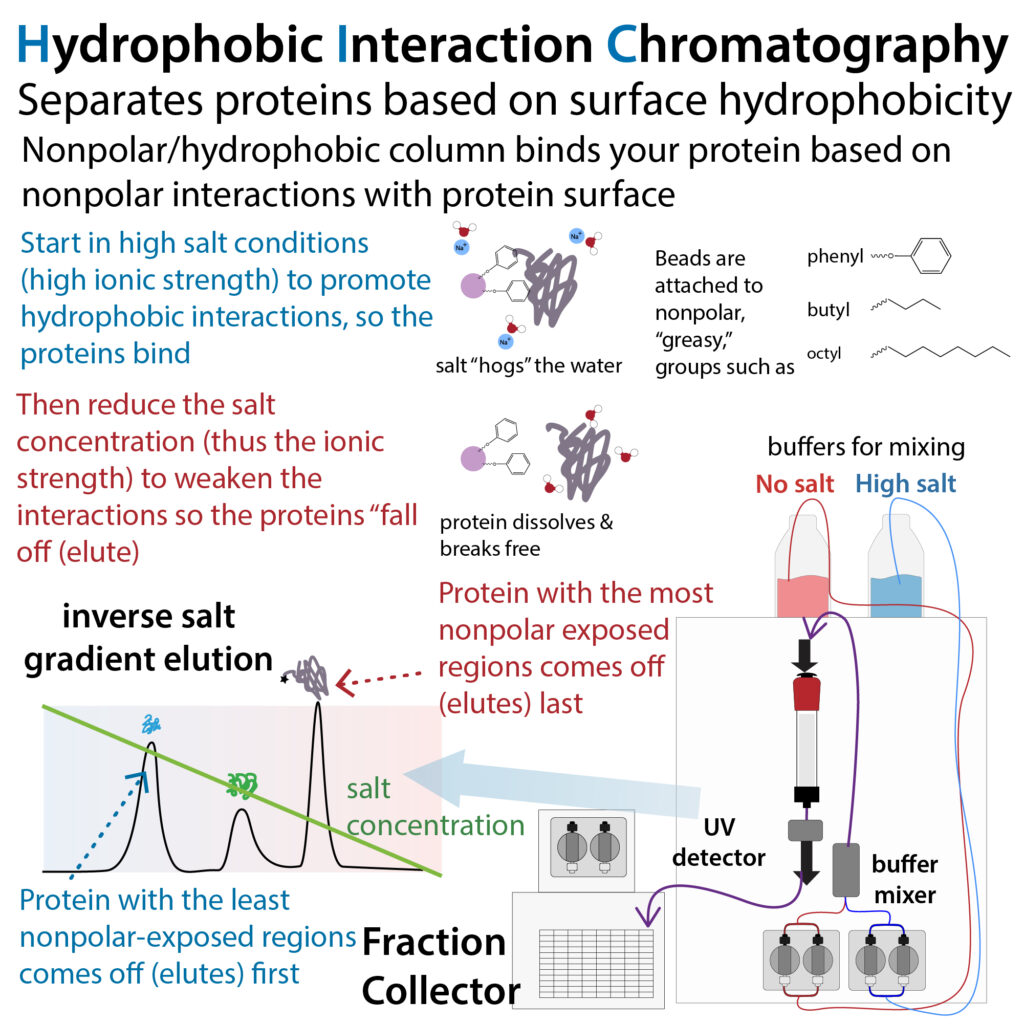
- Hydrophobic Interaction Chromatography (HIC): uses resin conjugated to “greasy” hydrophobic groups to separate proteins based on their surface hydrophobicity. Proteins with hydrophobic groups exposed on their surface will stick and the more hydrophobic, the more strongly they’ll stick. They can then be competed off by (typically gradually) changing the salt concentration or pH.
- e.g., butyl, octyl, or phenyl-conjugated resins
- Note: there’s also something called mixed-mode that involves resin with both hydrophobic and hydrophilic groups.
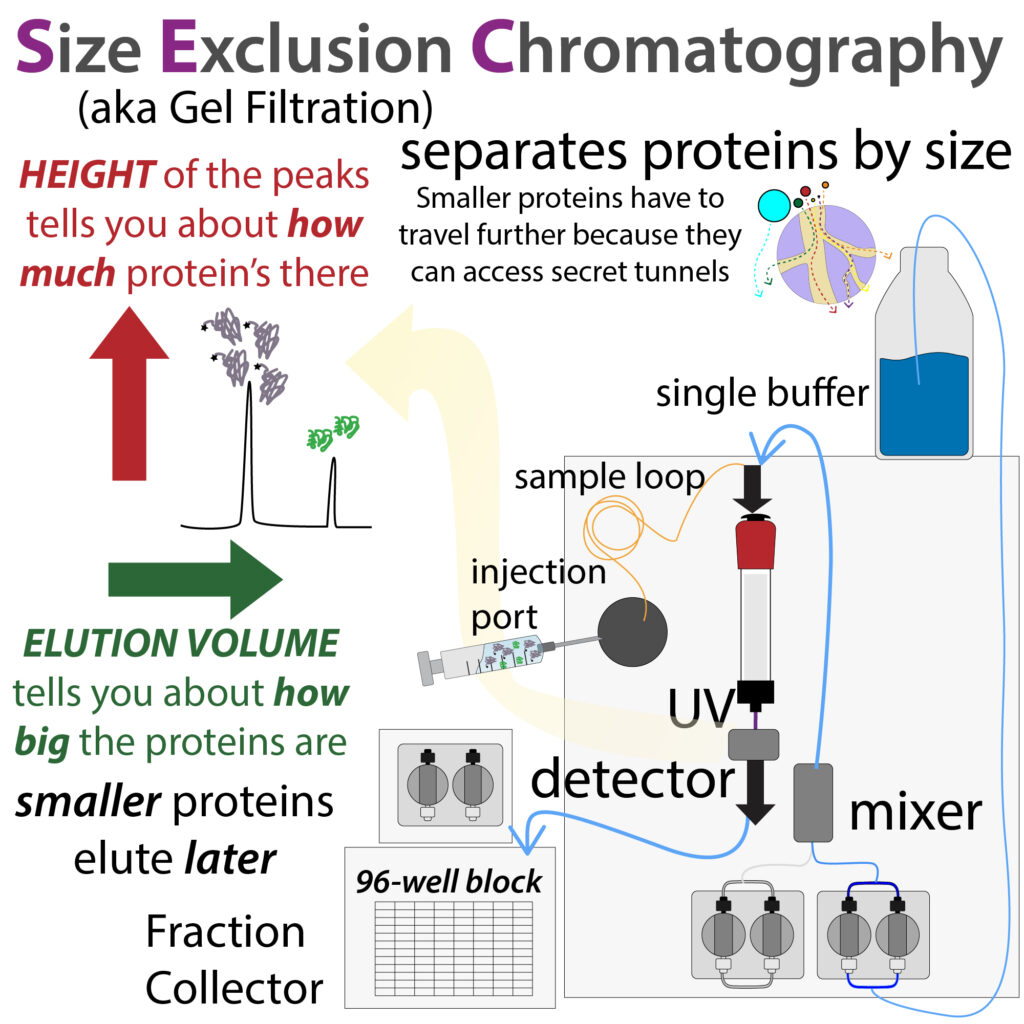
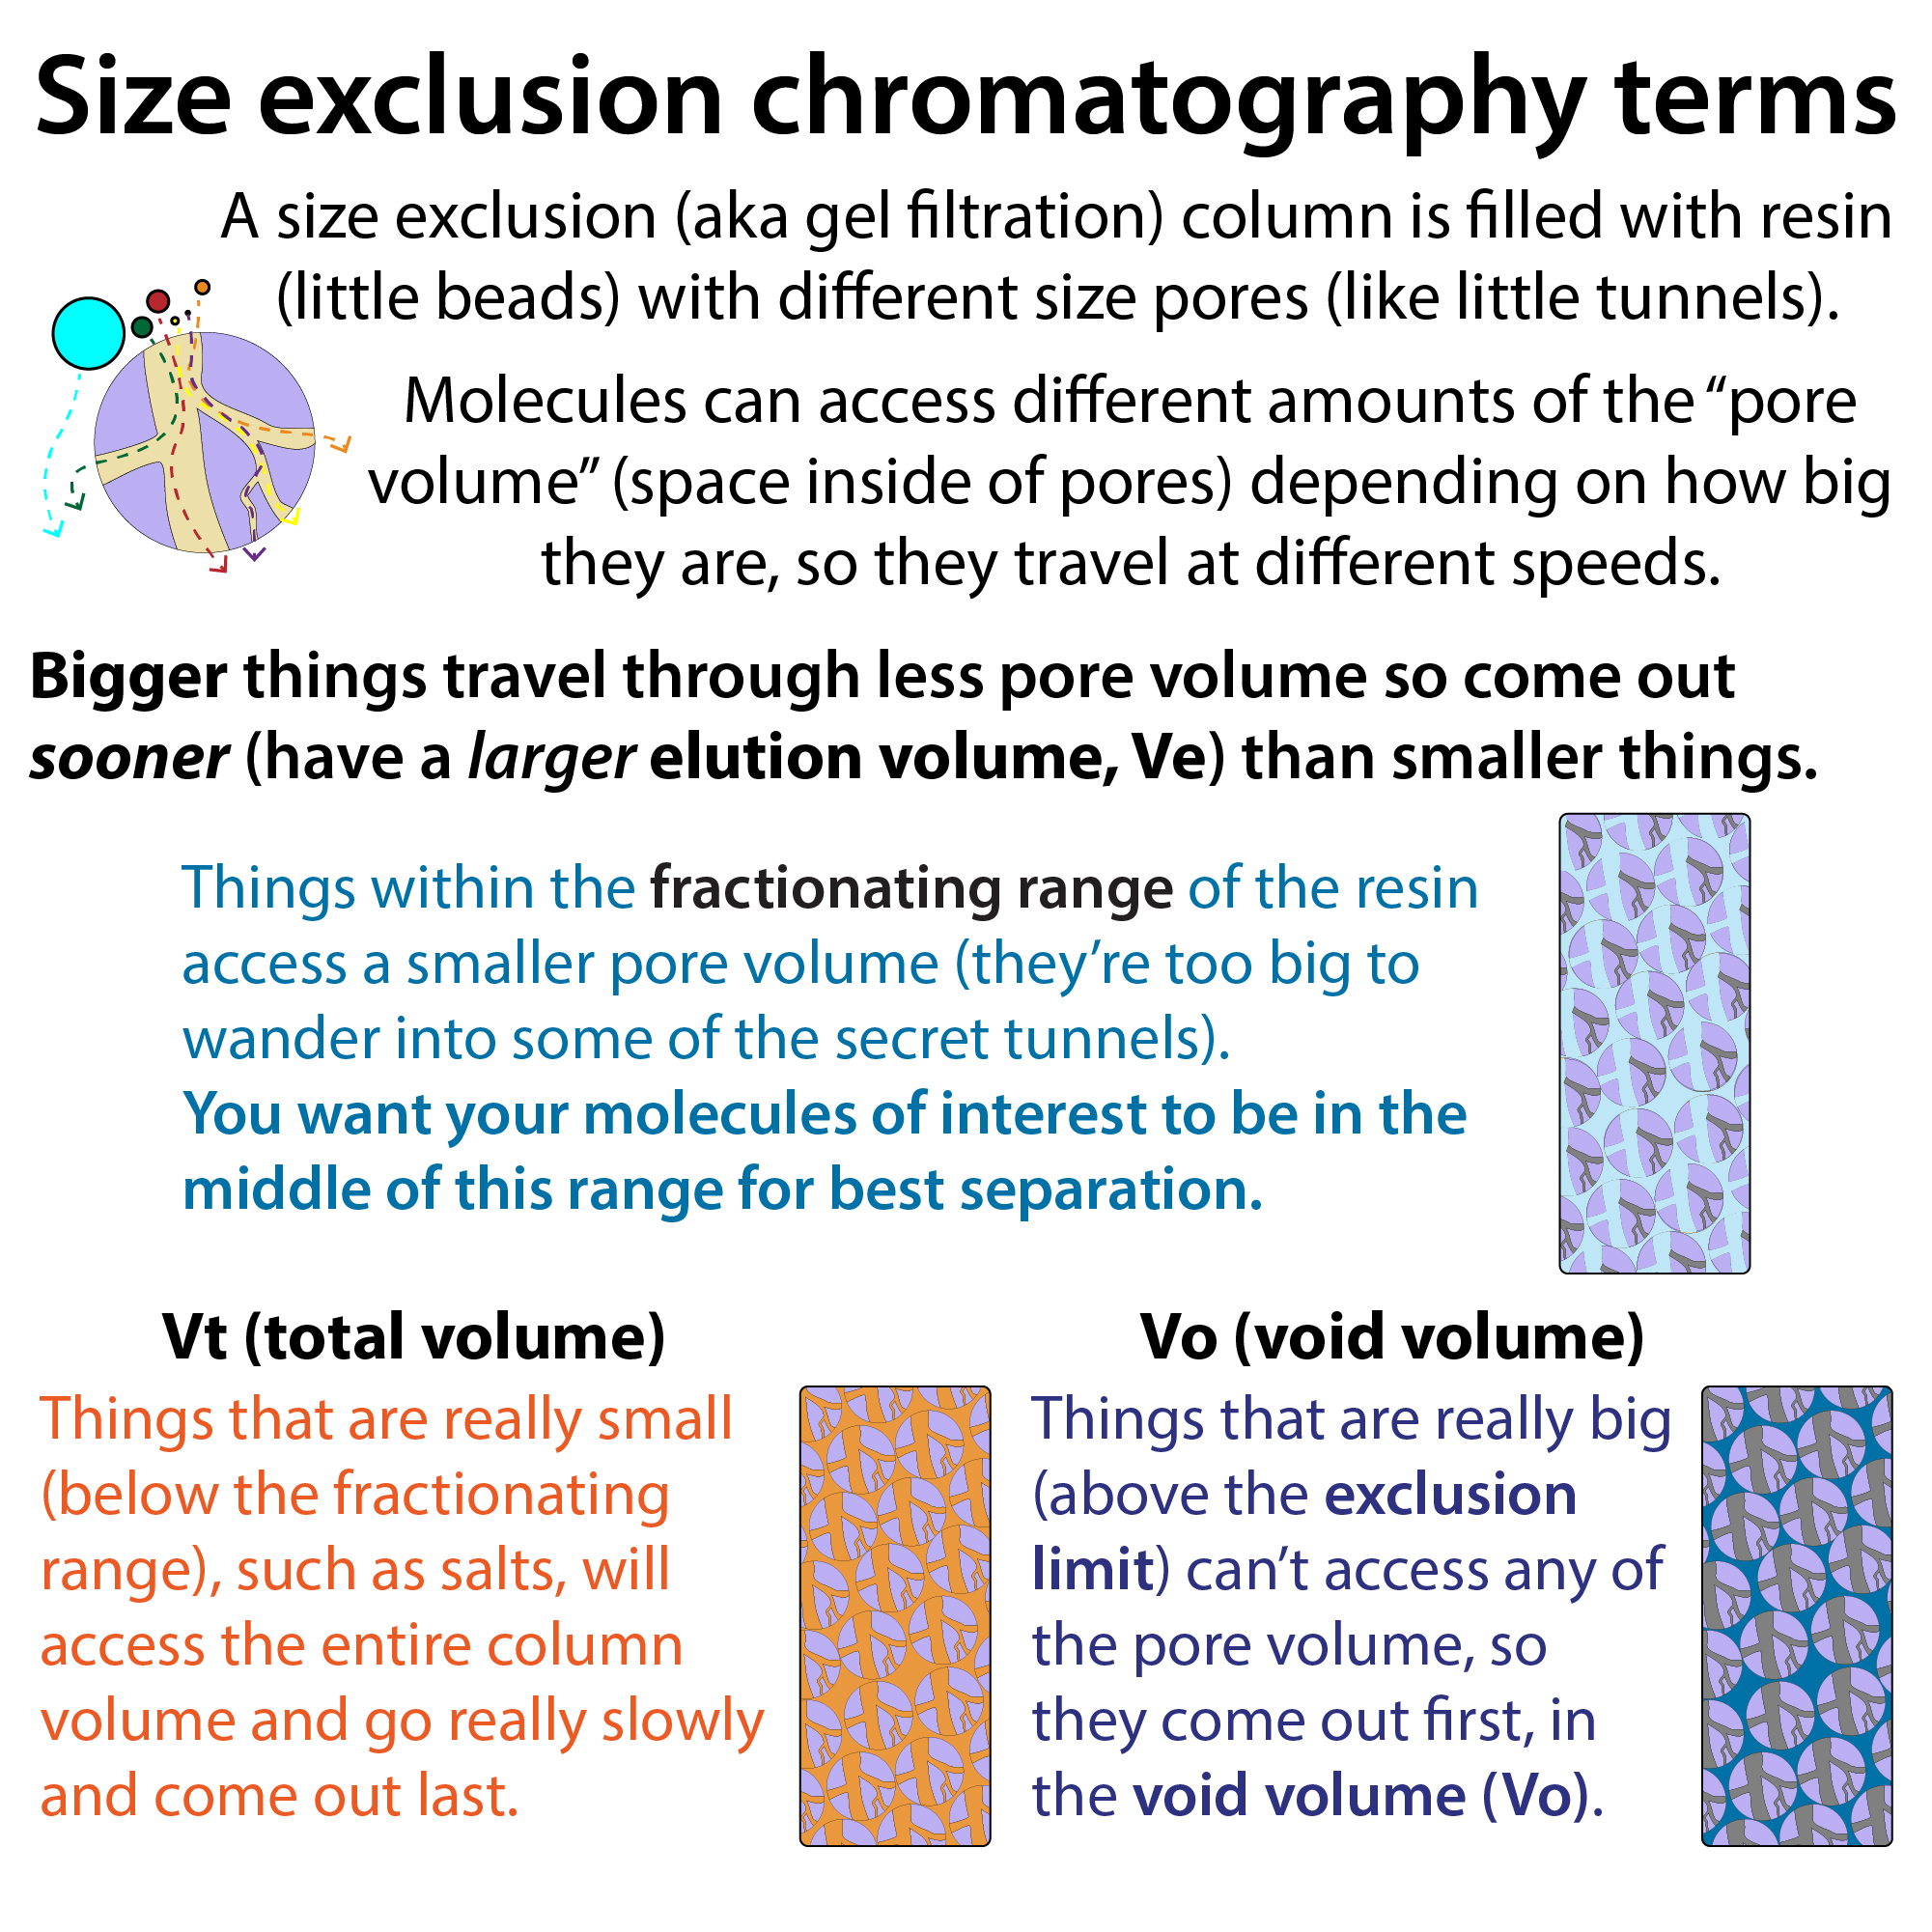
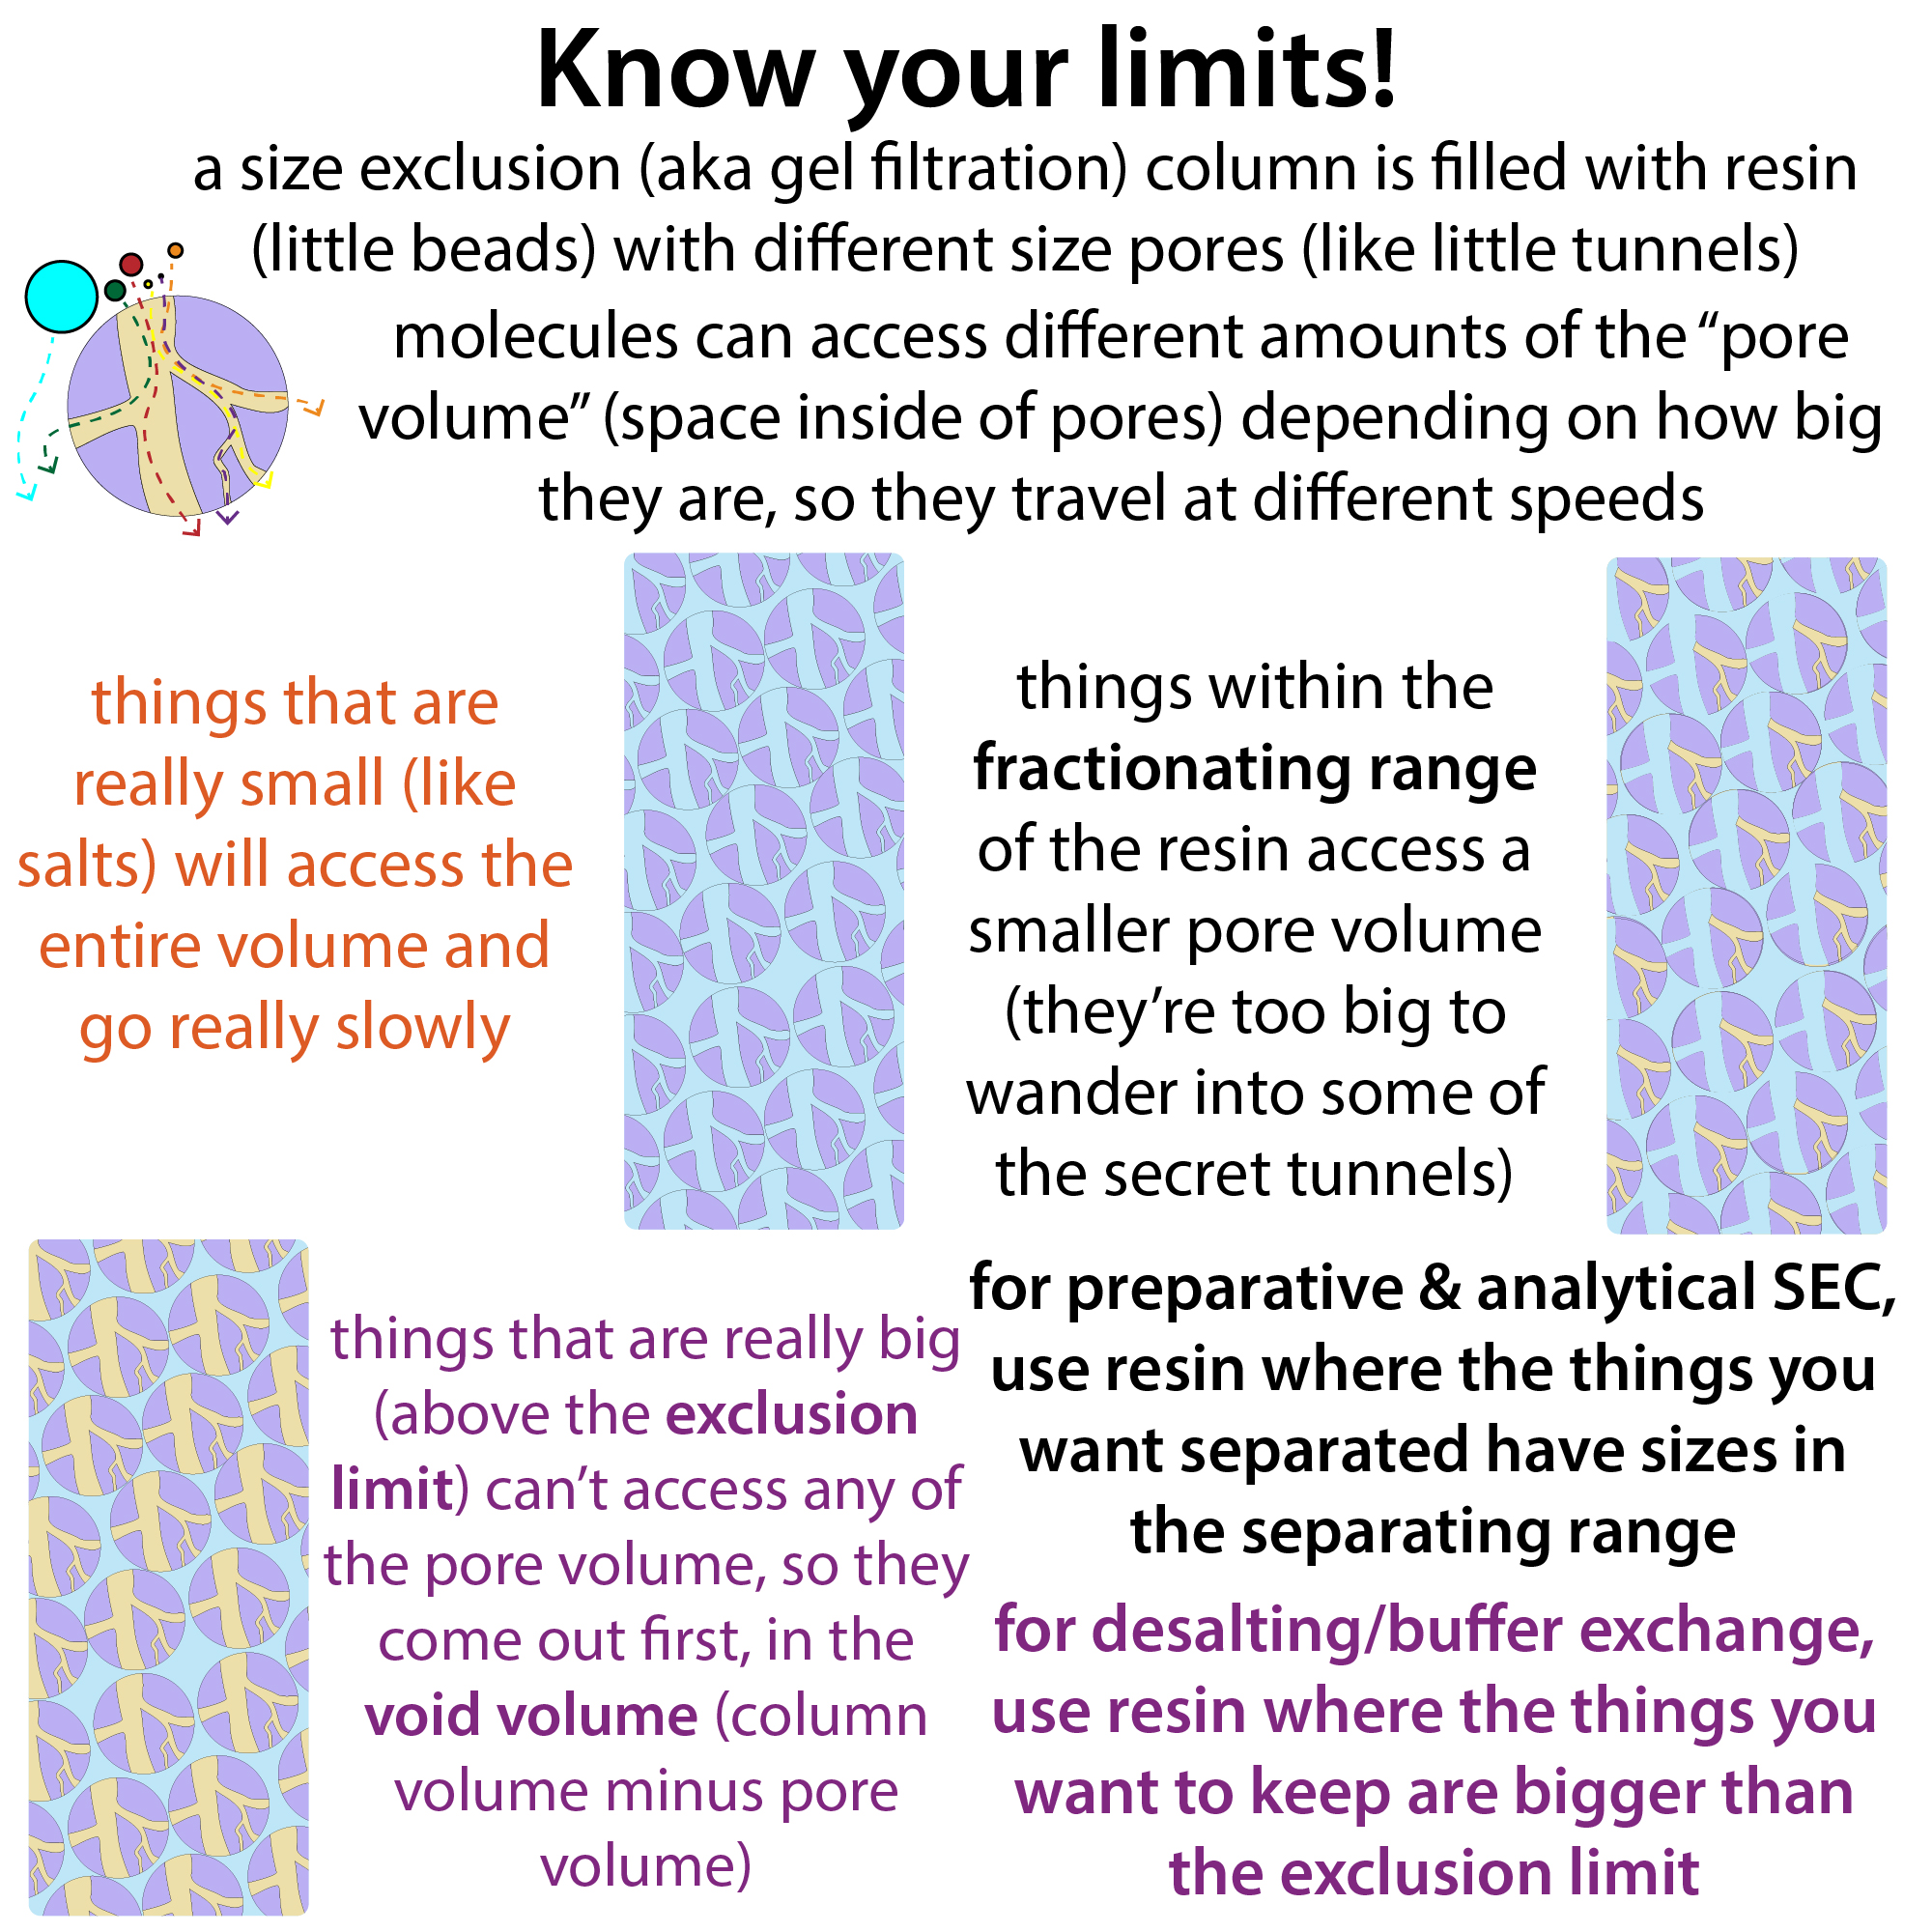
- Size Exclusion Chromatography (SEC), aka Gel Filtration: uses resin with pores of various sizes to separate proteins by their sizes. Smaller proteins can fit through (and thus must travel through) more pores, thus they travel slower than larger proteins, which can’t enter the smaller pores, so they get to take shortcuts and thus come out (elute) earlier. Different resins have different ranges of pore sizes, and you want to select a resin with a pore size that’s best for resolving (separating) proteins of the size you’re interested in.
- e.g., Superdex200 has a “fractionation range” of 1 x 10^4 to 6 x 10^5 Daltons (Da), indicating it’s good for separating proteins from 10 kDa to to 600 kDa; Superdex75 meanwhile, has a fractionation range of 3-70 kDa (thus better for small proteins and peptides); whereas Superose6, with a fractionation range of 5-5000 kDa (5 MDa) is good for the big guys.
Graphics




Other things
Along the way you may need to . . .
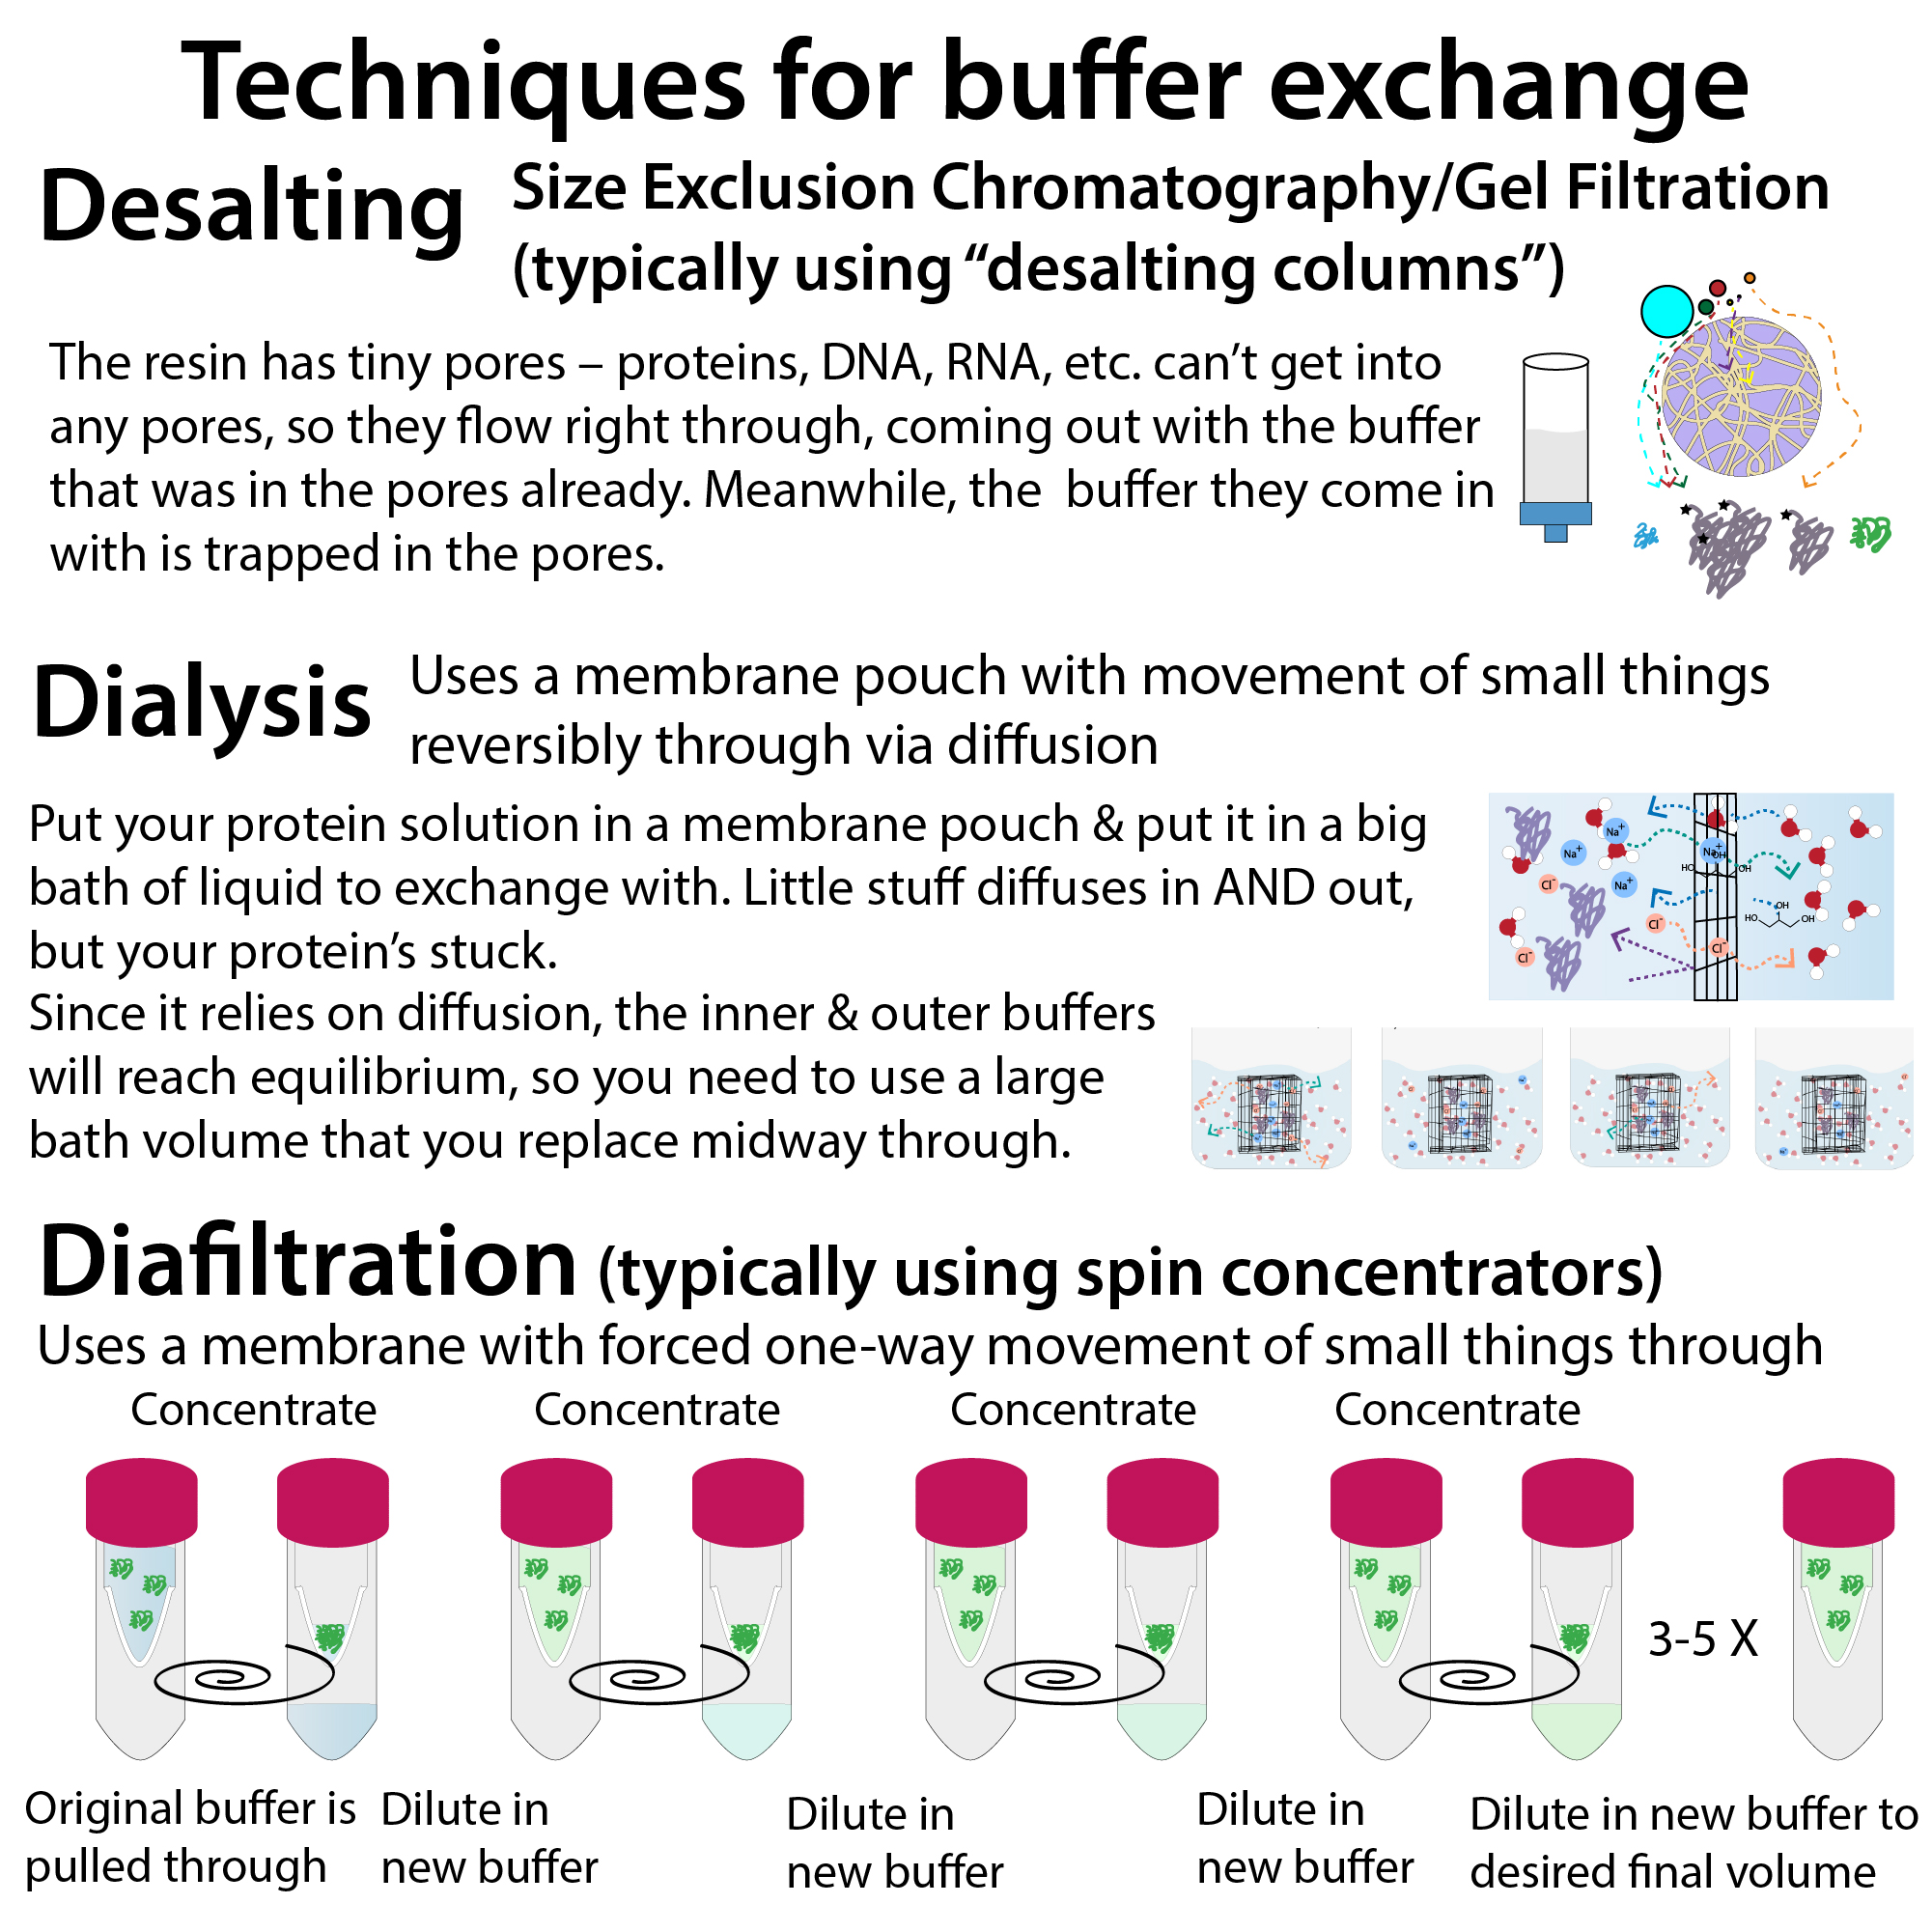
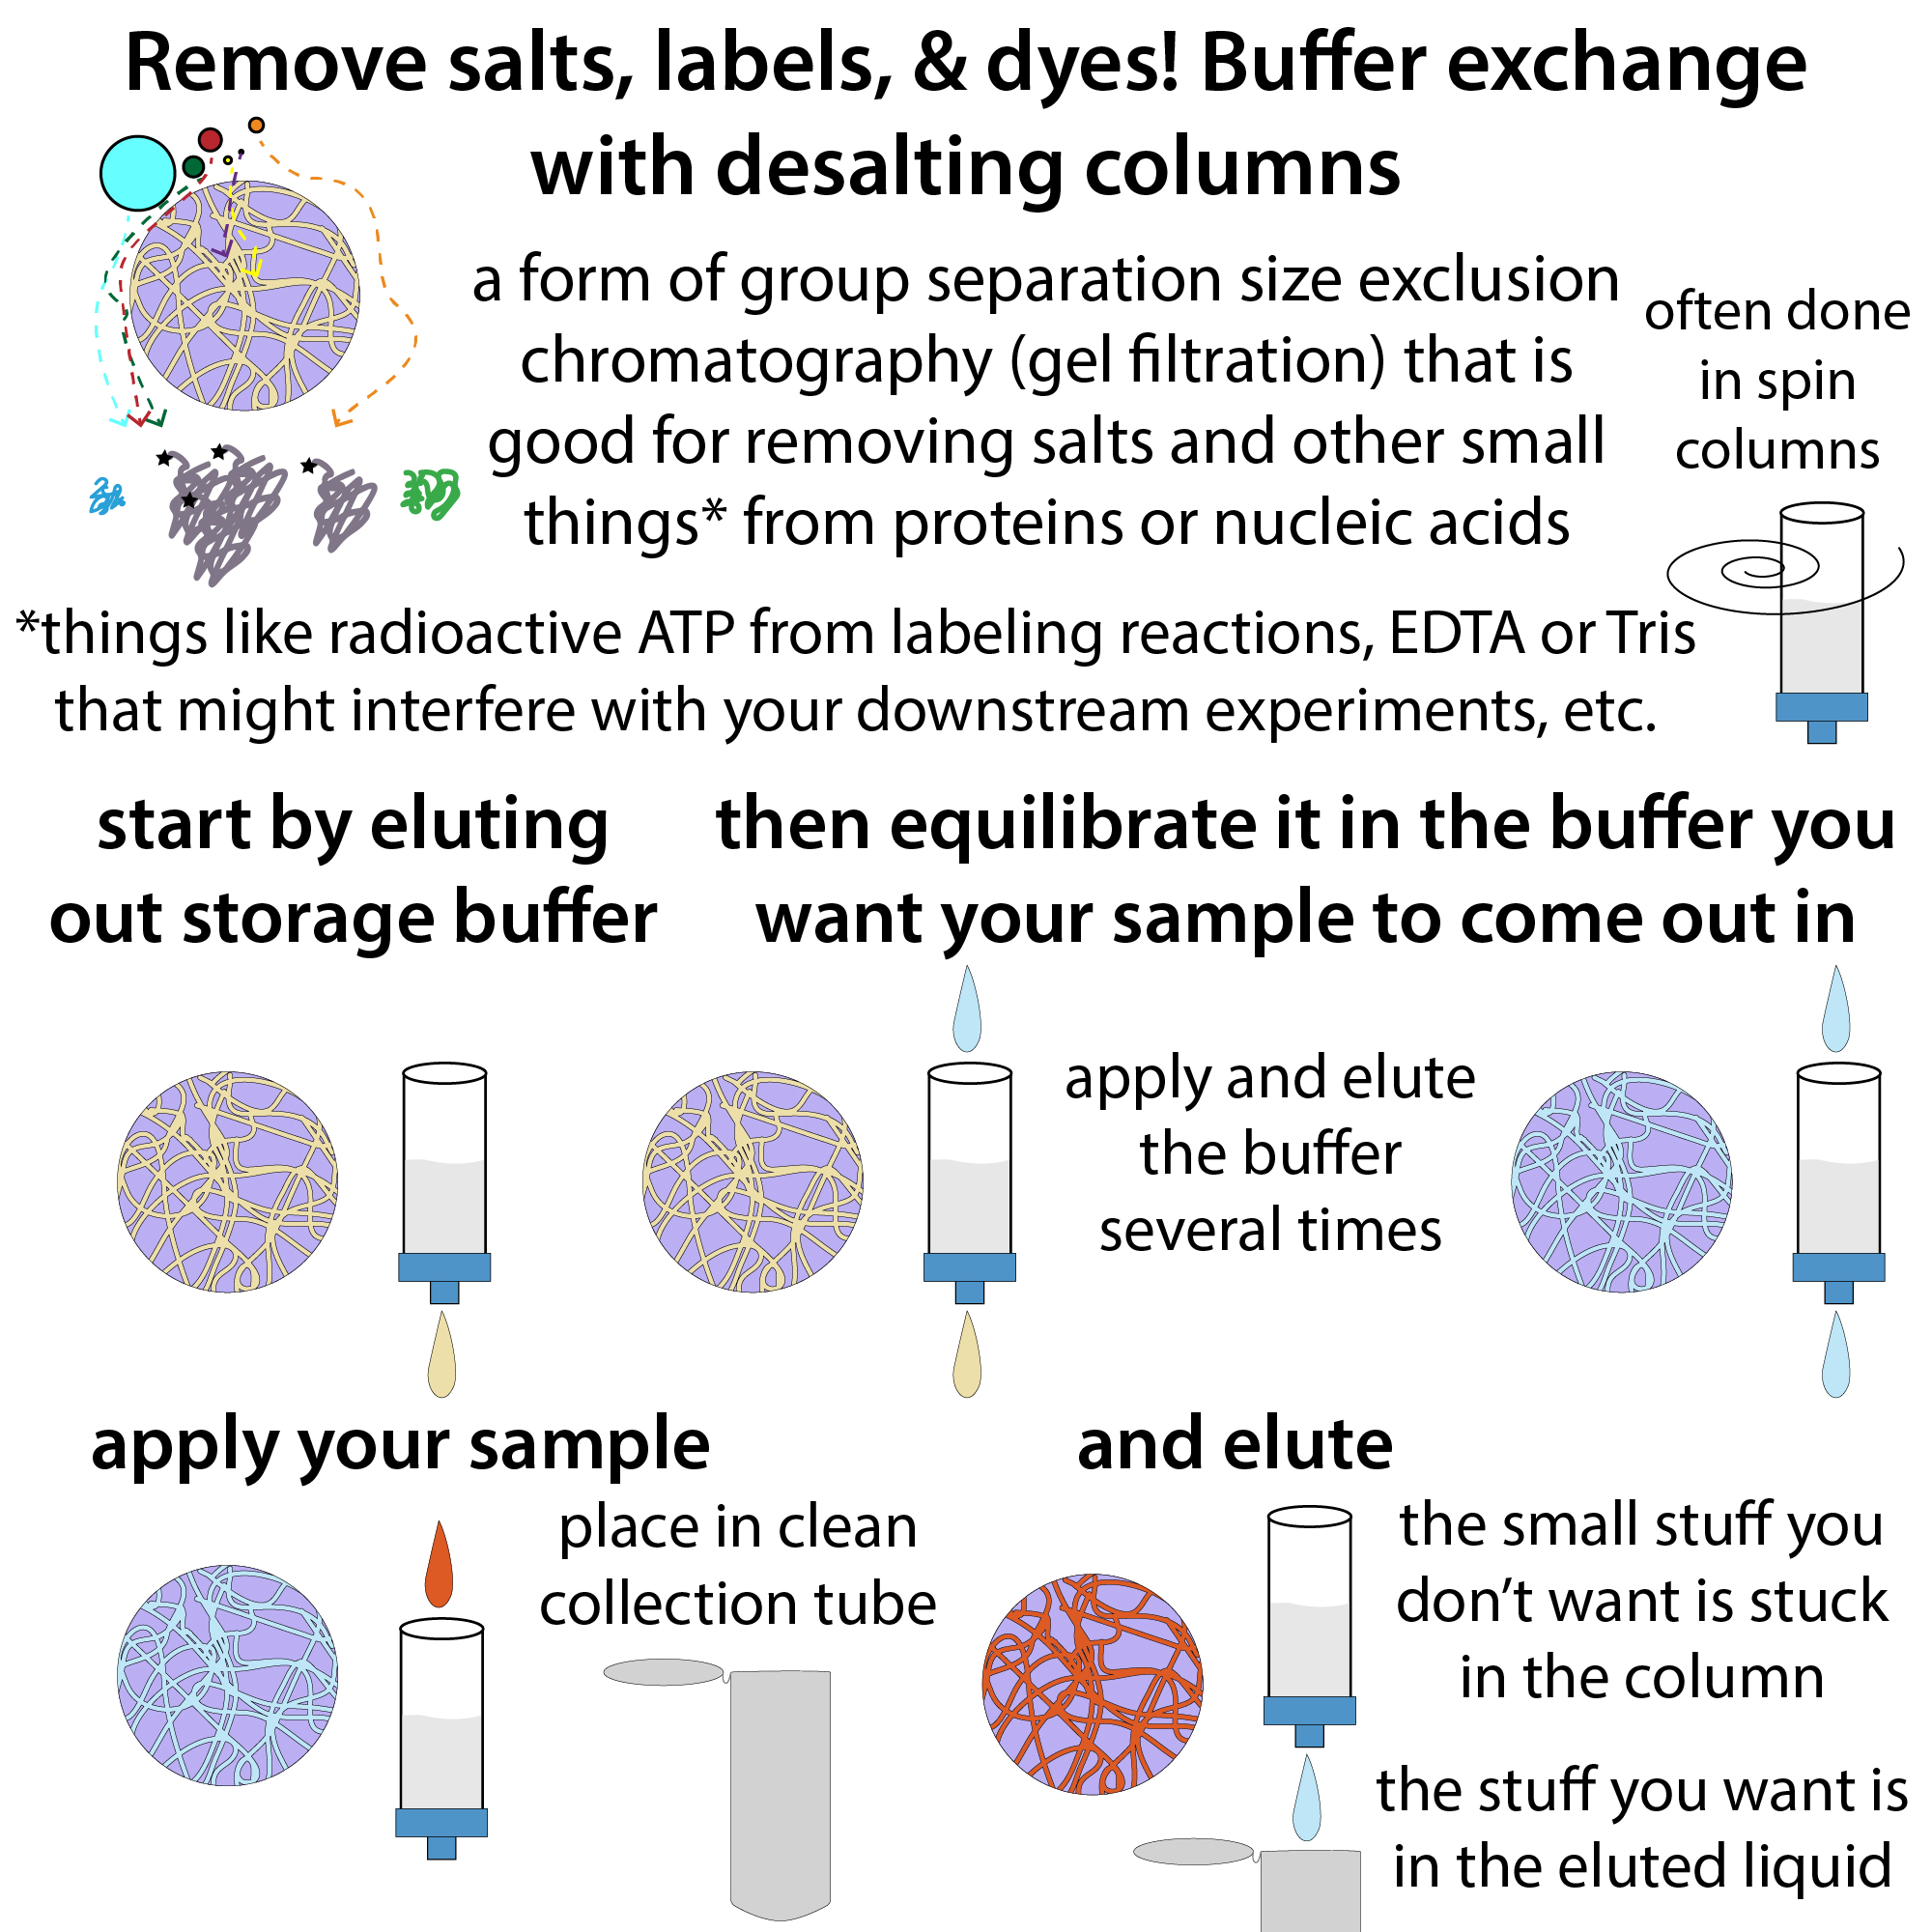
“Buffer exchange” to switch your protein into a more ideal buffer and/or “Desalt” to remove salts or other small molecules. You can do this using:
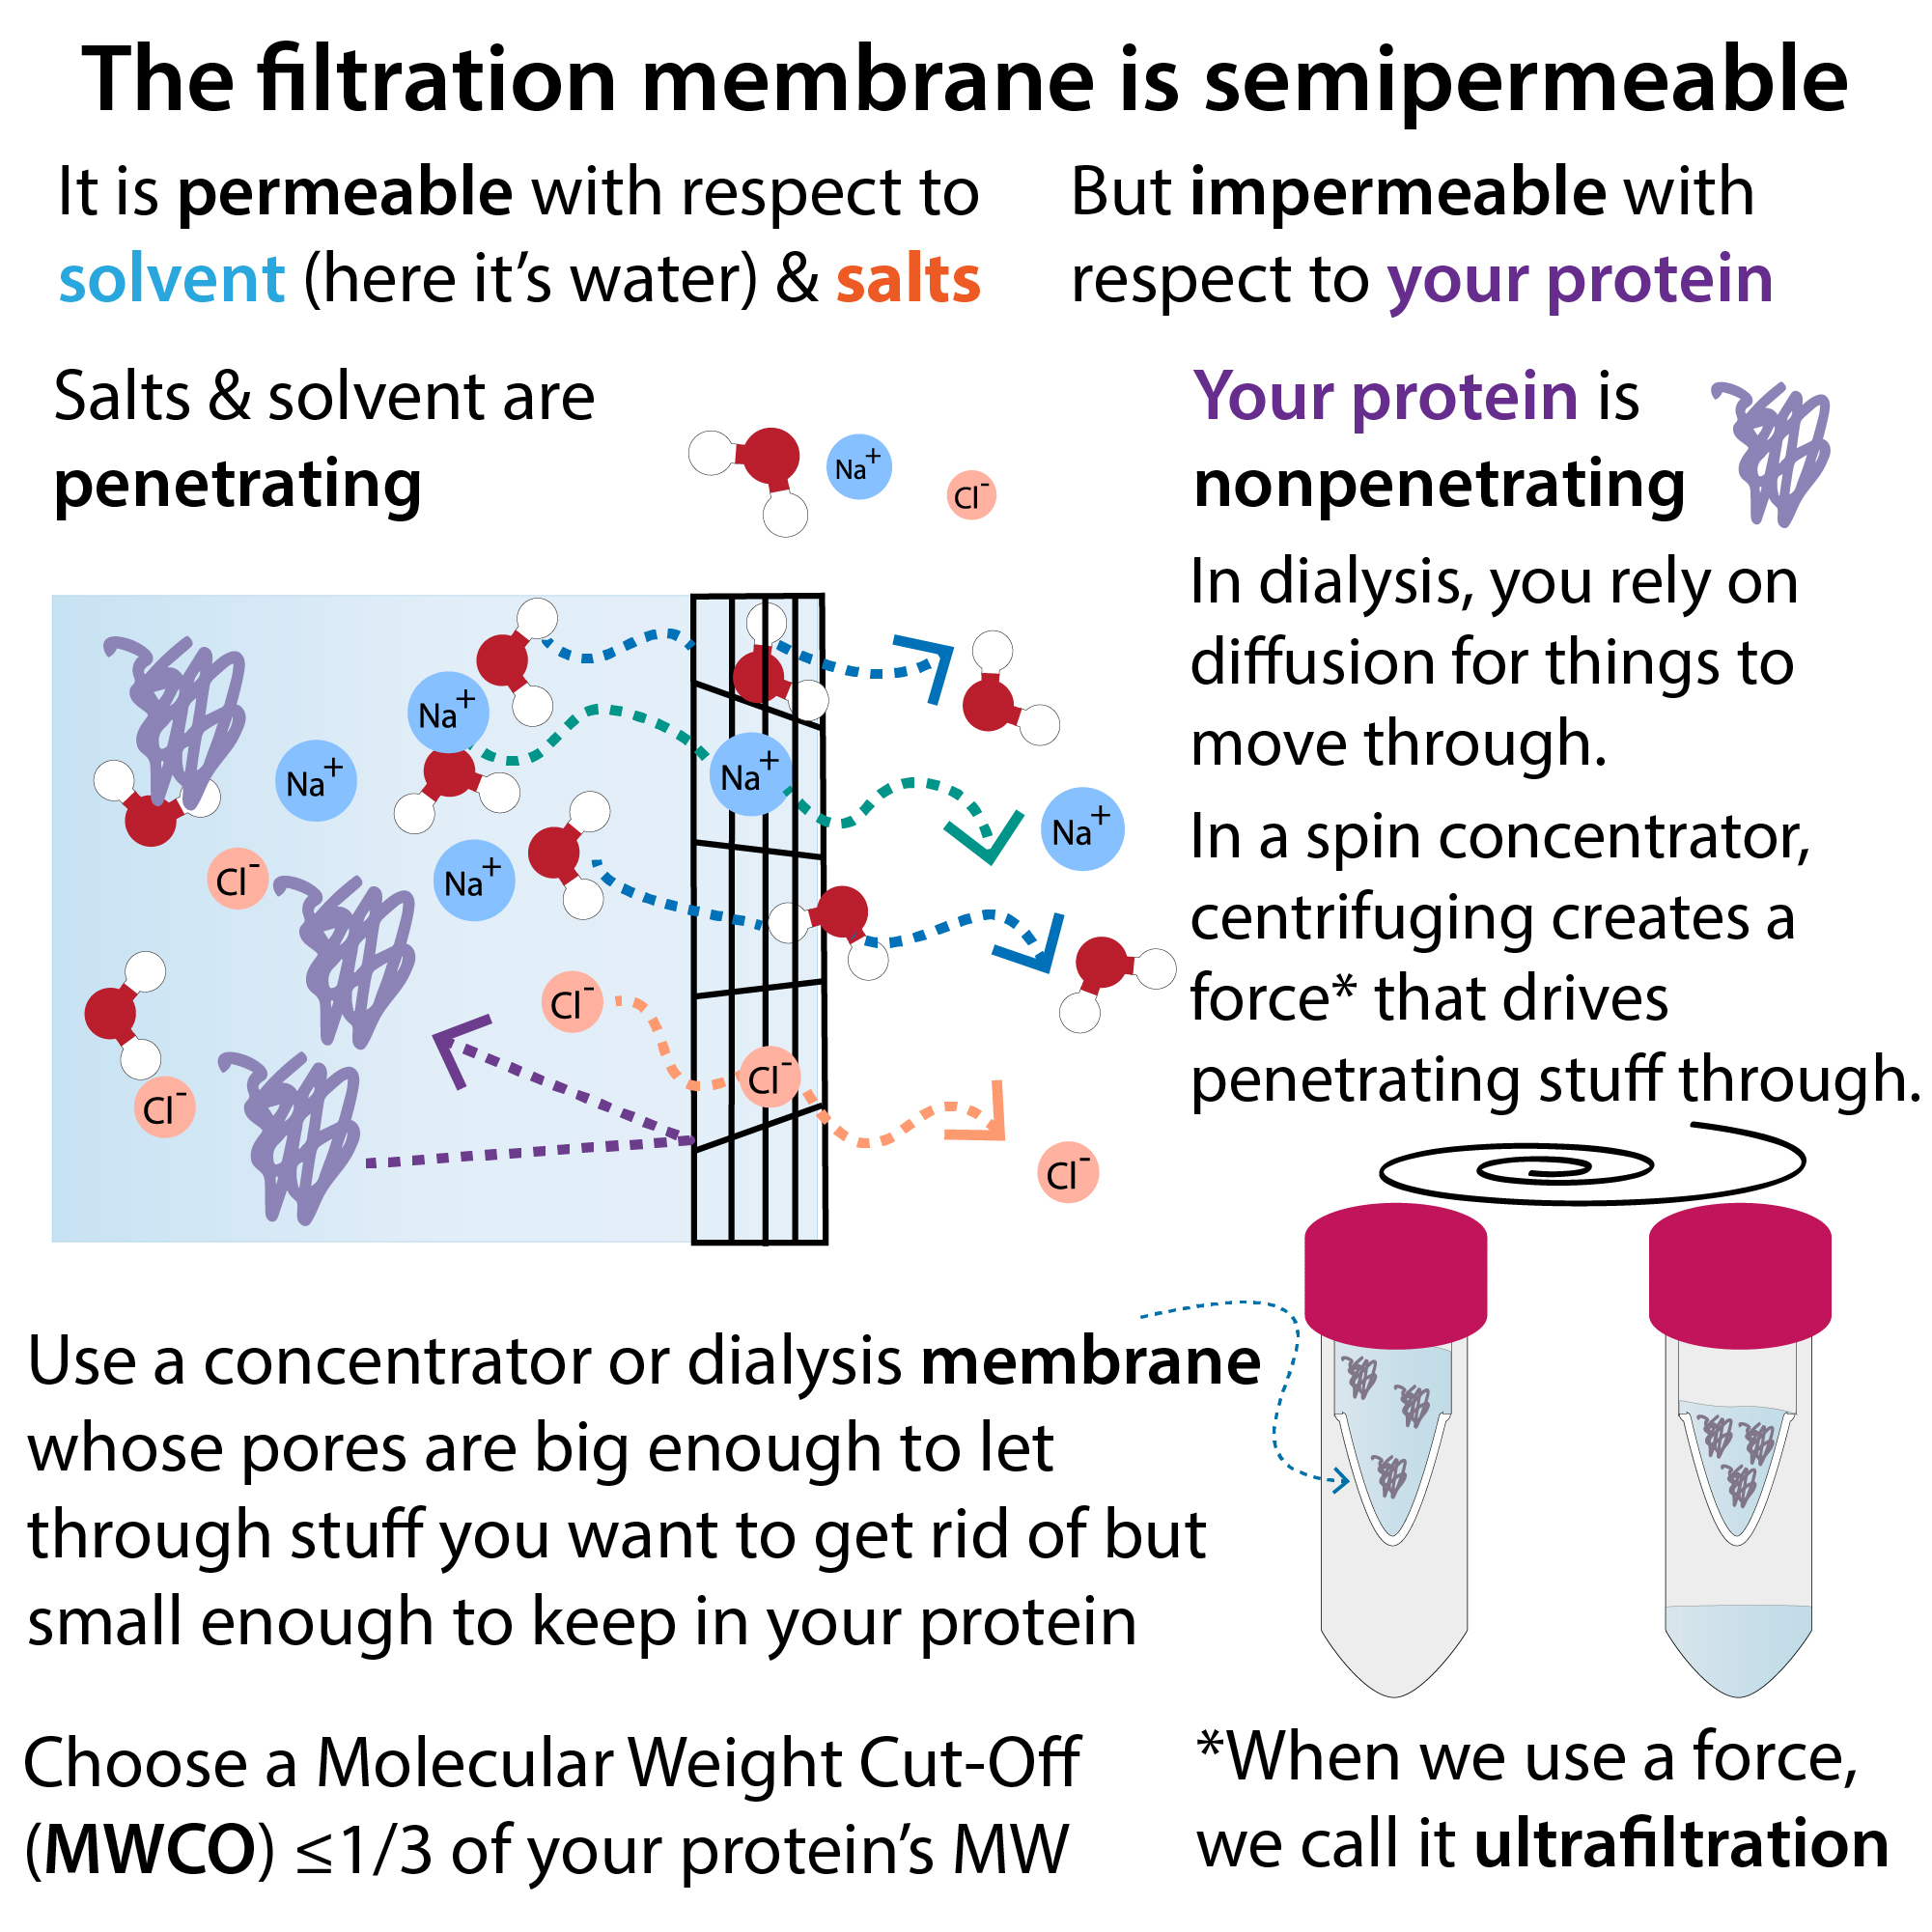
- Dialysis, which takes advantage of semi-permeable membrane pouches that allow salts and other small things to diffuse out into a large bath of desired liquid while your protein stays trapped inside.
- Desalting columns, which are a bulk separation form of SEC that has resin with huge pores that’s thus only able to separate big from really small.
- Diafiltration, typically using spin concentrators (more on these below) to repeatedly concentrate then dilute in new buffer.
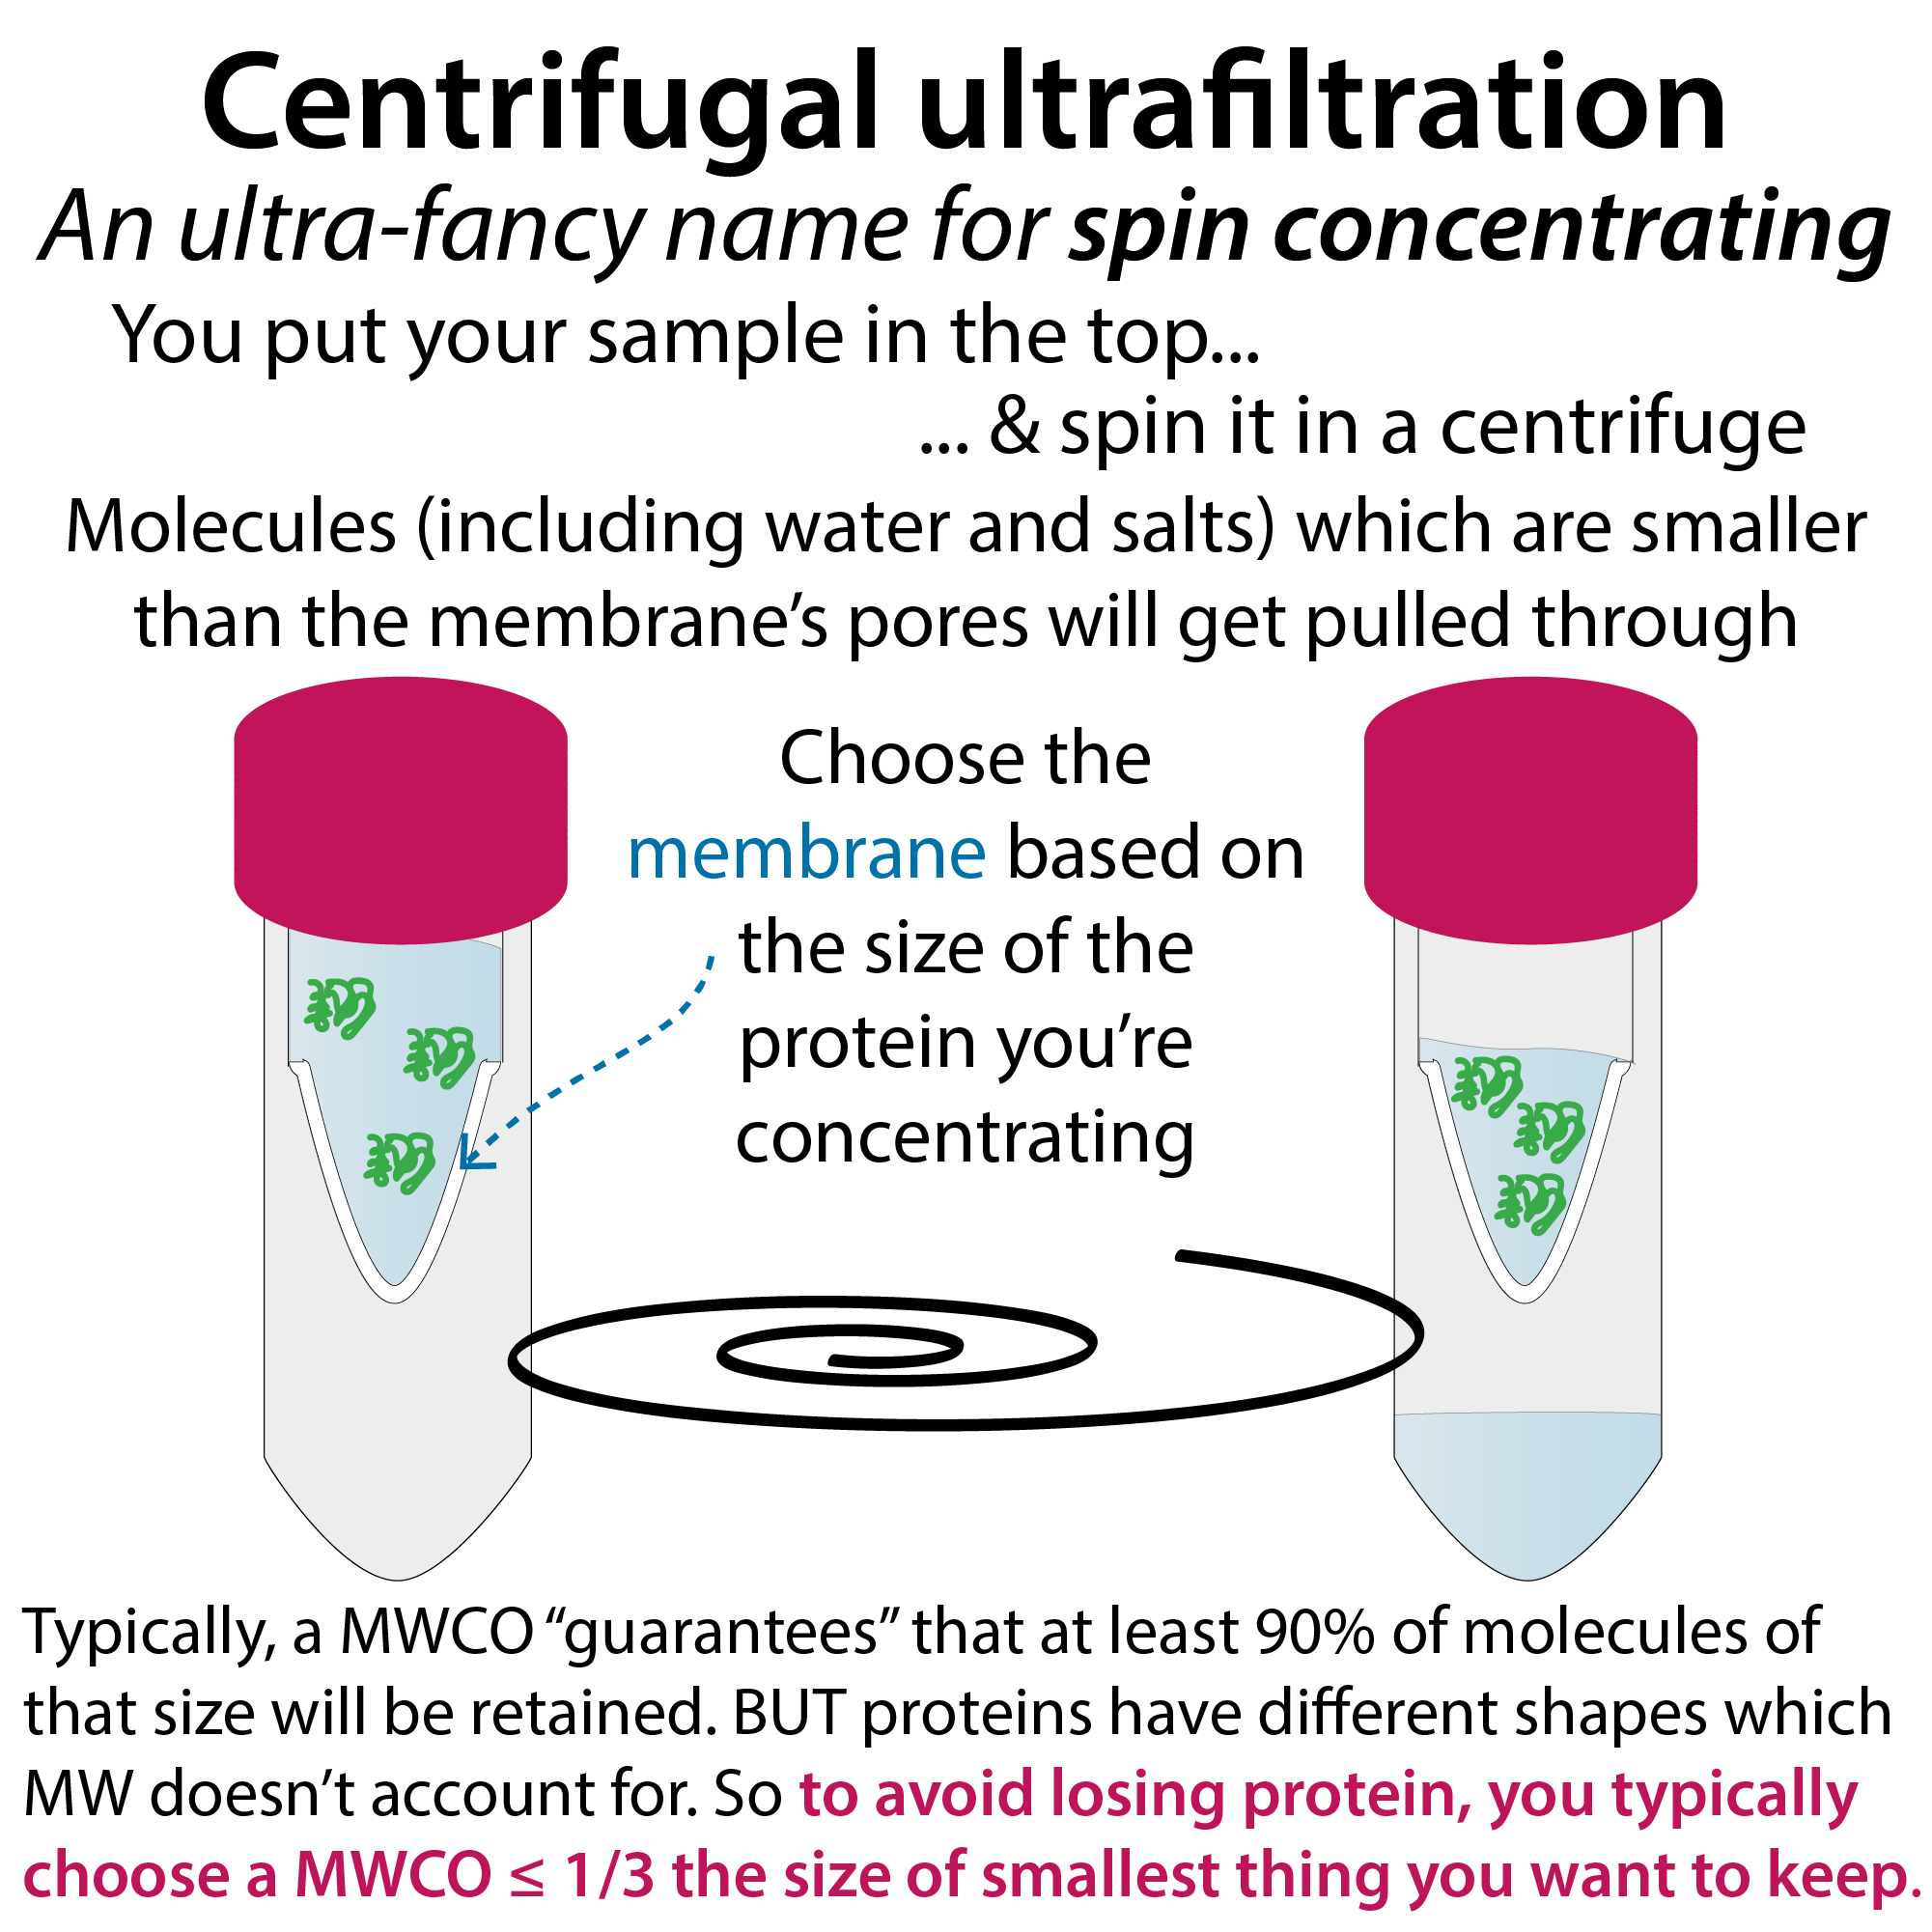
- With dialysis and use of spin concentrators, you need to pay attention to their molecular weight cut-off (MWCO) (e.g. 3K, 5K, 10K, 50K). MWCO refers (indirectly) to the size of the membrane’s pores. It’s given in units of Daltons (Da) & tells you molecules below this size can go through (are penetrating) but molecules above this size are retained (are non-penetrating & stay put in the pouch or compartment). You want to choose a MWCO smaller than your protein (& anything else you want to keep) but larger than whatever you want to get rid of. To avoid losing protein, you typically choose a MWCO 1/3 the size of smallest thing you want to keep.
Graphics




Concentrate the protein.
- This may need to be done to facilitate the next experimental step (e.g., SEC, which requires small, concentrated samples) and/or at the end of the purification for more stable (and convenient) storage.
- You typically do this using “centrifugal ultrafiltration,” which is just a fancy-dancy-hard-to-say-way of saying you stick your too-watery protein solution into a membrane-lined tube insert in a “spin concentrator” and spin it really fast. The force from the spinning pulls the water (plus salts and other small things) through the membrane, but your protein’s too big to get through the membrane’s pores so it stays put.
- For larger scale work, there are faster methods such as Tangential Flow Filtration (TFF), which flows a solution over a membrane (and which I often wish I had access to . . .)
Graphics
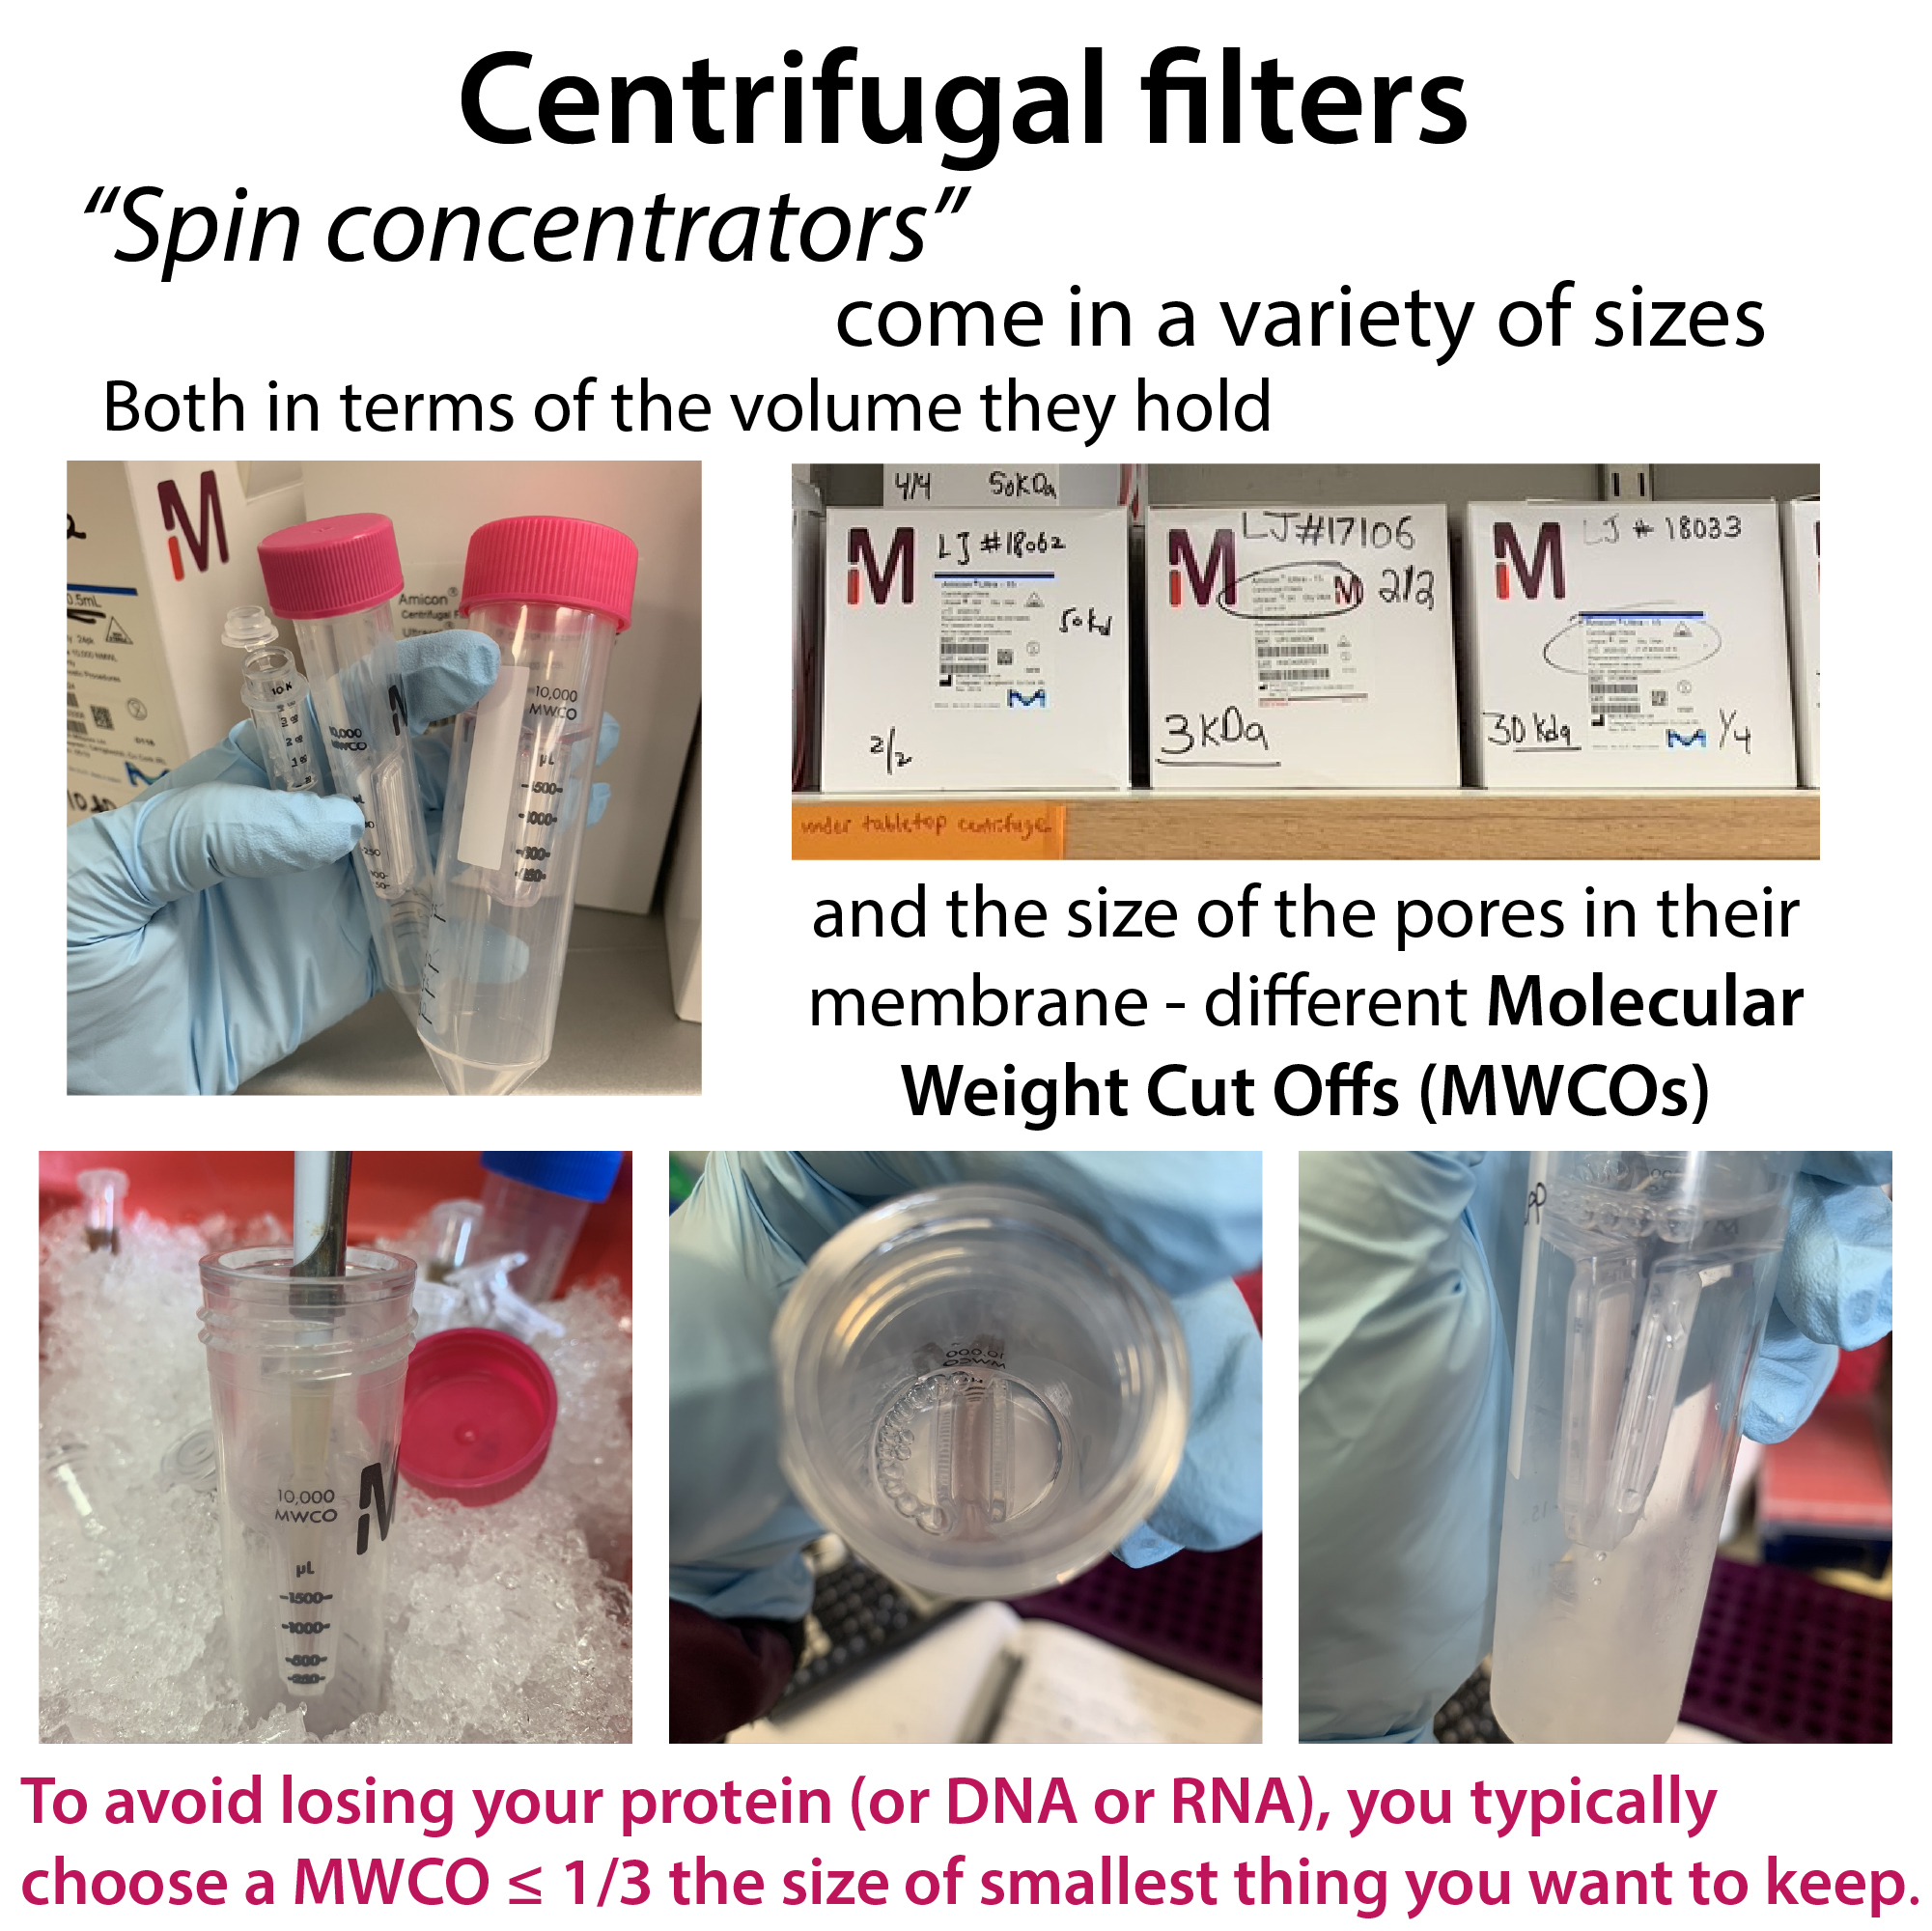
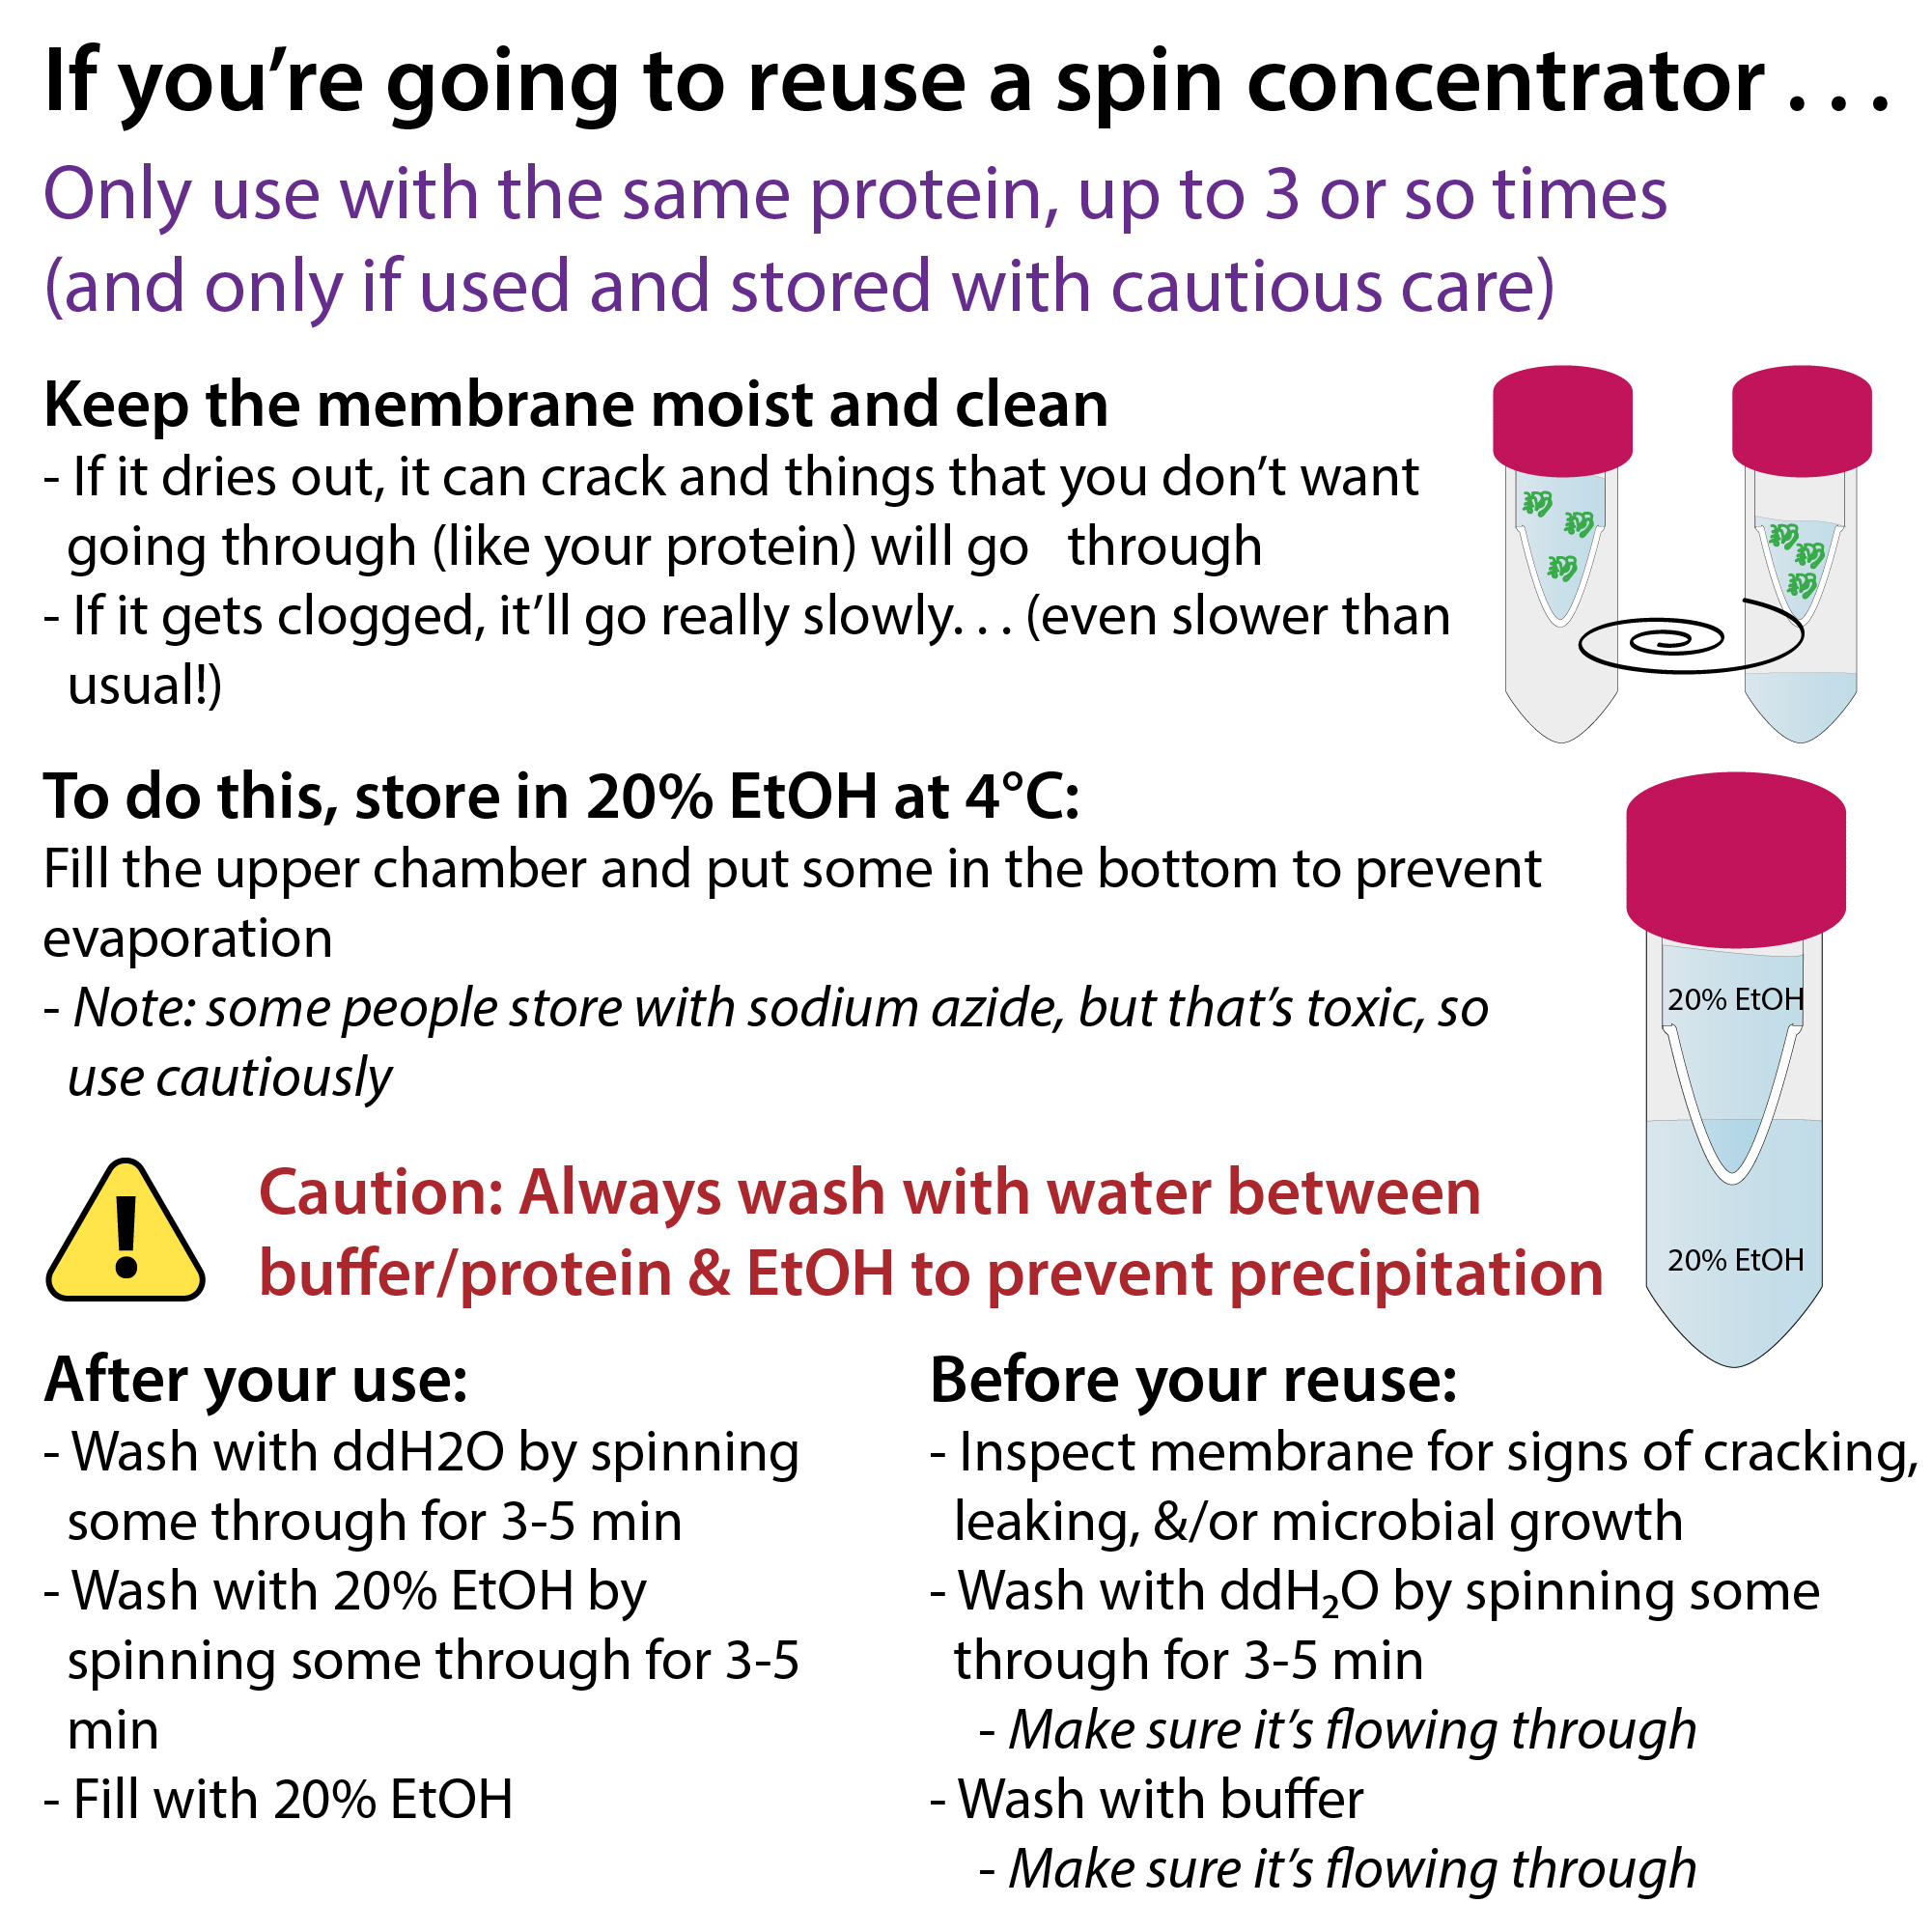
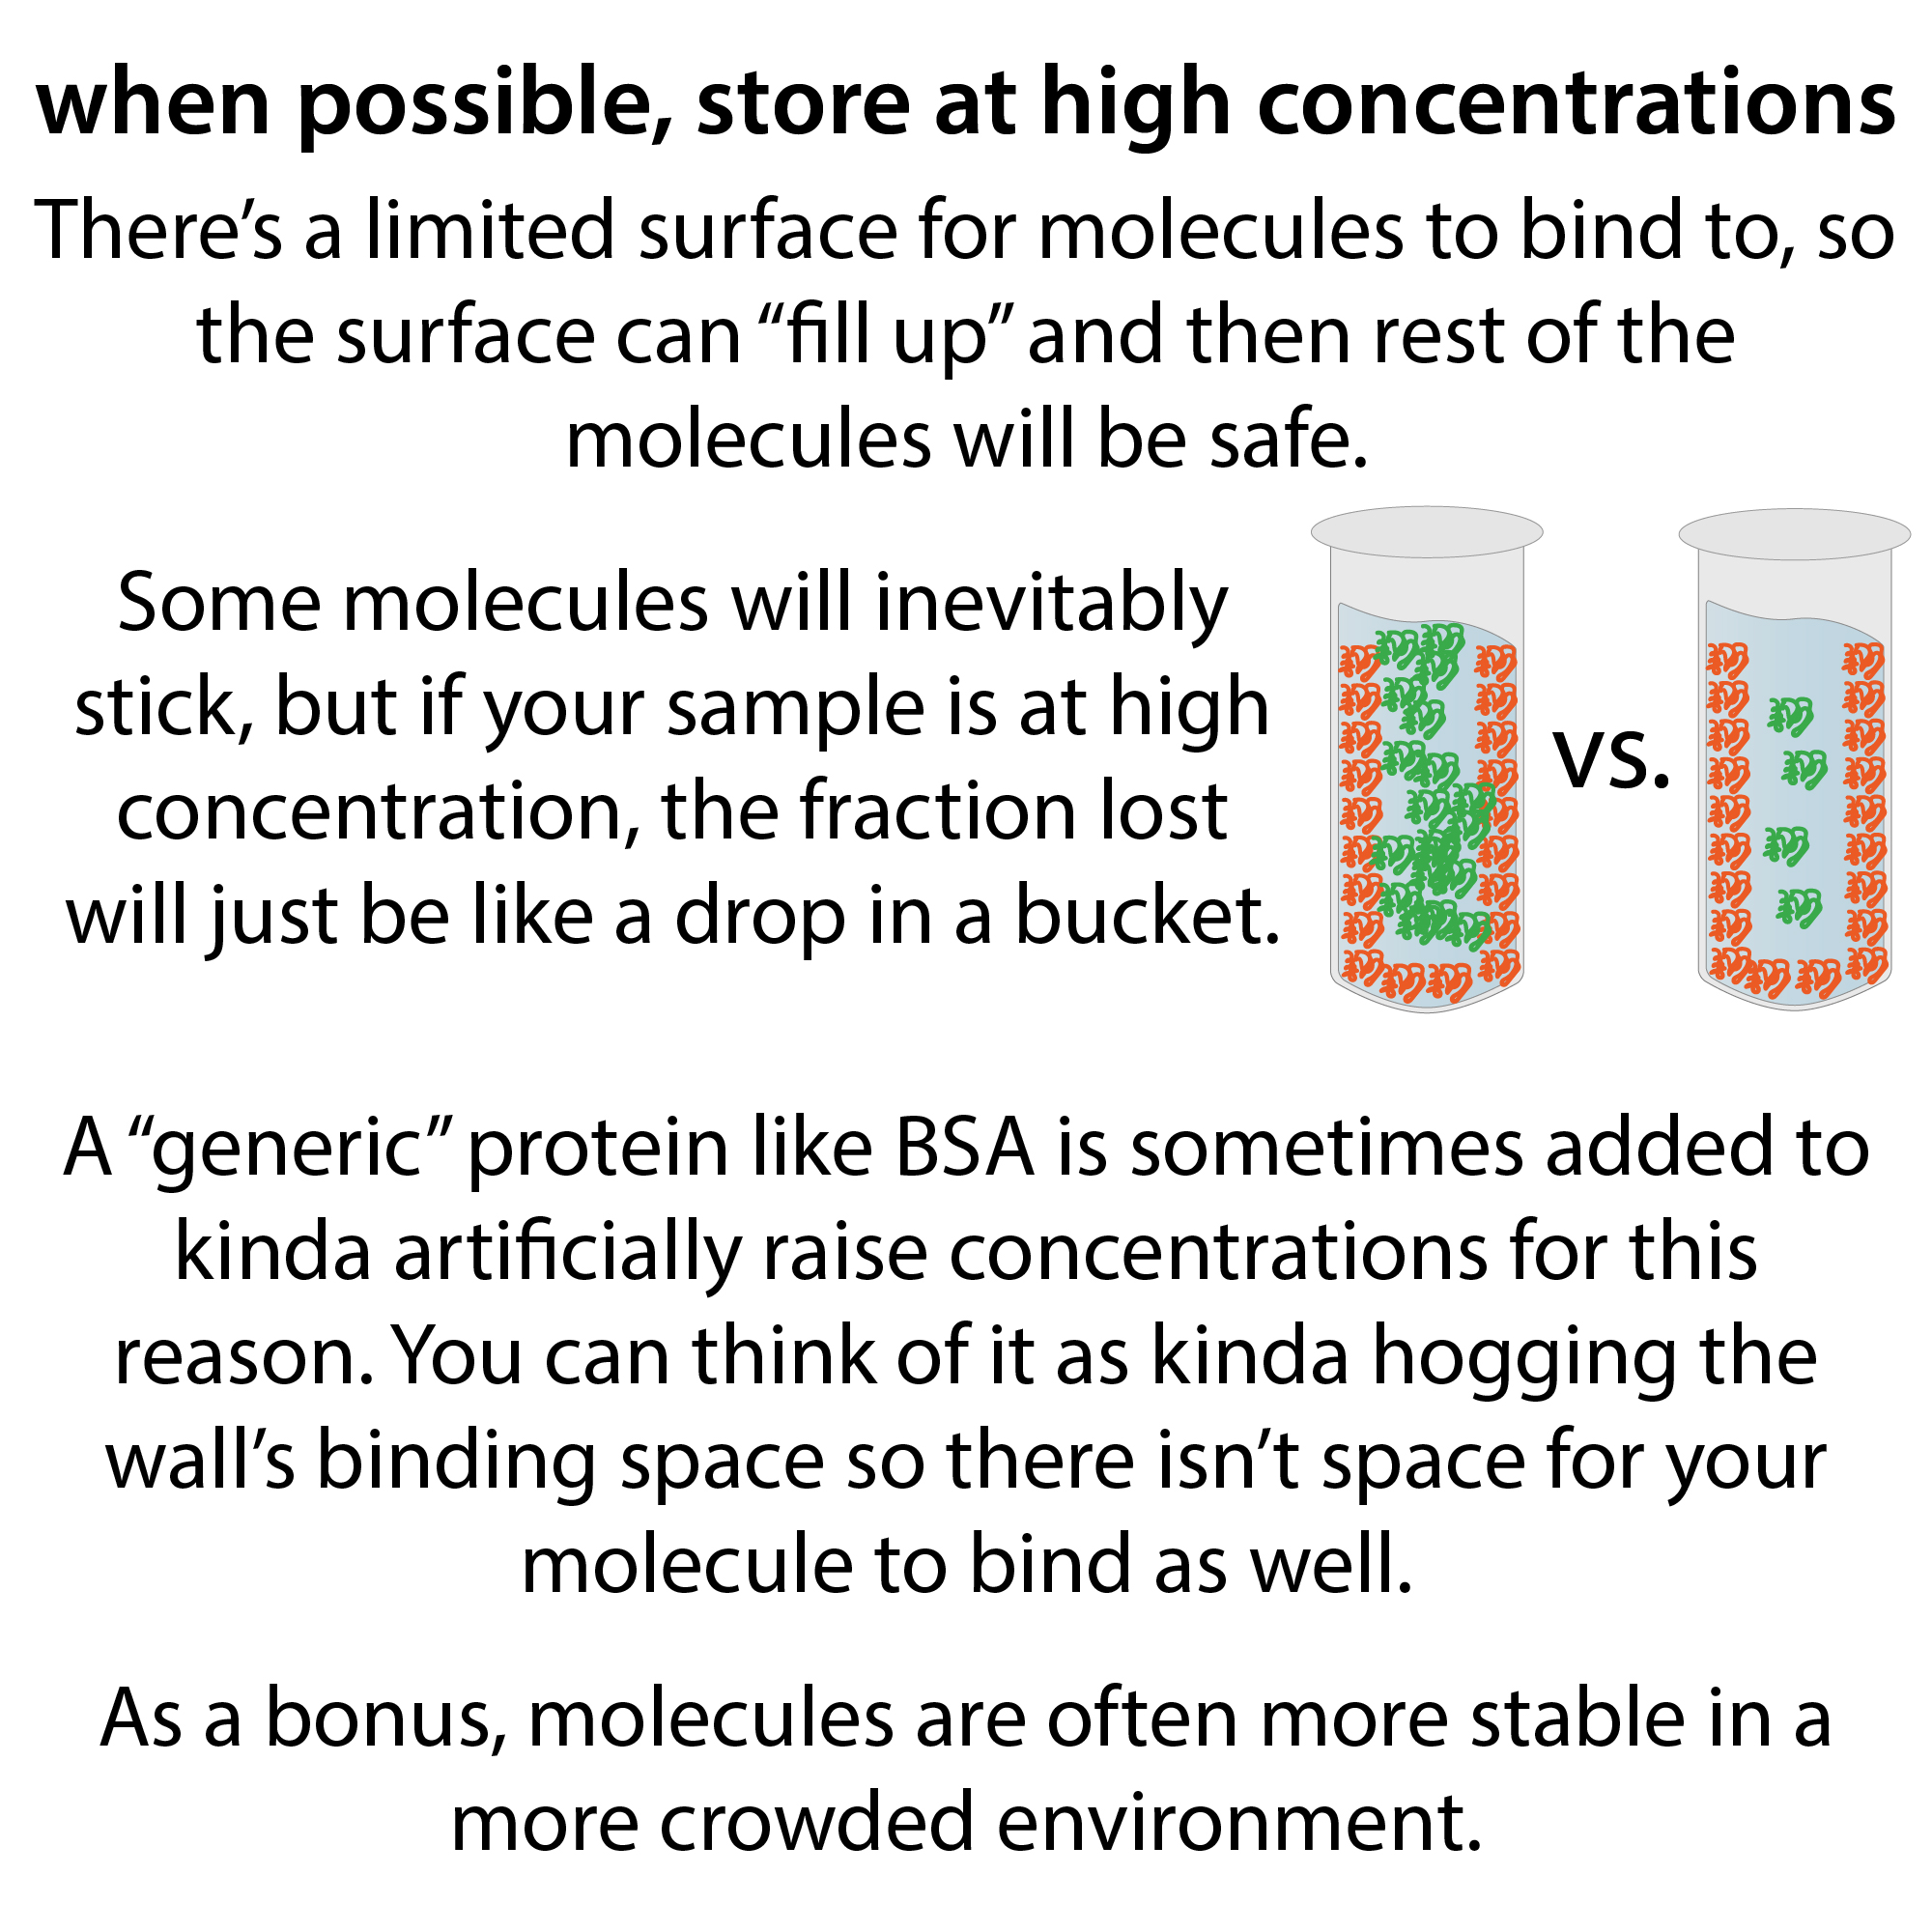
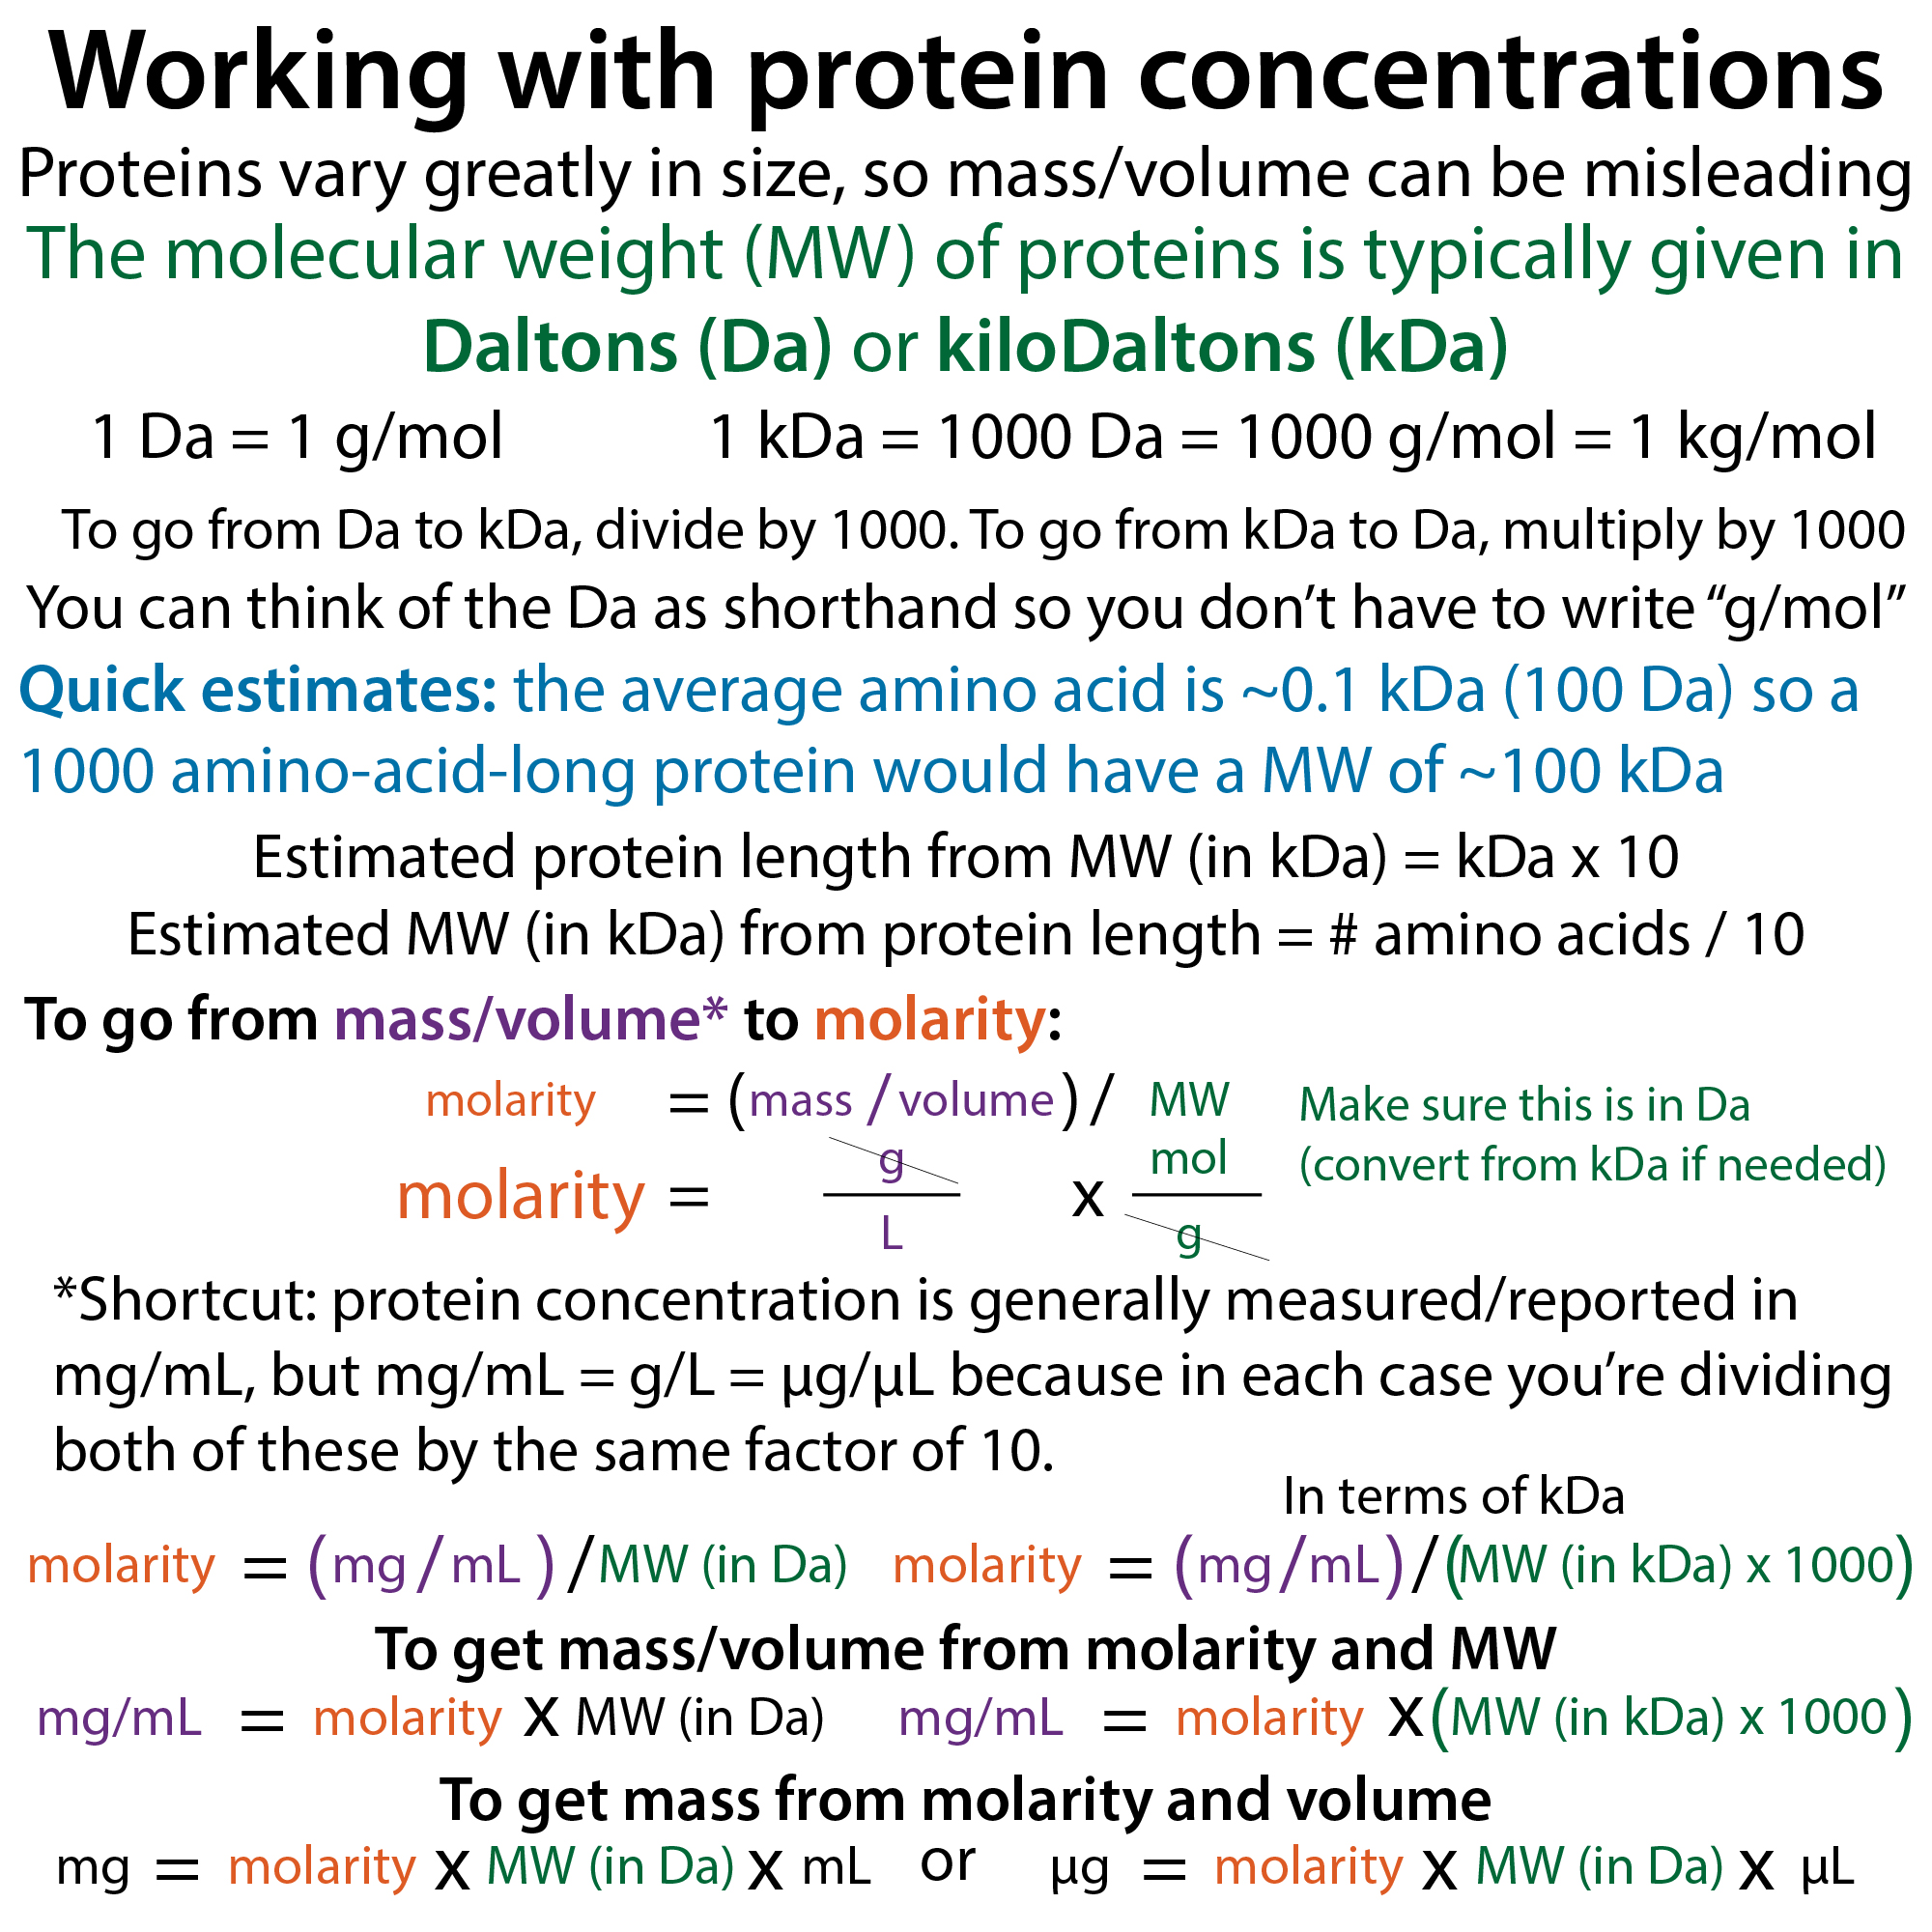
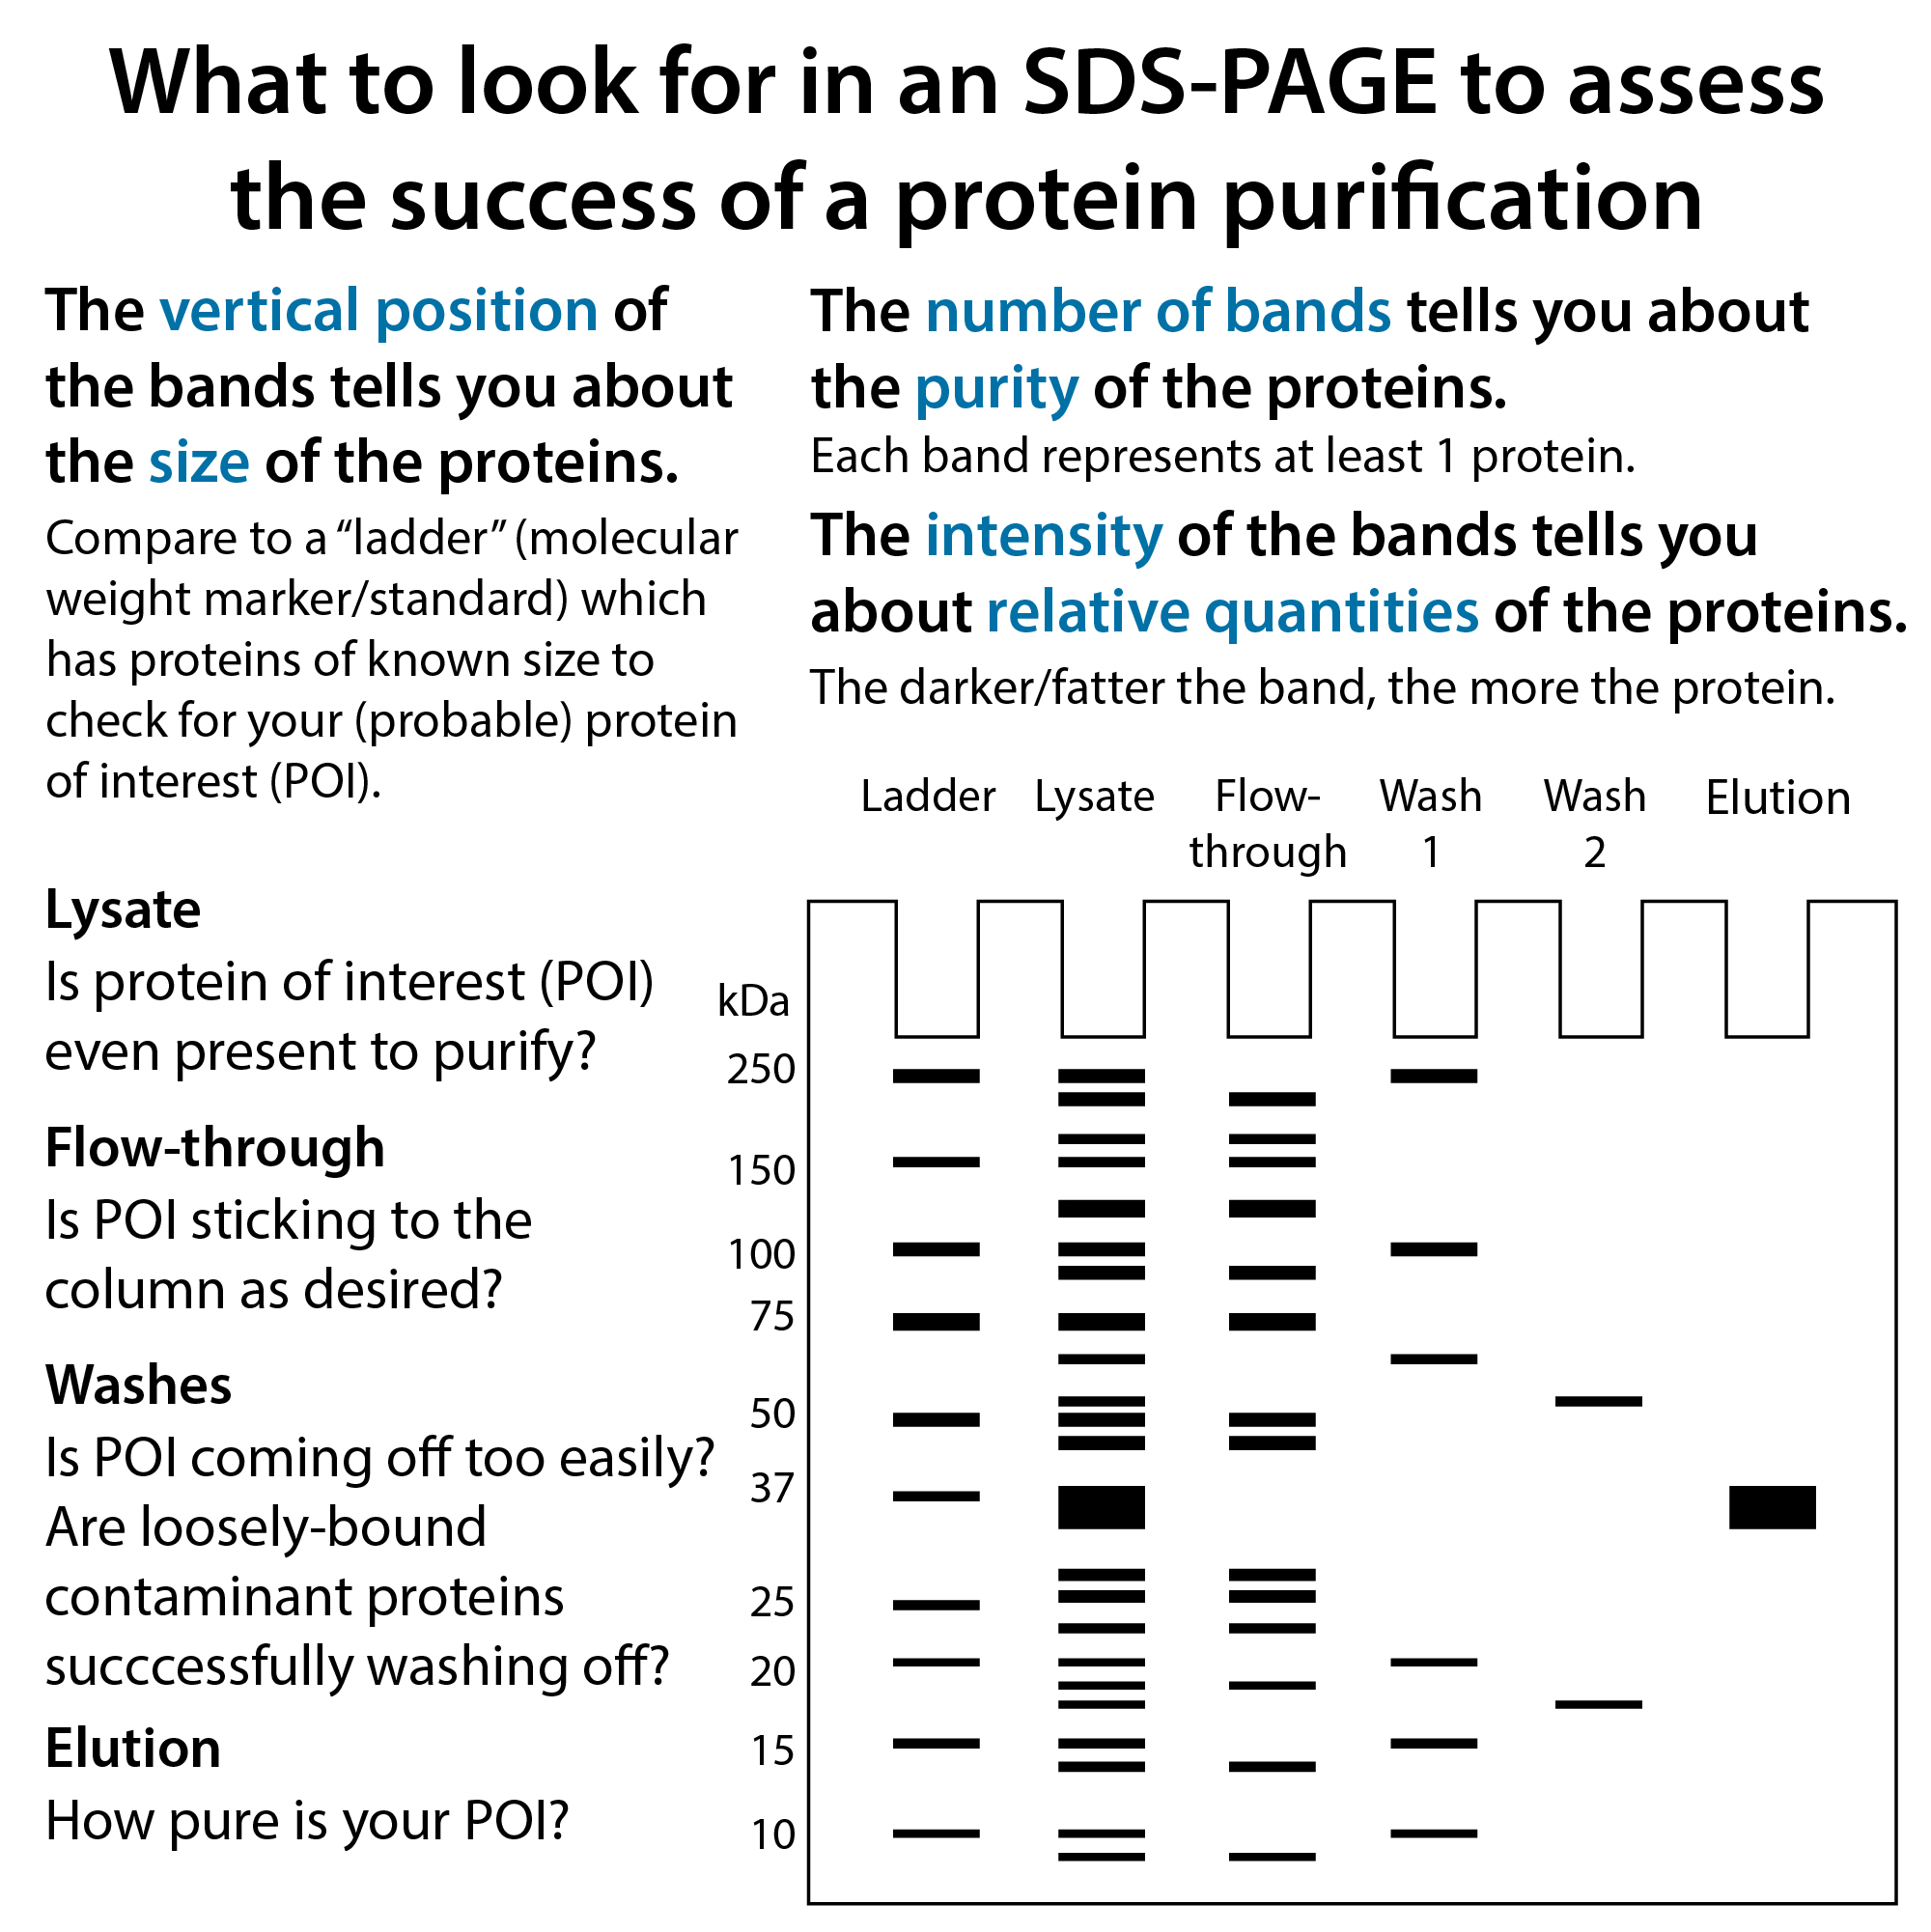
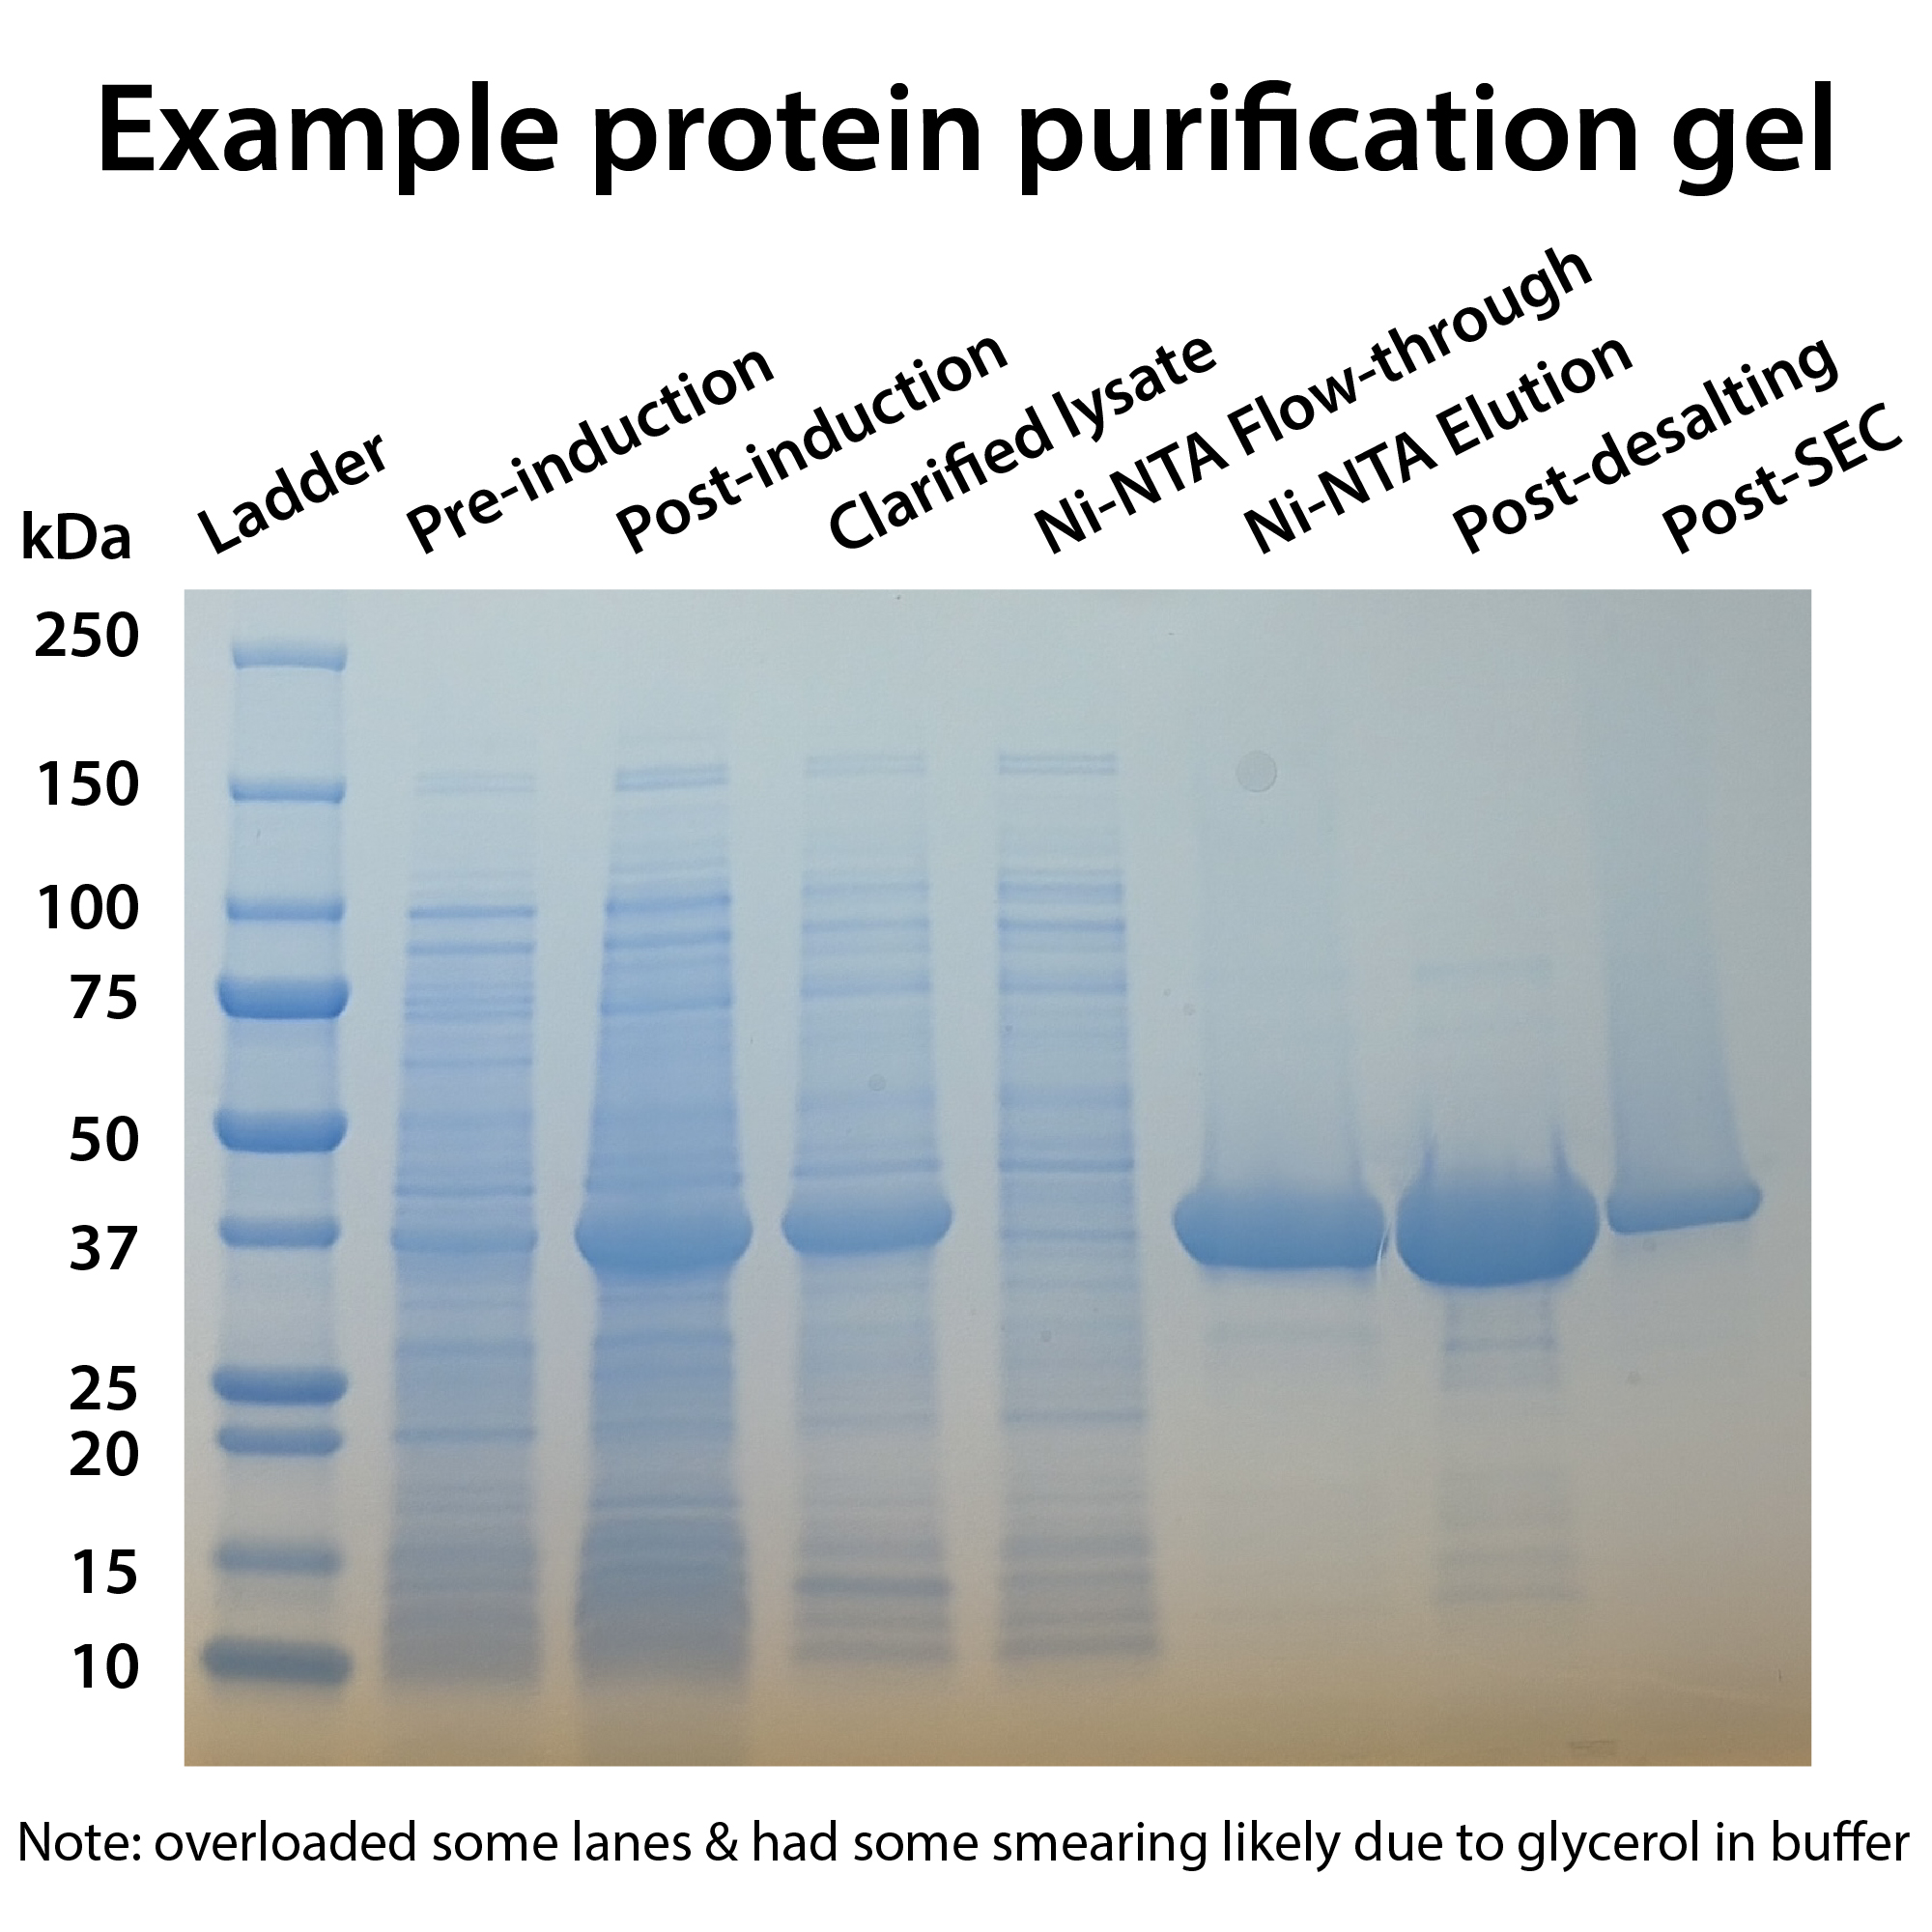
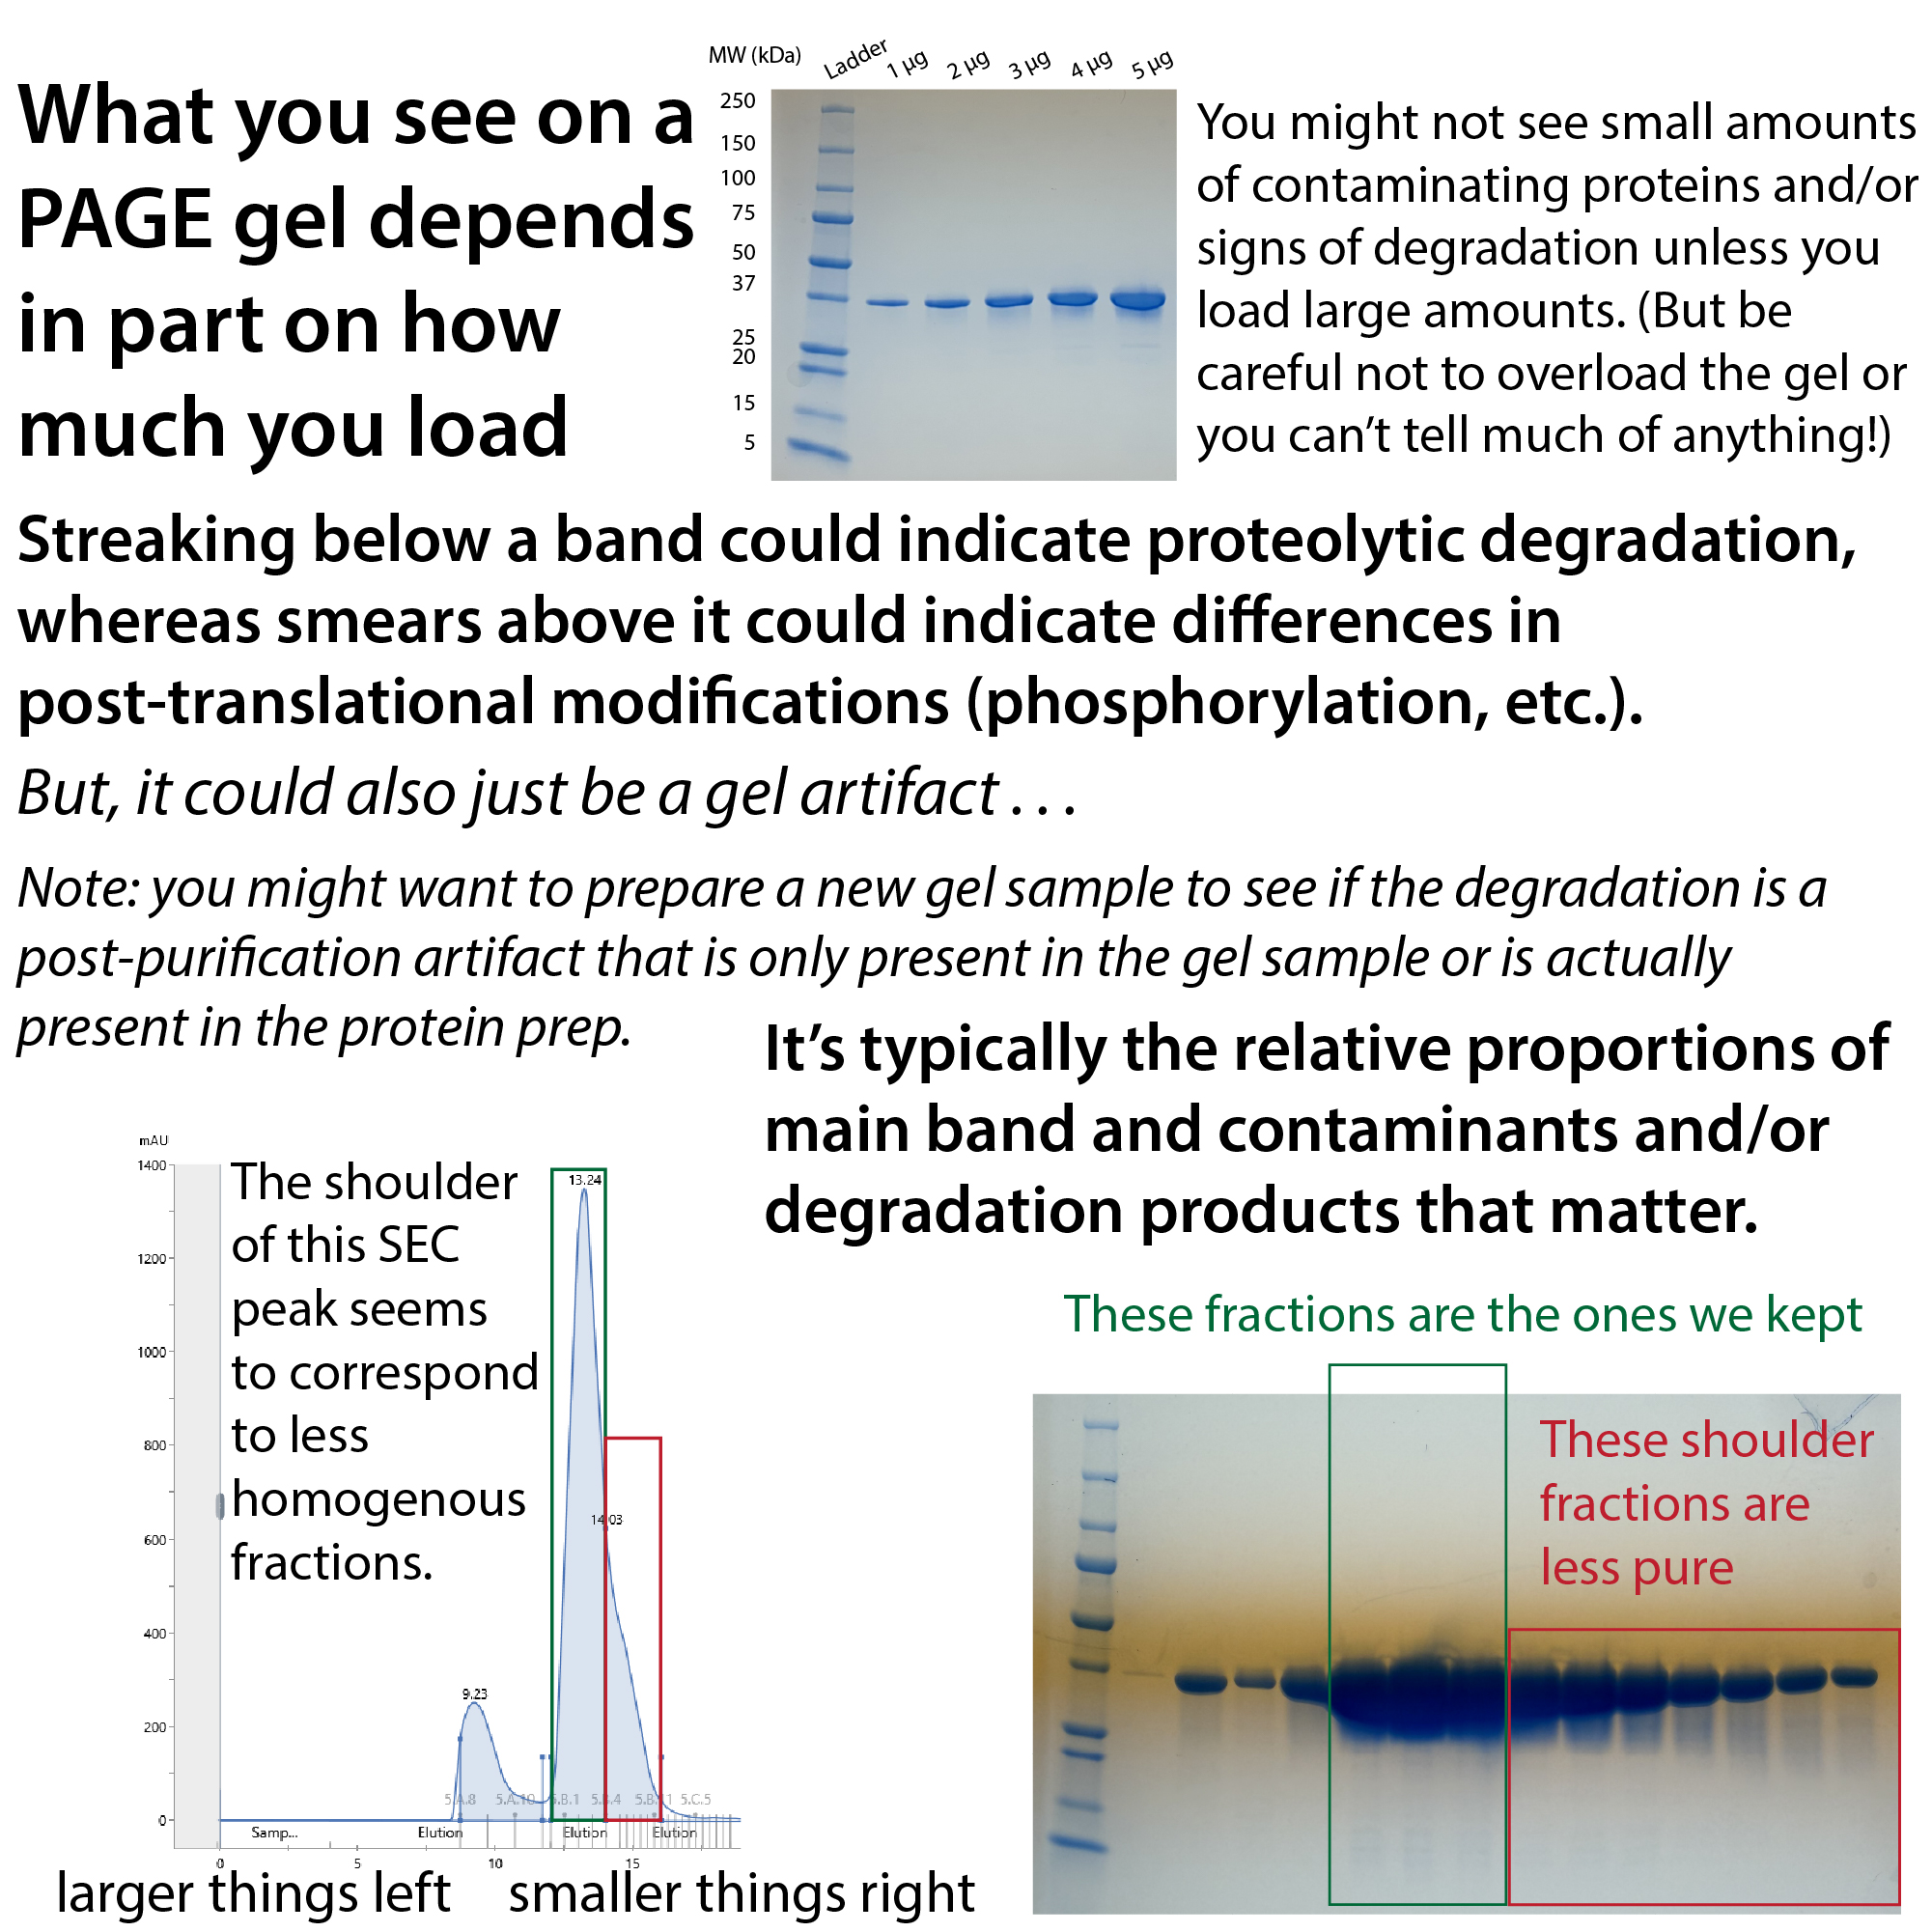
Assess the purity of the protein, typically via SDS-PAGE. As described in the intro, this where we take a small sample of solution containing the protein, unfold them and coat them in a negatively-charged detergent, and use a positive charge to entice them to travel through a gel mesh. The bigger the protein, the slower they’ll travel, and thus the higher up in the gel they’ll be when we turn off the electricity (thus removing the positive charge). We can then stain the proteins in the gel (e.g., with Coomassie dye) to get a look (based on the presence, strength, locations, and number of bands).
Graphics


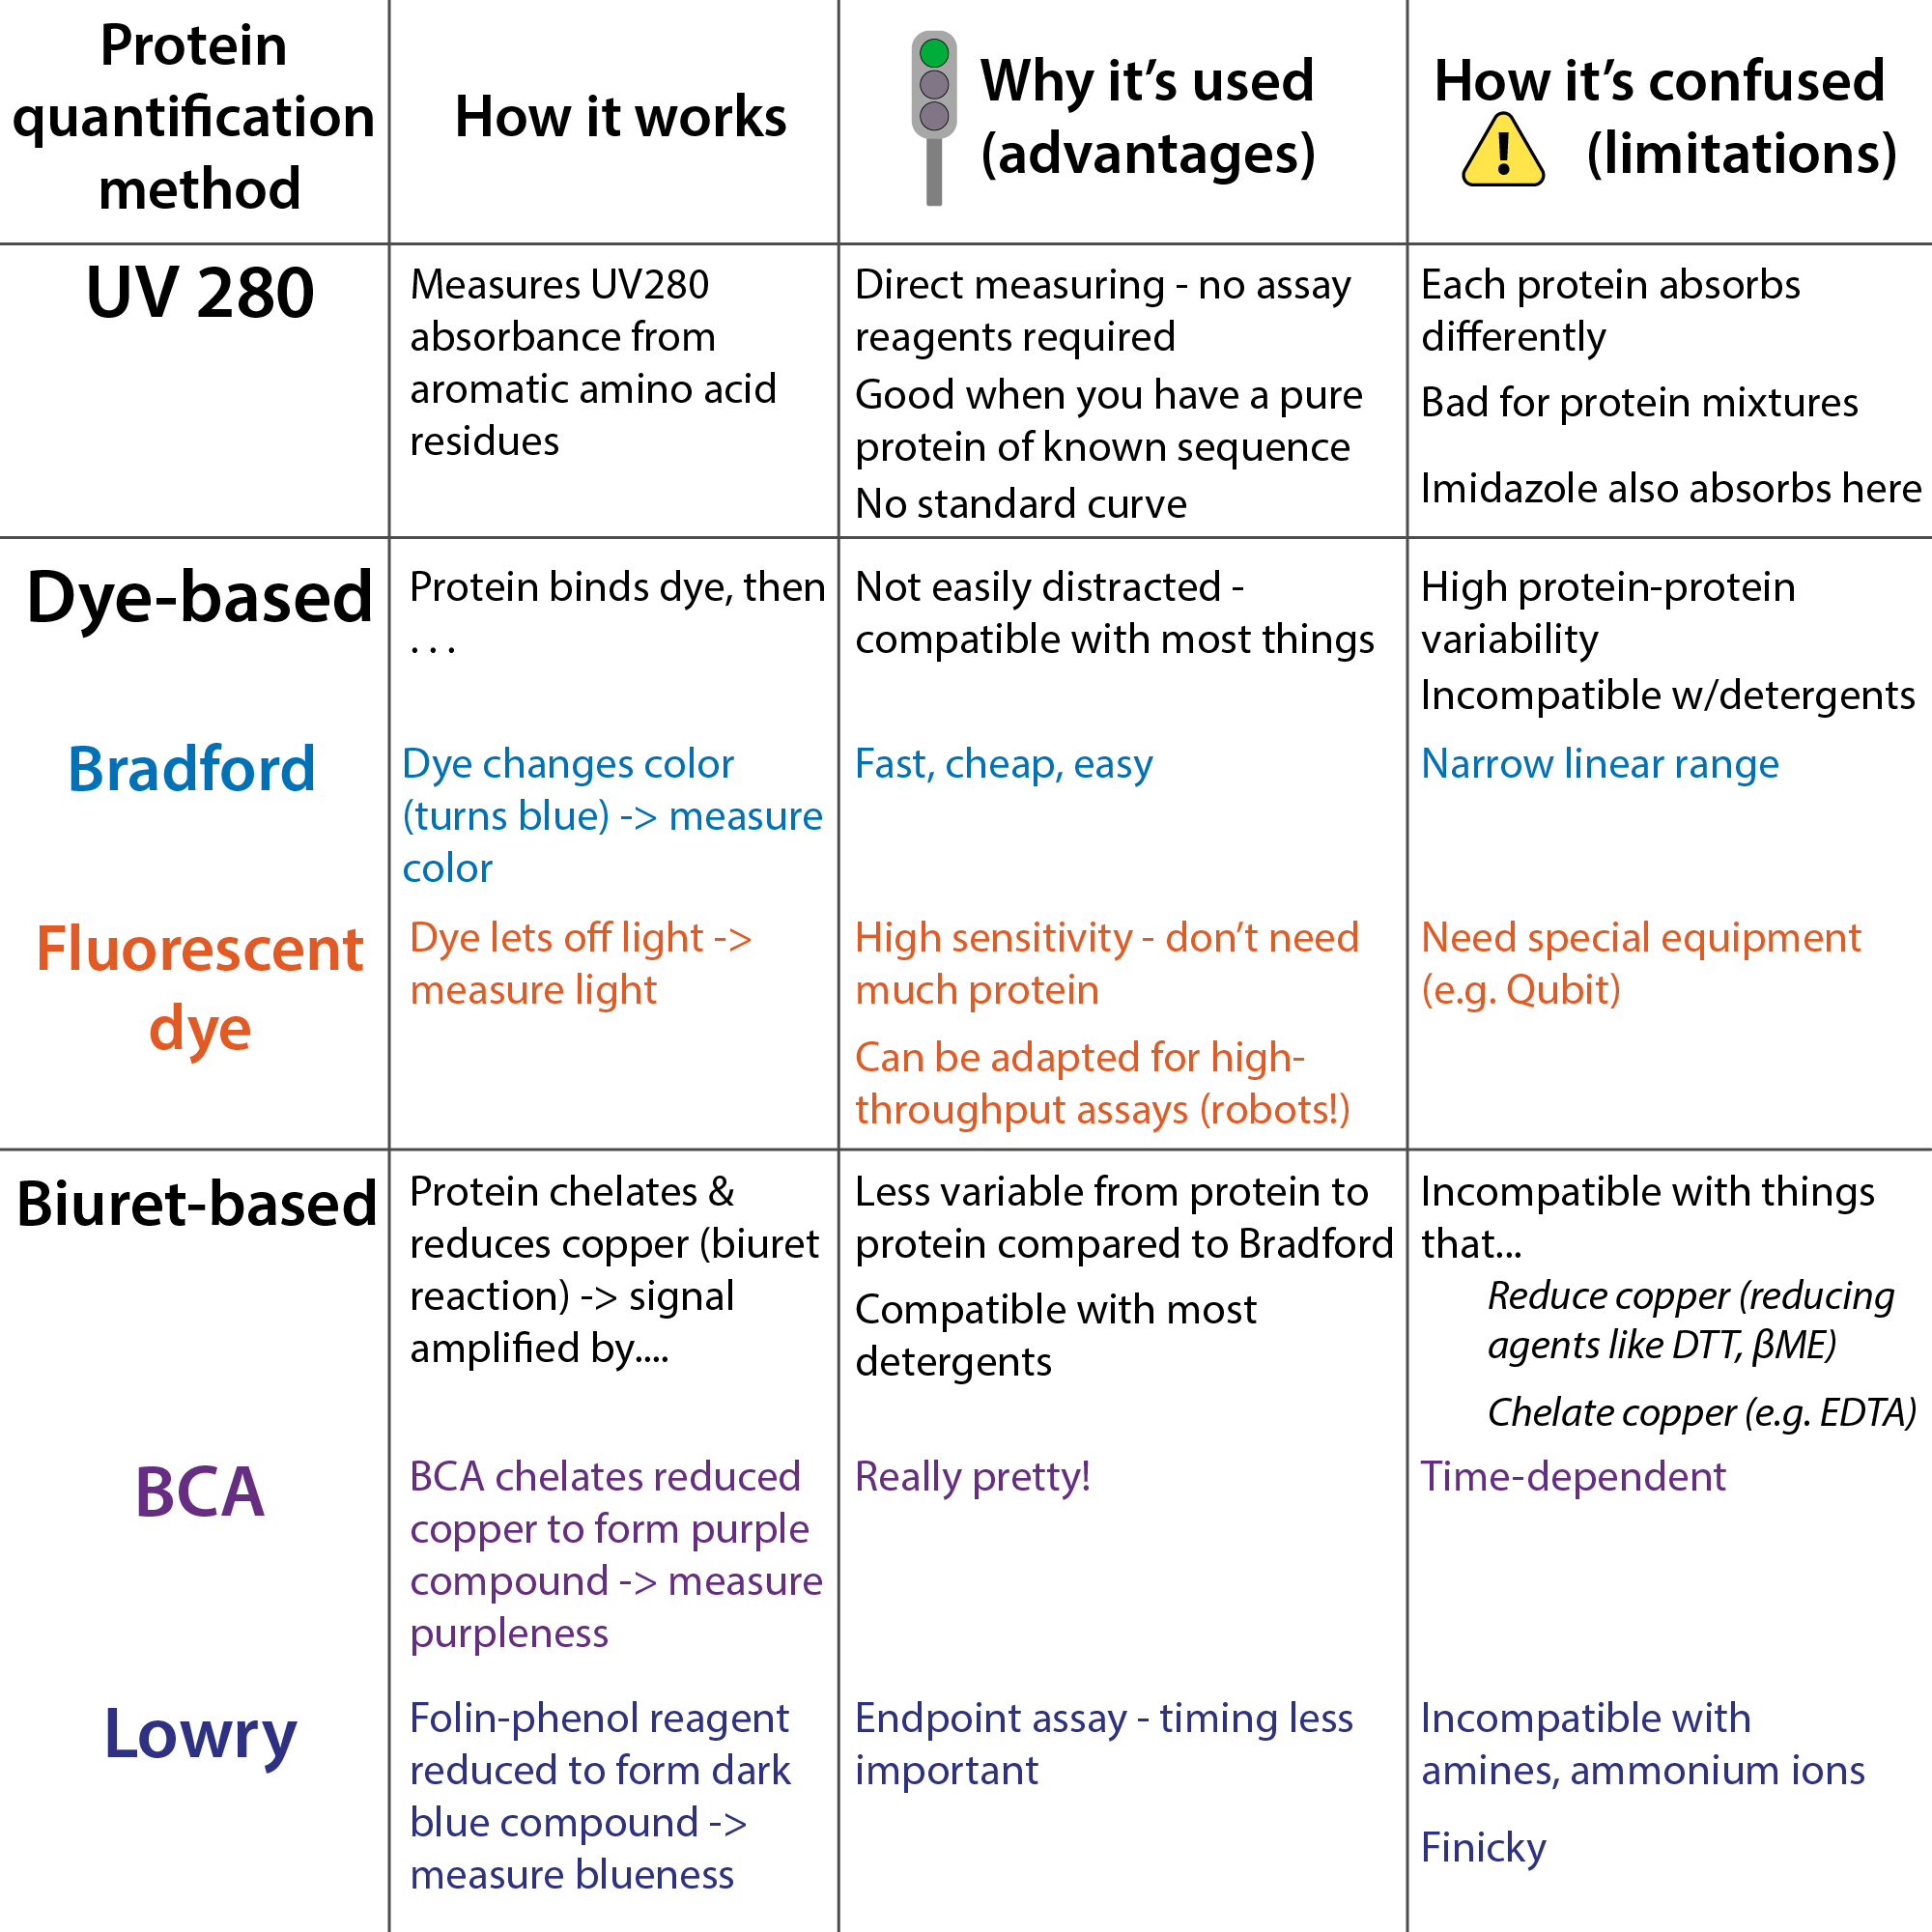
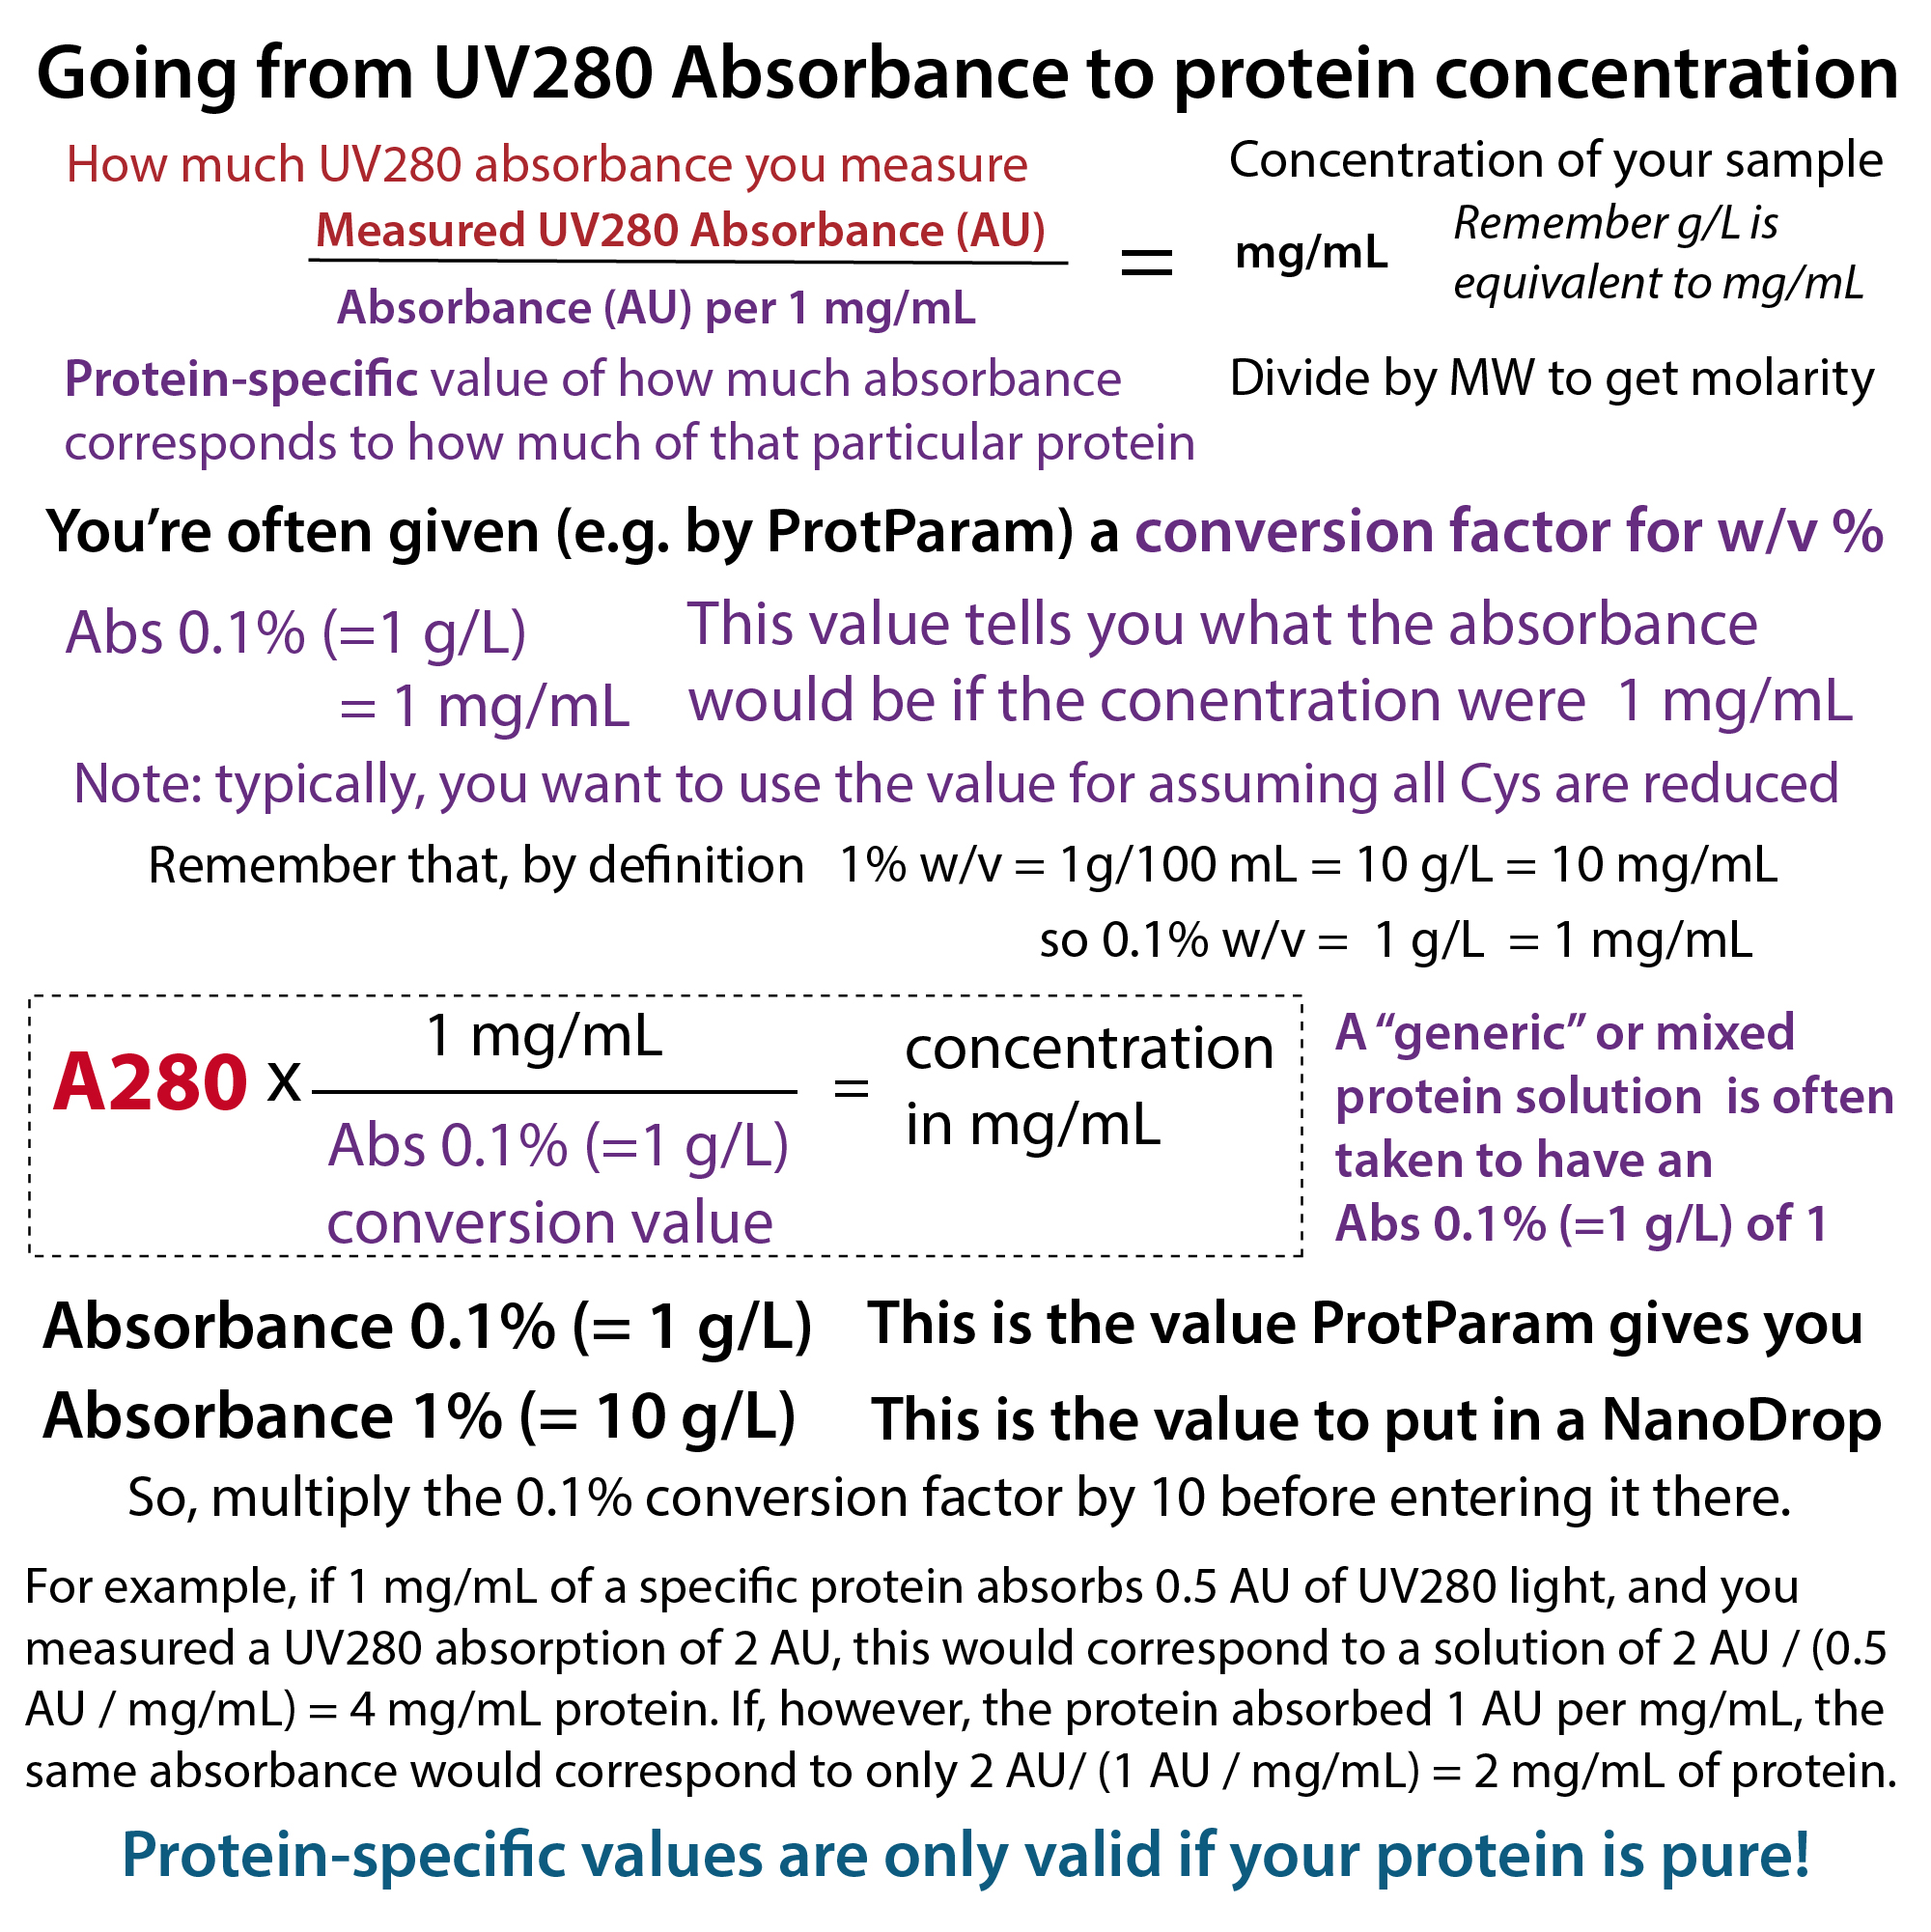
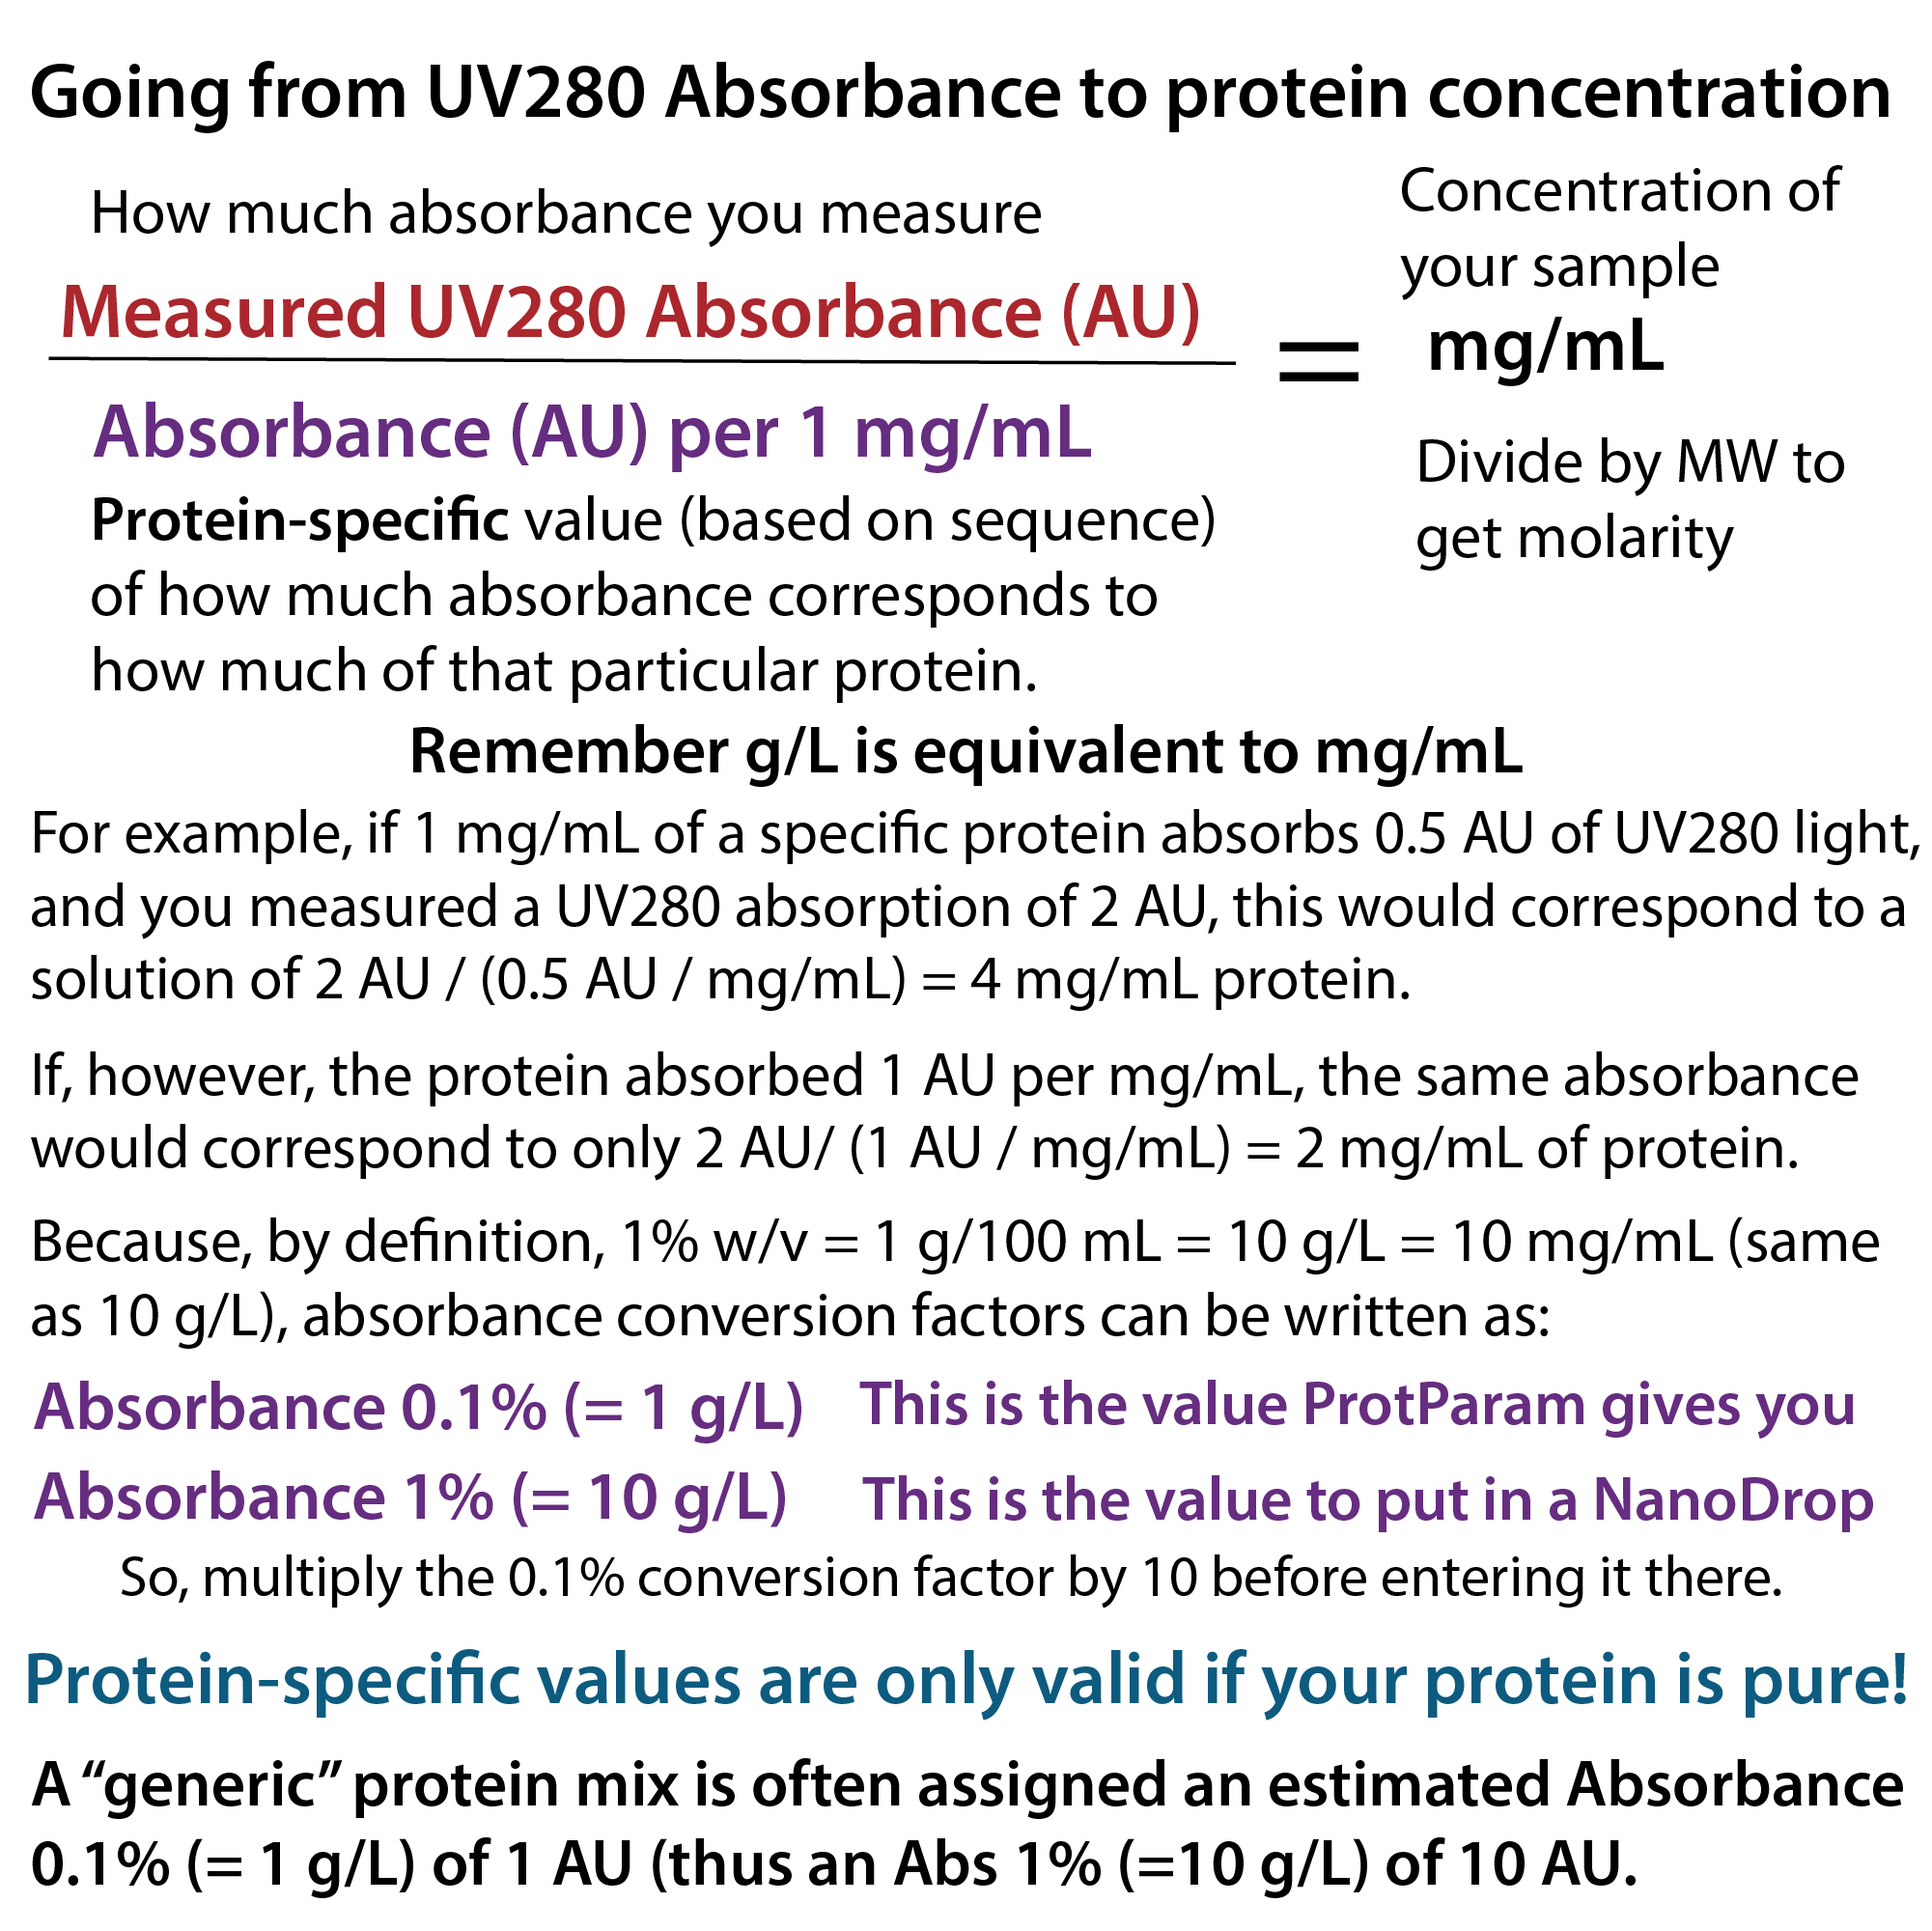
Measure the concentration of the protein. As described in the intro, we can use tests such as a Bradford assay (in which a dye binds to proteins and turns blue and you calculate how much protein there is based on how blue a protein-containing solution turns), a BCA assay (another dye-based method, but with a different mechanism, that’s less biased by amino acid differences between proteins), and/or the amount of 280 nanometer (nm) ultraviolet (UV) light absorbed (UV280).
Graphics




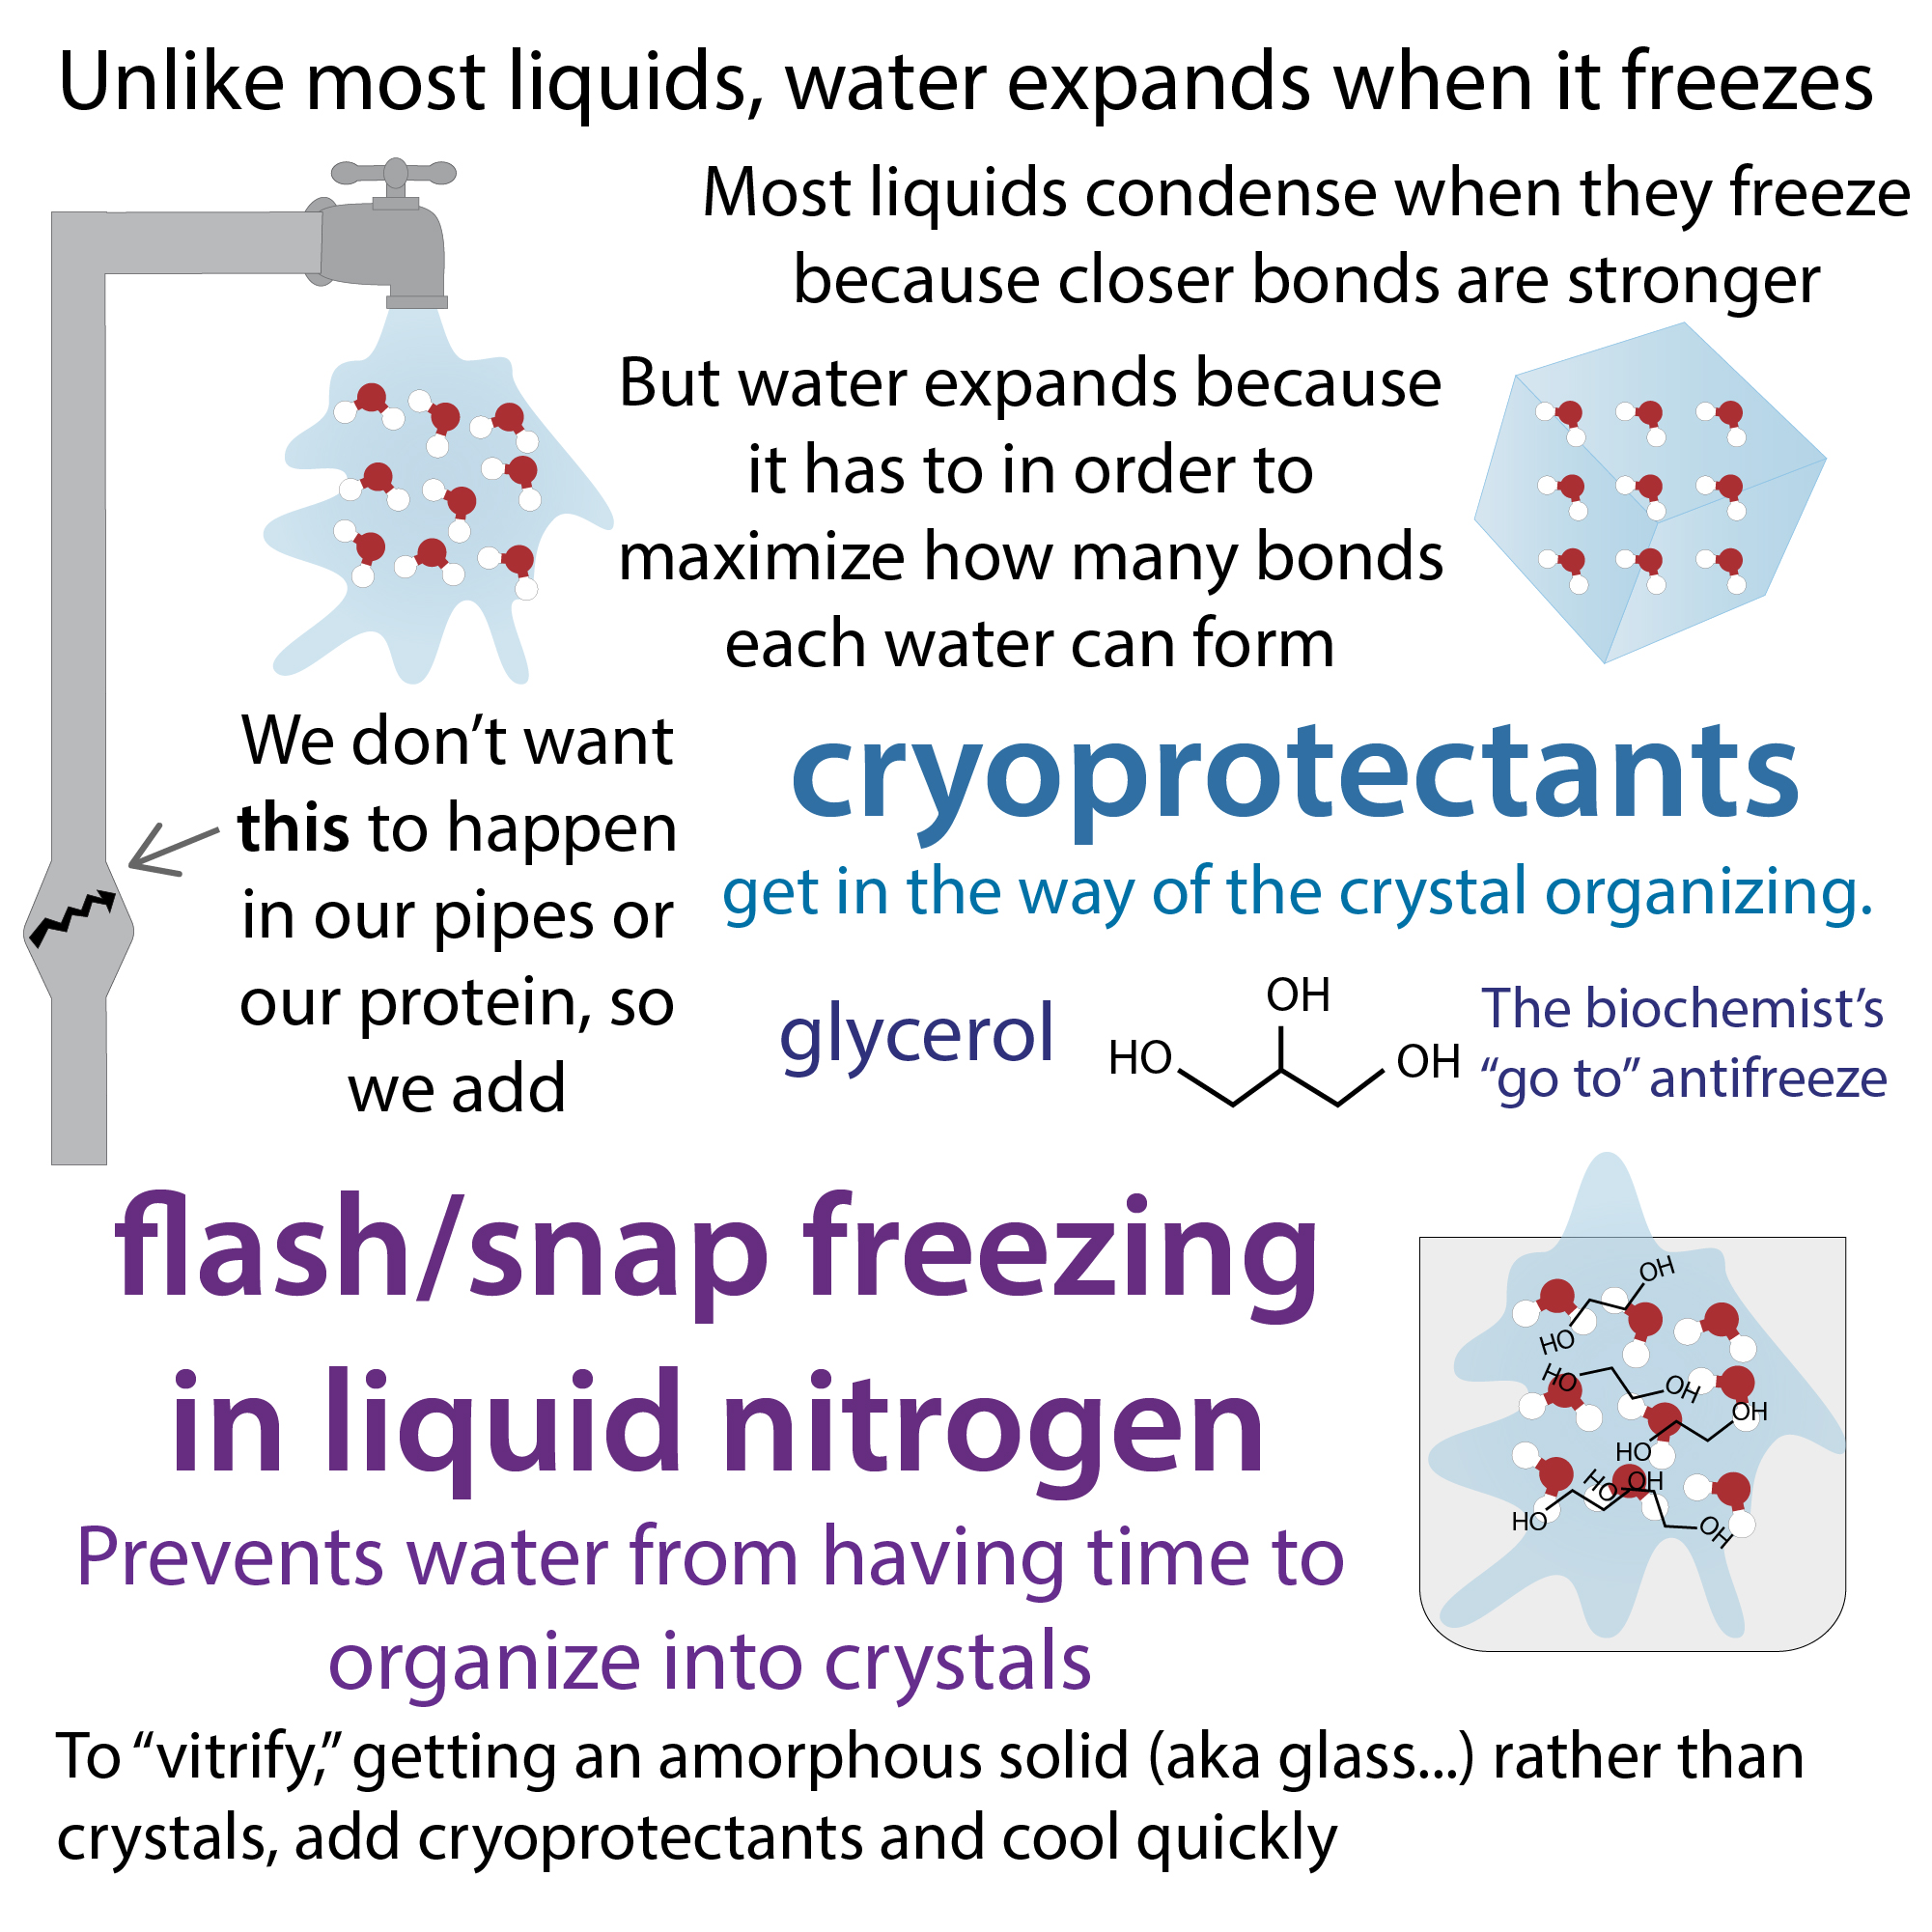
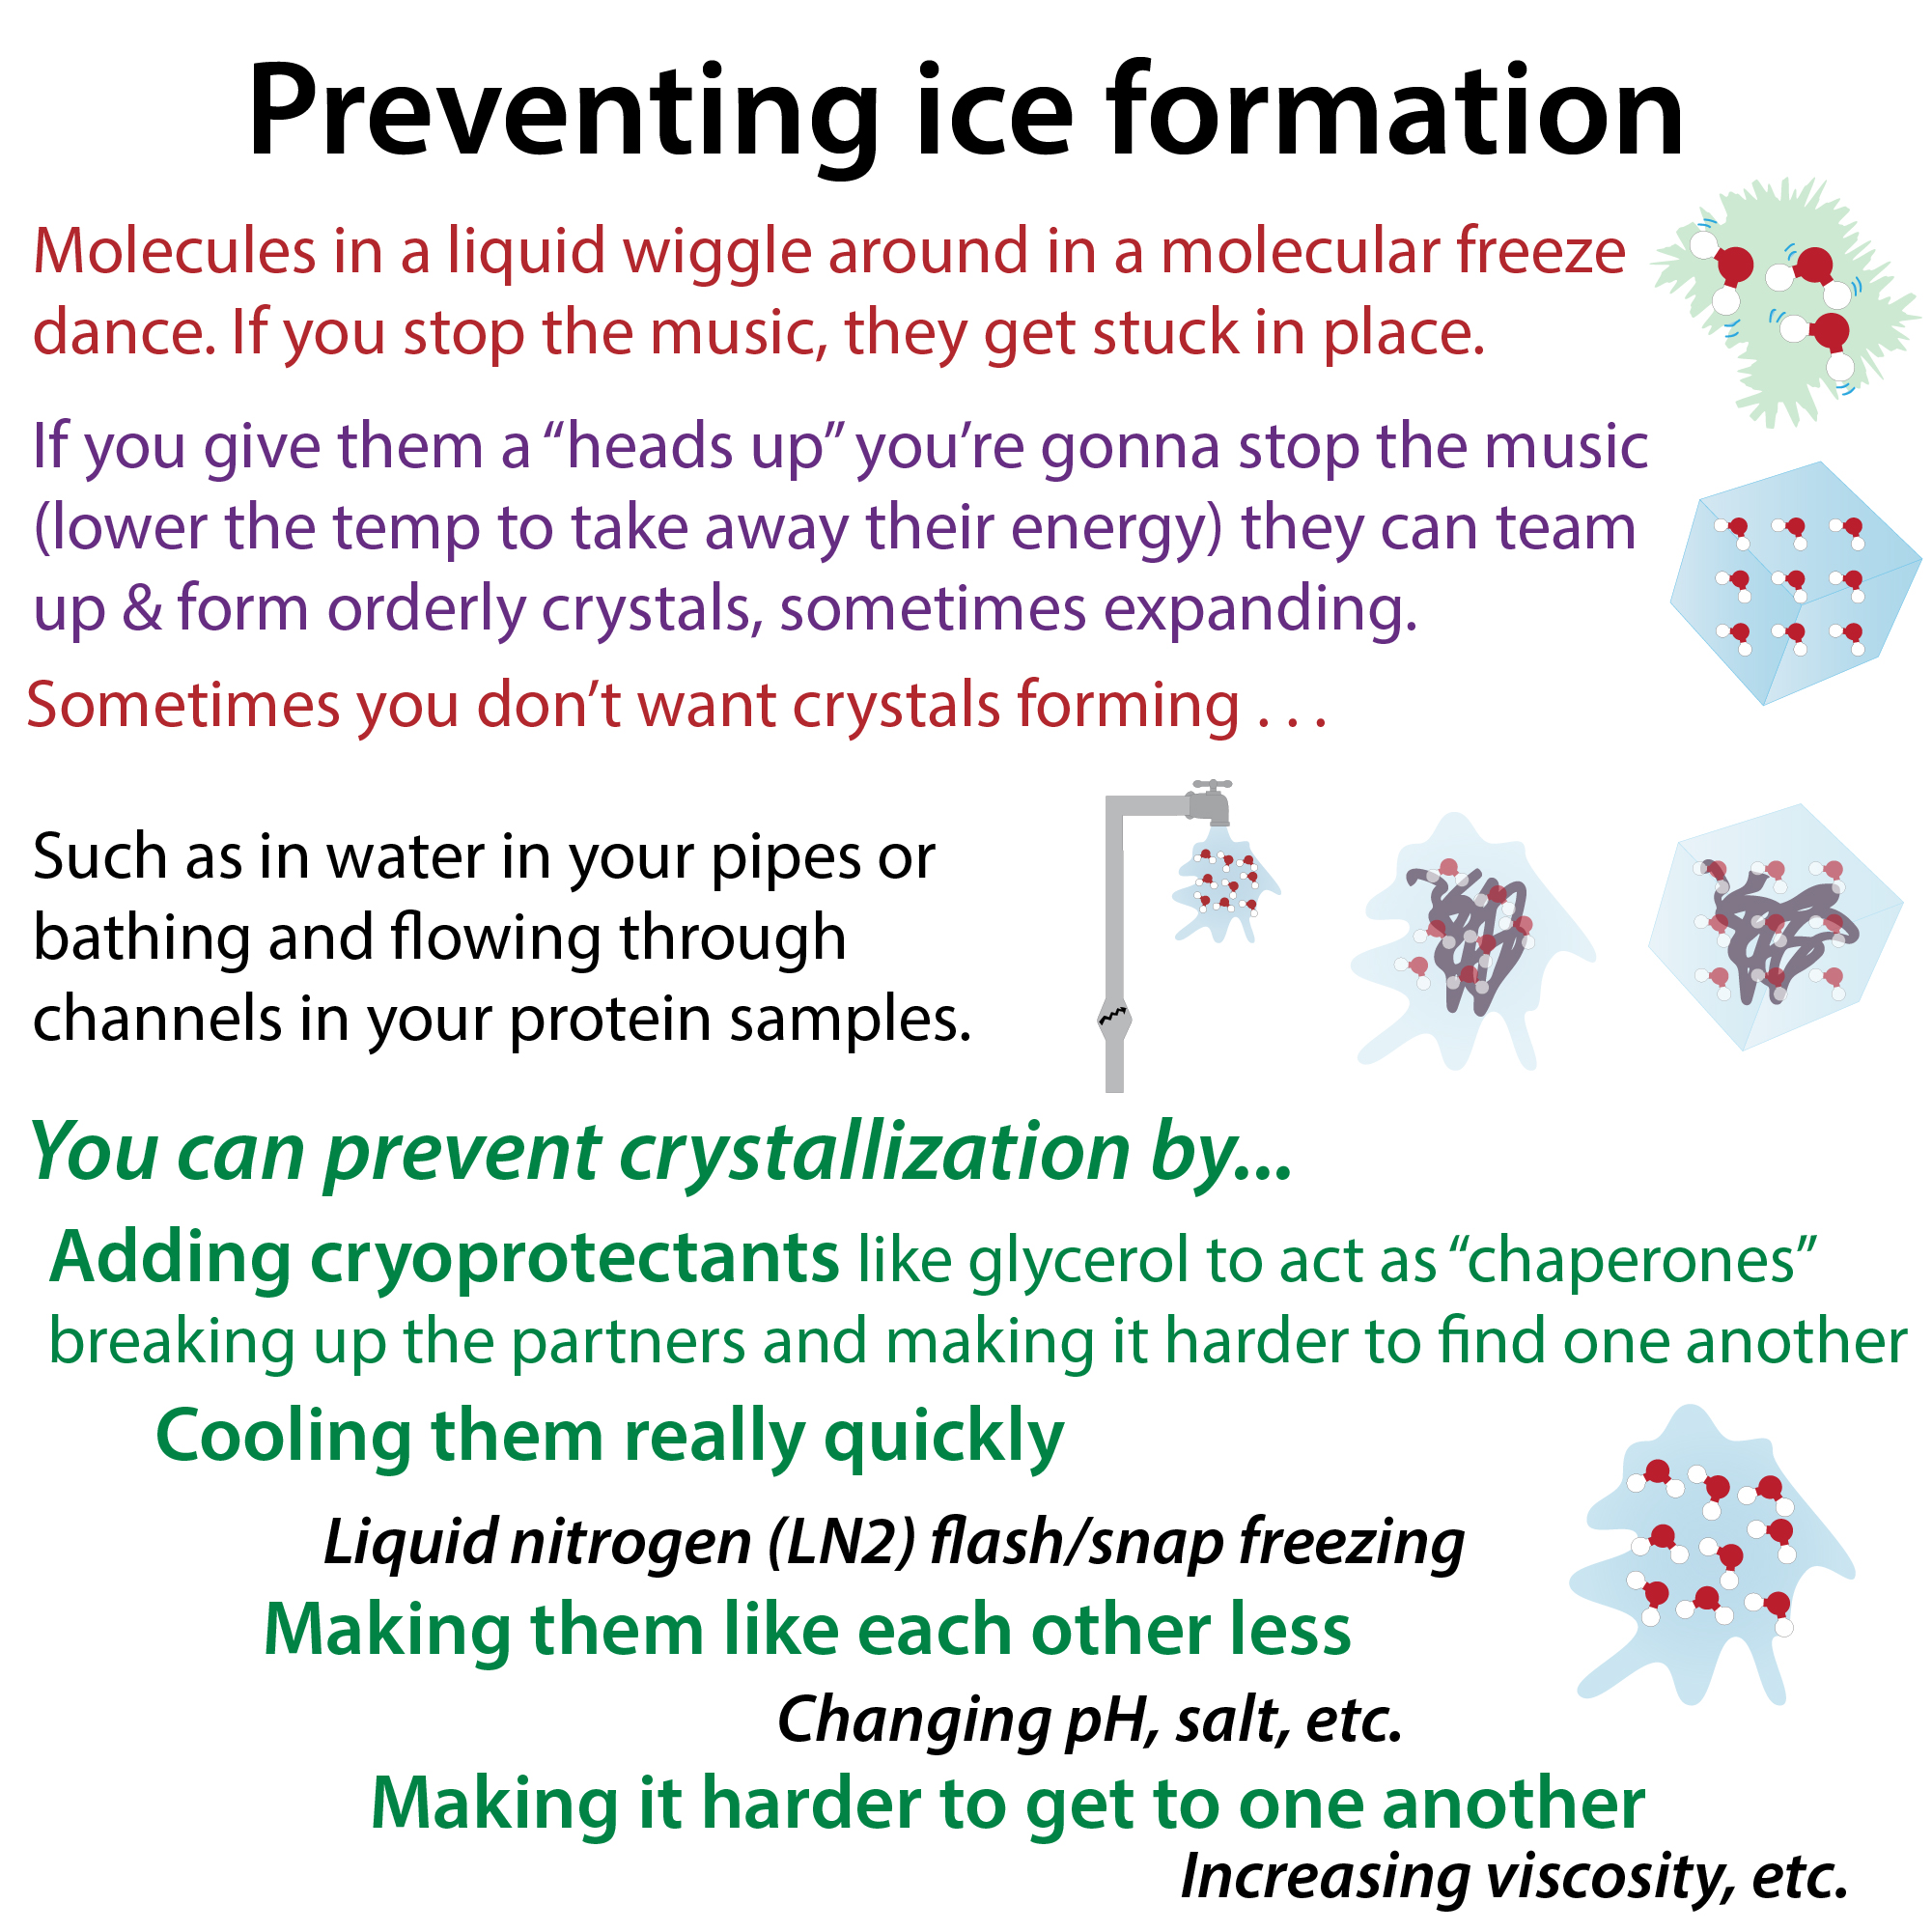
And, at the end, you’ll want to “freeze” the protein for safe long-term storage. You typically ultimately want to keep it at -80°C, but you need to get it down to that icy temp without ice forming! We often mix our protein with a cryoprotectant like glycerol (either after purifying or by including in the final purification buffer) and then dunk them quickly in liquid nitrogen (LN2) to prevent harmful ice crystals from forming, which proteins don’t like.
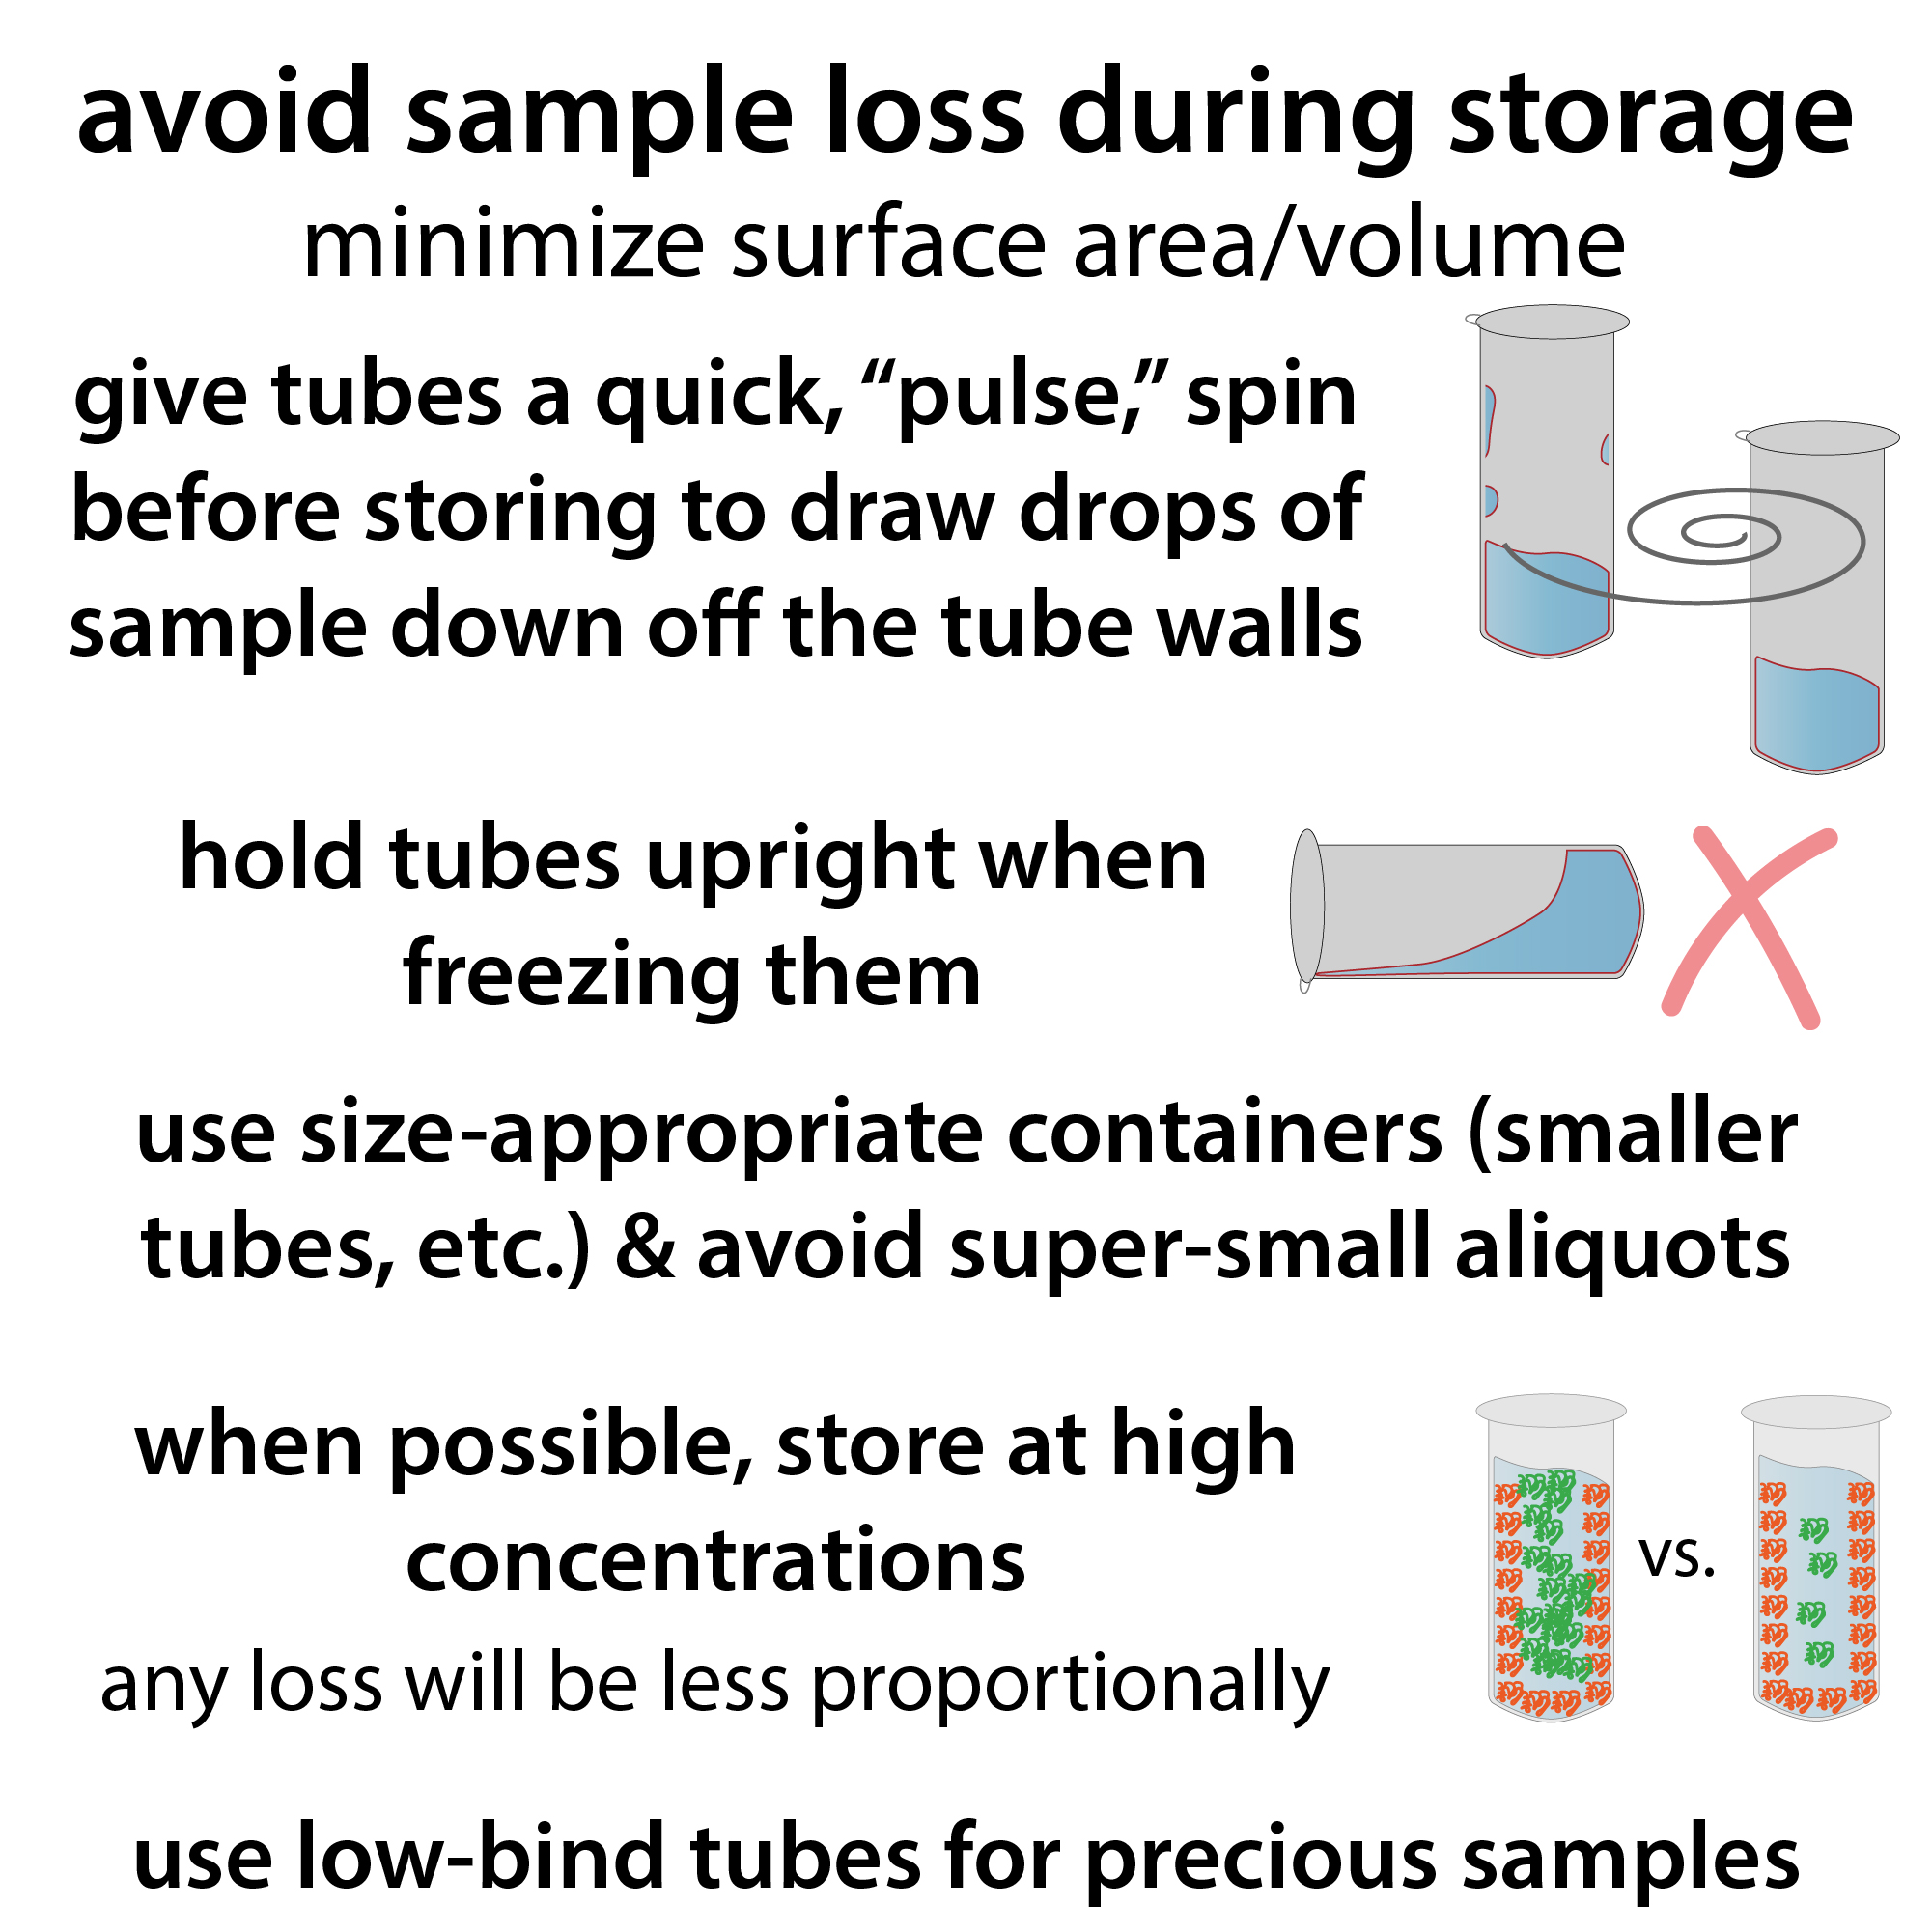
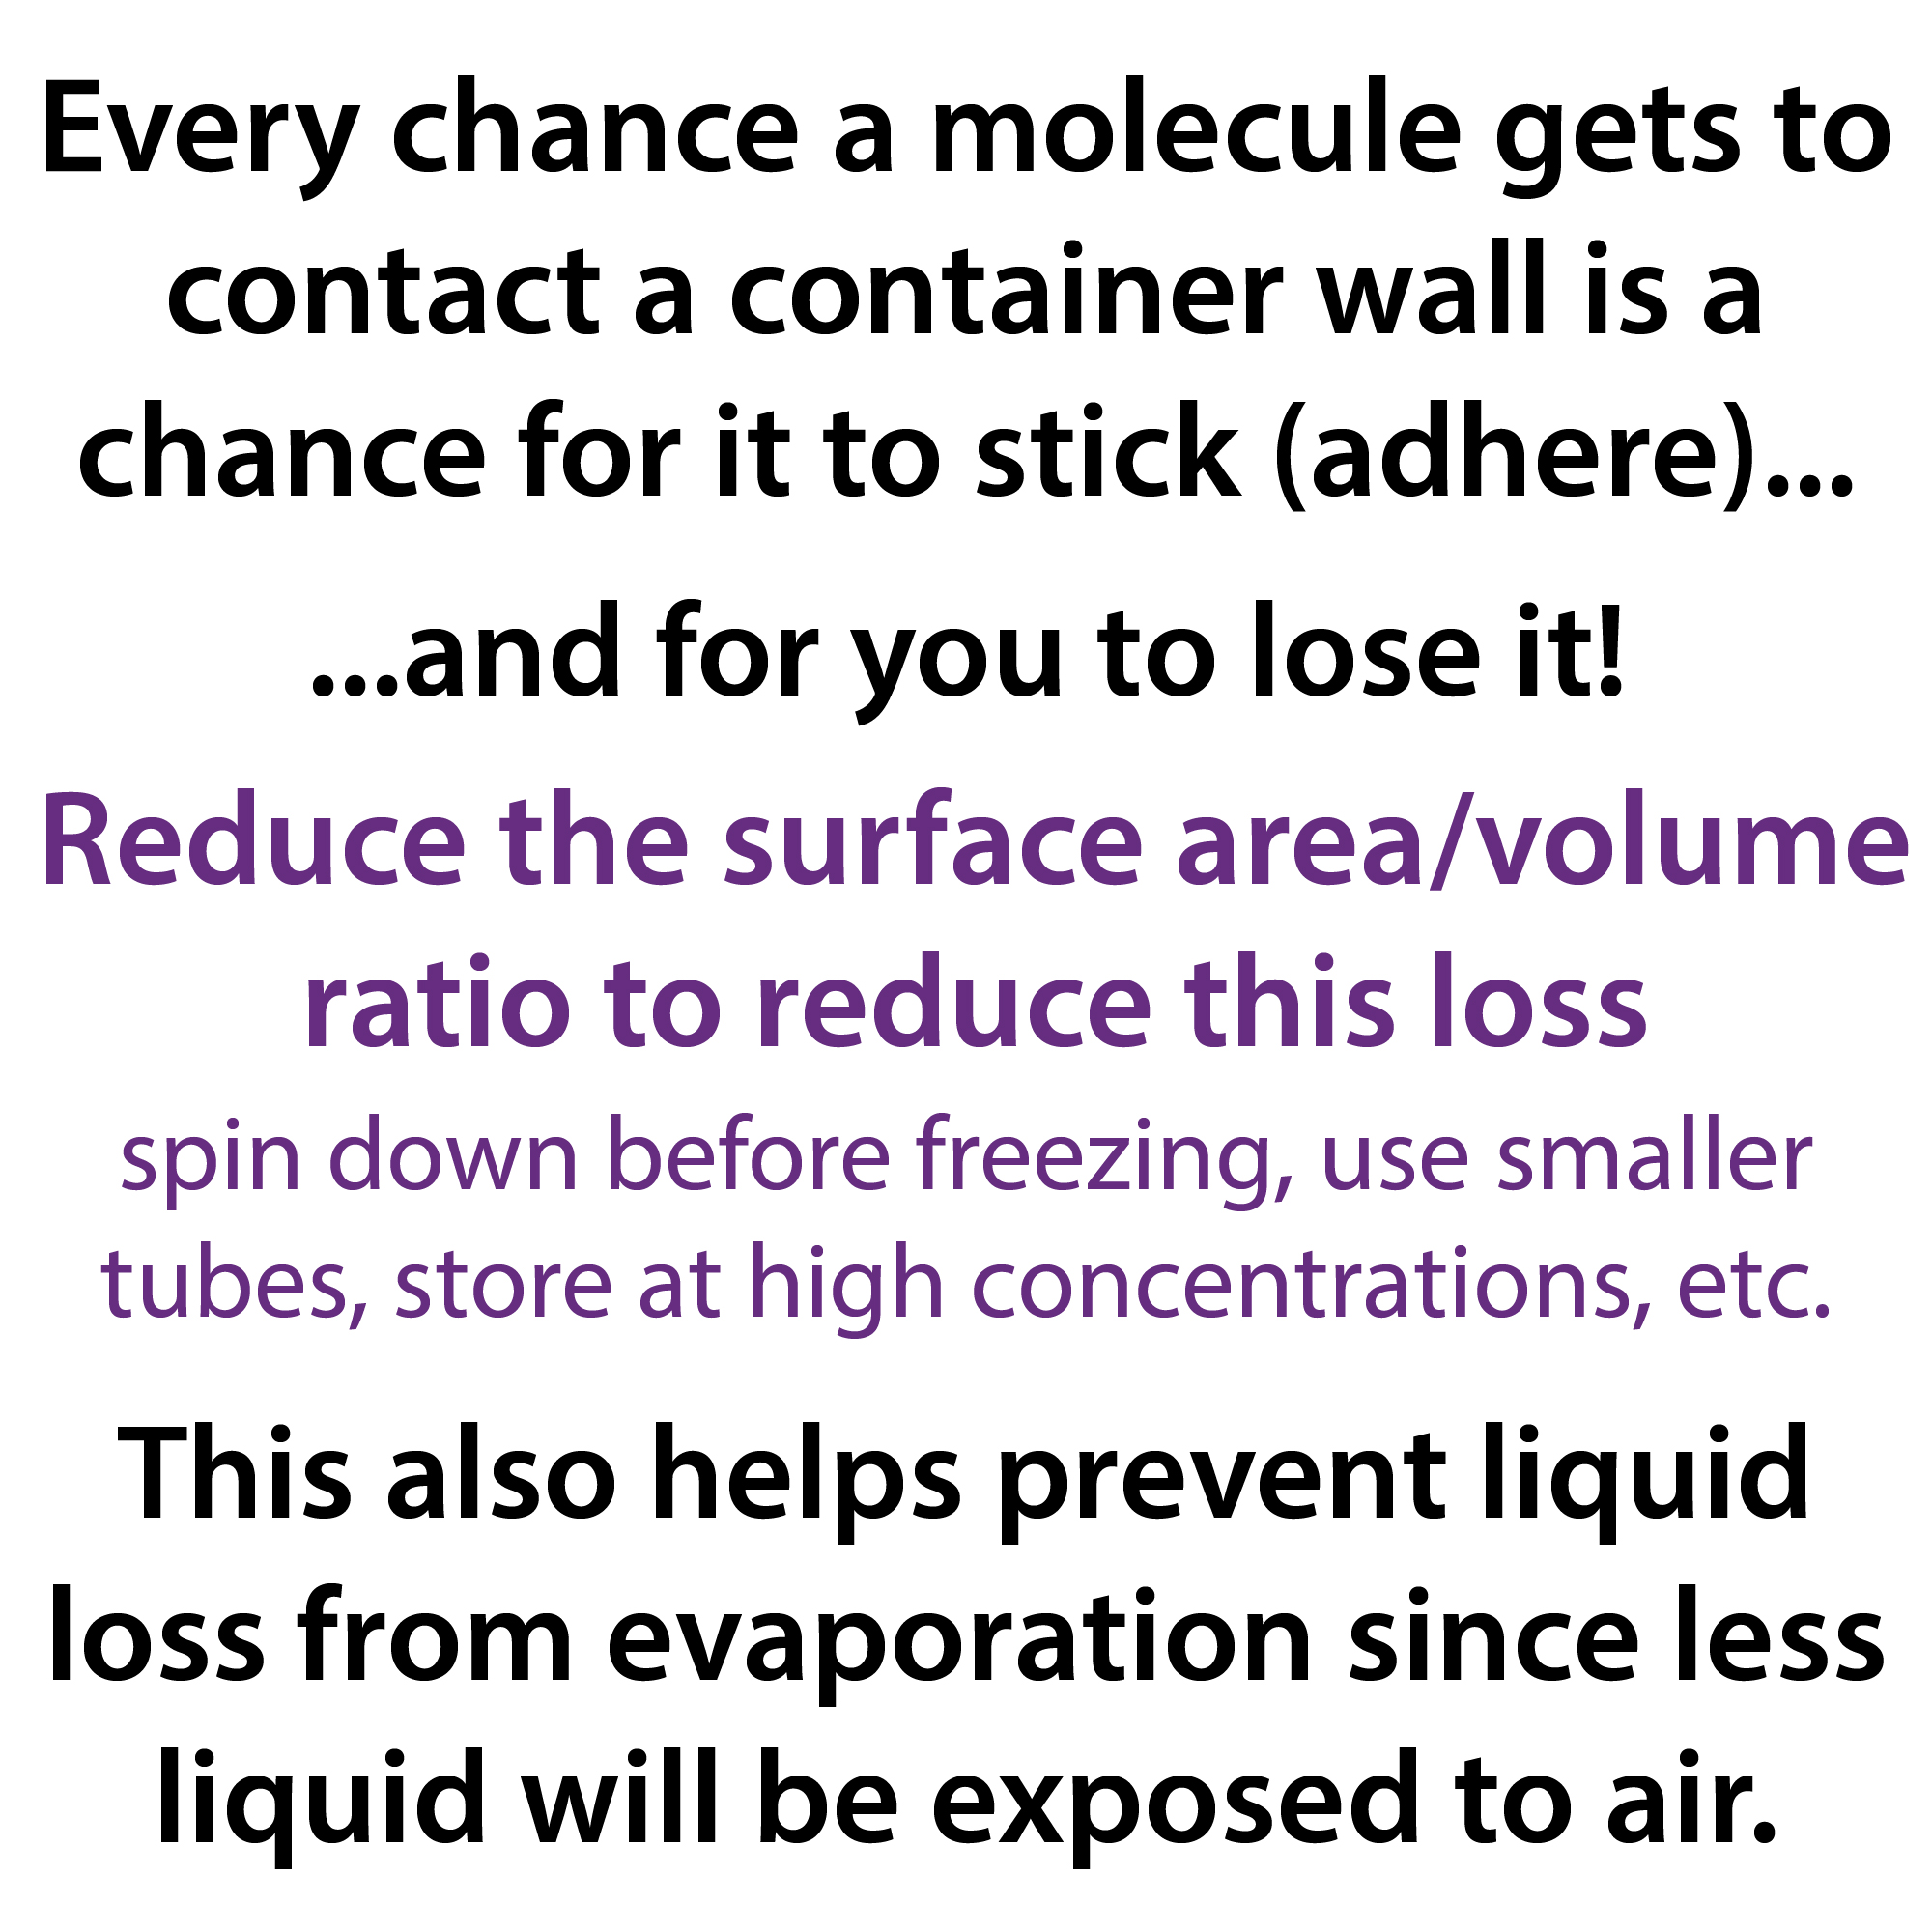
Proteins also don’t like being frozen and woken up and frozen and woken up and… You want to avoid multiple freeze-thaws, so you freeze “single-use” aliquots.
Graphics

Associated content & resources
The run-up
- Homogenization and lysis (cellular disruption) – an overview of methods and practical considerations:
- Ultrasonication
Protein chromatography in general
- Elution: terms, strategies, & practical tips
- FPLC (AKTA)
- FPLC (AKTA) practical tutorials
- Interpreting & working with protein chromatography chromatograms
- Packing protein chromatography columns
Types of protein chromatography
- IMAC/His-tag purification
- Strep tag affinity purification
- Ion exchange chromatography
- Size exclusion chromatography (SEC)/Gel filtration
YouTube playlists
Other things
- Ultrafiltration/spin concentrating
- Protein dialysis
- Desalting & buffer exchange gel filtration columns
- “Crashing out”: tips for preventing it during protein purification & what you can do if it happens
- Flash freezing/vitrification
- Measuring how much protein you have – overview
- Measuring protein concentration – emphasis on Bradford & UV-based methods
- SDS-PAGE
External resources
- ThermoFisher Protein Expression Handbook: discusses various strategies for expressing proteins and is a good place to start for people wanting to get into recombinant expression
- Cytiva (previously GE) Principles & Methodology Handbooks (all free to download without registering or anything although they do include product information)
- There are lots of good ones but the Strategies for protein purification handbook is a great place to start for people interested in purification
Protein characterization
Examples of some of the experimental techniques you might use to characterize your protein
- Purity and unfolded “size” (length)
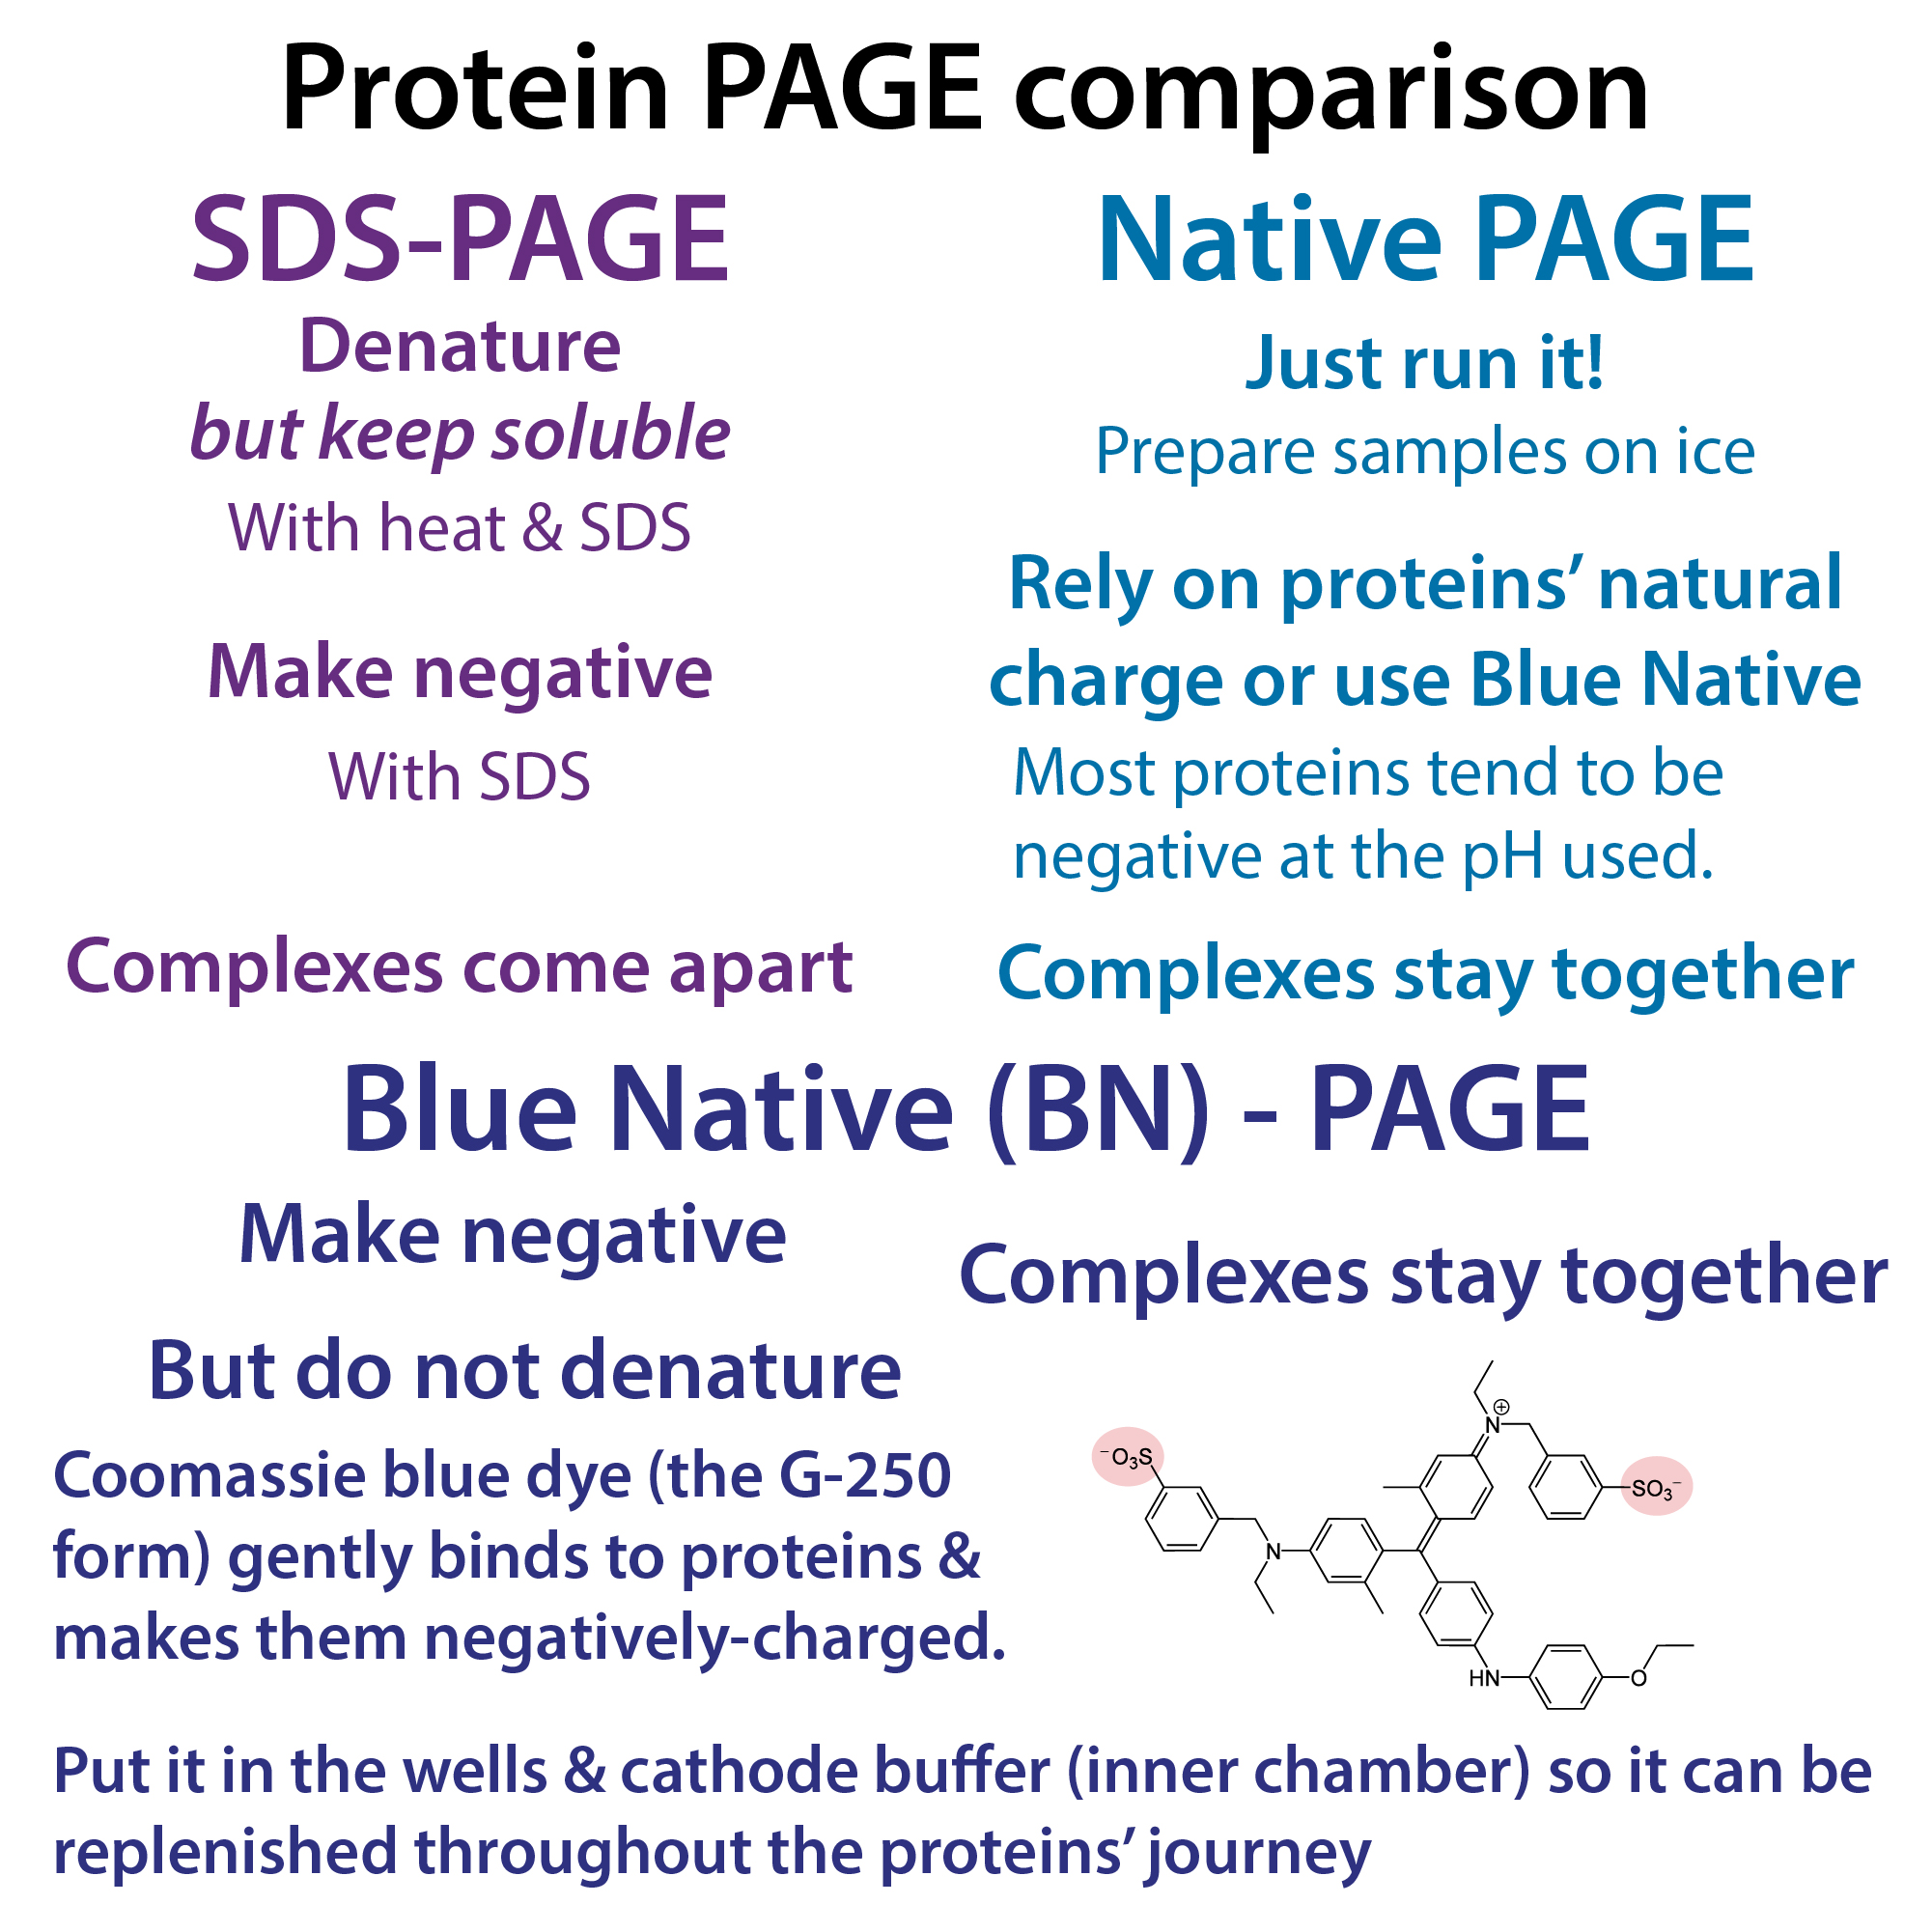
- Folded size, oligomerization &/or complex state, etc.
- Native PAGE
- Analytical Size Exclusion Chromatography (Analytical SEC)
- Mass Photometry
- Analytical ultracentrifugation
- Concentration – “all methods”
- UV280-based
- Bradford assay
- BCA assay
- Lowry assay
- High-resolution 3D atomic architecture
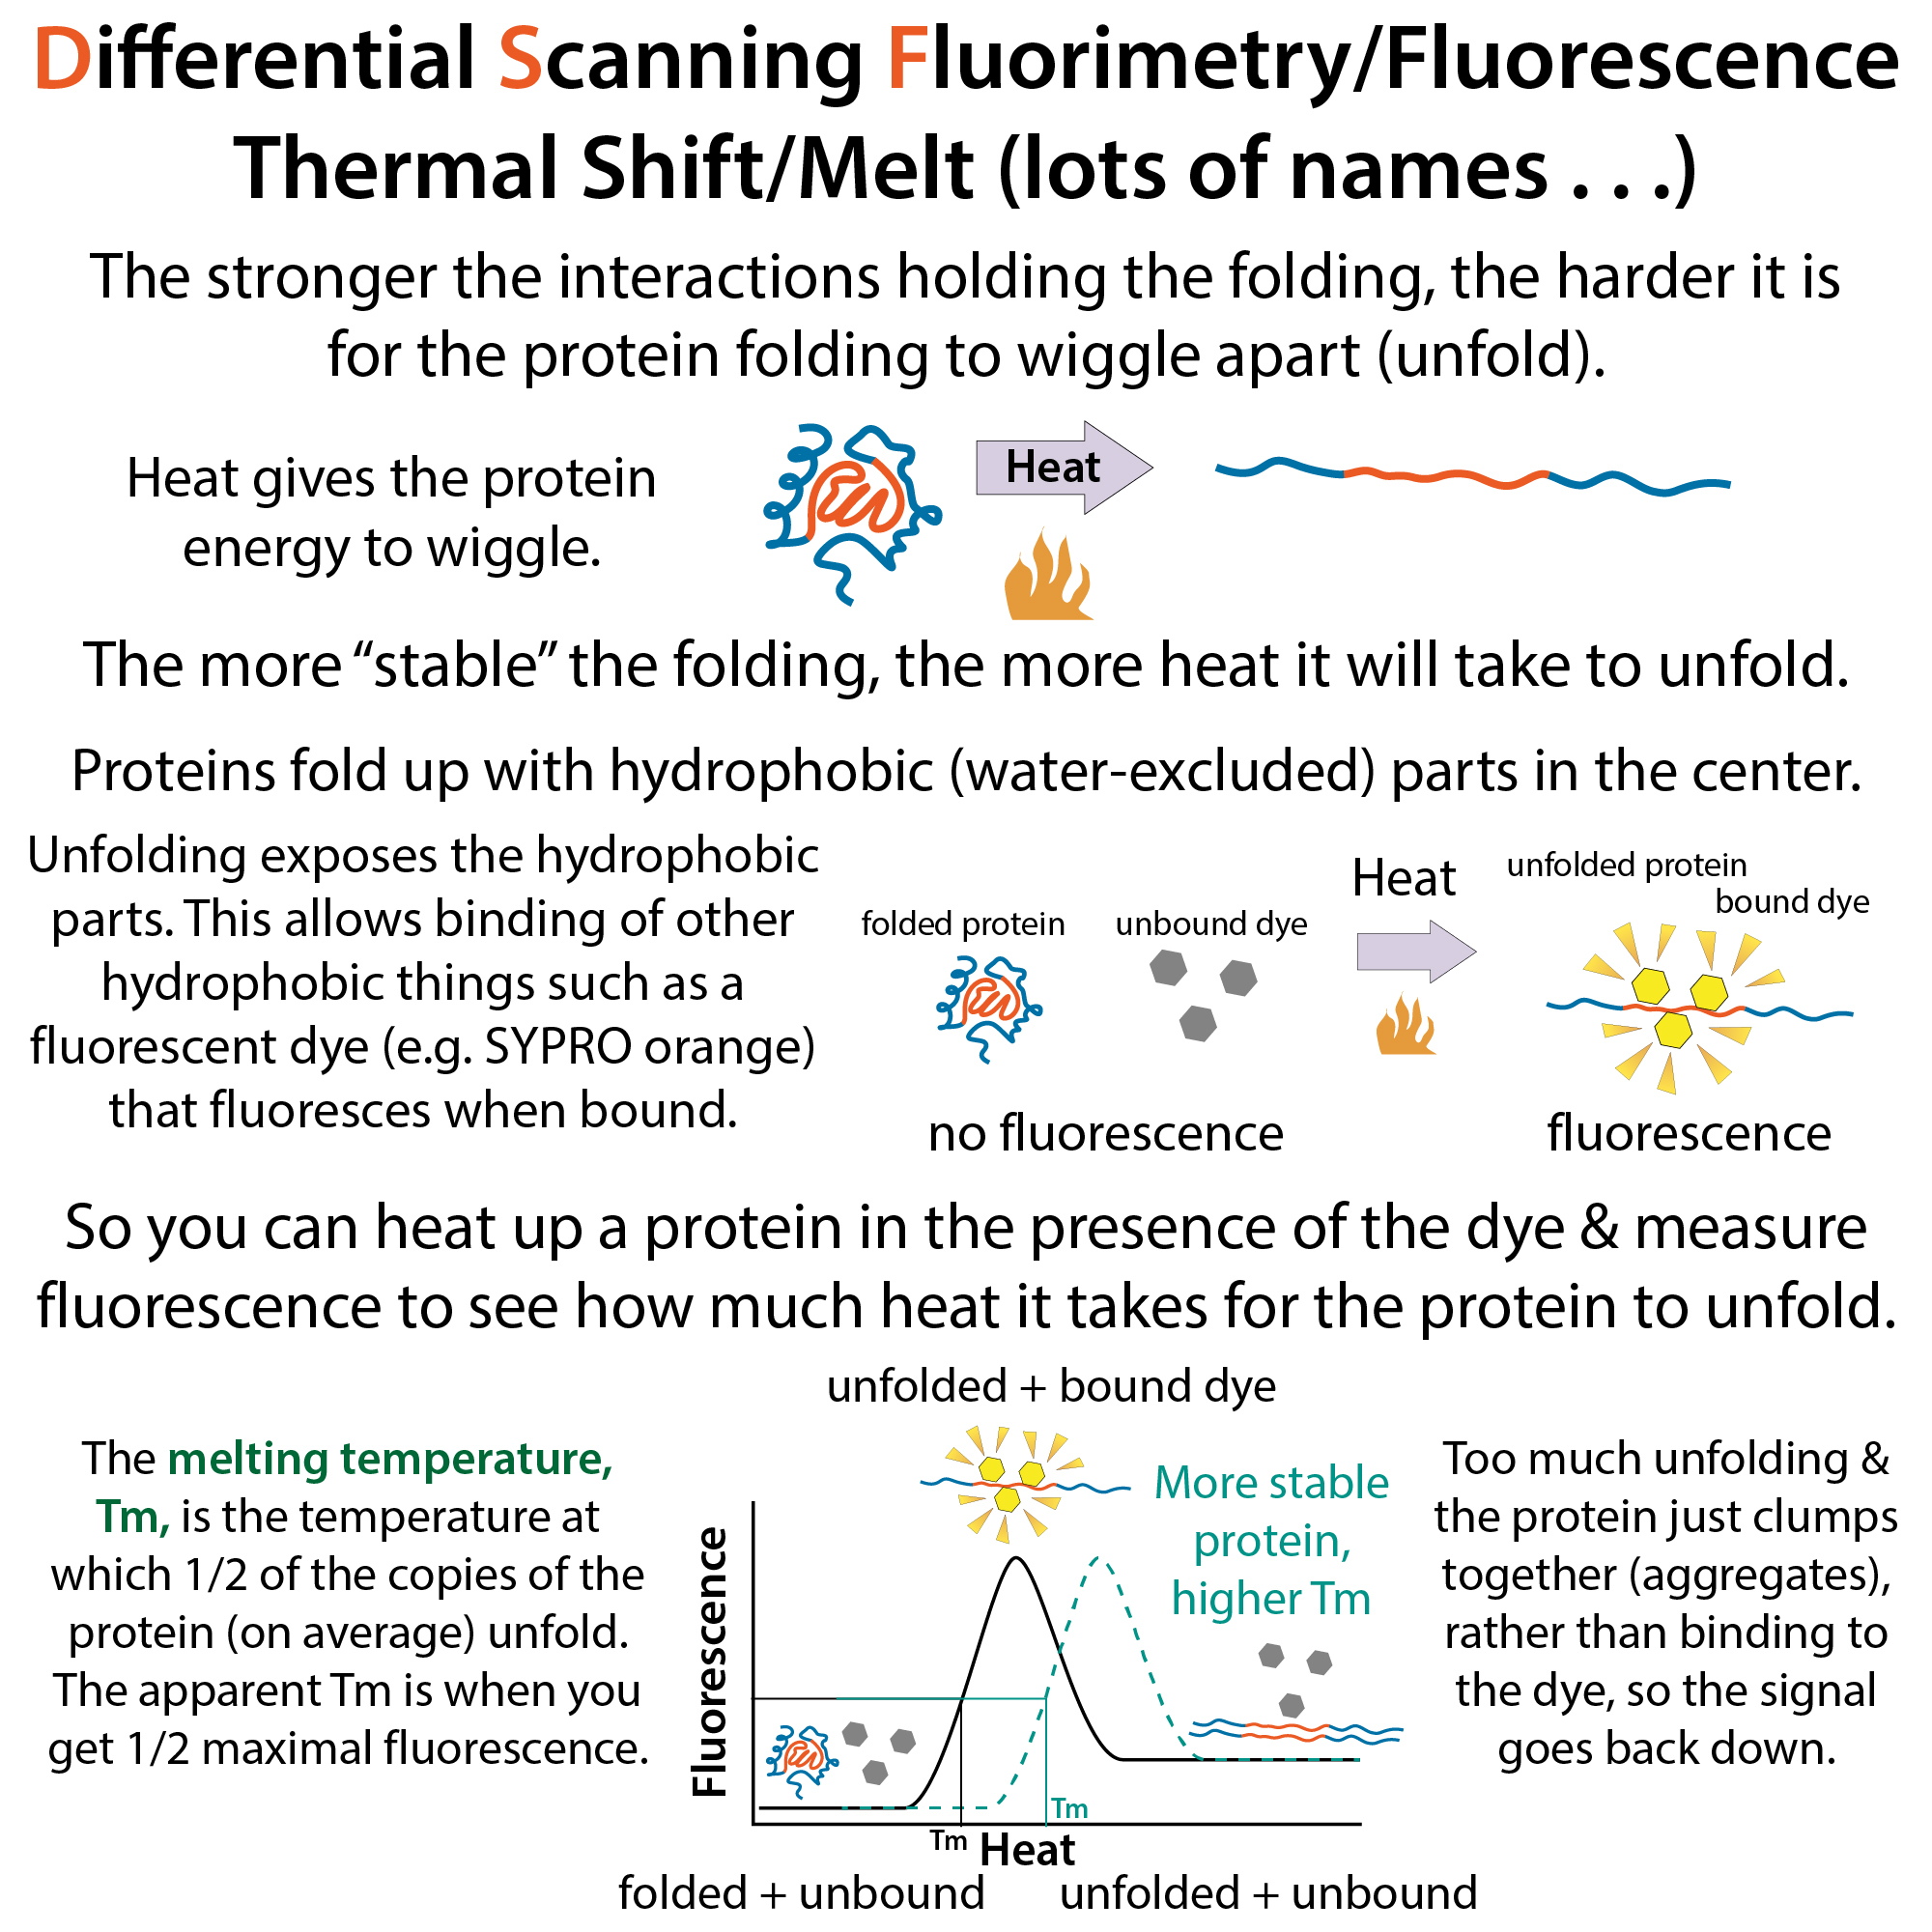
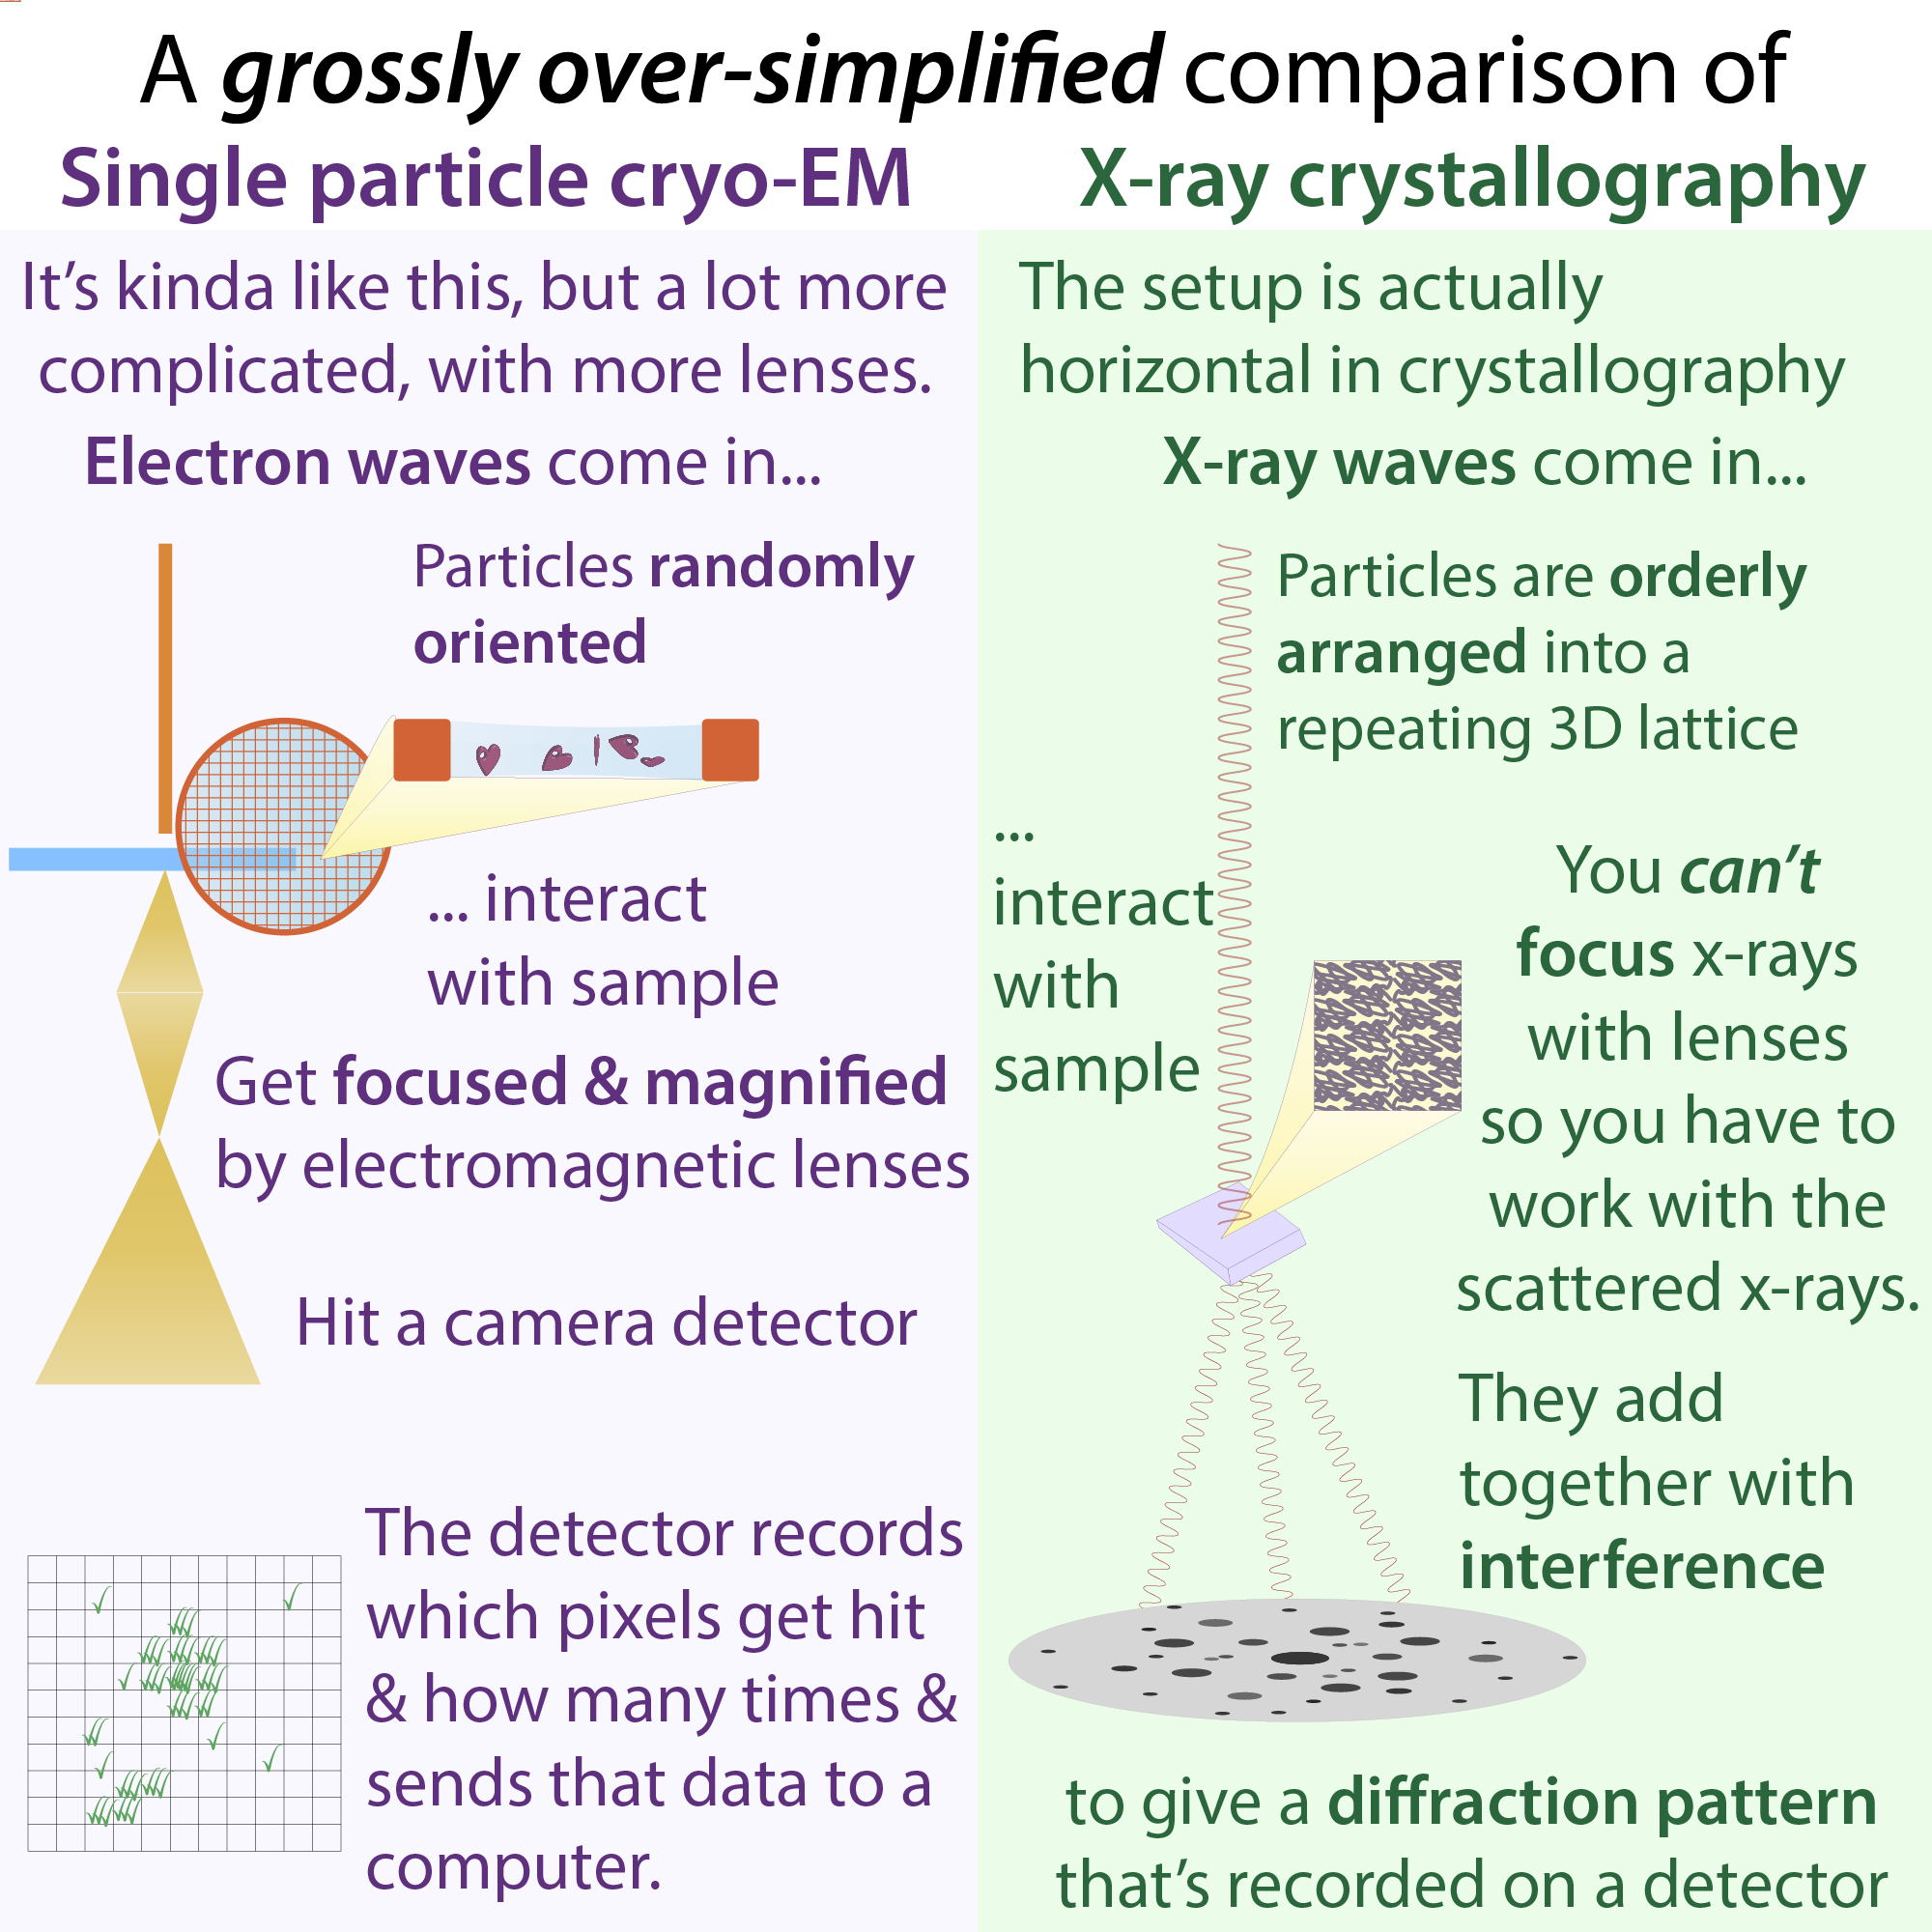
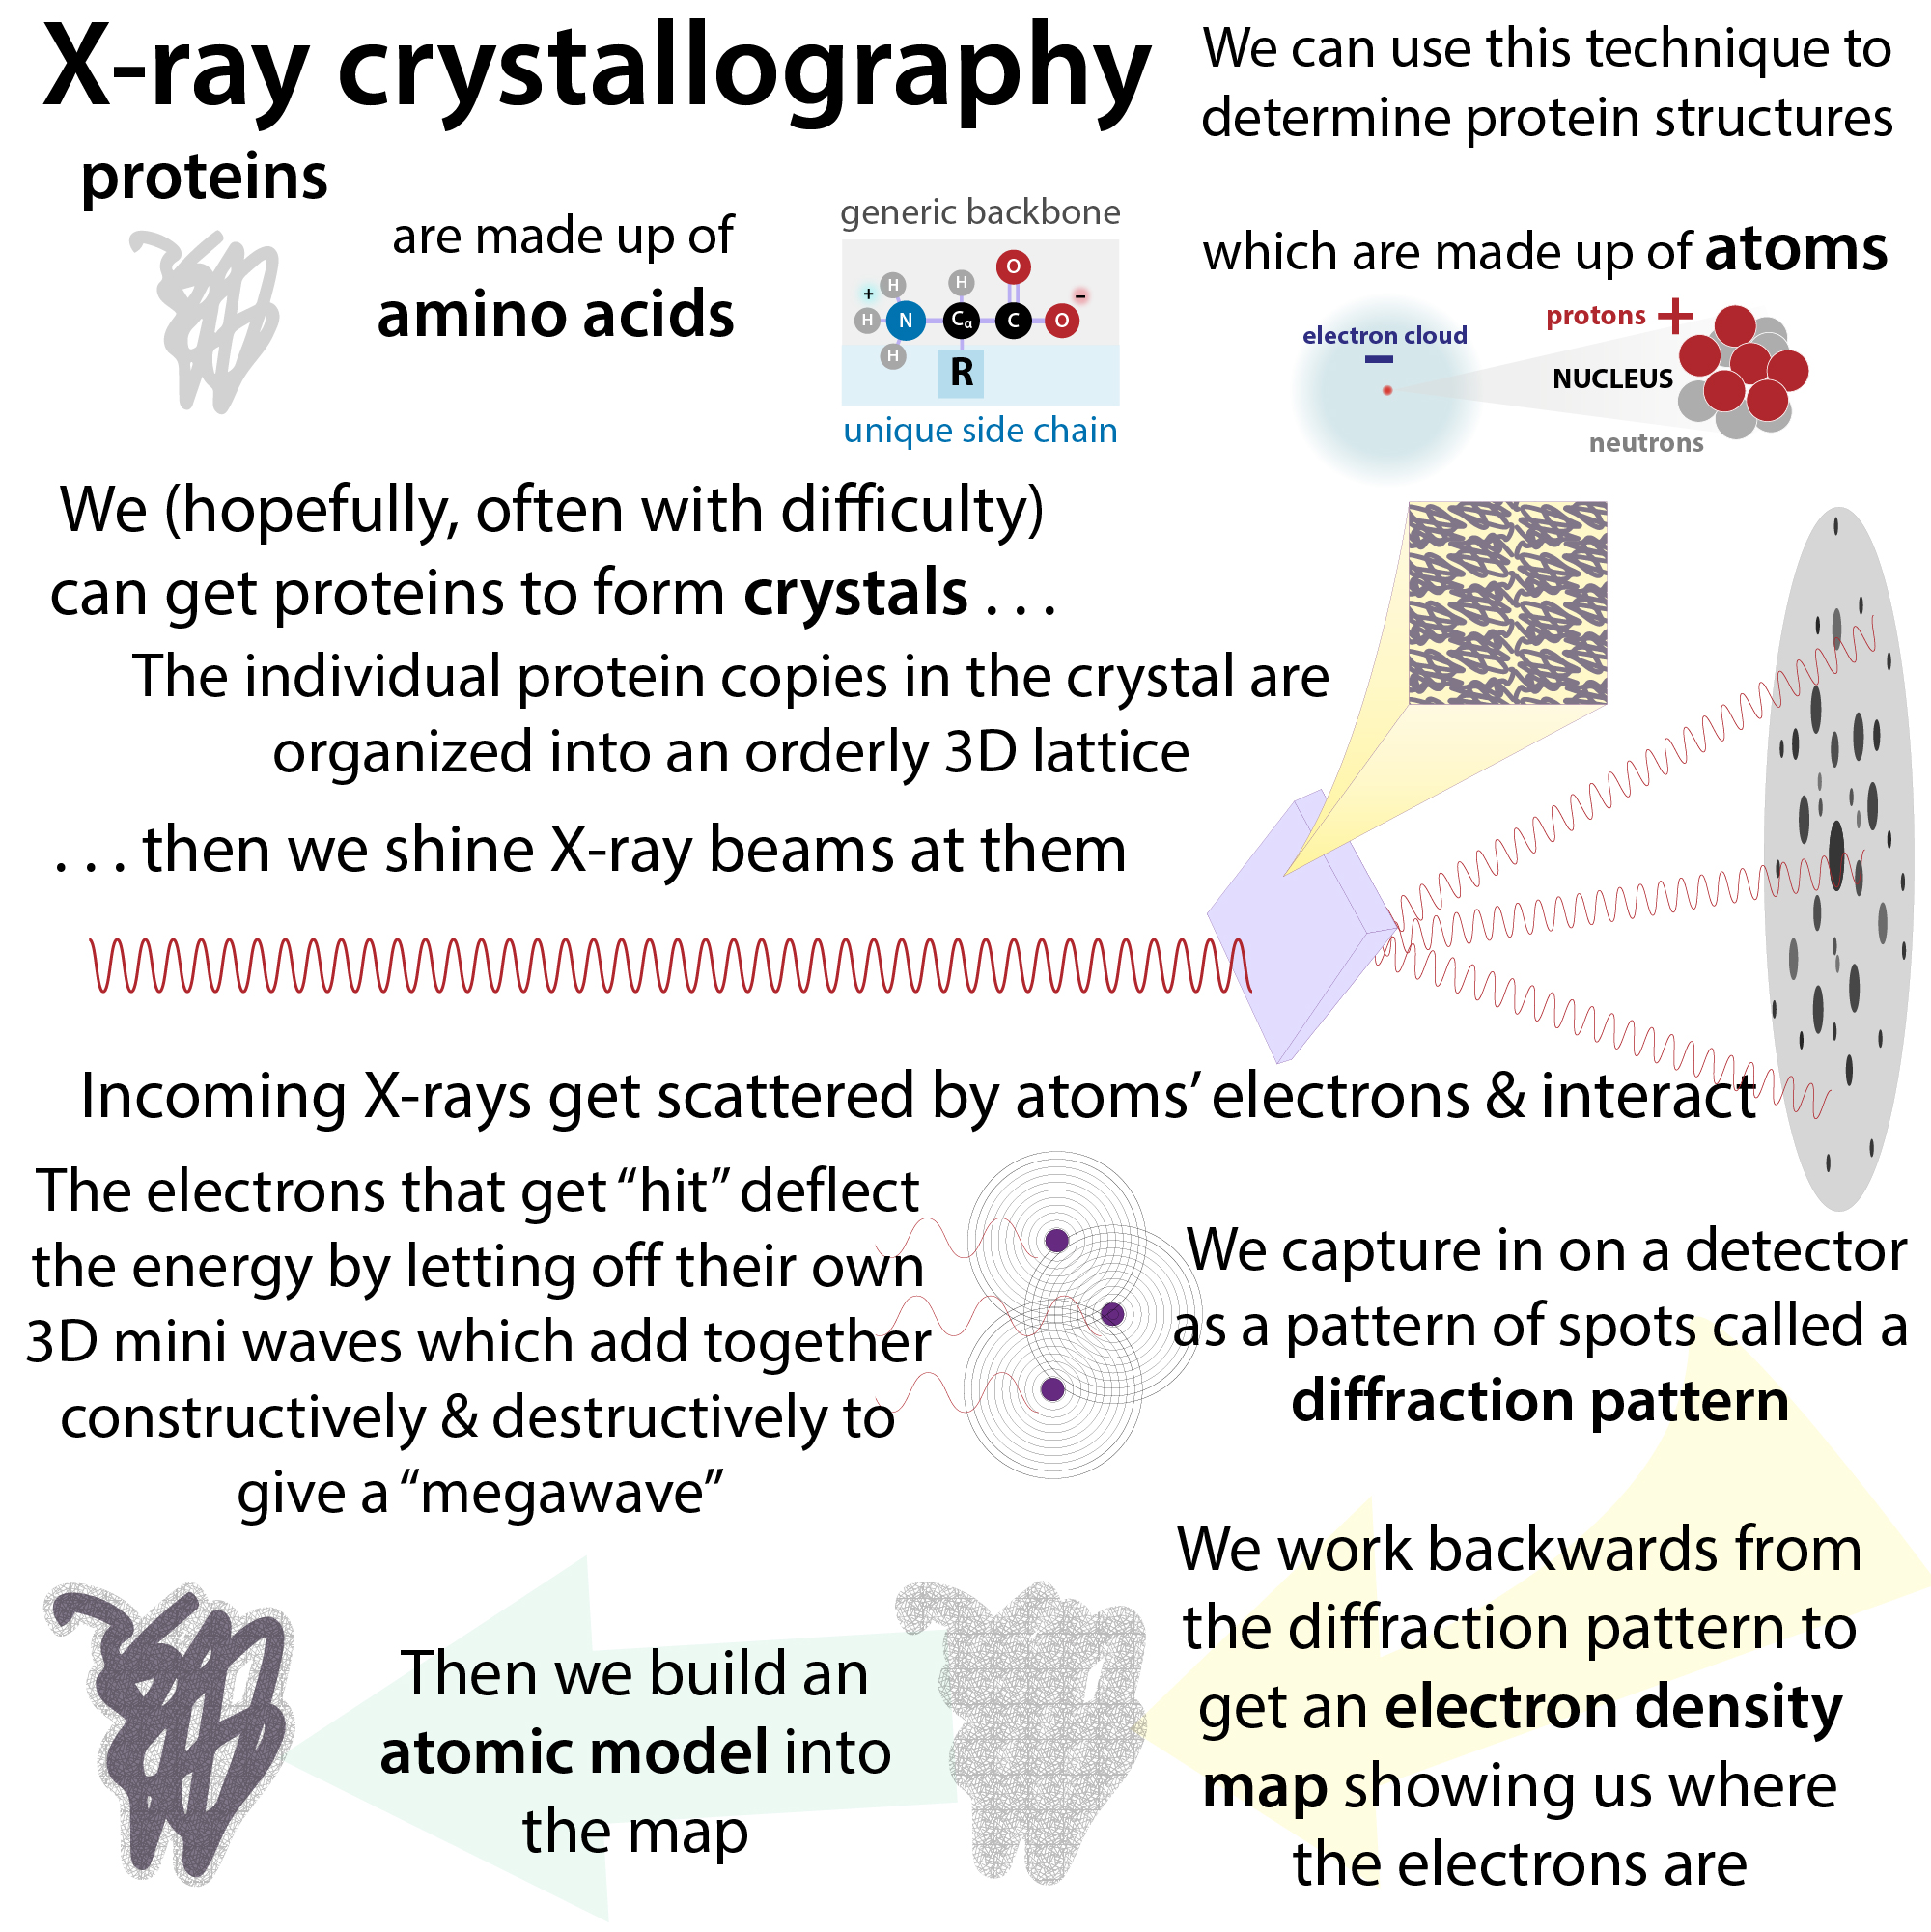
- X-ray crystallography
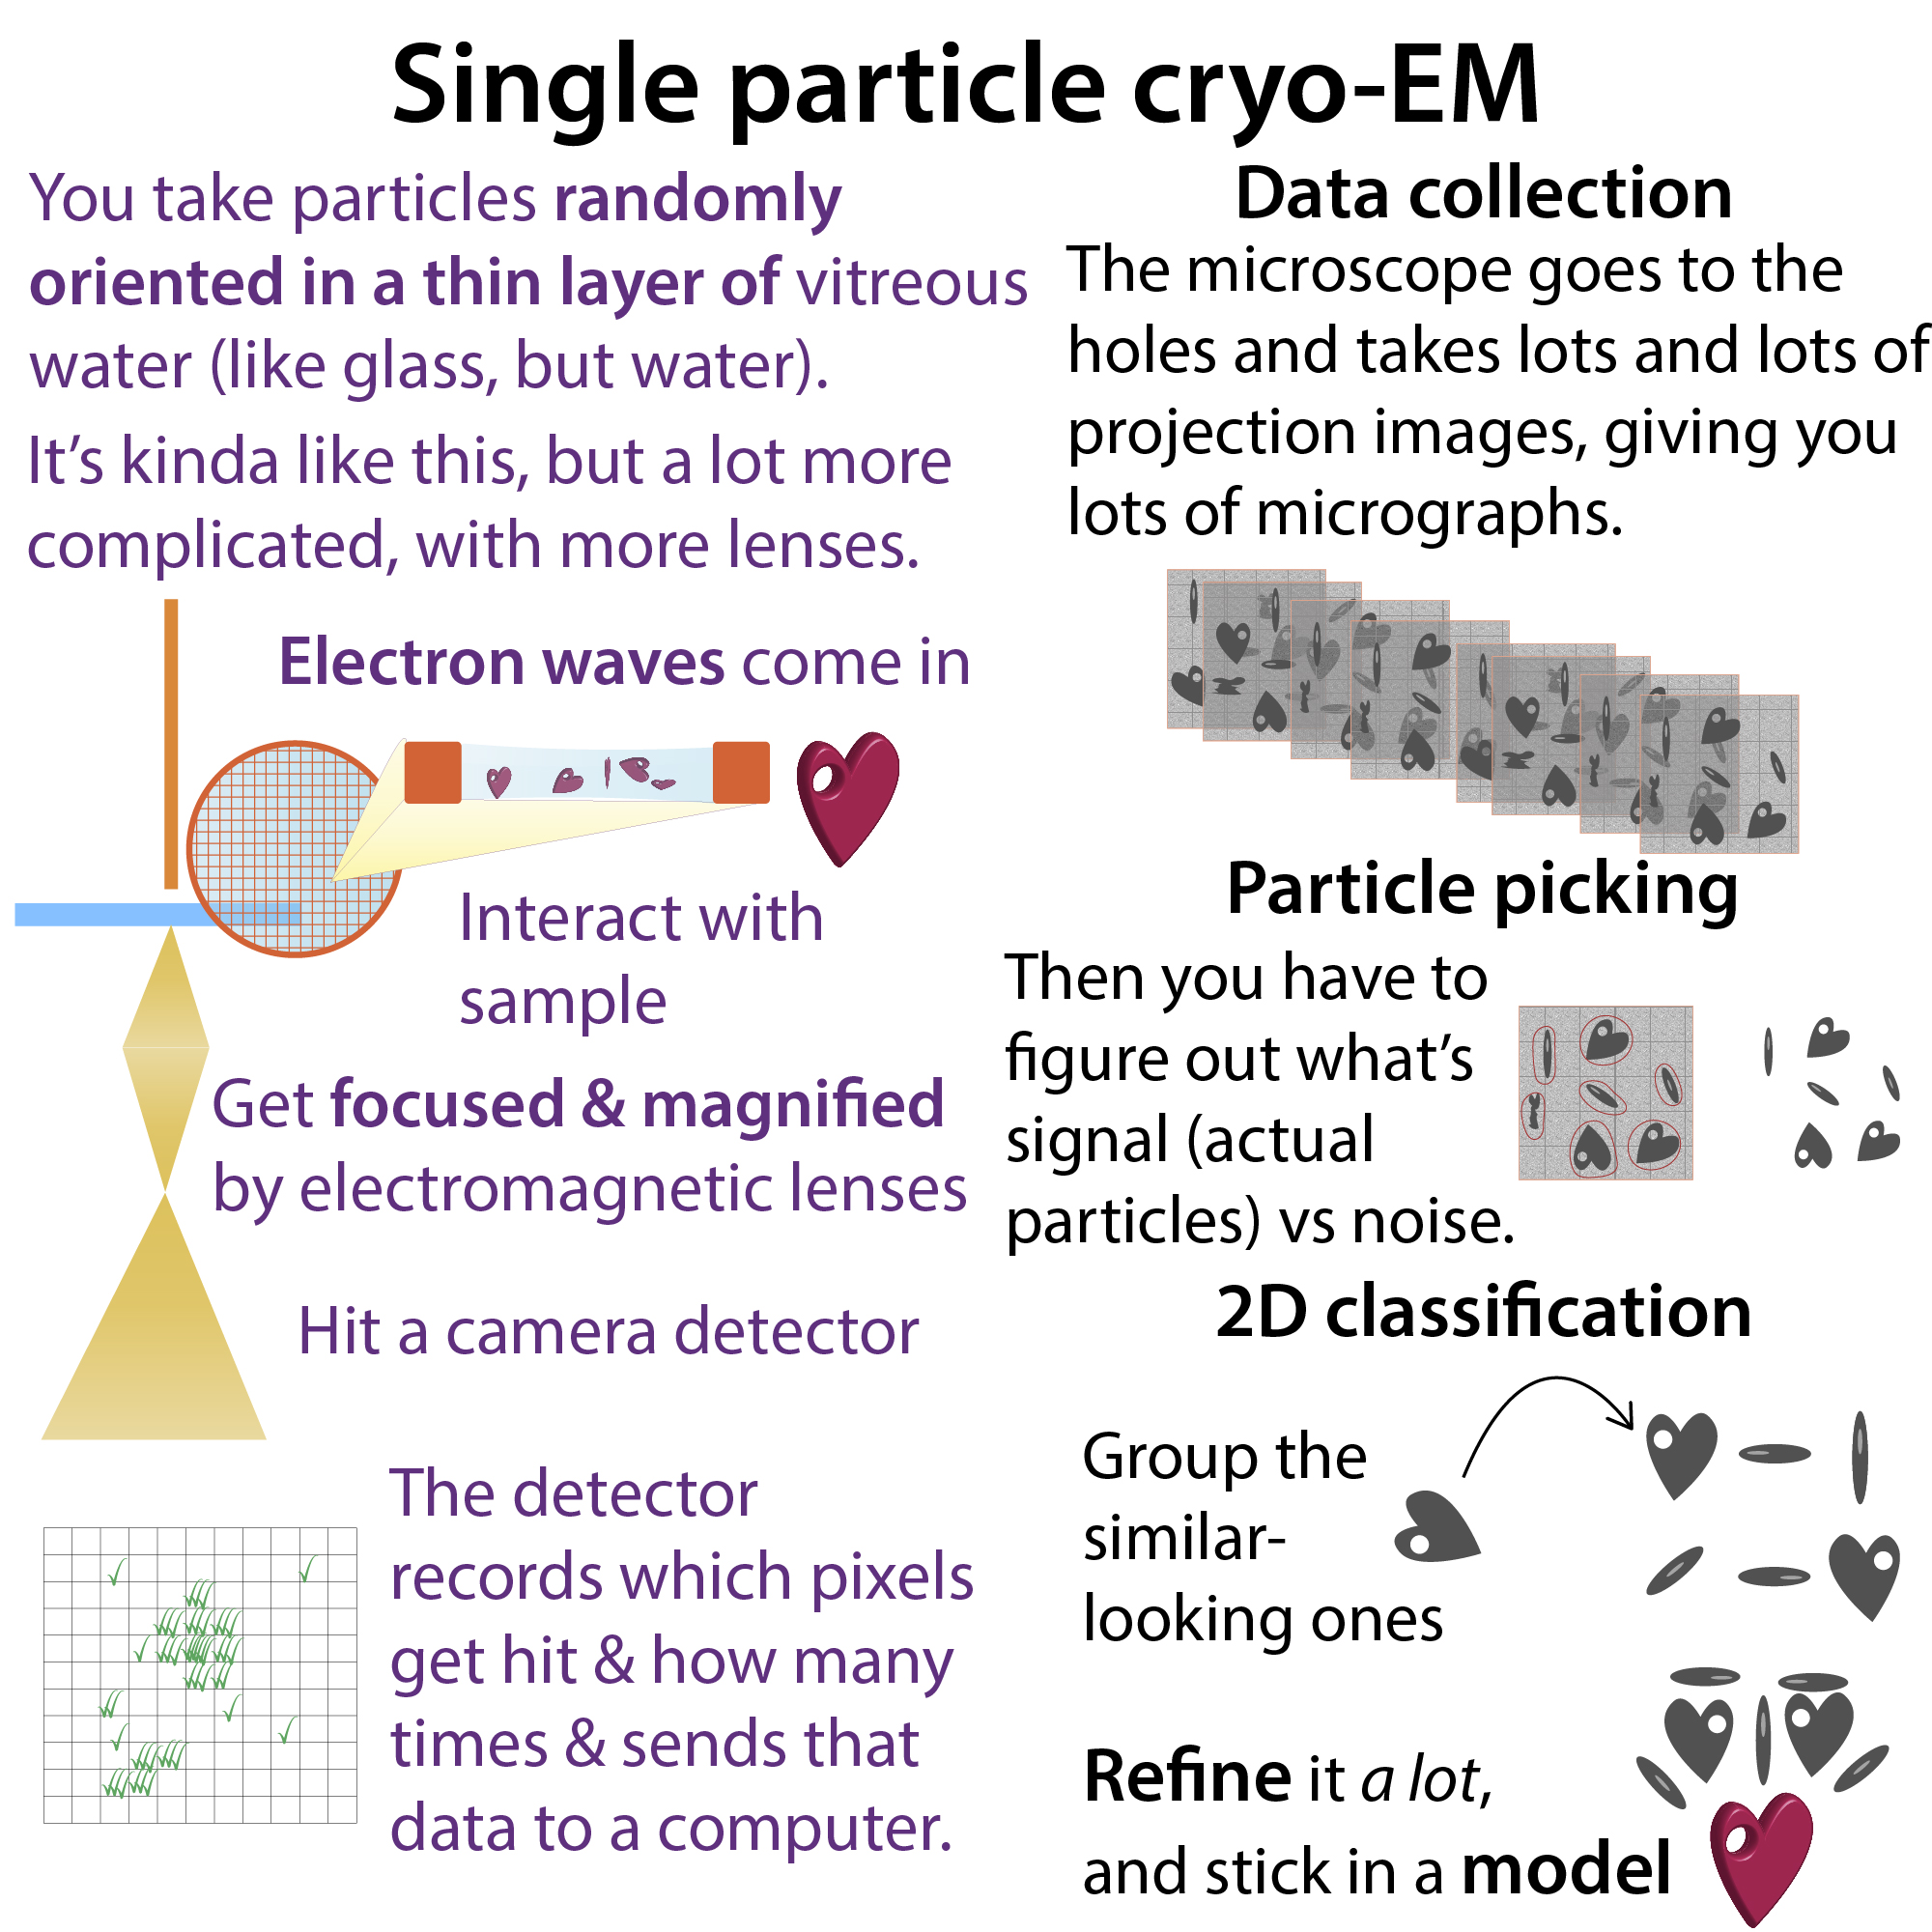
- Cryo-electron microscopy (cryo-EM)
- NMR (nuclear magnetic resonance)
- Low-resolution solution “shape” information
- SAXS (small-angle x-ray scattering)
- DLS (dynamic light scattering)
- MALS (multi-angle lights scattering)
- CD (circular dichroism)
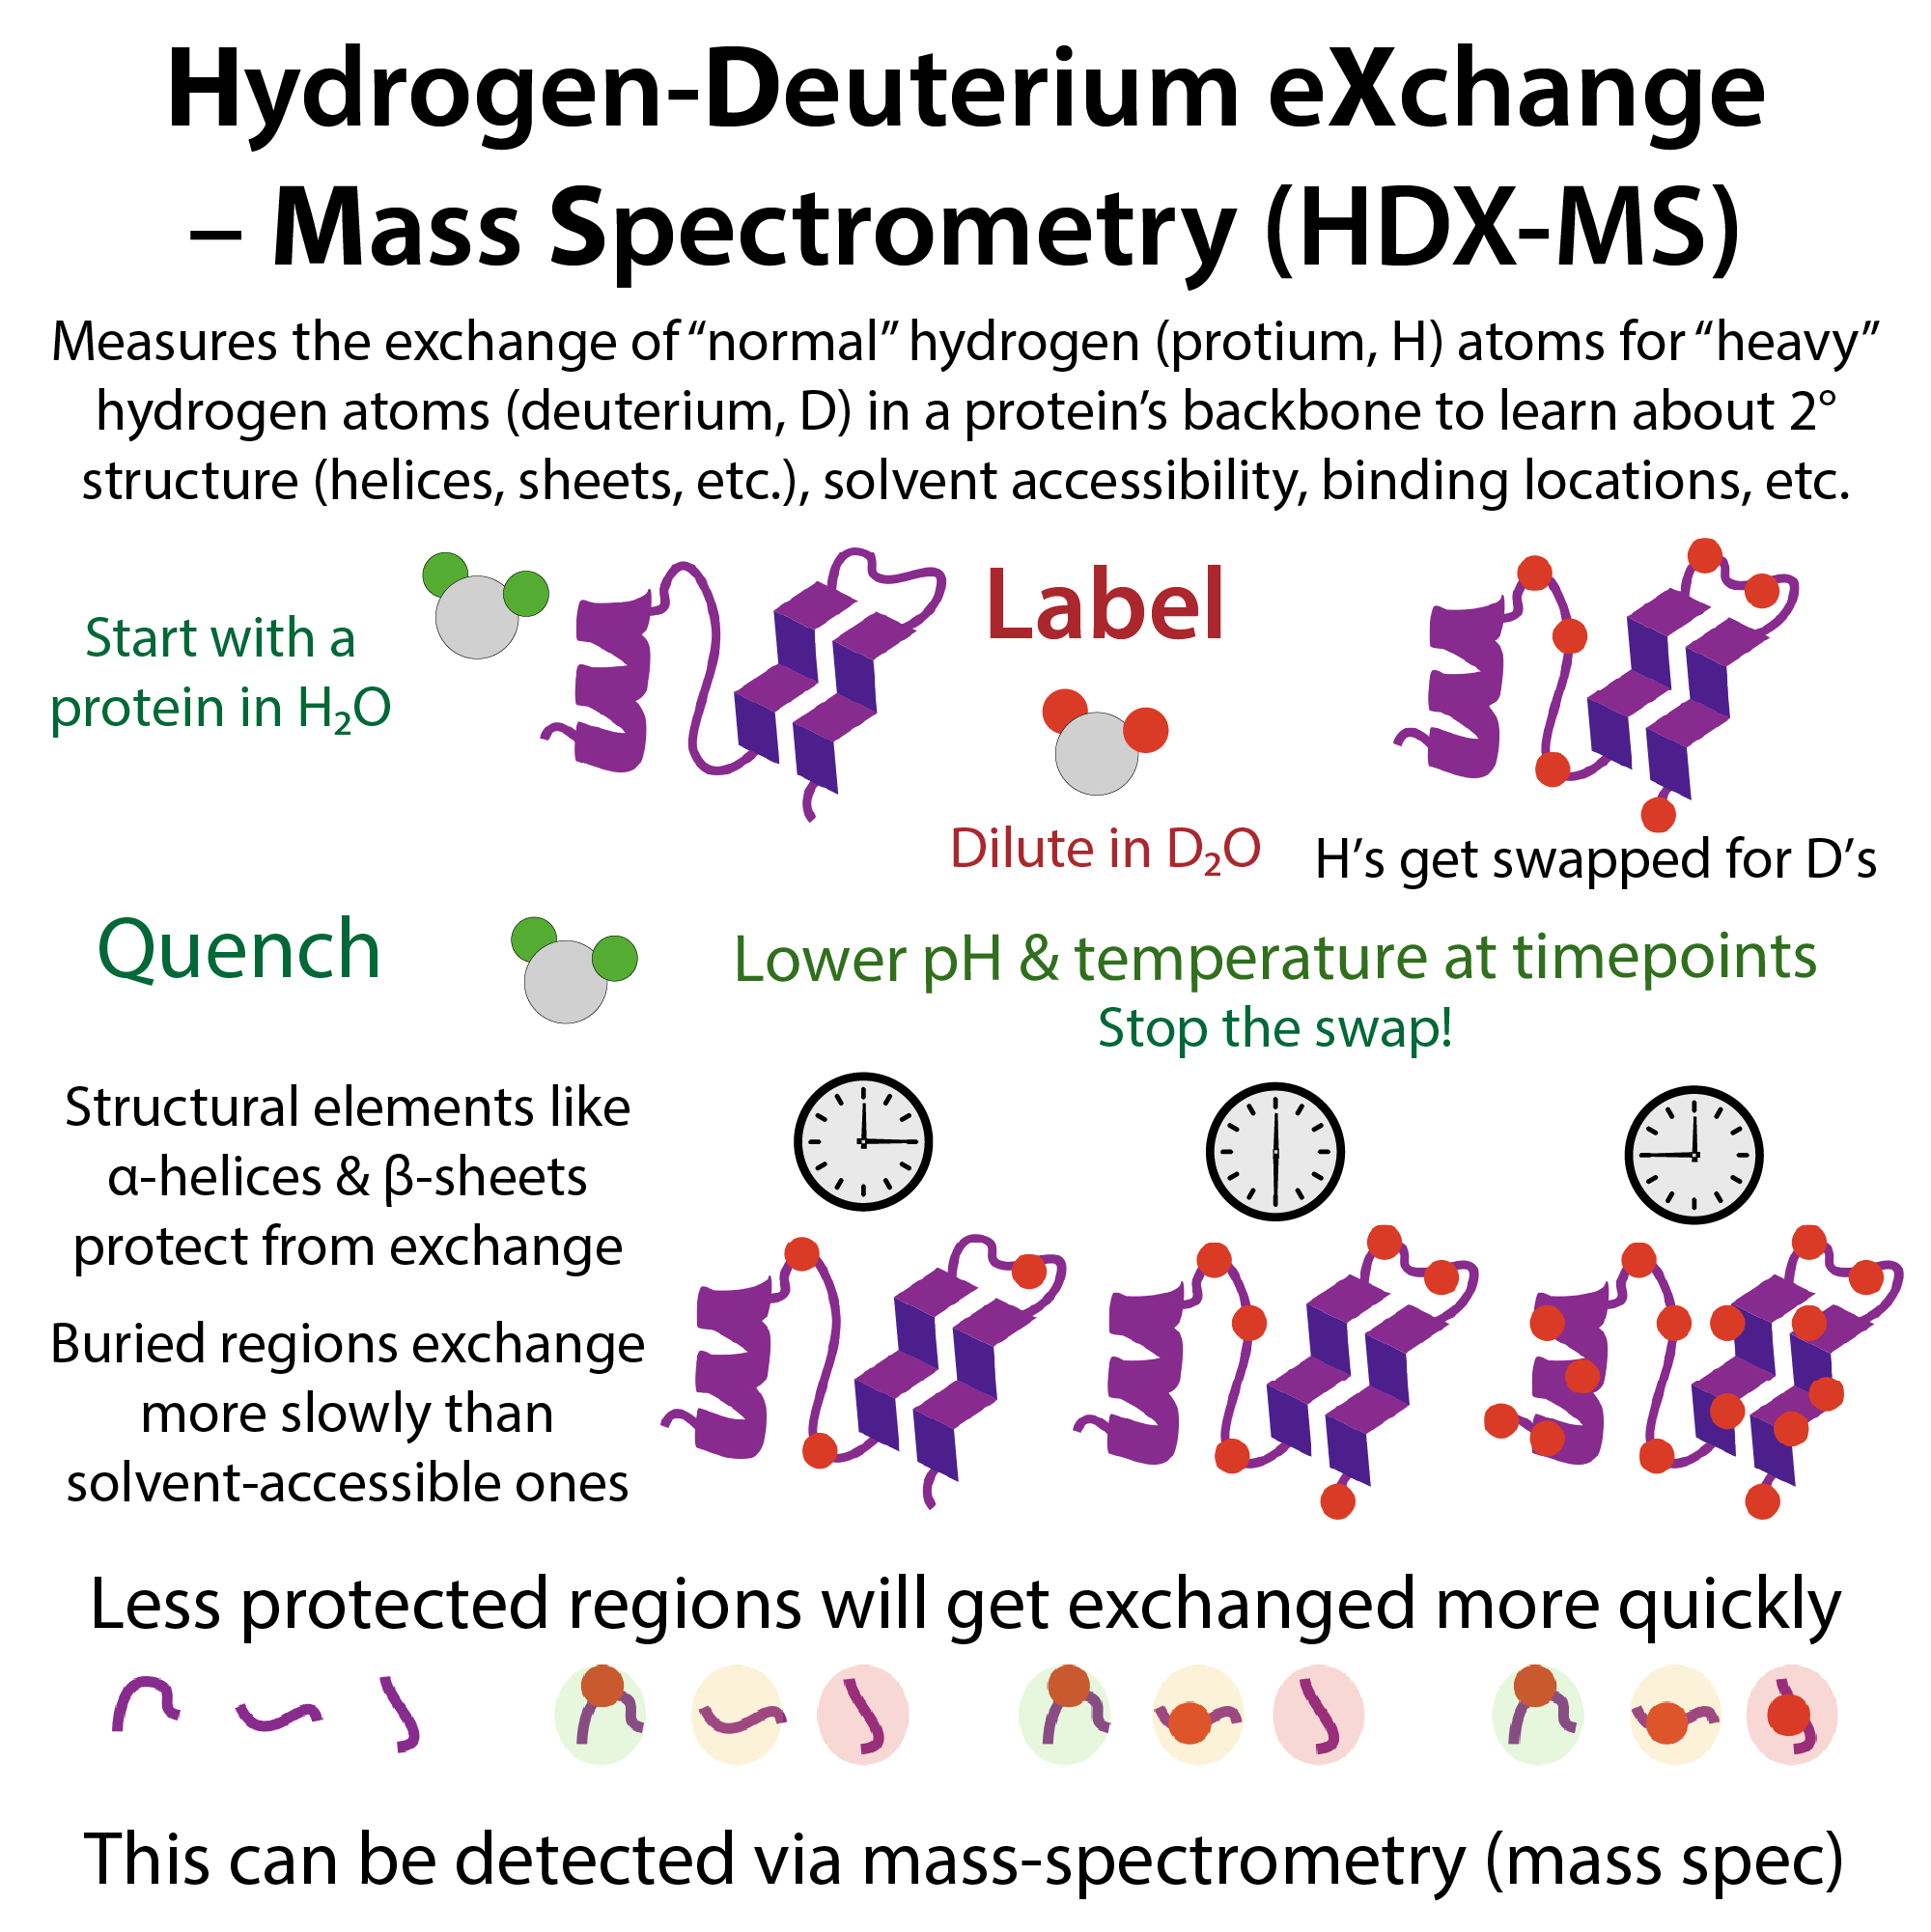
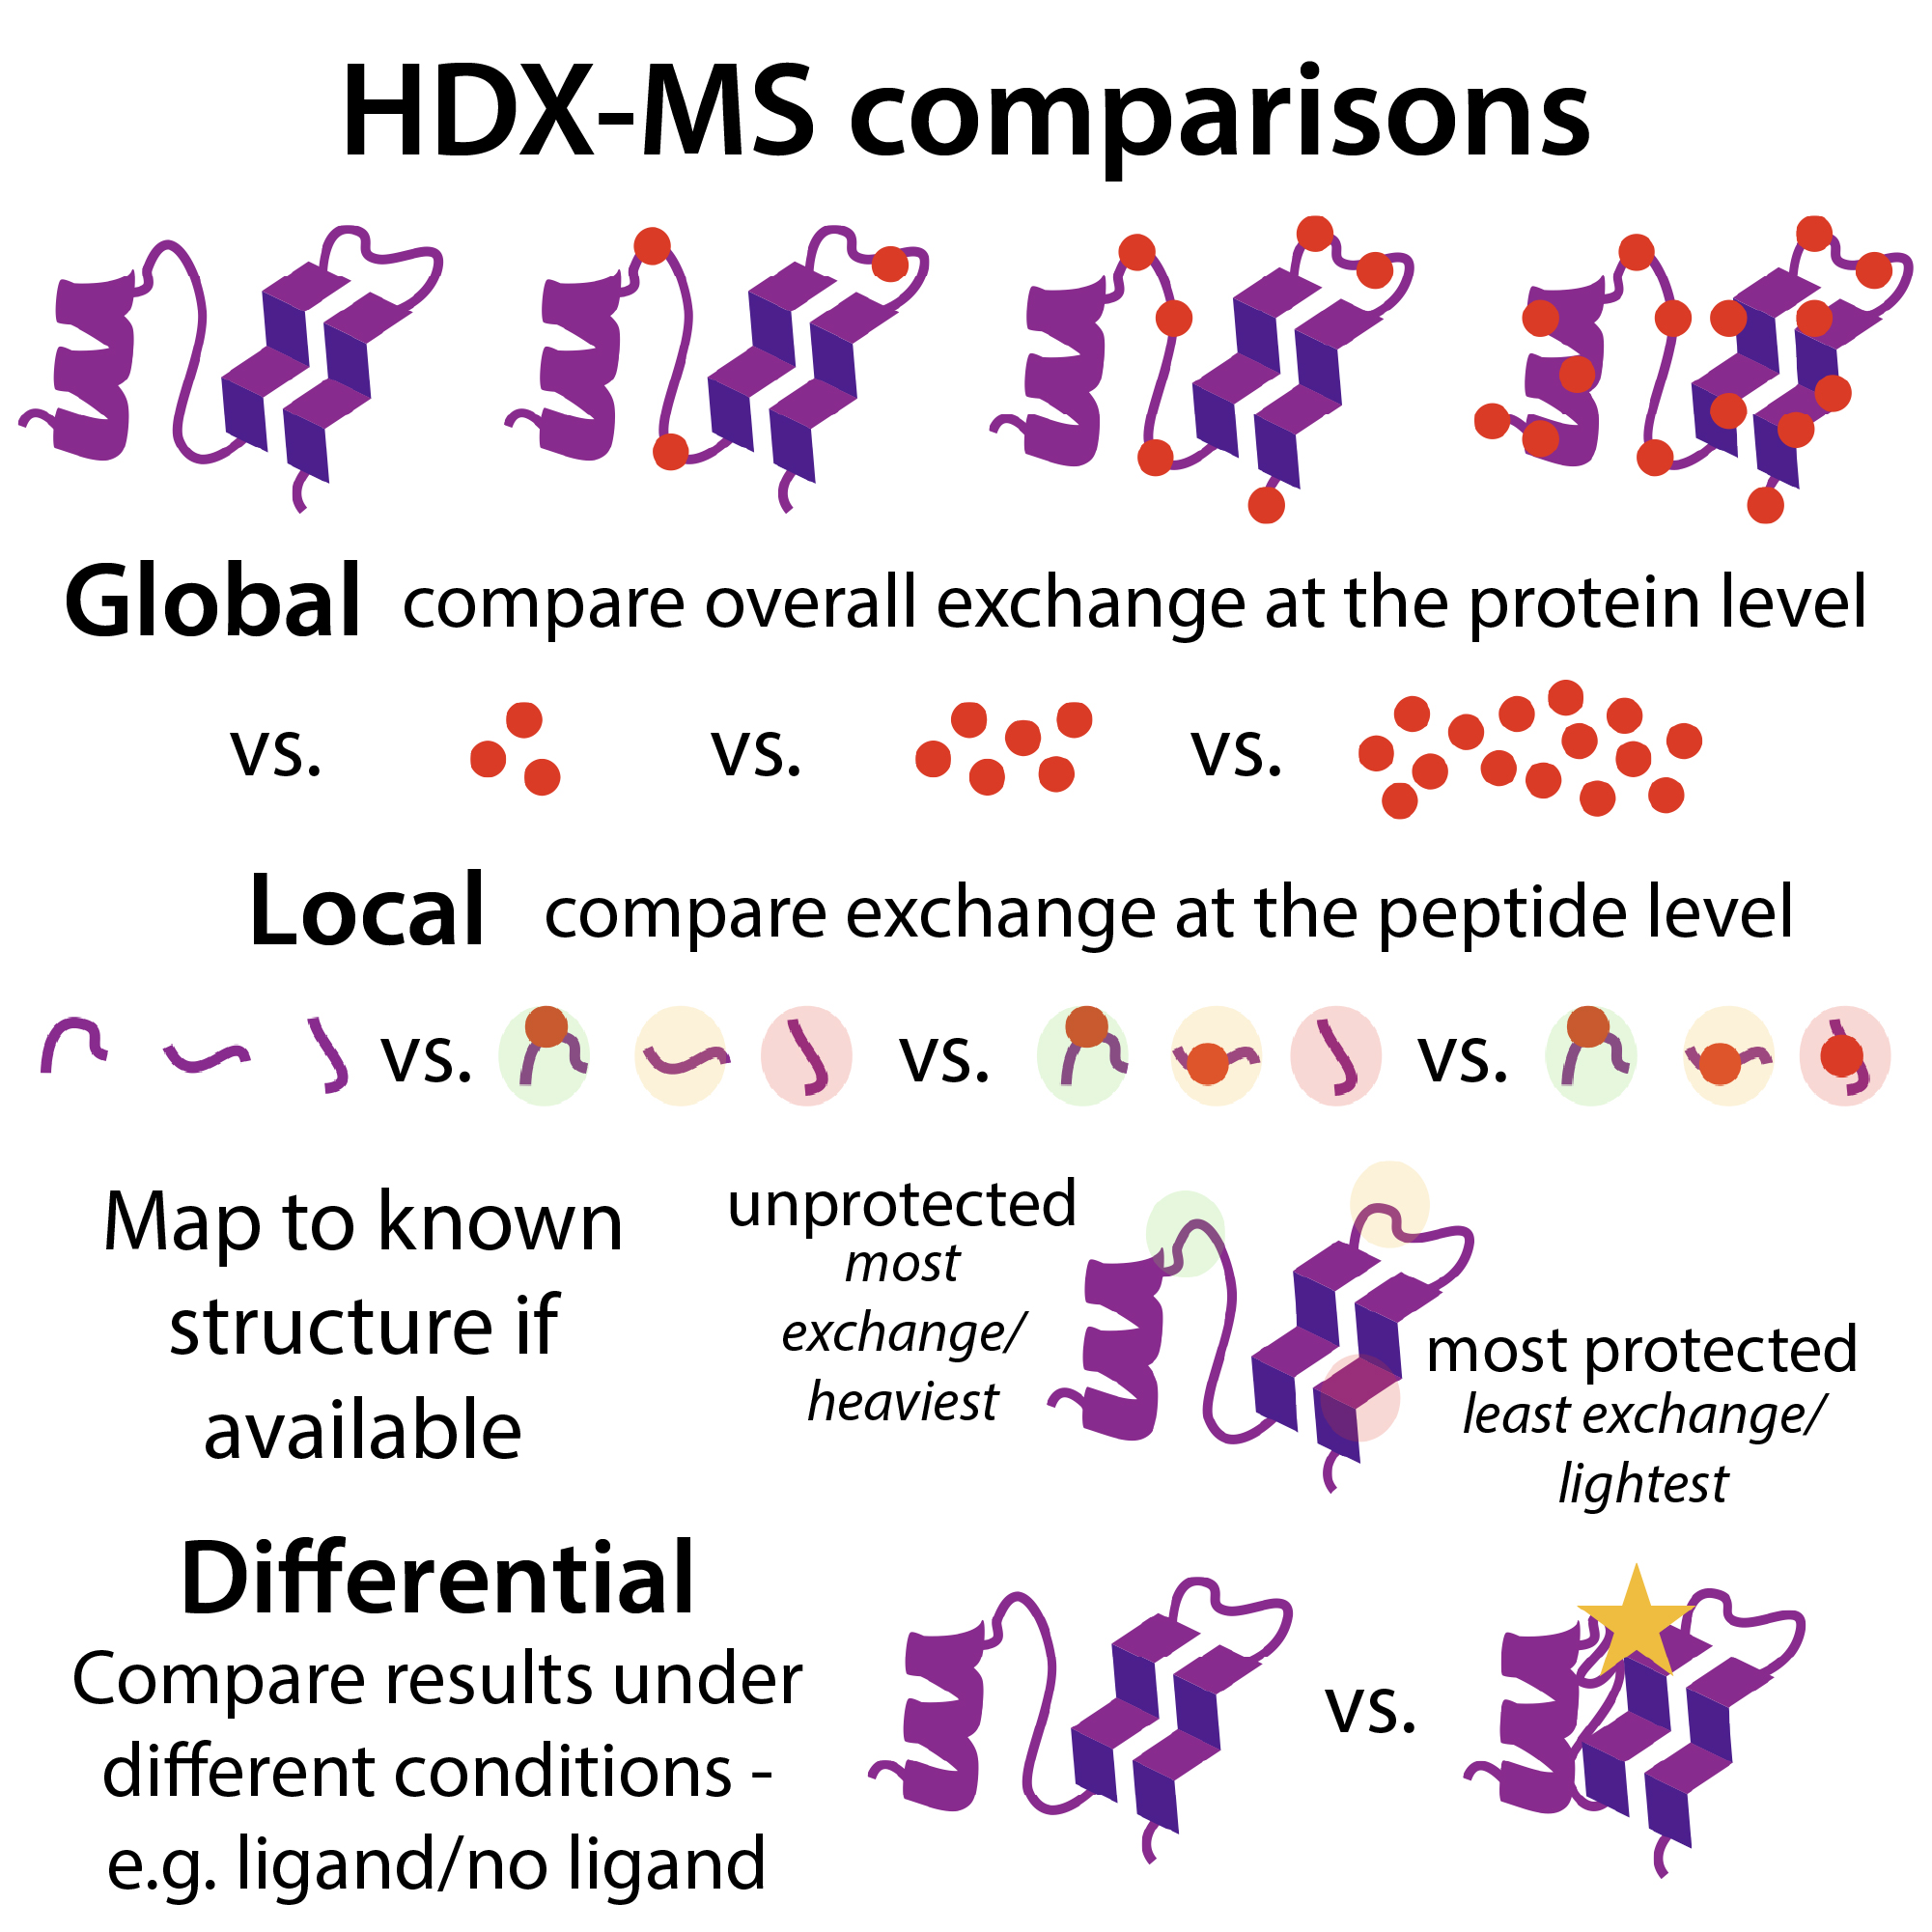
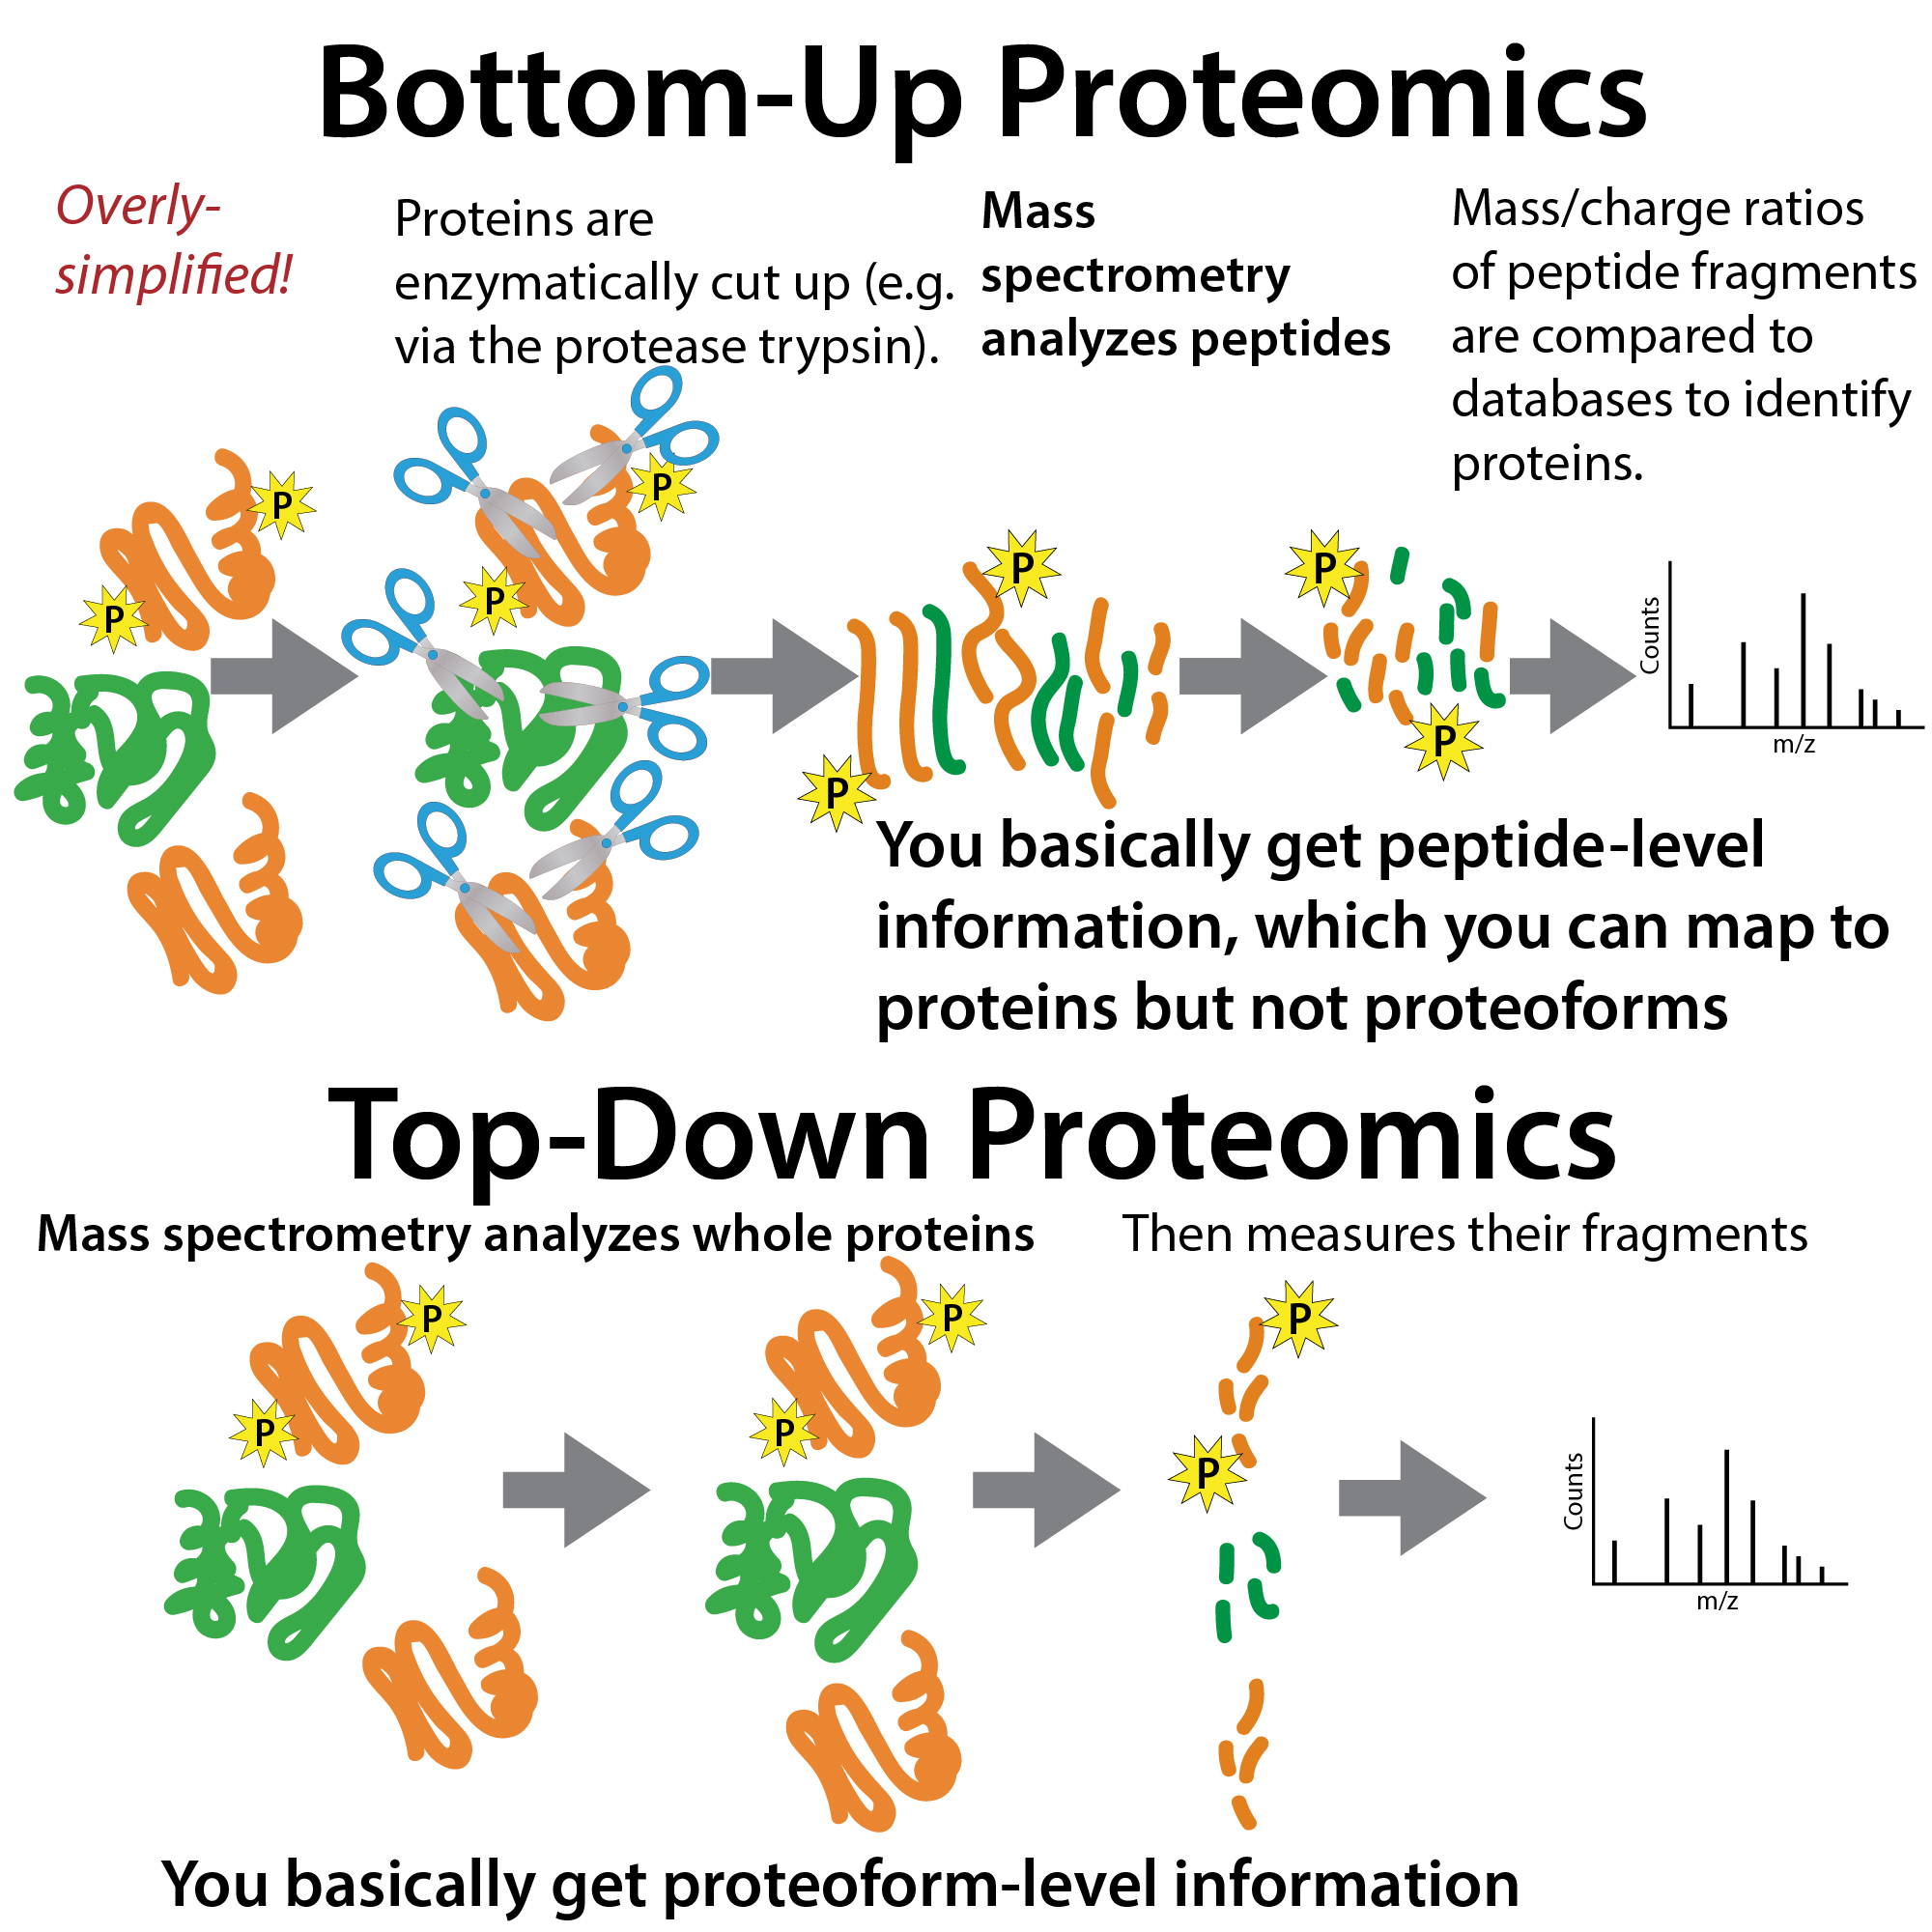
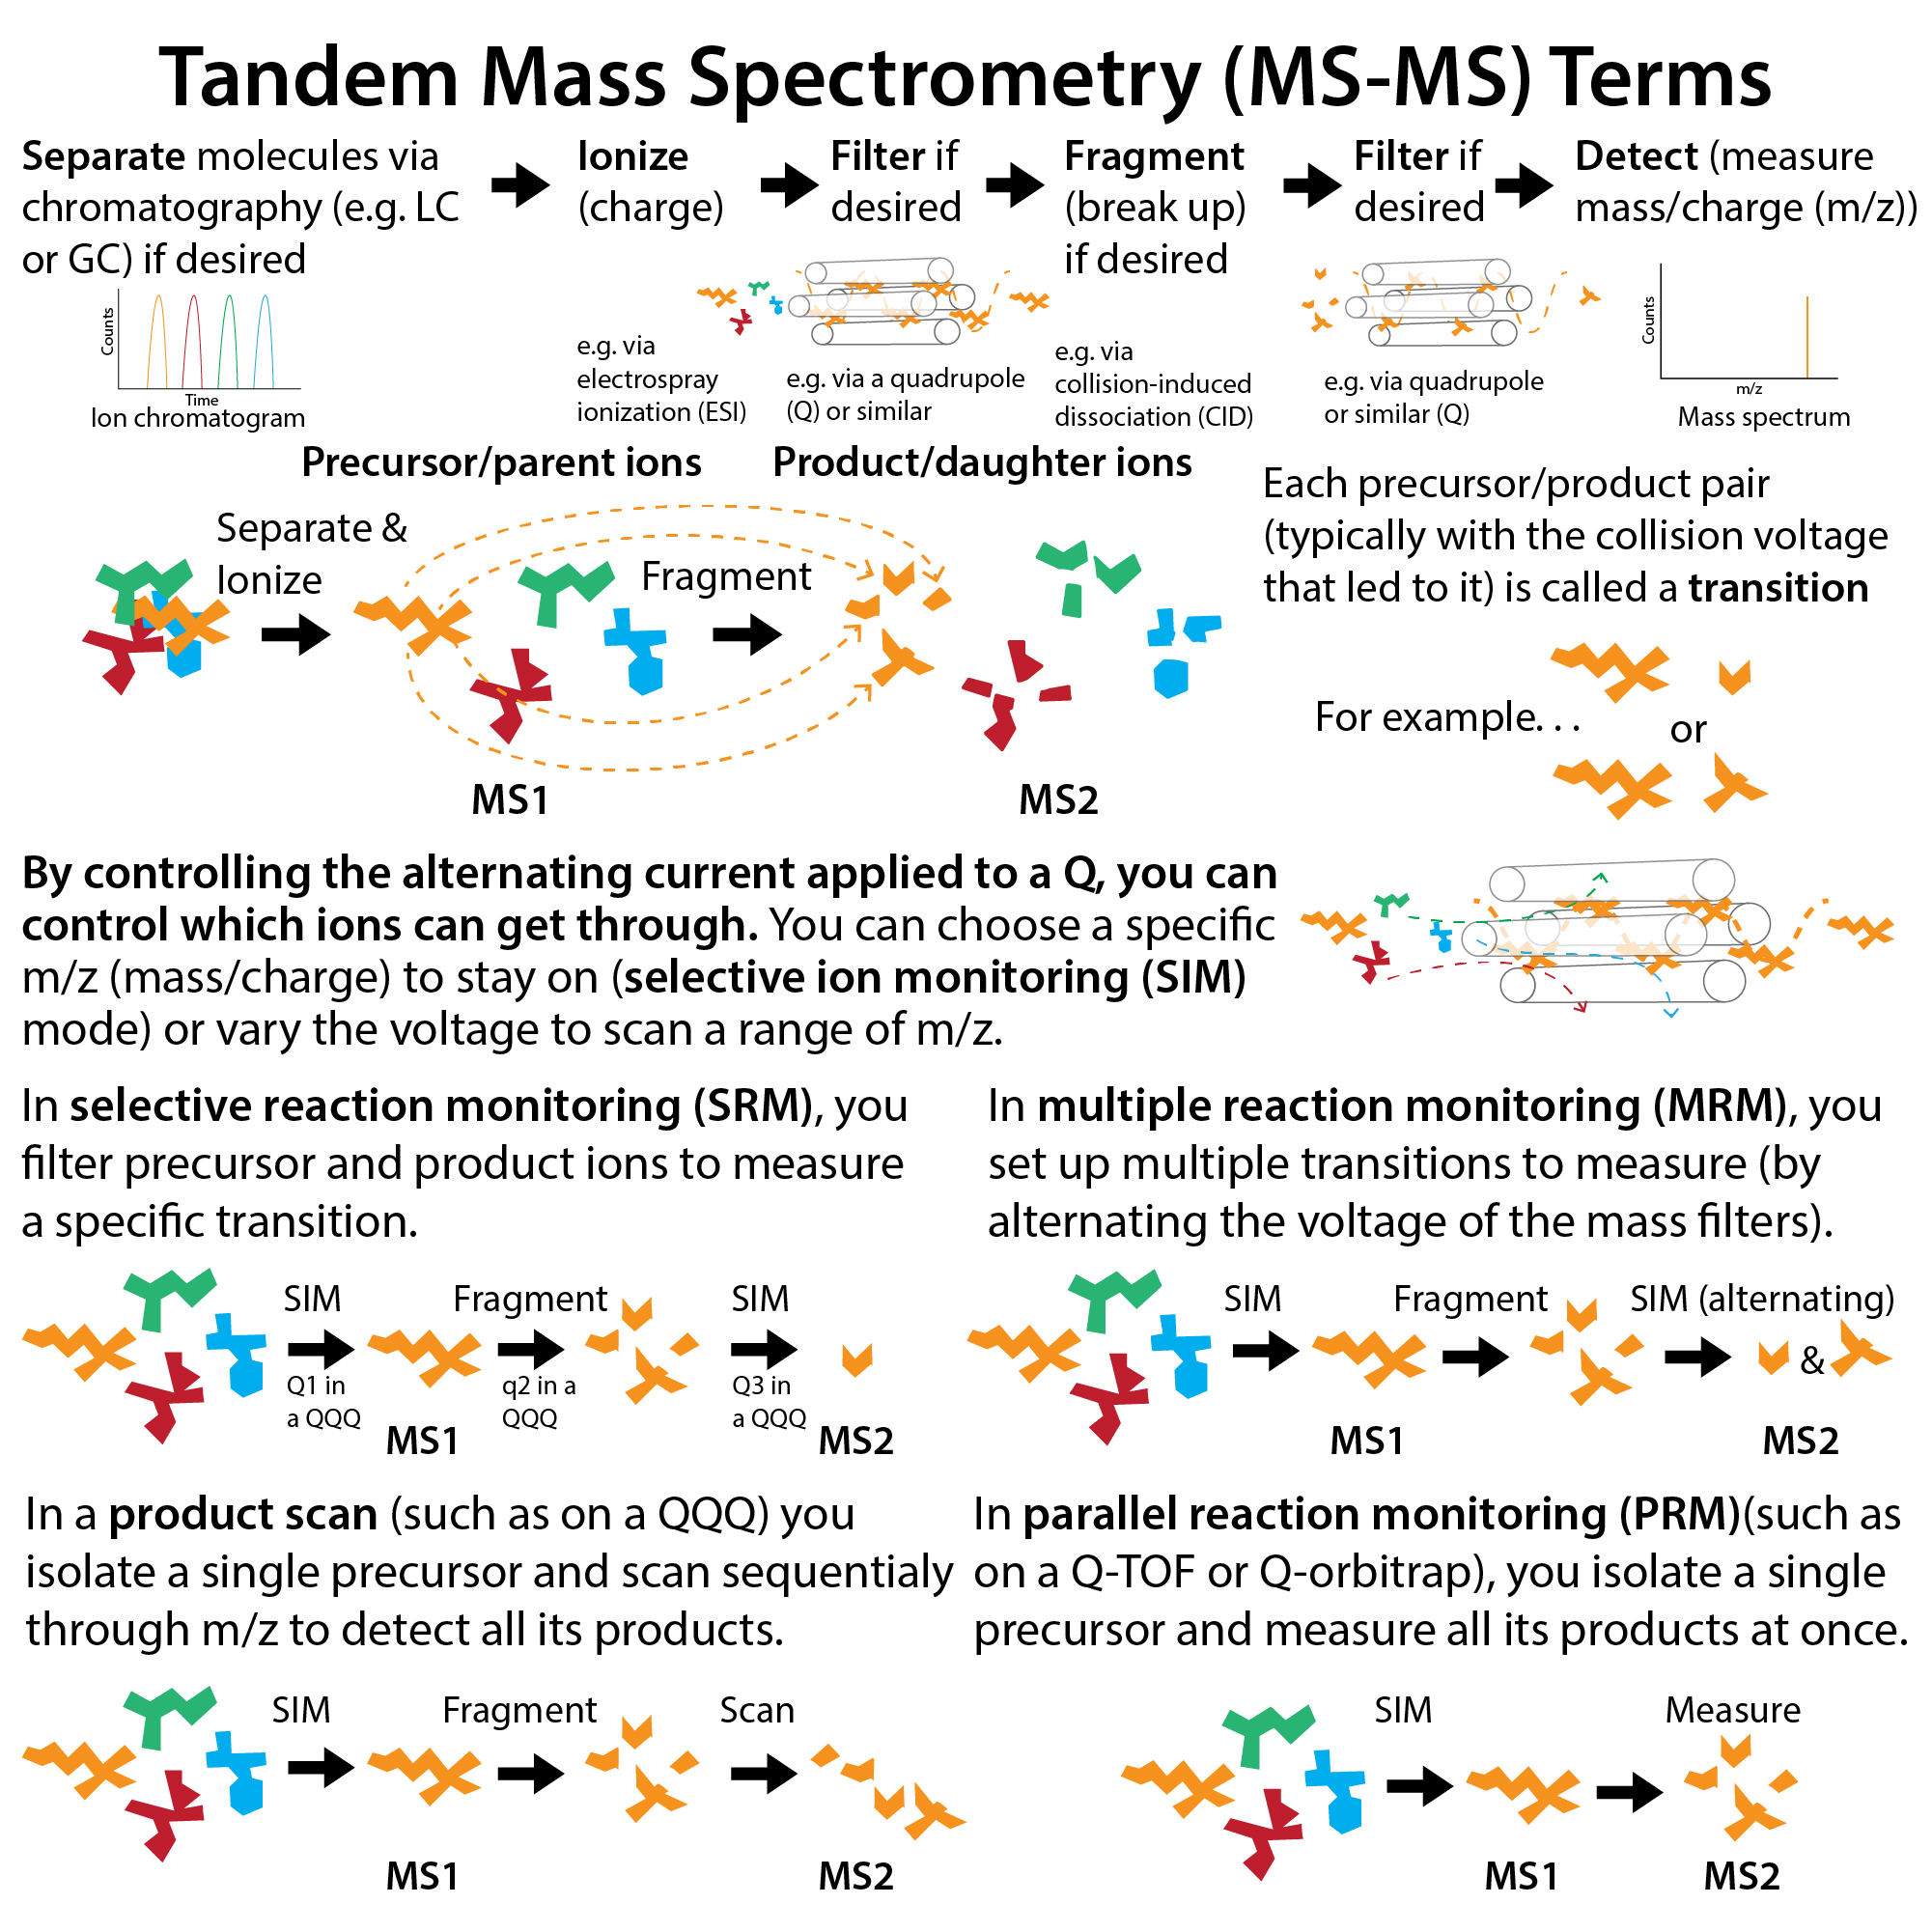
- Hydrogen deuterium-exchange mass spectrometry (HDX-MS)
- Binding affinities
- ITC (isothermal calorimetry)
- Measures binding based on changes in heat due to endothermic and exothermic binding interactions.
- SPR (Surface Plasmon Resonance) (e.g., Biacore)
- Measures binding to (lots of copies of) a molecule immobilized on a chip that liquid containing the binding partner is flowed over.
- BLI (Biolayer Interferometry)
- Measures binding to (lots of copies of) a molecule immobilized on the tip of a probe that is dipped into liquid containing the binding partner.
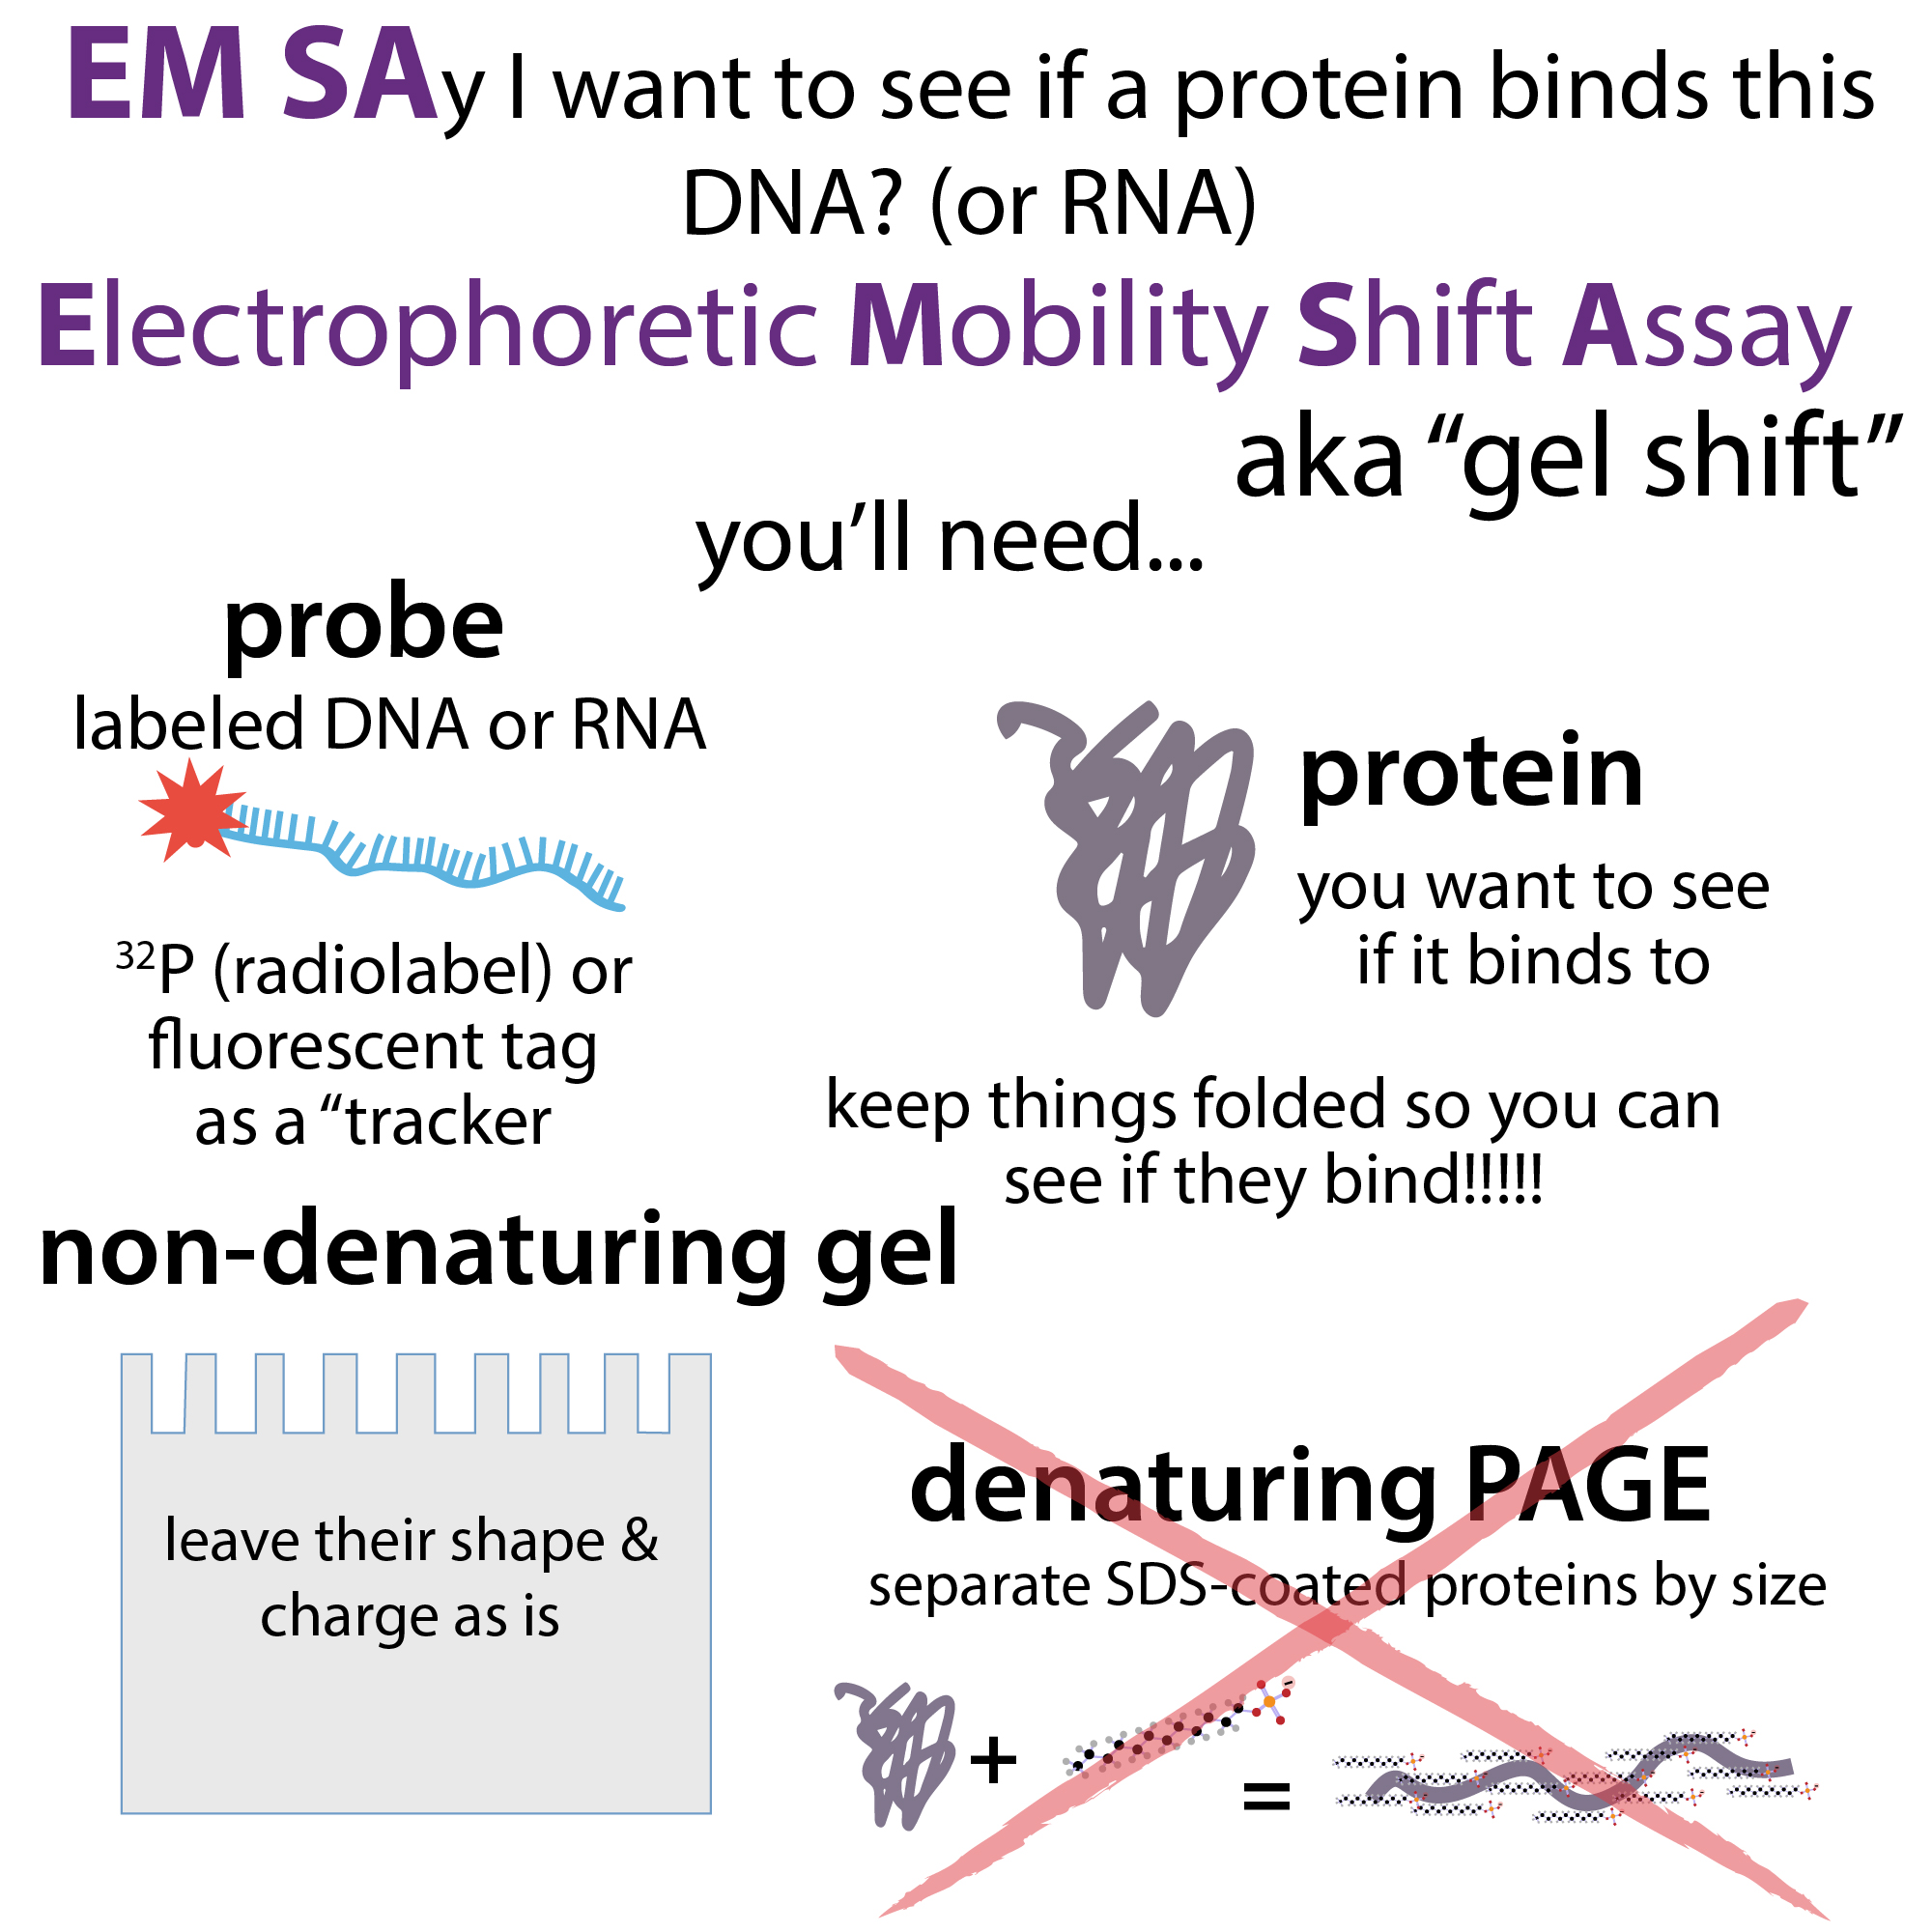
- EMSA (gel shift)
- Measures binding of molecules using non-denaturing gel electrophoresis – a complex of molecules is bigger than the molecules on their own, causing their bands to “shift” in the gel.
- Slot blots
- Measures binding to (lots of copies of) a molecule immobilized on a membrane. Can be used to measure protein-nucleic acid binding.
- Microscale thermophoresis (MST)
- Measures binding of fluorescently labeled (or intrinsically fluorescent) molecules free-floating in little capillary tubes.
- ITC (isothermal calorimetry)
- Post-translational modifications
Graphics