Want the greatness of glycerol without the gunk? Try preparing an 80% glycerol solution. It’s way easier to work with! Here’s a practical look at how you can do it. 


Fold up a paper towel to make a hot flask holder when preparing agarose gels. Just fold it up, wrap it around the neck of the flask, pinch it close to the glass and don’t burn yourself!


Today’s lab trick, the finger flick! I learned from a mentor in undergrad, that flicking the bottom of tubes to create a manual vortex is one of the best ways to mix things gently. Just flick, flick, flick, then (typically) pulse spin in a microfuge to draw that flicked liquid down to the bottom of the tube. Microfuges are great for that, but not great for mixing! So flick, invert, pipet up and down, etc. when you want to mix. And for really tough stuff, like resuspending cell pellets or breaking up a clumpy solid you’re trying to dissolve, go to the real vortex – but don’t use that for things you don’t want to “break”! (don’t use that real vortex for things like mixtures with enzymes, genomic DNA, definitely NOT competent cells).  For those things, a finger flick is fabulous! 


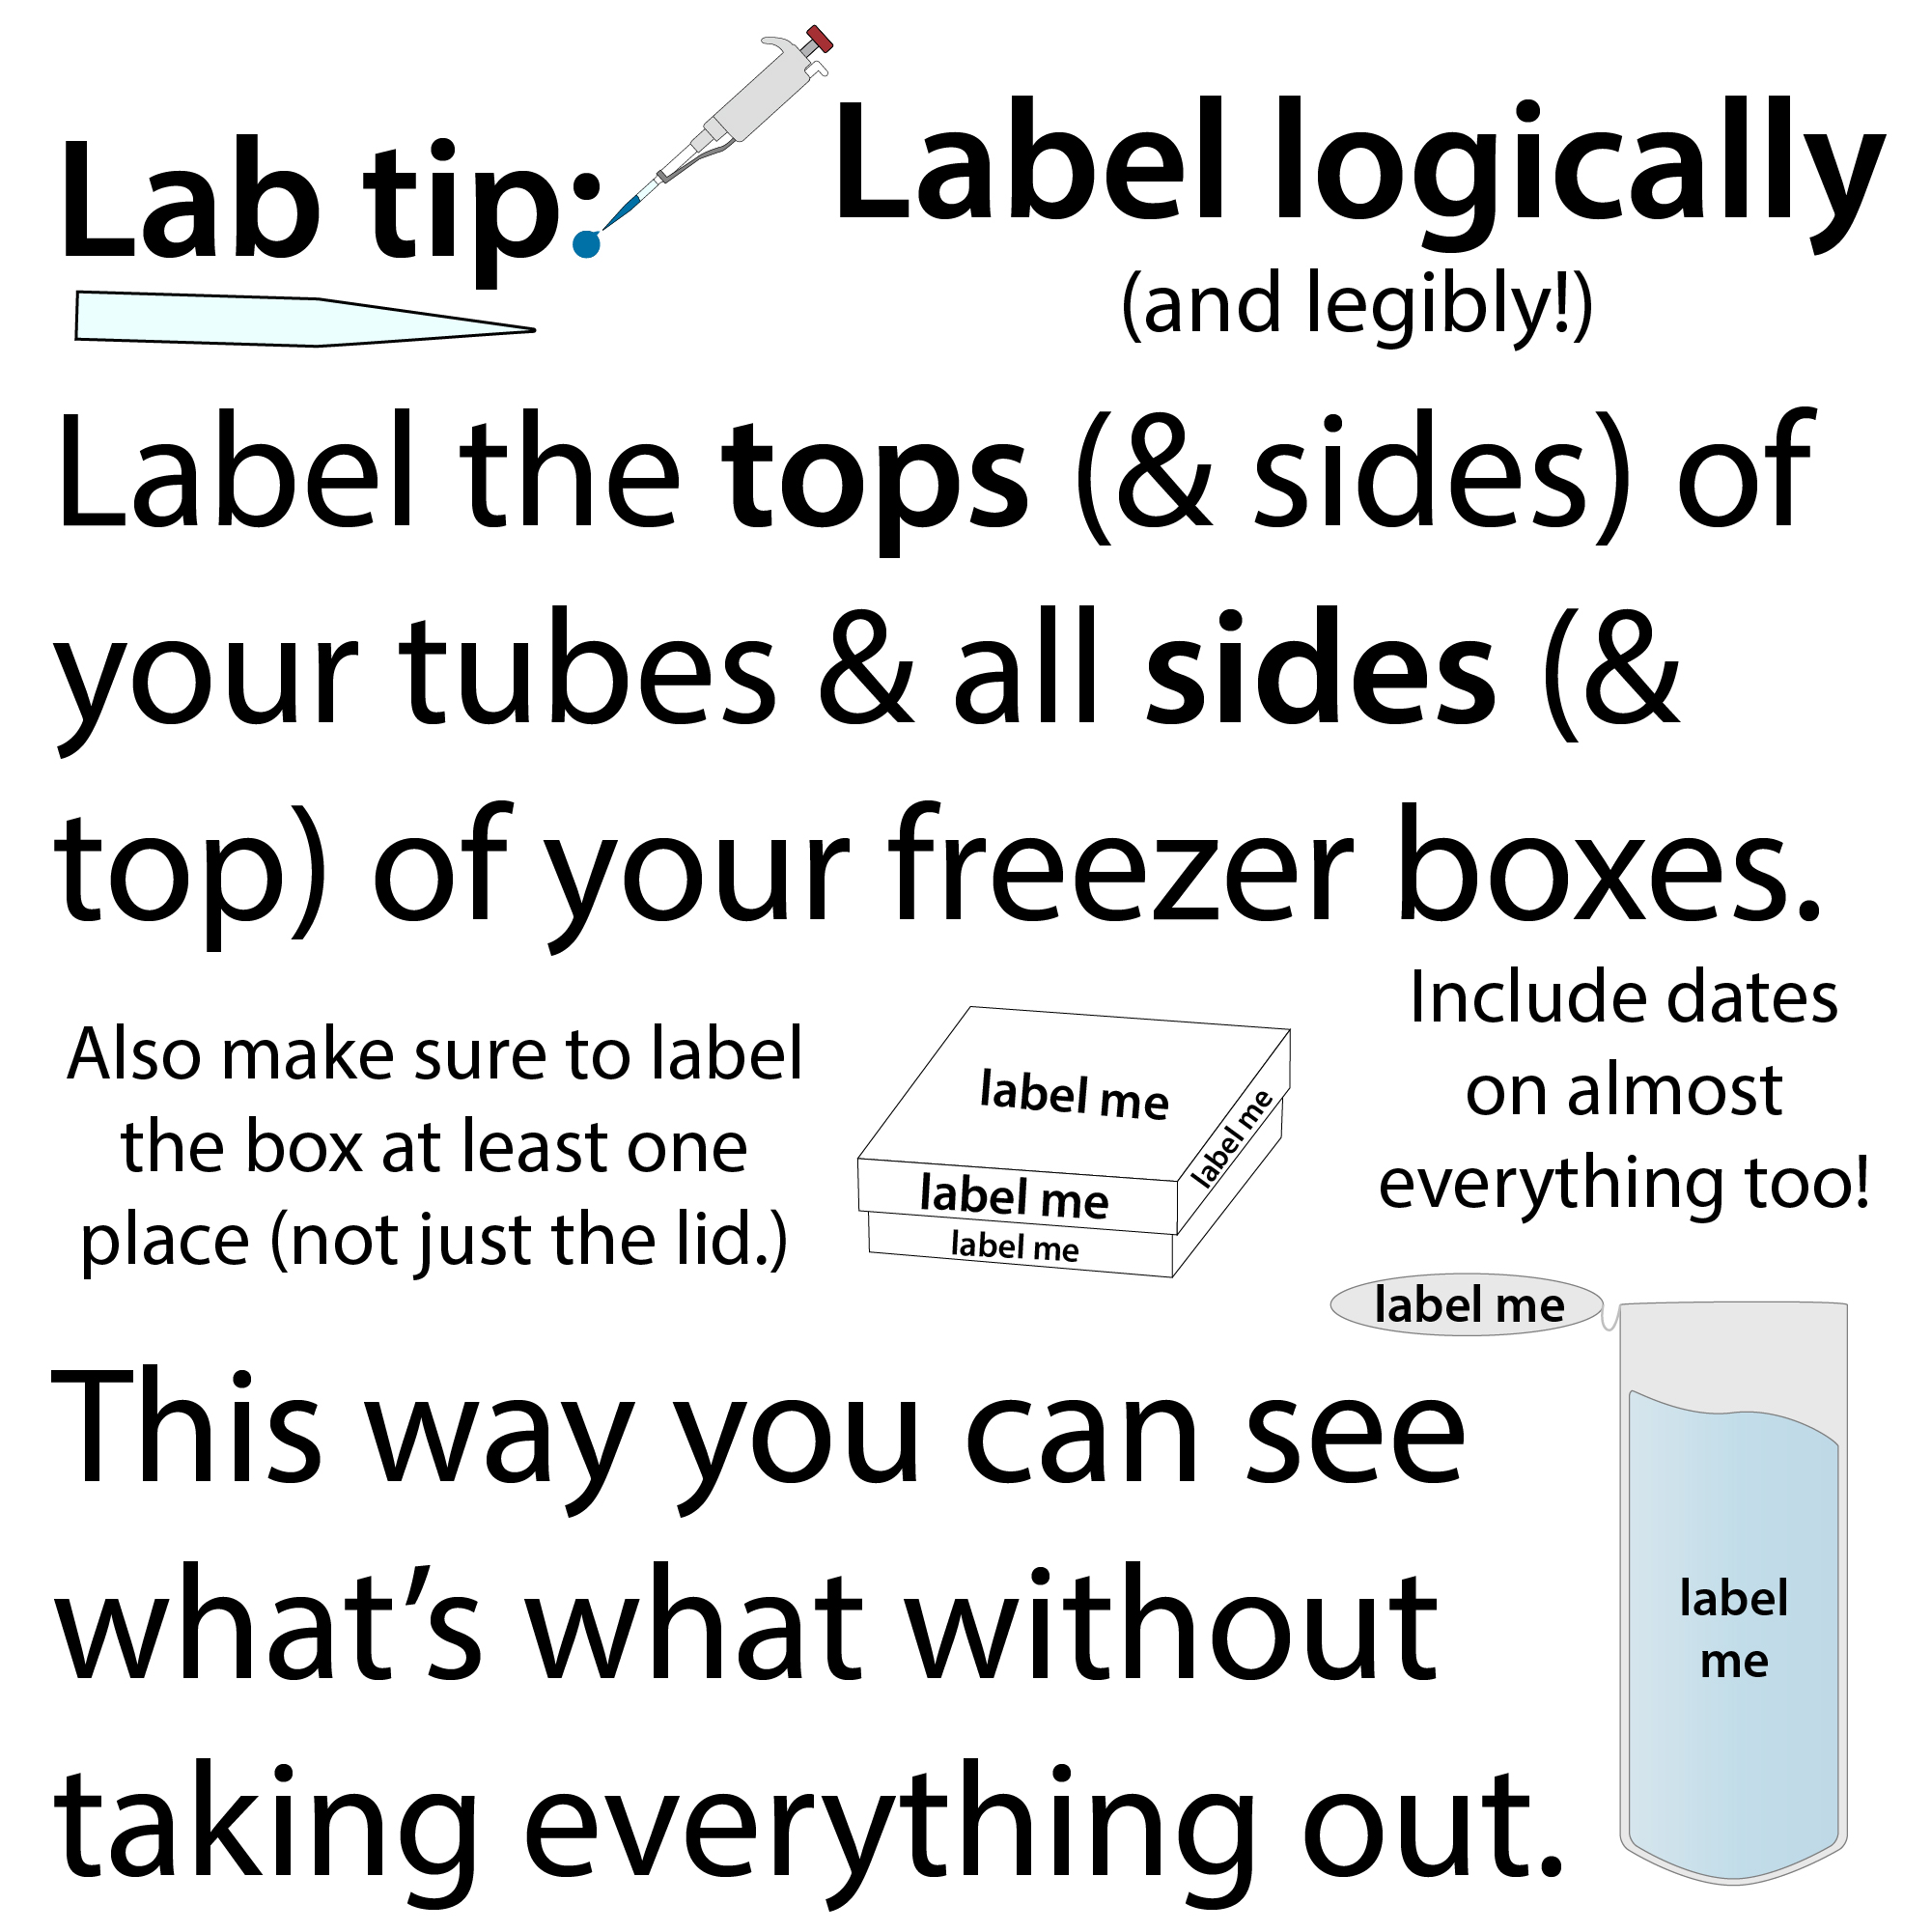
Lab labeling – do it! And do it well! So you don’t say “what’s this tube, I can’t tell…” 

Flash freeze fishing – and other tricks for snap freezing eppendorf tubes in liquid nitrogen. More on the science behind flash freezing here: http://bit.ly/flashfreezingdance


Tips for loading PAGE gels – the strategy that works for me. Practice makes perfect but when it comes to pipetting sample into a PAGE gel well, here are some tips that I hope will help you excel! 


Random tips for working with DNA/RNA spin columns

Be careful taking the column in and out so you don’t contaminate your sample and ruin what the whole column’s all about! 

More on how these columns work: http://bit.ly/spincolumns


PCR tube rack – quick lab hack! Tape together 2 empty micropipet tip racks and you’ve got yourself a PCR tube rack! Simple but does the trick! 


Some quick tips for when liquid jumps back & gets stuck in your tips! And how to prevent it from happening. Spoiler alert – keep your thumb down until all the liquid is out AND the pipet is out! (that’s what it’s all about!)


Random tips for choosing & using micropipettes. Just some more things I forgot to mentioned before, including:

  • for greatest accuracy, choose the smallest pipet that will pipet your volume
  • when pipetting small volumes, look to make sure you actually drew up & dispensed the liquid (it can be hard to see!)
  • open tubes before loading tip…
  • take tips in order to help you keep track


Core Facilities and Shared Research Resources. Not every lab has all the expertise or the equipment for every part of projects they want to do. And/or they don’t want to spend their limited time doing aspects of a project that don’t make the best use of the expertise they do have. Therefore, schools and research institutions often have core facilities for things like sequencing, mass spectrometry, imaging, antibody production, media making, etc. These cores provide physical services as well as consultations, often training, and sometimes access to equipment for you to use yourself. There are sometimes facilities with shared research resources like microscopes, incubators, qPCR machines, electrophoresis machines, etc. (ours is called the Center for Advanced Technology, CAT, and it’s really cool! You can also often (with permission of course!) use equipment in nearby labs and there are often listservs, Slack channels, and good ole word-of-mouth to help you find things you need (typically start by talking to trainees in the lab). So look into your options were you work. And remember, scientific sharing is caring! And people are often happy to try to help if they can. Another option can be formal collaborations with other labs who have expertise in an area. A really great thing about UCSF is it’s super duper collaborative, so labs are always working with one another. And I love it!


Clipboard managers are your friend! Random tip, but these are so useful but I didn’t discover them until grad school! Basically they automatically save things you copy and let you quickly recopy them. I use one called CopyClip (not a paid endorsement!) and it puts a little paperclip icon in my top computer bar where I can see the last 20 (you can set it for more or less) and I just have to click on them to re-copy them so I can paste them. This has saved me on so many occasions!  

Here’s a link to CopyClip https://apps.apple.com/us/app/copyclip-clipboard-history/id595191960?mt=12  

 And info about PC ones –https://zapier.com/blog/best-clipboard-managers/


Western blot blocking. In a western blot, it’s important that the places where the primary antibody is bound are only where your protein is. If you add the primary antibody without blocking, it’ll still bind your protein, but it’ll also bind all the exposed sticky surface. So you need to first coat the sticky surface with some “boring” protein. By “boring” I mean it won’t interact with any of the antibodies and/or interfere with any detection methods, etc. Basically, you want something that’s there just to de-stickify the membrane so that the whole membrane is coated in proteins – but be so unreactive that it’s like nothing’s there. A couple common options are BSA (Bovine Serum Albumin) and nonfat milk (really!) Milk’s cheap but can have clumping and cross-reactivity problems. You don’t want to use milk if you’re going to use a biotin-based detection system (because milk has biotin) and you also don’t want to use milk if you are probing for phosphorylation because milk has proteins like casein that are phosphorylated. 

Be it BSA or milk, we typically dissolve it in a solution containing a low concentration of a detergent. Most commonly, we use Tris Buffered Saline (TBS) with Tween 20 detergent (so TBST). My starting point is 1% nonfat milk in TBS w/0.1% Tween 20. Then if I have background or signal problems I can optimize as needed. Some helpful resources:

G-Biosciences: Western Blot Blocking: Tips and Tricks for Blocking Agents, Posted by The Protein Man on May 30, 2017 https://info.gbiosciences.com/blog/western-blot-blocking-tips-and-tricks-for-blocking-agents 

Thermo Fisher, Western blot tips, tricks and troubleshooting: https://www.thermofisher.com/ps/en/home/global/forms/life-science/western-tips-tricks-troubleshooting.html.html 


Filtering biochemical solutions. We filter solutions a lot in biochemistry – for sterilization (0.2μm (micron) ones for that) or just de-crudding stuff (often 0.45μm). To get the liquid to go through the membrane we can use syringes, vacuum, or centrifugation (but don’t confuse the spin filters with the spin concentrators (ultrafiltration devices). 

We choose filters based on what we’re trying to keep out, what we want to go through safely, and what our solvent is. When we’re dealing with protein solutions, we often use a treated PVDF or PES membrane, which have low protein binding. For small volumes we can use spin filters or syringe filters, and for larger volumes, bottle or tube-top vacuum filters. 

Here are some good guides to choosing  

How to Select a Syringe Filter and How to Use it? (2020 Guide), Aireka cells, https://airekacells.com/blog/syringe-filter 

 Syringe Filters for Aqueous Solutions, Tisch Scientific https://scientificfilters.com/syringe-filters-aqueous-solutions/ 

Corning filtration guide: https://www.corning.com/catalog/cls/documents/selection-guides/t_filterselectionguide.pdf 

and here’s the source for the particle size figure: https://commons.wikimedia.org/wiki/File:Airborne-particulate-size-chart.svg Jisaac9, Mieszko the first, CC BY-SA 3.0 https://creativecommons.org/licenses/by-sa/3.0 , via Wikimedia Commons 


Prepping lots of gel samples.

Random (for least you a) lab tip(s) for preparing lots of SDS-PAGE samples

  • instead of preparing them in individual tubes, use PCR strip tubes or PCR plates
  • instead of adding loading buffer to each sample individually, pipette excess into a PCR strip or plate row, then use a multichannel to load into the wells (either before adding sample, or after sample (then you can mix multi as well))
  • if you’re running multiple gels in the same box, label the gel cassettes (at the top of the plates, I suggest writing the name multiple times in case it washes/rubs off)
  • if you’re running multiple gels, load all the ladders first and it will help you find the other wells (and is helpful because you often load a lower volume of ladder and then you don’t have to keep changing the pipet setting)
  • if you’re running 4 gels in a tetra box, make sure that you see bubbles from each module – sometimes the connection can be bad and you need to fiddle around to make sure all the metals are making contact to the power supply

more on SDS-PAGE: http://bit.ly/sdspageruler 

more on working with lots of samples: http://bit.ly/mastermixesmultichannels 


Parafilm! Parafilm is like a heavy-duty, super-stretchy, water-repelling, saran wrap. We use it in the lab for lots of things including:

  • wrapping petri dishes
  • preparing agarose gel samples
  • covering beakers to prevent evaporation
  • covering graduated cylinders to mix solutions by inverting
  • sealing bottles of hygroscopic (water-absorbing) solutions

It’s super duper duper awesome. Just take a small piece, hold one end down and gently stretch around the thing and stick it back on itself. Voila! You’ve got a seal! See the appeal?


Biochemistry involves a lot of balancing – and not just schedules! So here is some hard-won advice for preparing centrifuge tubes efficiently, such as when you ask cells to make a protein for you, then lyse the cells (break them open) to rescue that protein but need to pellet out the membrane gunk). 

  • start with eyeball guessing it, pouring roughly equal amounts into the tubes
  • no matter how many tubes you have, work pairwise
  • weigh each in a pair – placing the tube in something stable, in the center of the balance
  • zero the scale with the heavier of the pair
  • add leftover sample (the tiny bit still in the tube after you poured your sample in) dropwise until it’s zeroed 
  • always make sure you’re including the caps when weighing – and use the same make of tubes & caps for both samples to make your life easier with the estimations
  • always make sure you’re wiping off any ice before weighing (and before placing in rotor) (and check the rotor buckets before and after the run to make sure they’re dry)
  • if you have an odd number of samples, do all the pairs first (using some from this last tube to get the others to balance if you need to), then cap and zero this oddball and make a water blank for it (start with eyeballing it, then add dropwise such as from a squirt bottle)
  • make sure you keep track of which tubes are paired with which so you don’t have to re-weigh them!

Save (with) the date –  practical advice for good lab labeling/file-naming/organizing, etc. habits

link to video in case embed isn’t working: https://youtu.be/vFg3tO5C4dQ 

One of the most important pieces of advice I can state is always, always, save (with) the date! 

  • include the date in file names
    • (and don’t include spaces in your file names, instead_use_underscores)
  • write the date on tubes, etc.
    • sample tubes, stock solutions, enzyme tubes, antibodies, etc.

And keep good lab notes you can cross-reference to!

P.S. be wary of the year written in January…


Make sure your gel runs well! Tips for setting up, loading, & running PAGE gels (from someone who does it a LOT)

link to video in case embed isn’t working: https://youtu.be/FGYI8siXwRQ


Preventing leaks in SDS-PAGE (emphasis on setting up Biorad Tetra Cell cassette modules)

Key points:

  • You will need a gel cassette or a buffer dam for both sides of the electrode assembly in order to create an inner buffer chamber.
  • Ensure the short sides are facing the gasket
  • Strategically place your gel(s) so your gel (not just a dam) or your hardest-to-load gel is closest to the outside for easy loading (remembering which way the assembly will need to be in order for the lid to go on red to red
  • Go in with each cassette or buffer dam at an angle, then push back and up
  • Ensure the top of the short sides are flush against the bottom ledge of the rubber gasket line
  • Hold tightly when flipping to place the other side
  • Check that you haven’t disrupted the first side
  • Keep holding tightly until all is clamped
  • Maintain pressure back and up, but not so strong that you push it above the rubber ledge
  • After placing the assembly in the box, pour a small amount of 1X running buffer into the inner chamber and check to ensure the liquid level doesn’t go down. If it does, you need to reassemble your assembly (but at least you know before there’s sample in there!). If no leaks, fill ‘er up!

Note: this is not an endorsement of bio-rad or a video from them or anything, just a very very very frequent user. (And I will say they give great educational discounts!)


PAGE tip – use a gel loading tip to straighten well walls before loading your samples.

This will help your lanes run unwarped and ensure you are able to get your tip in the well without disrupting the neighboring ones and/or having your sample jump out.


Lab hack for cracking open pre-cast PAGE gel cassettes 


Psst – can I let you in on a secret? You don’t need one of the official Biorad gel cracker things to open their pre-cast gels. In fact, I think the curved part of a metal lab spatula works even better!


Tips for releasing handcast PAGE gels


With handcast SDS-PAGE gels, the comb comes out easier, but the gel can be harder to remove, thanks to suction. What I recommend….

  1. Take a plastic gel wedge and wedge it into a well, where there’s a gap so you don’t have to worry about chewing up the wedge or the glass
  2. Press gently, using the wedge as a lever to pry apart the plates
  3. See which plate the gel is adhering to (ideally the short plate, and try to coax it that way
  4. Flip the glass plate gently over into a gel box filled with DI water
  5. Gently use your (gloved) fingers to nudge the gel off


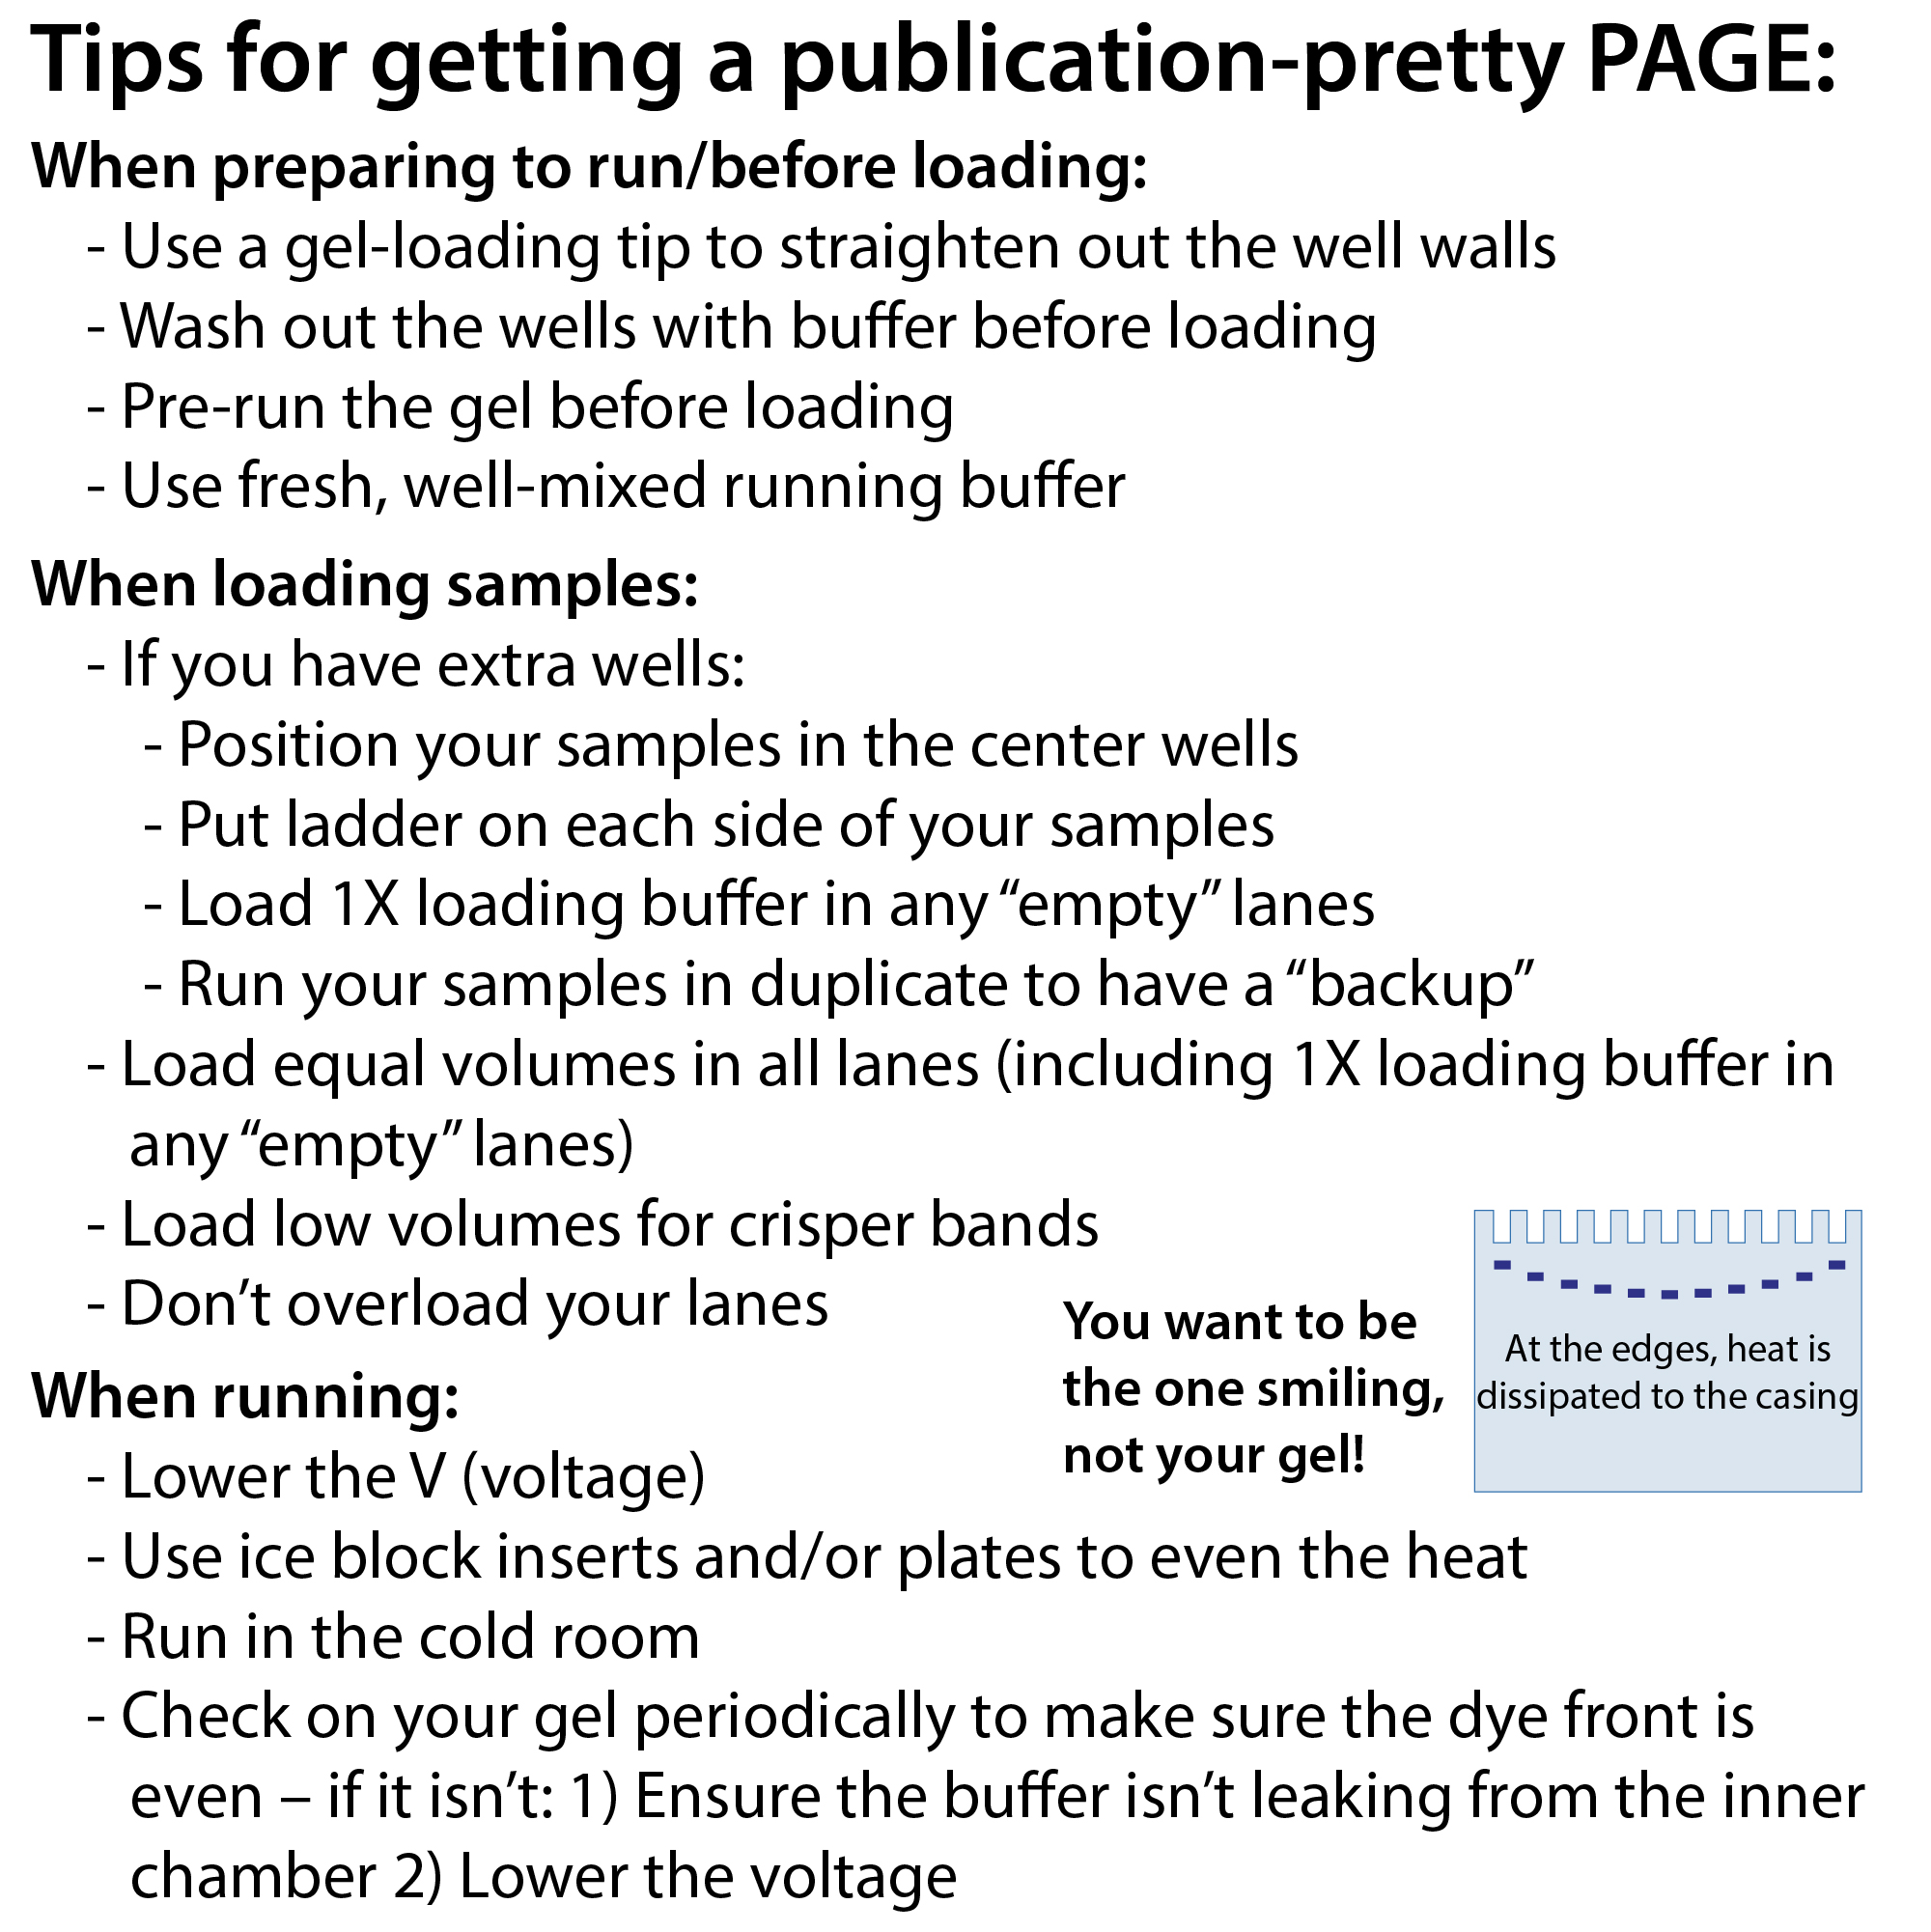
Tips for getting a publication-pretty PAGE (SDS-PAGE, urea-PAGE, etc.):

  • When preparing to run/before loading:
  • Use a gel-loading tip to straighten out the well walls
  • Wash out the wells with buffer before loading
  • Pre-run the gel before loading
  • Use fresh running buffer
  • Ensure your running buffer is well-mixed
  • When loading samples:
  • If you have extra wells:
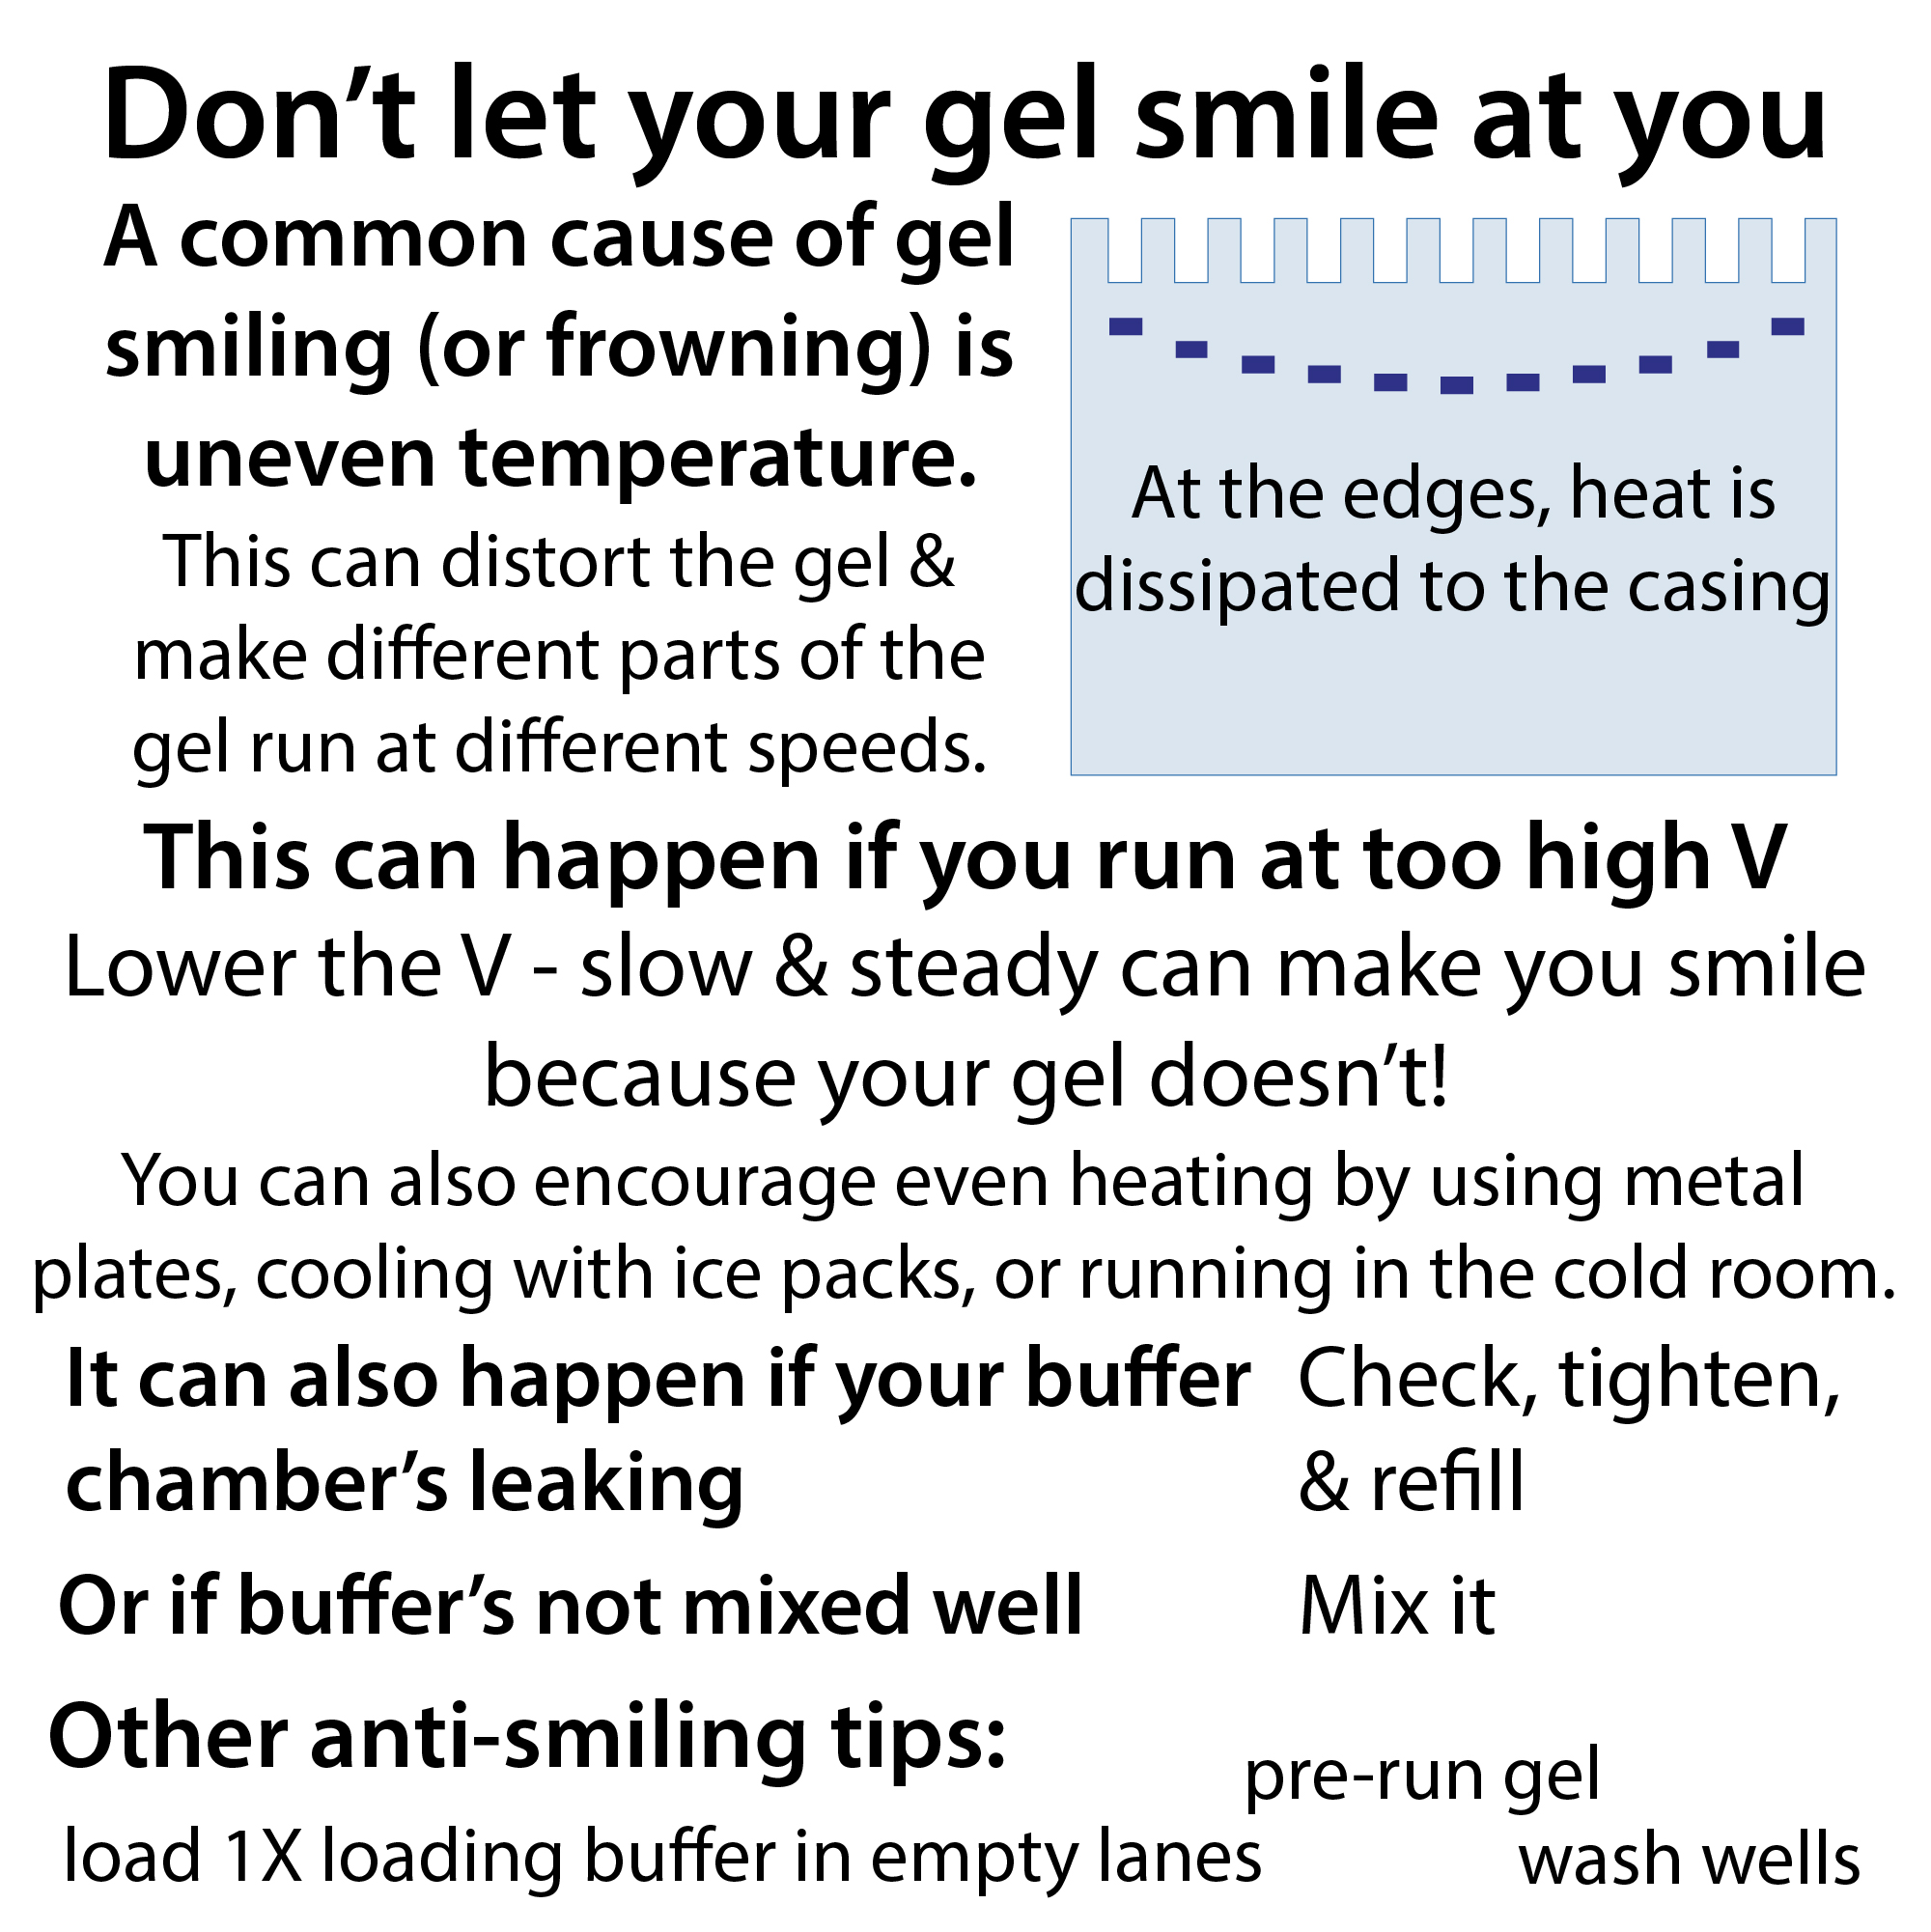
  • Position your samples in the center wells, where they’ll be less affected by smiling (outer lanes running slower than the middle ones) and less likely to get ripped
  • Put ladder on both sides of your samples
  • Load 1X loading buffer in any “empty” lanes
  • Run your samples in duplicate to have a “backup” to choose the nicer-loaded one
  • Load equal volumes in all lanes (including 1X loading buffer in any “empty” lanes) to promote even running
  • Load low volumes for crisper bands
  • Don’t overload your lanes, as it will both look bad itself & warp nearby lanes
  • For proteins, limit to ~2-3 µg of a pure protein or 10-20 µg of total protein in a mixture like a lysate (load less if running a western blot, which is more sensitive in its detection)
  • Work quickly so things don’t diffuse
  • When running:
  • Lower the V
  • Helps even the heat in the gel to prevent smiling and other warping
  • Helps make bands crisper
  • Use ice block inserts and/or plates to even the heat
  • Run in the cold room

  • Check on your gel periodically to make sure the dye front is even – if it isn’t: 1) Ensure the buffer isn’t leaking from the inner chamber 2) Lower the voltage

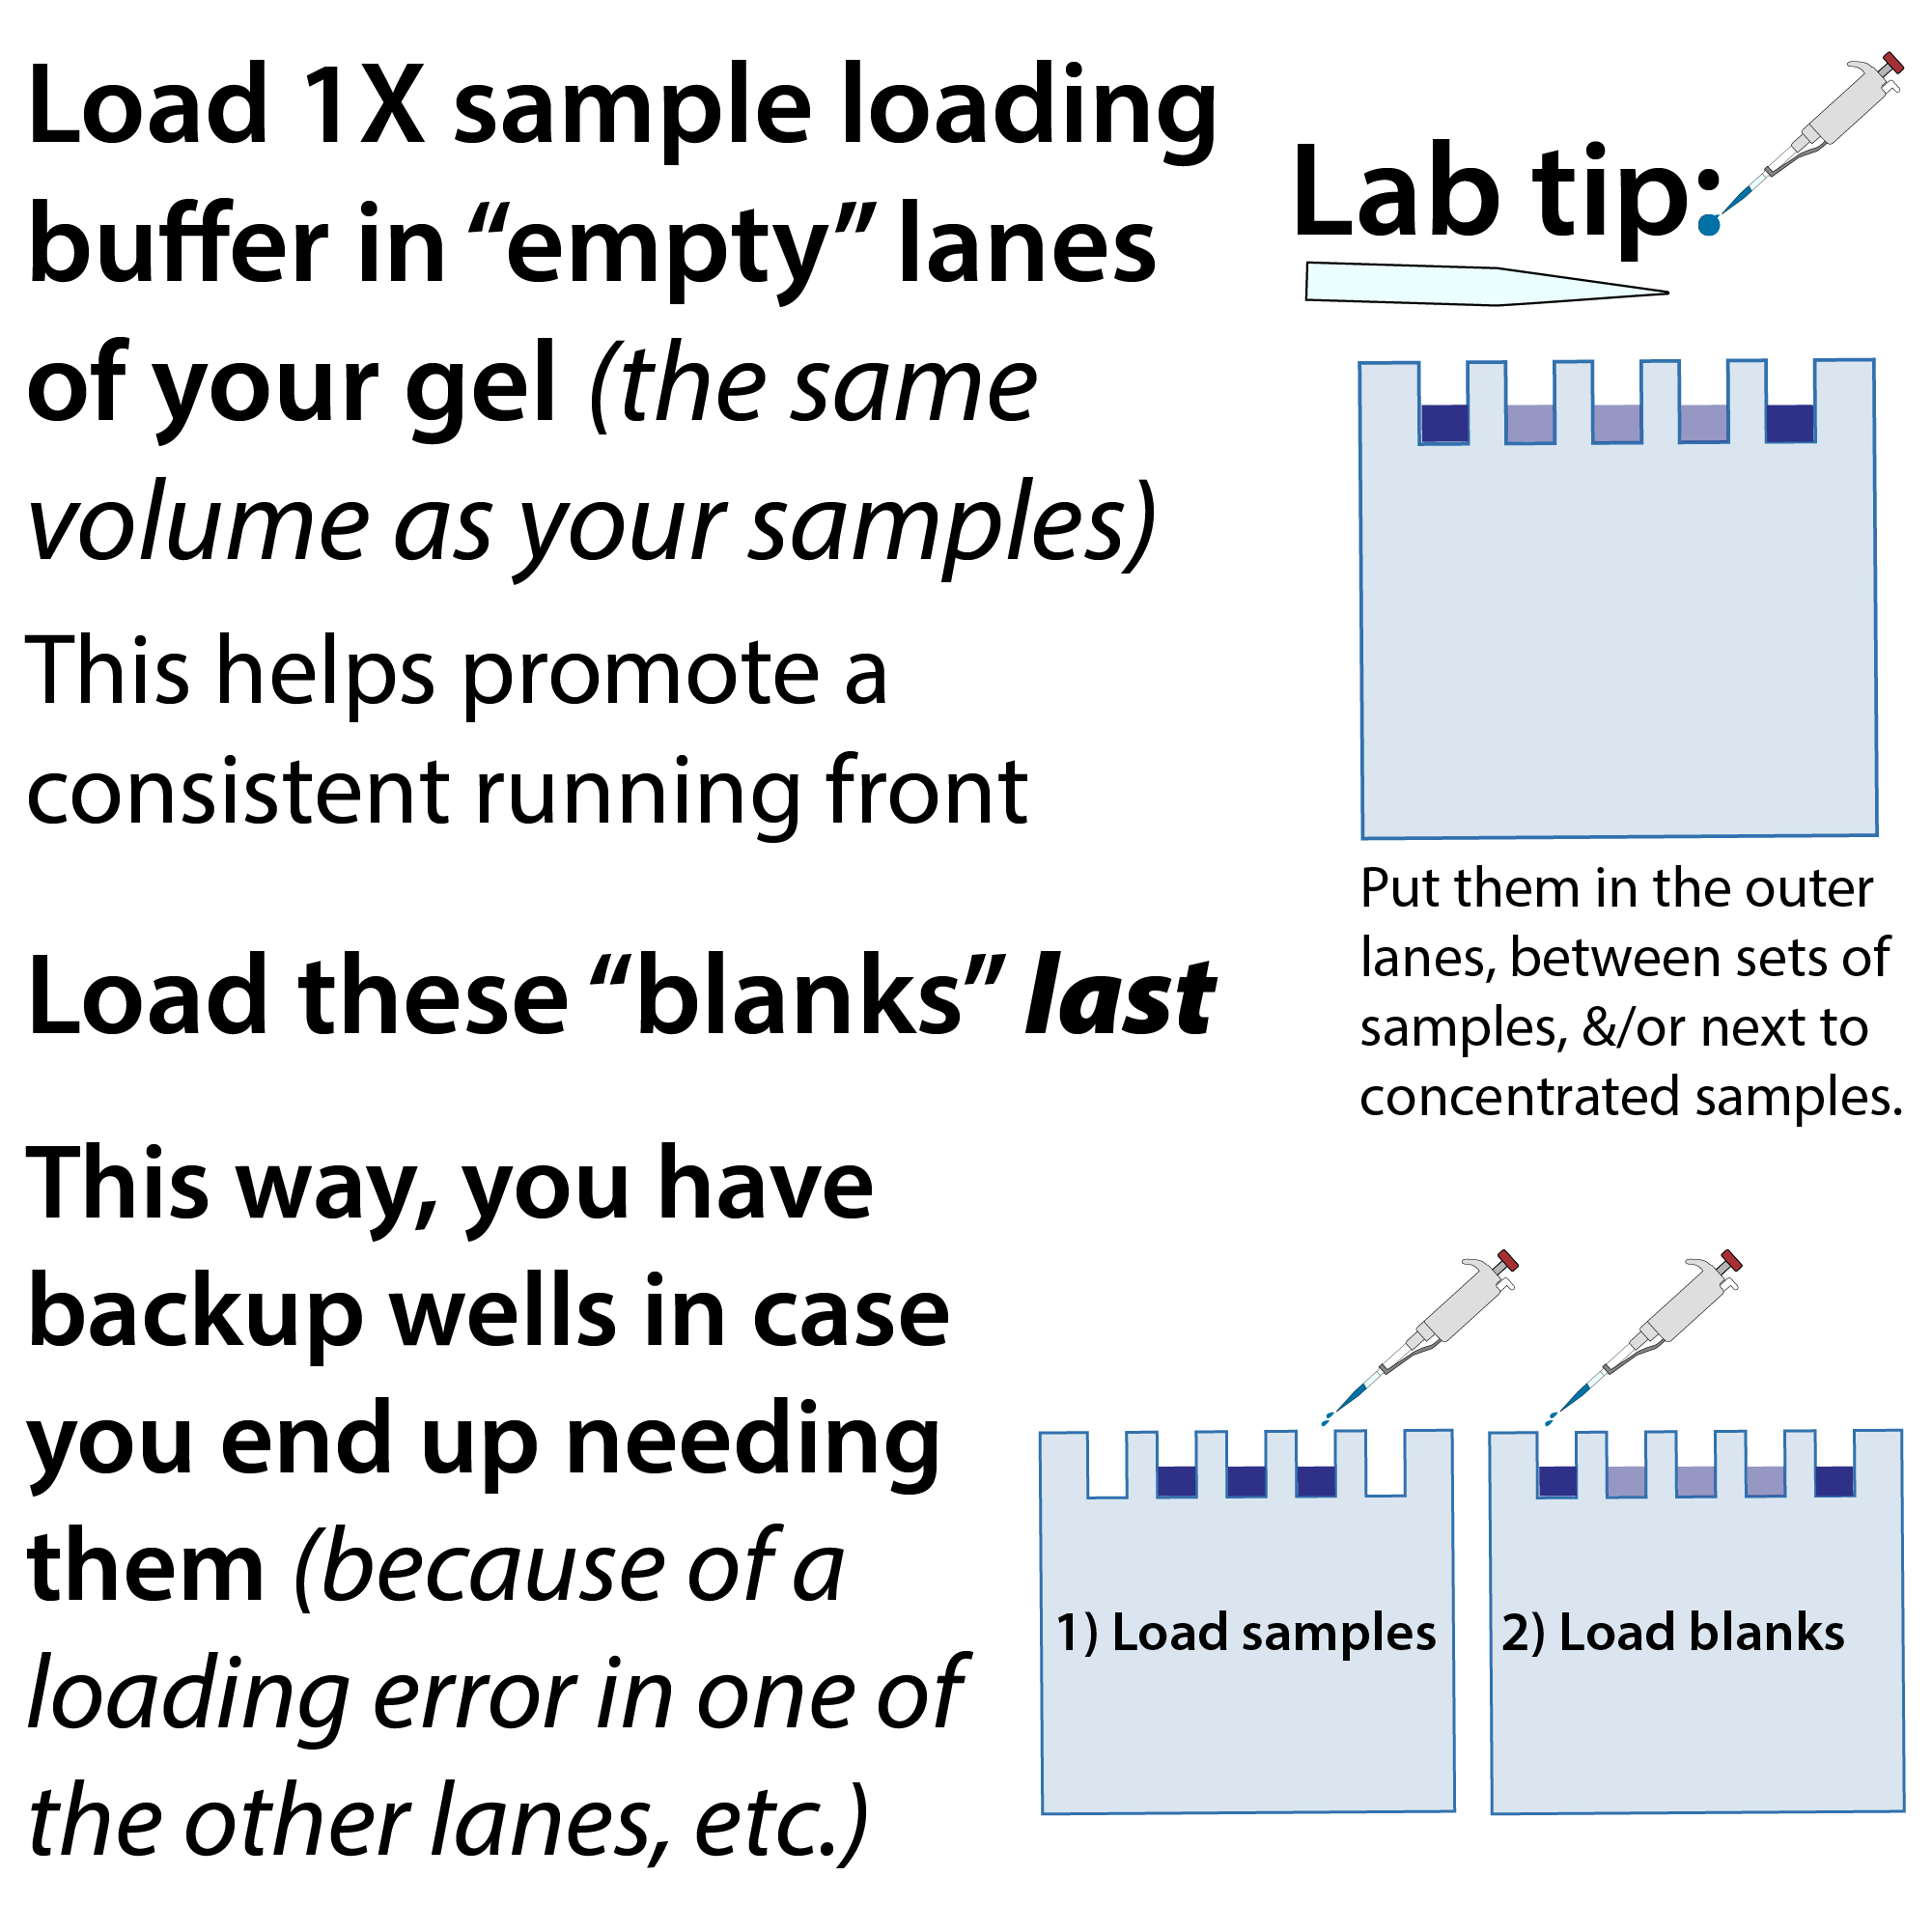
Load 1X sample loading buffer in “empty” lanes – but load them last, and strategically

Especially if you load the same volume as your samples, doing this will help promote a consistent running front (avoiding artifacts like smiling, where the middle lanes run faster than the outer lanes, giving your bands an evil grin . . .) 

You want to be strategic about where you put them – I like to put them in the edge lanes, between sets of samples, &/or next to highly-concentrated and/or viscous samples, which have a tendency to warp the neighboring lanes.

I recommend loading these “blanks” last – just in case . . . This way, you have backup wells in case you end up needing them (because of a loading error in one of the other lanes, etc.)

Note: 1X indicates that it’s at the working concentration. So for example, you might have a 4X sample loading buffer that you normally mix one volume of that with 3 volumes of sample (e.g., if you wanted to prepare 20 µL worth, you’d mix 20/4 = 5 µL loading buffer + 15 µL protein solution). For the blanks, in this case, you’d mix the loading buffer with water (or a buffer) instead of protein solution. 

Random practical lab tip – if you have a lot of SDS-PAGE samples to run, prepare them in a PCR strip! (Or PCR plate).

link to video in case embed isn’t working: https://youtu.be/8niN_DLXfTE 

This way you can use a multichannel pipet to get it set up, your samples stay together (unlike a bunch of eppendorfs), and you can just stick it in a PCR machine (thermal cycler) to boil (just set it to incubate at 95C for 5 minutes-ish). If you don’t want to run your gel right away, just stick your prepared samples in the -20 until you are (better to store them prepared in the SDS buffer than just as is – this will help protect them from proteases, which will get unfolded by the SDS). 

This is especially handy when you’re going straight from a fraction collector block (like maybe you want to check the fractions from a protein purification) or a PCR strip of some sort of reaction or something. Just use the multichannel to transfer directly in and mix!

Even if you can’t use a multichannel for that mixing, you can still (assuming you have one) use it for sticking your sample loading buffer into all the tubes/wells. Do this first (before sample) so you can use the same tips multiple times and so you’re mixing when you add the larger volume – you’ll get better mixing this way. When using a multichannel, make sure that all the tips suck up the same amount (and squirt it all back out!)

Be careful when pipetting SDS because it sure is SuDSy! Pipet slowly and make sure to keep your thumb pressed down when you pull the pipet out. Also make sure to just stick the tip right  under the surface so you don’t get excess buffer stuck on the sides of the tips. 


Practical lab tips for working with protease inhibitor tablets…

link to video in case embed isn’t working: https://youtu.be/dvy3DVXuegw

  • grind them up first to make it easier to dissolve (I like folding a weigh paper in half, sticking a table in the middle, fold it back in half, then using the spatula to gently grind it up, then pour it into the liquid)
  • if you don’t need a whole tablets-worth, make a concentrated stock solution (e.g. dissolve a 50-ml-worth tablet in 2ml of water or 100 mM phosphate buffer, pH 7.0 for 25X) and store aliquots at -20°C for up to 6 months or in the fridge for 1-2 weeks
  • always add to your buffers right before you’re ready to use them (for example, if you’re preparing buffers the day before a purification, make the rest of the buffer but hold off on adding the inhibitor)
  • if you’re doing something with metal-dependent protein(s) or planning to do a metal affinity chromatography step (e.g. NiNTA for a His-tag purification), make sure to use an EDTA-free one. EDTA is a chelator (metal-biter) so it will steal metals from your proteins (and those of metal-dependent proteases, which is one reason it’s sometimes added) and it will strip the metal off of your column.

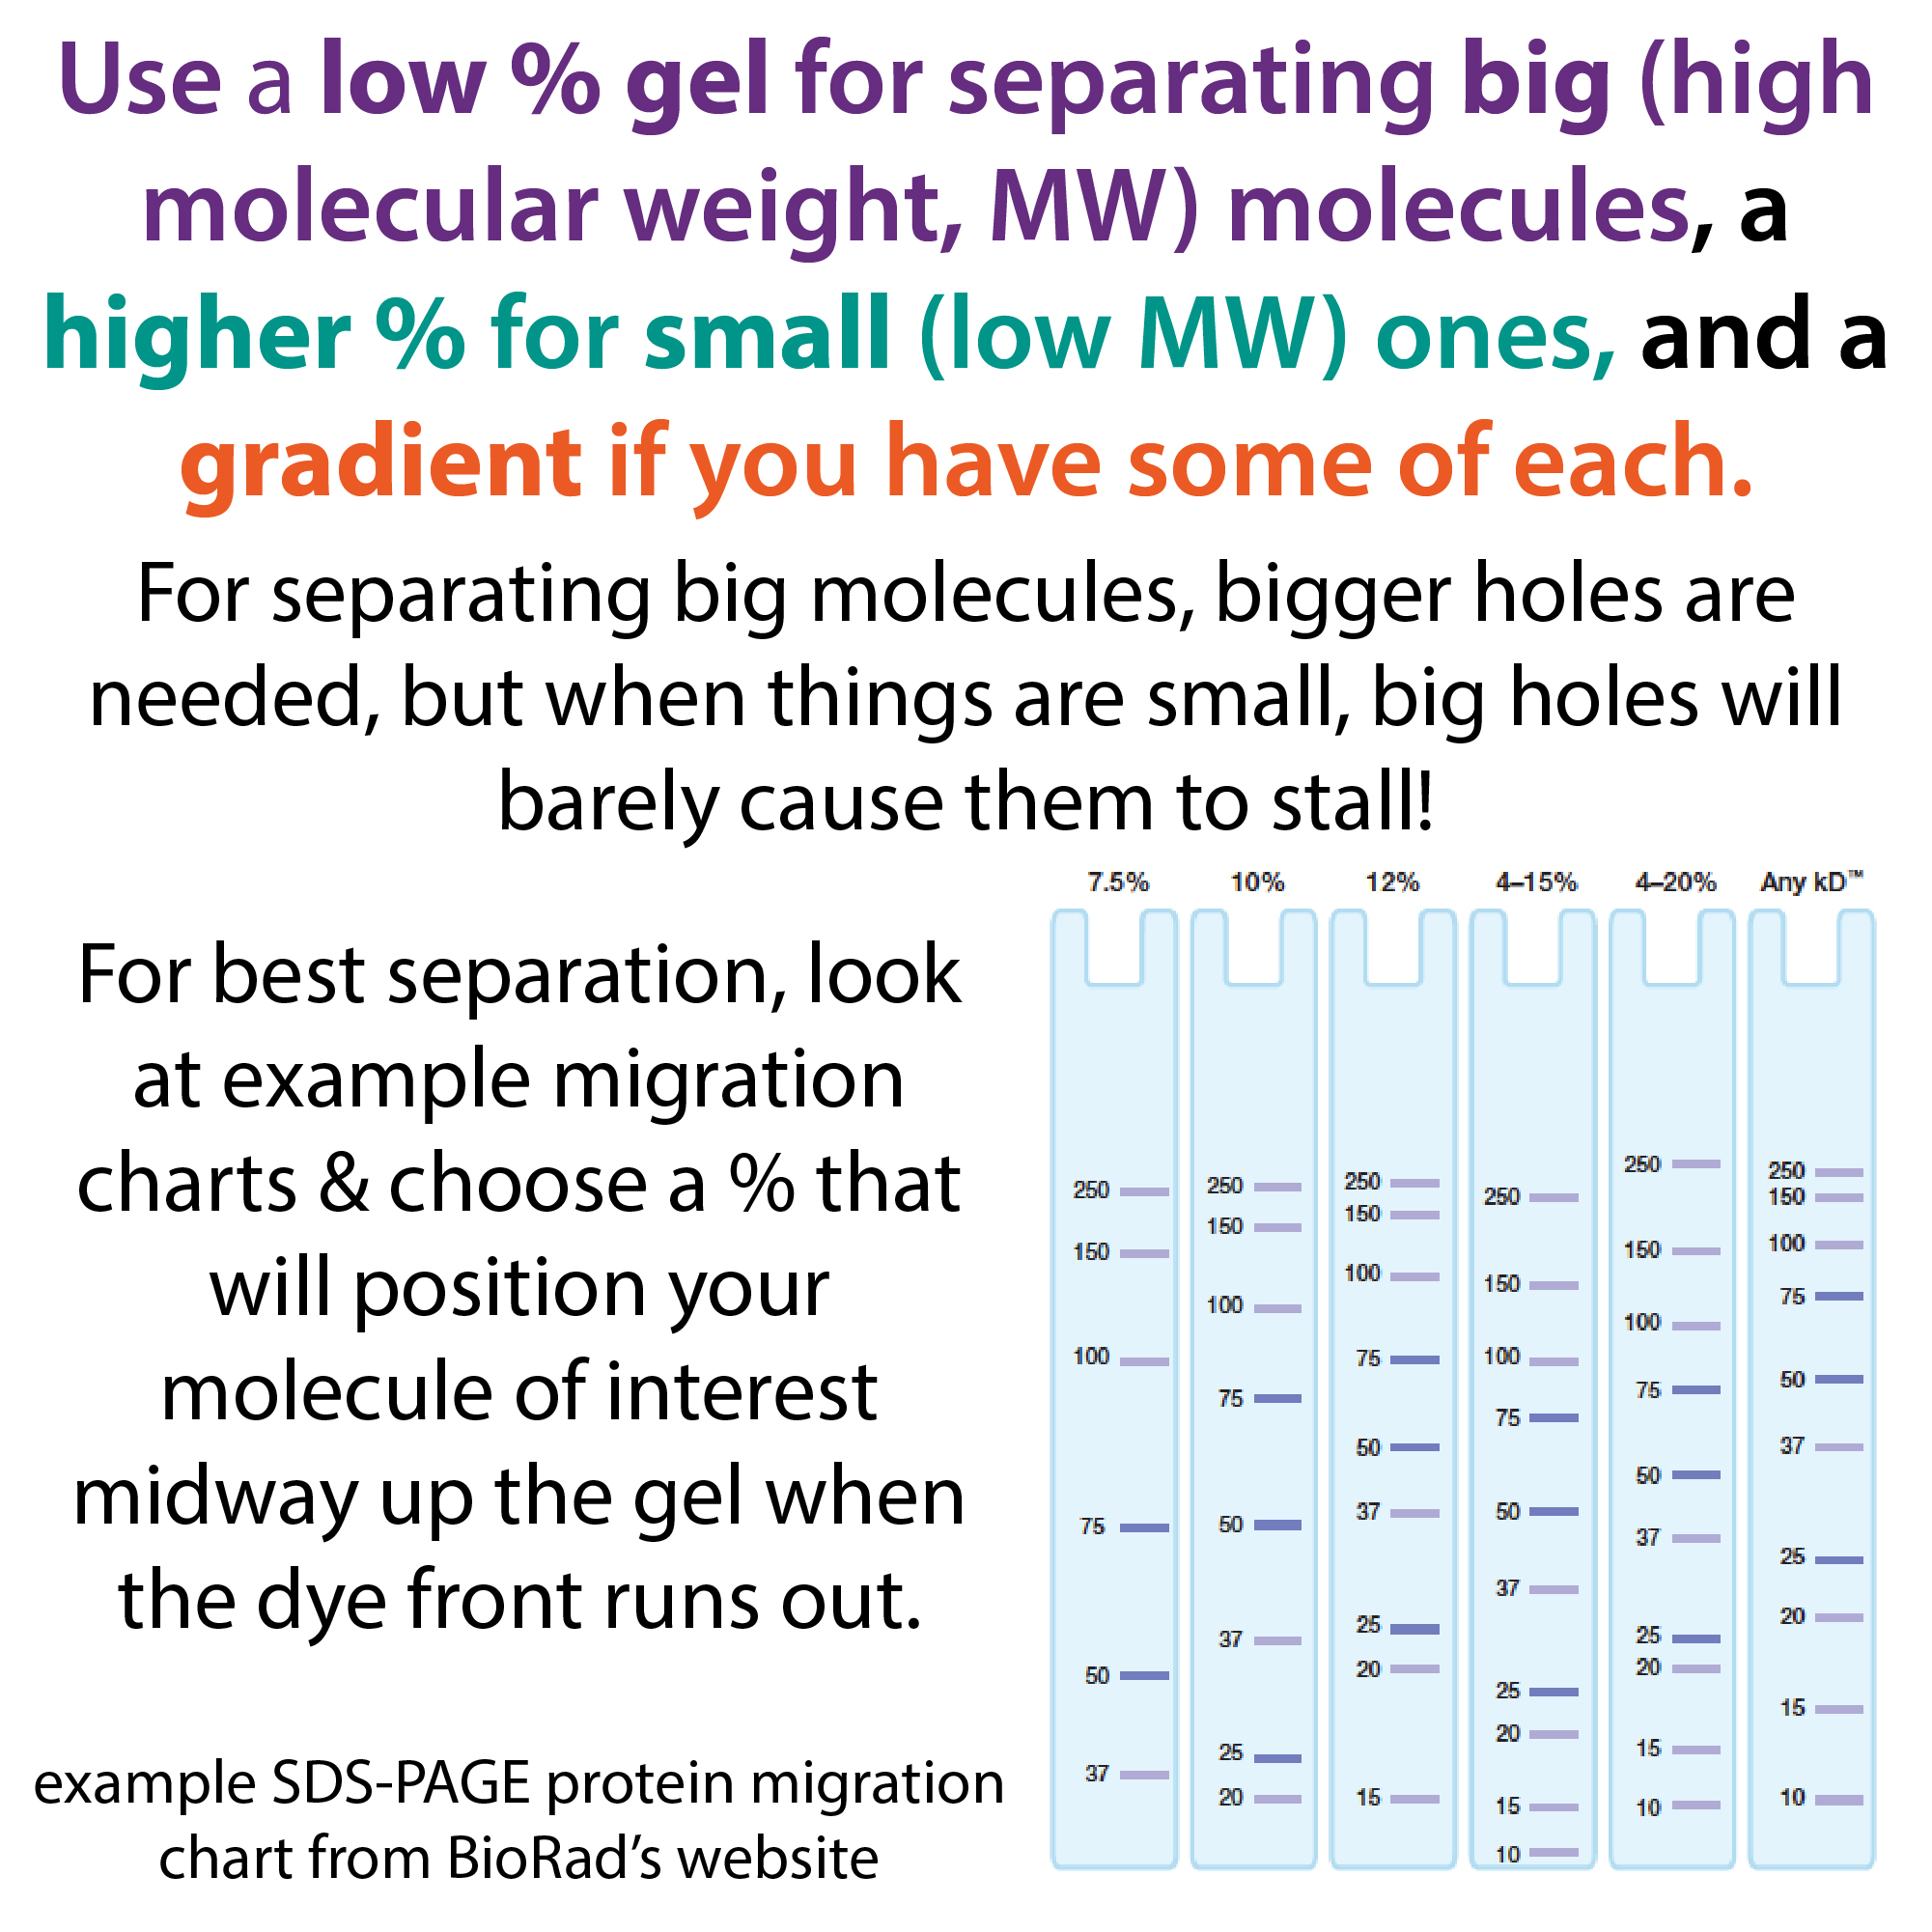
Choosing a gel percentage for gel electrophoresis (polyacrylamide & agarose)

link to video in case embed isn’t working: https://youtu.be/ecFPG1oJcF0

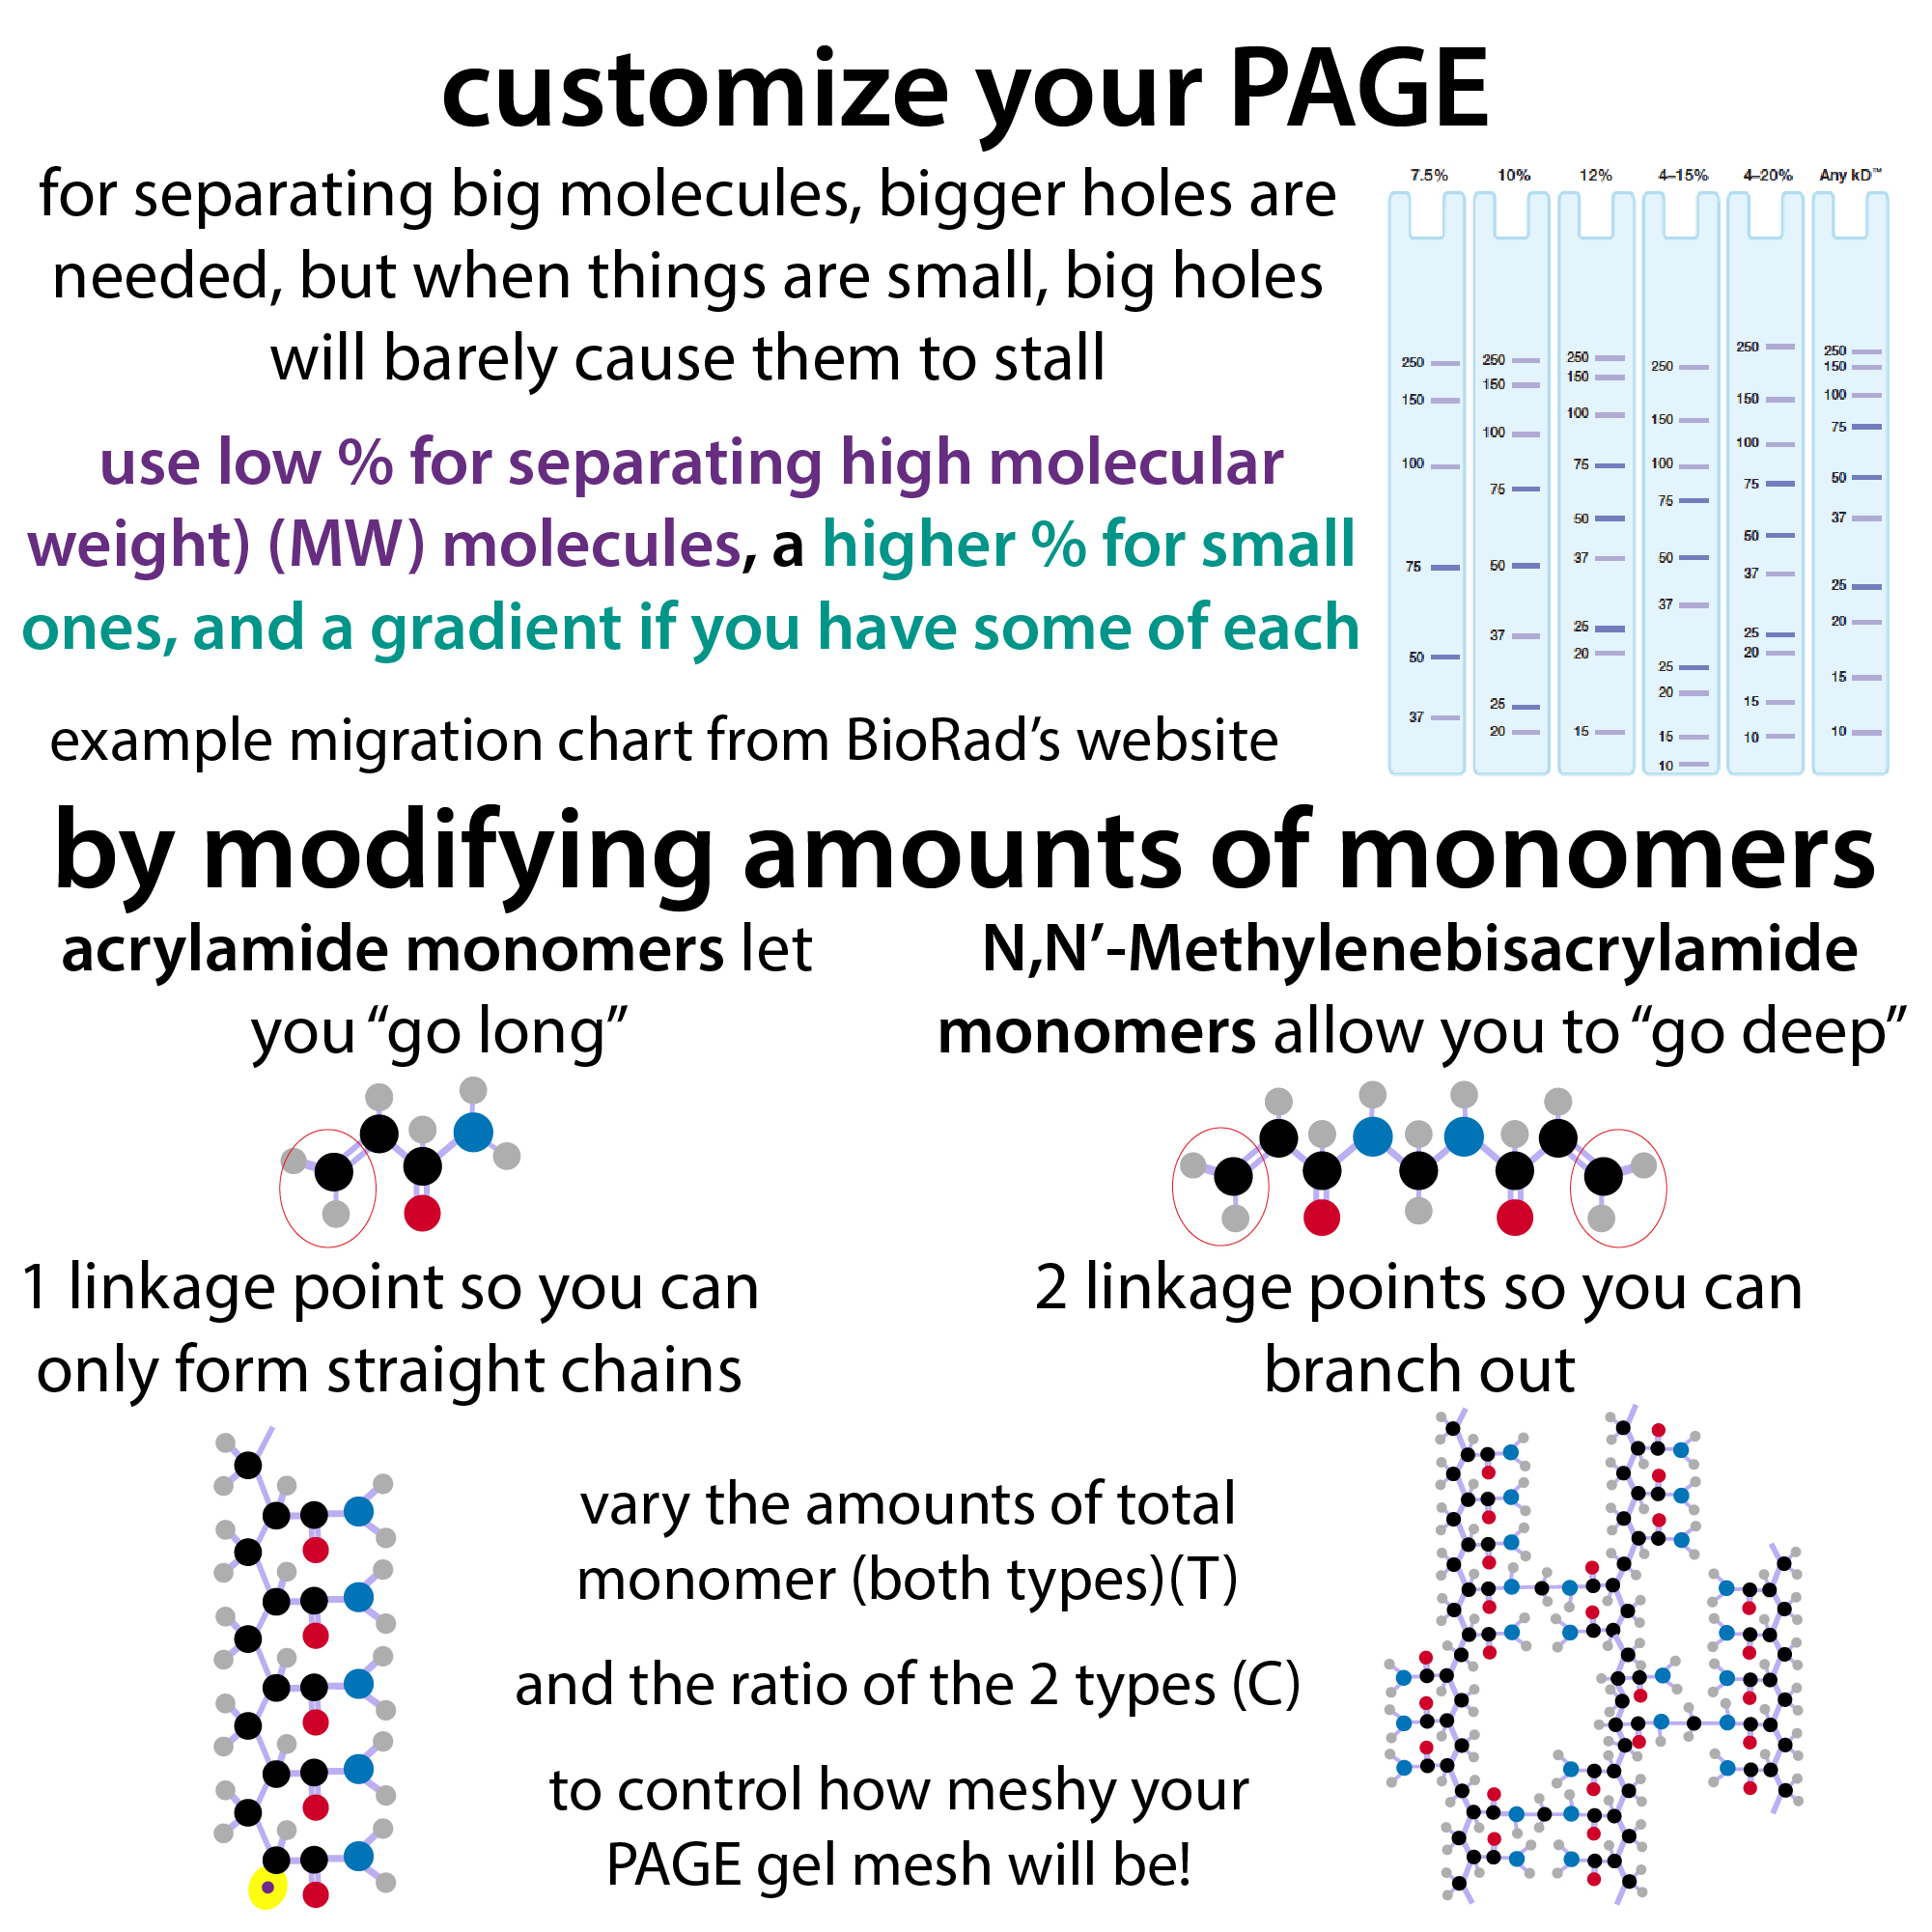
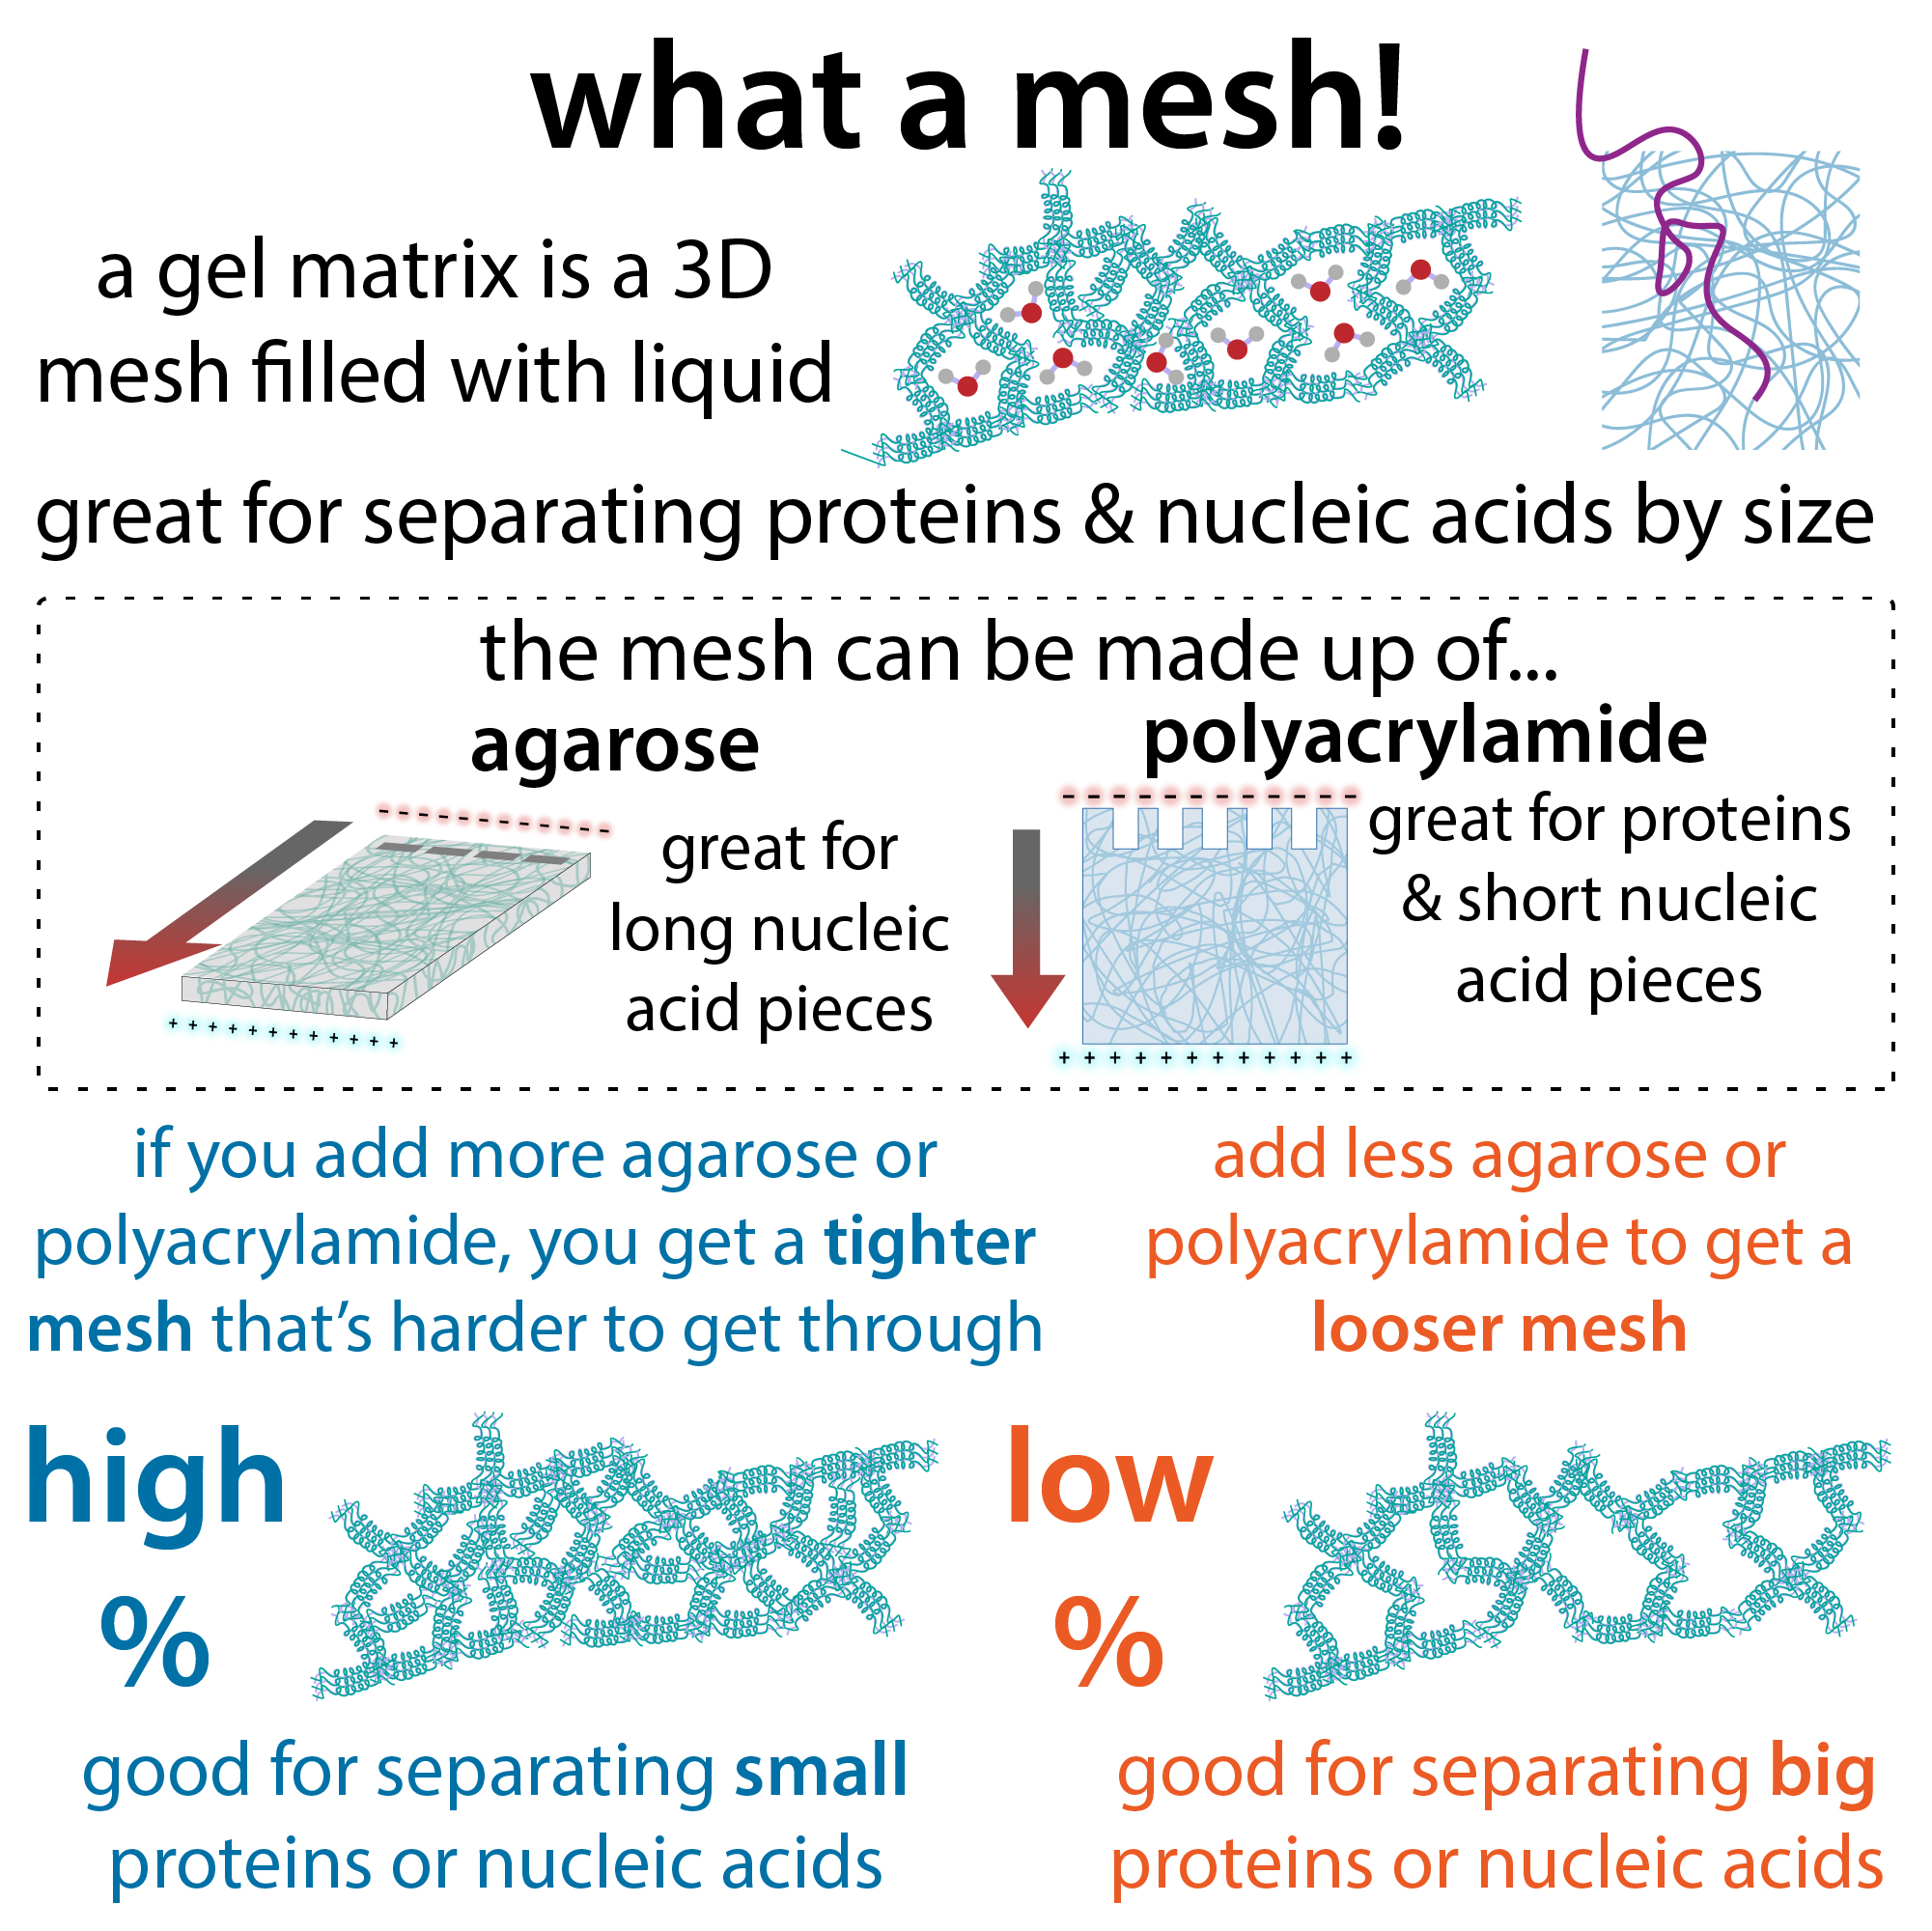
Use a higher percentage gel to separate smaller molecules and lower percentage gel to separate bigger molecules. Have some of both? A gradient gel might serve you well! Not sure what to use? Look to a migration chart to tell!

YouTube: https://youtu.be/ecFPG1oJcF0 

ThermoFisher Gel Electrophoresis Tables: https://www.thermofisher.com/us/en/home/references/ambion-tech-support/rna-electrophoresis-markers/general-articles/gel-electrophoresis-tables.html 

more on agarose gels: http://bit.ly/agaroses  ; YouTube: https://youtu.be/aVj8hhOupLs   

more on polyacrylamide gels:  https://bit.ly/polyacrylamidepolymerization  ; YouTube:  https://youtu.be/wj2i18Y1GeY

Practical lab tips for avoiding sample loss during storage…

link to video in case embed isn’t working: https://youtu.be/vg74vIFGm8c

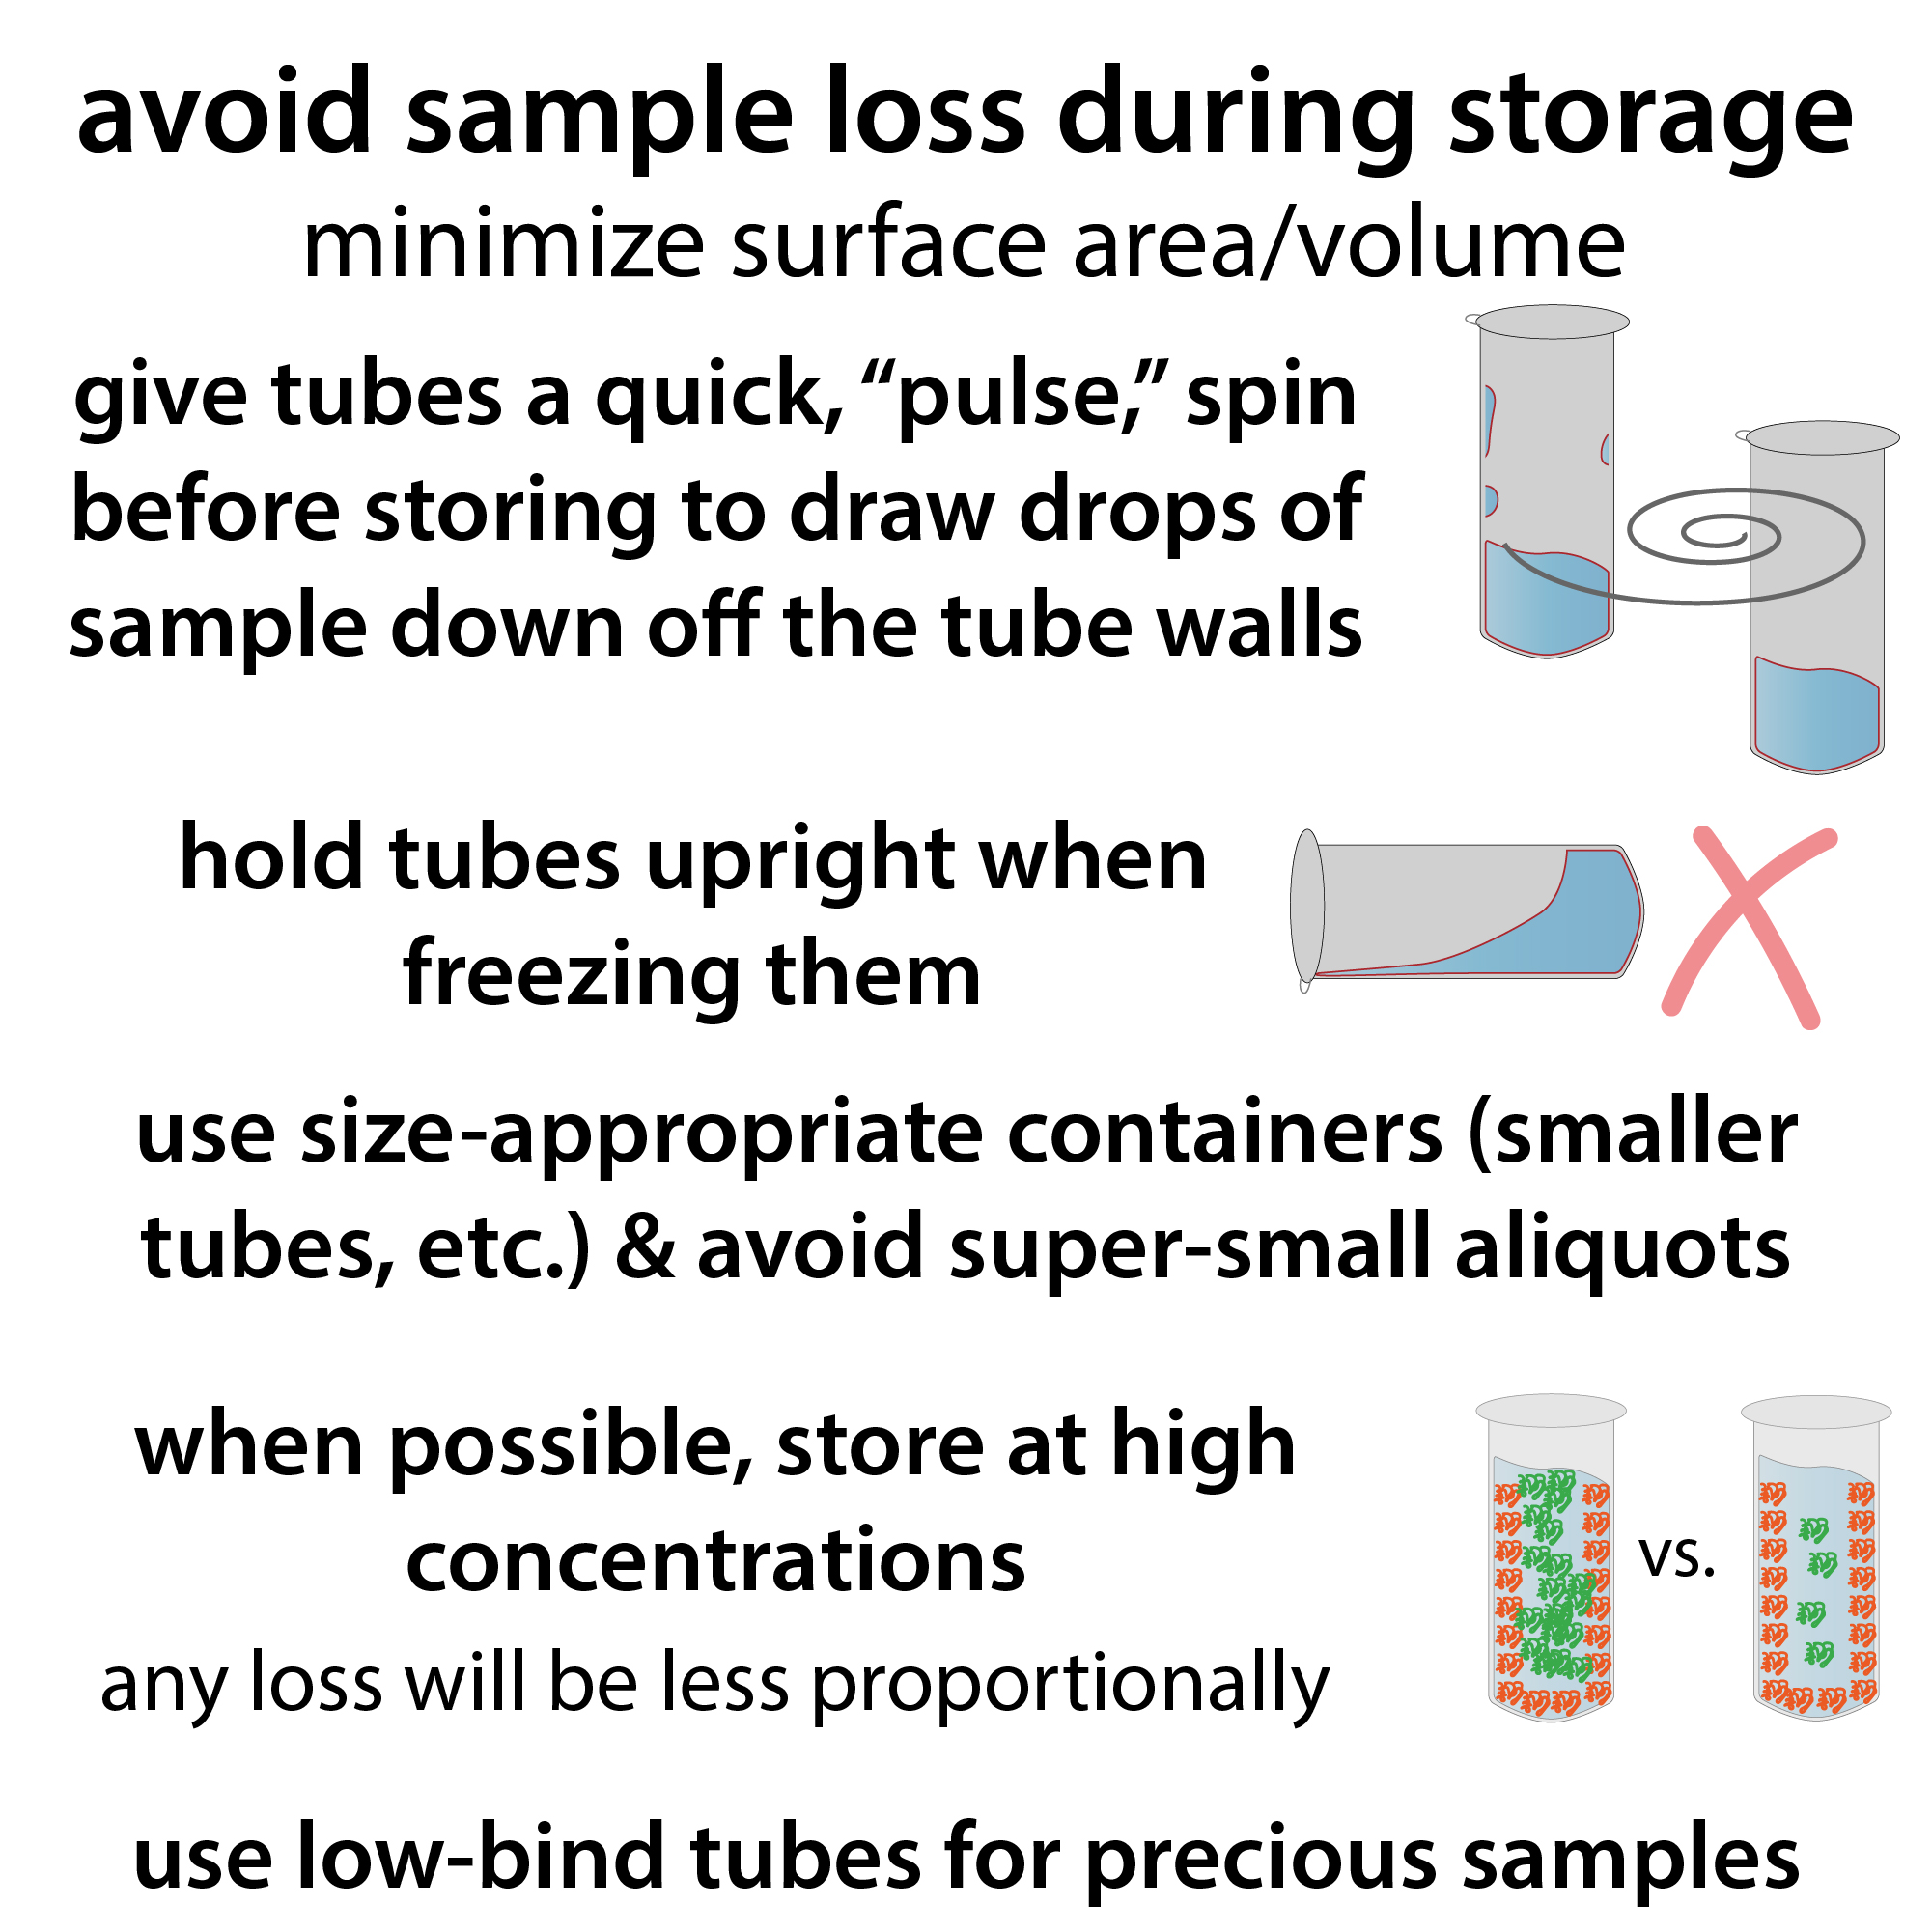
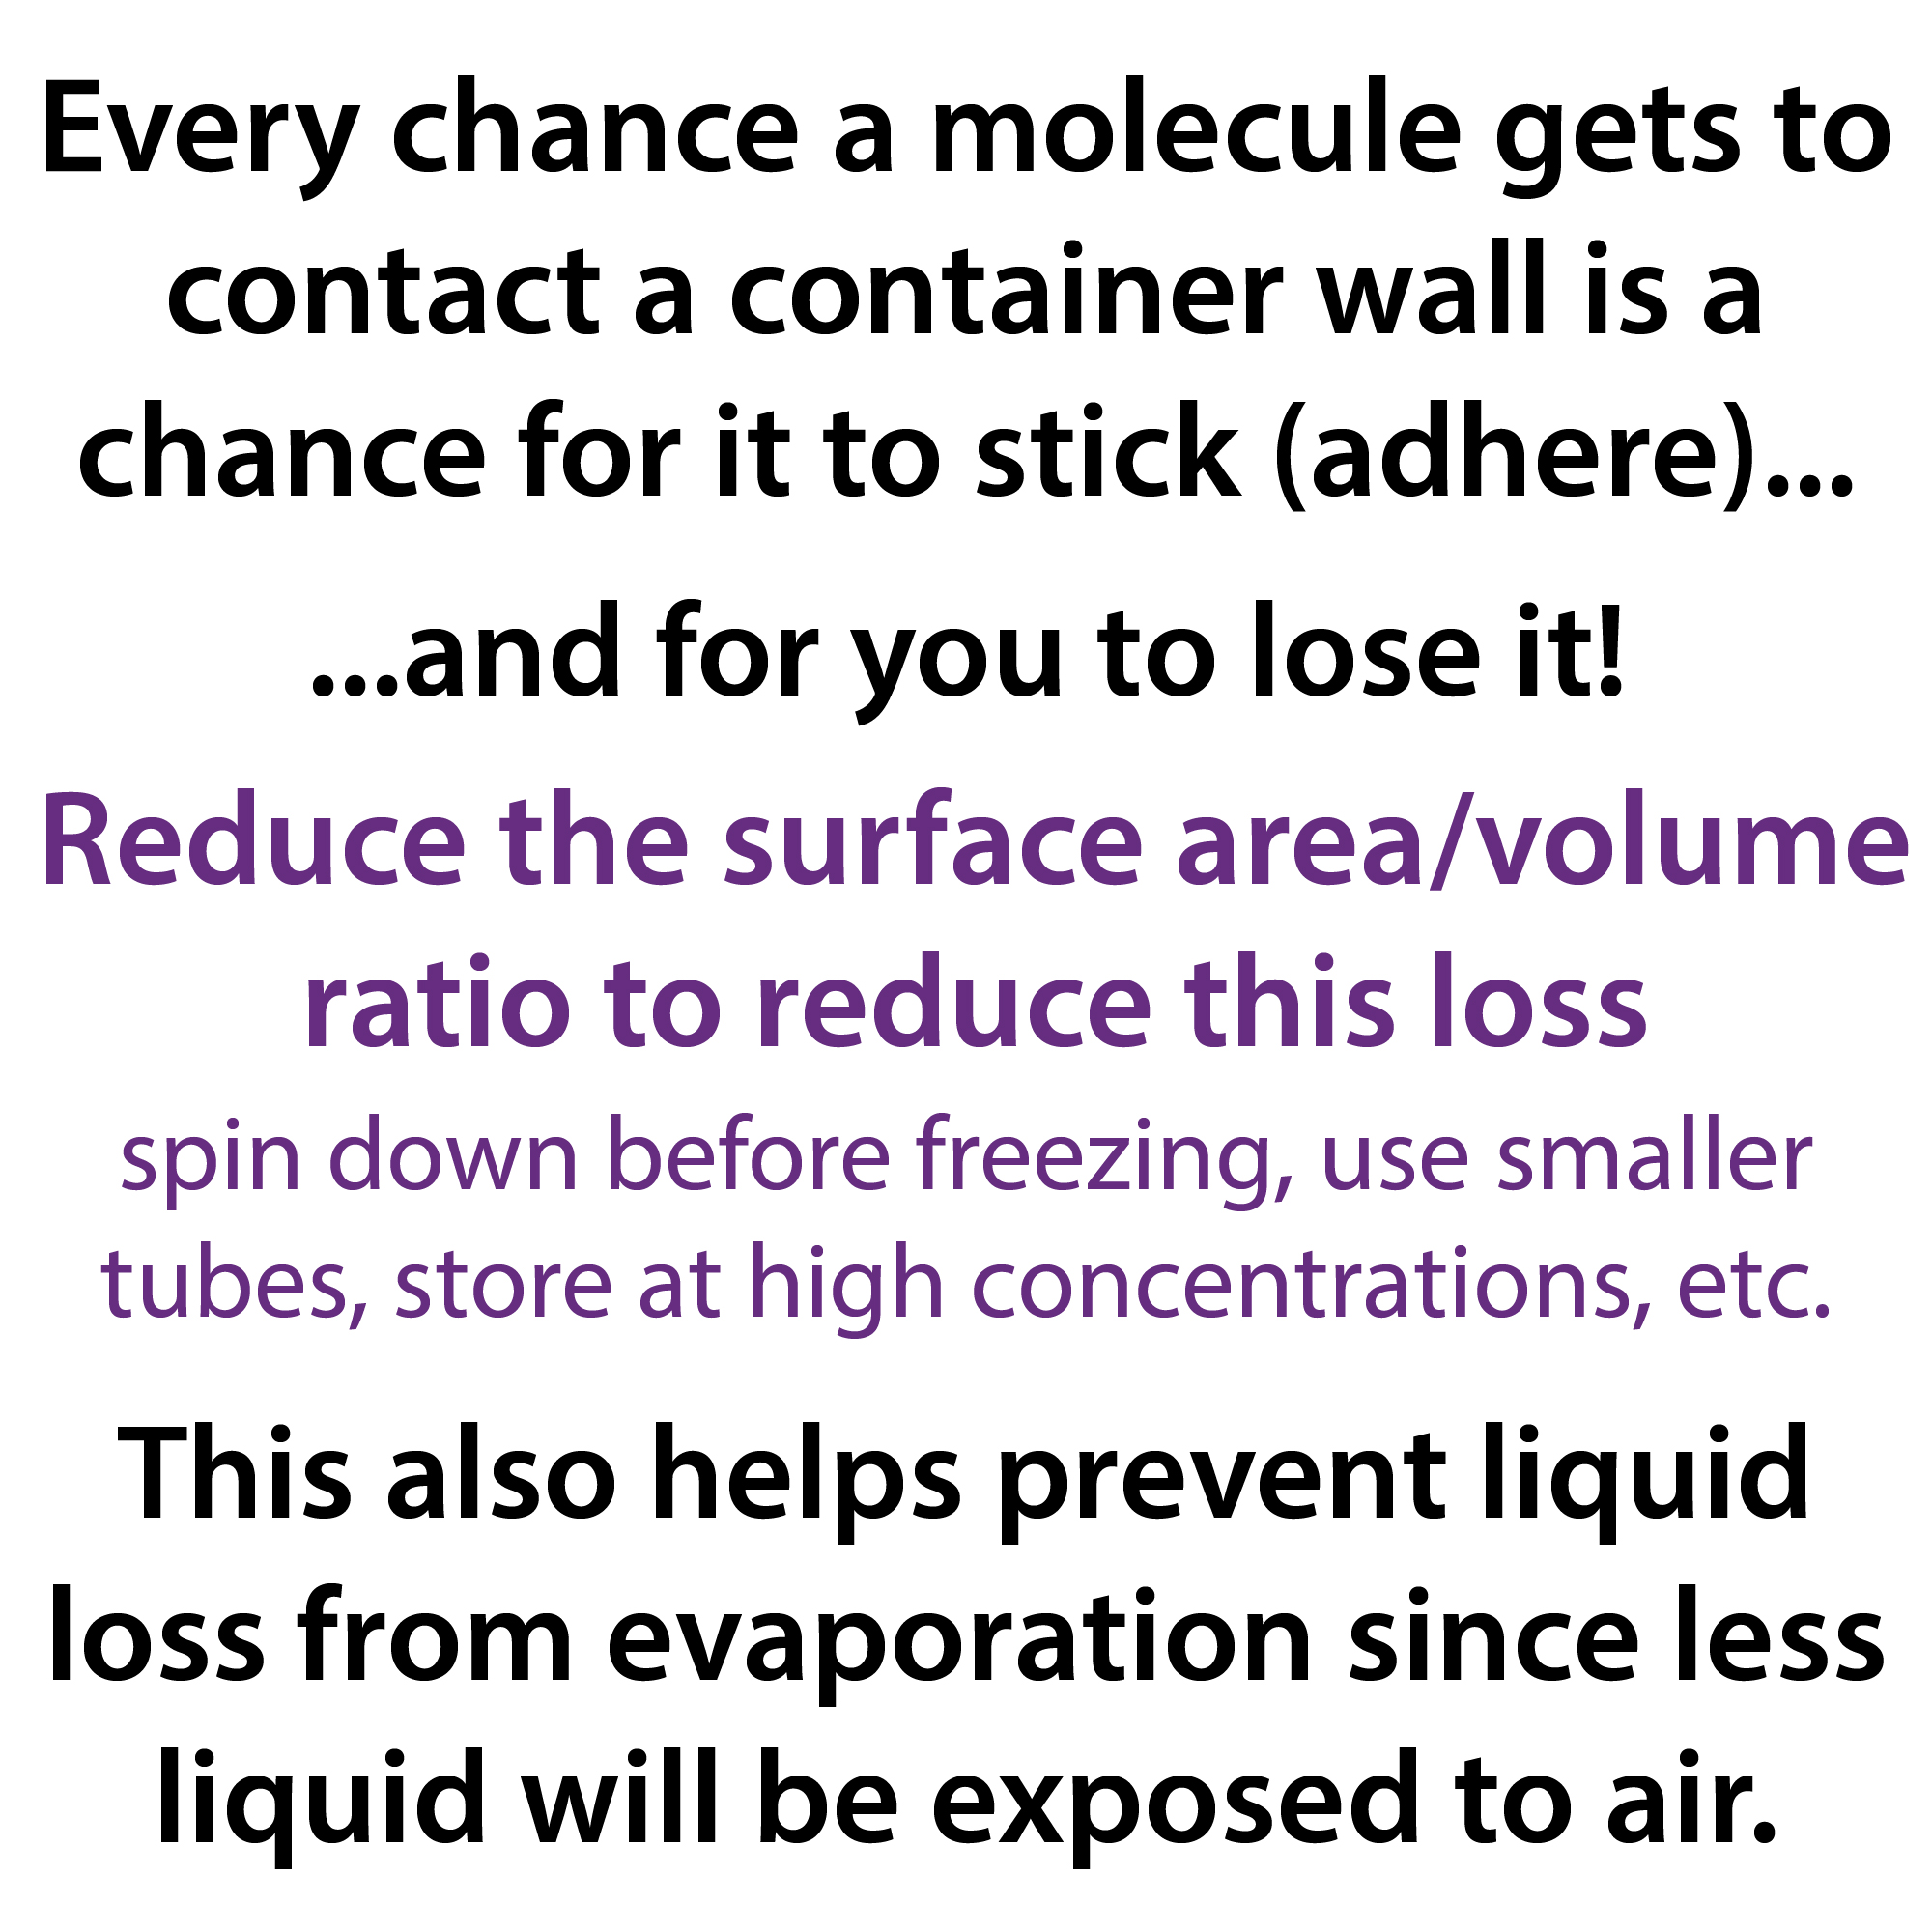
very chance a molecule gets to contact a container wall is a chance for it to stick (adhere) and for you to lose it! Reduce the surface area/volume ratio to reduce this loss. This also helps prevent liquid loss from evaporation since less liquid will be exposed to air.

YouTube: https://youtu.be/vg74vIFGm8c 

Here are a few strategies to avoid sample loss during storage:

  • give tubes a quick, “pulse,” spin before storing to draw drops of sample down off the tube walls
  • hold tubes upright when freezing them
  • use size-appropriate containers (smaller tubes, etc.) & avoid super-small aliquots
  • use low-bind tubes for precious samples
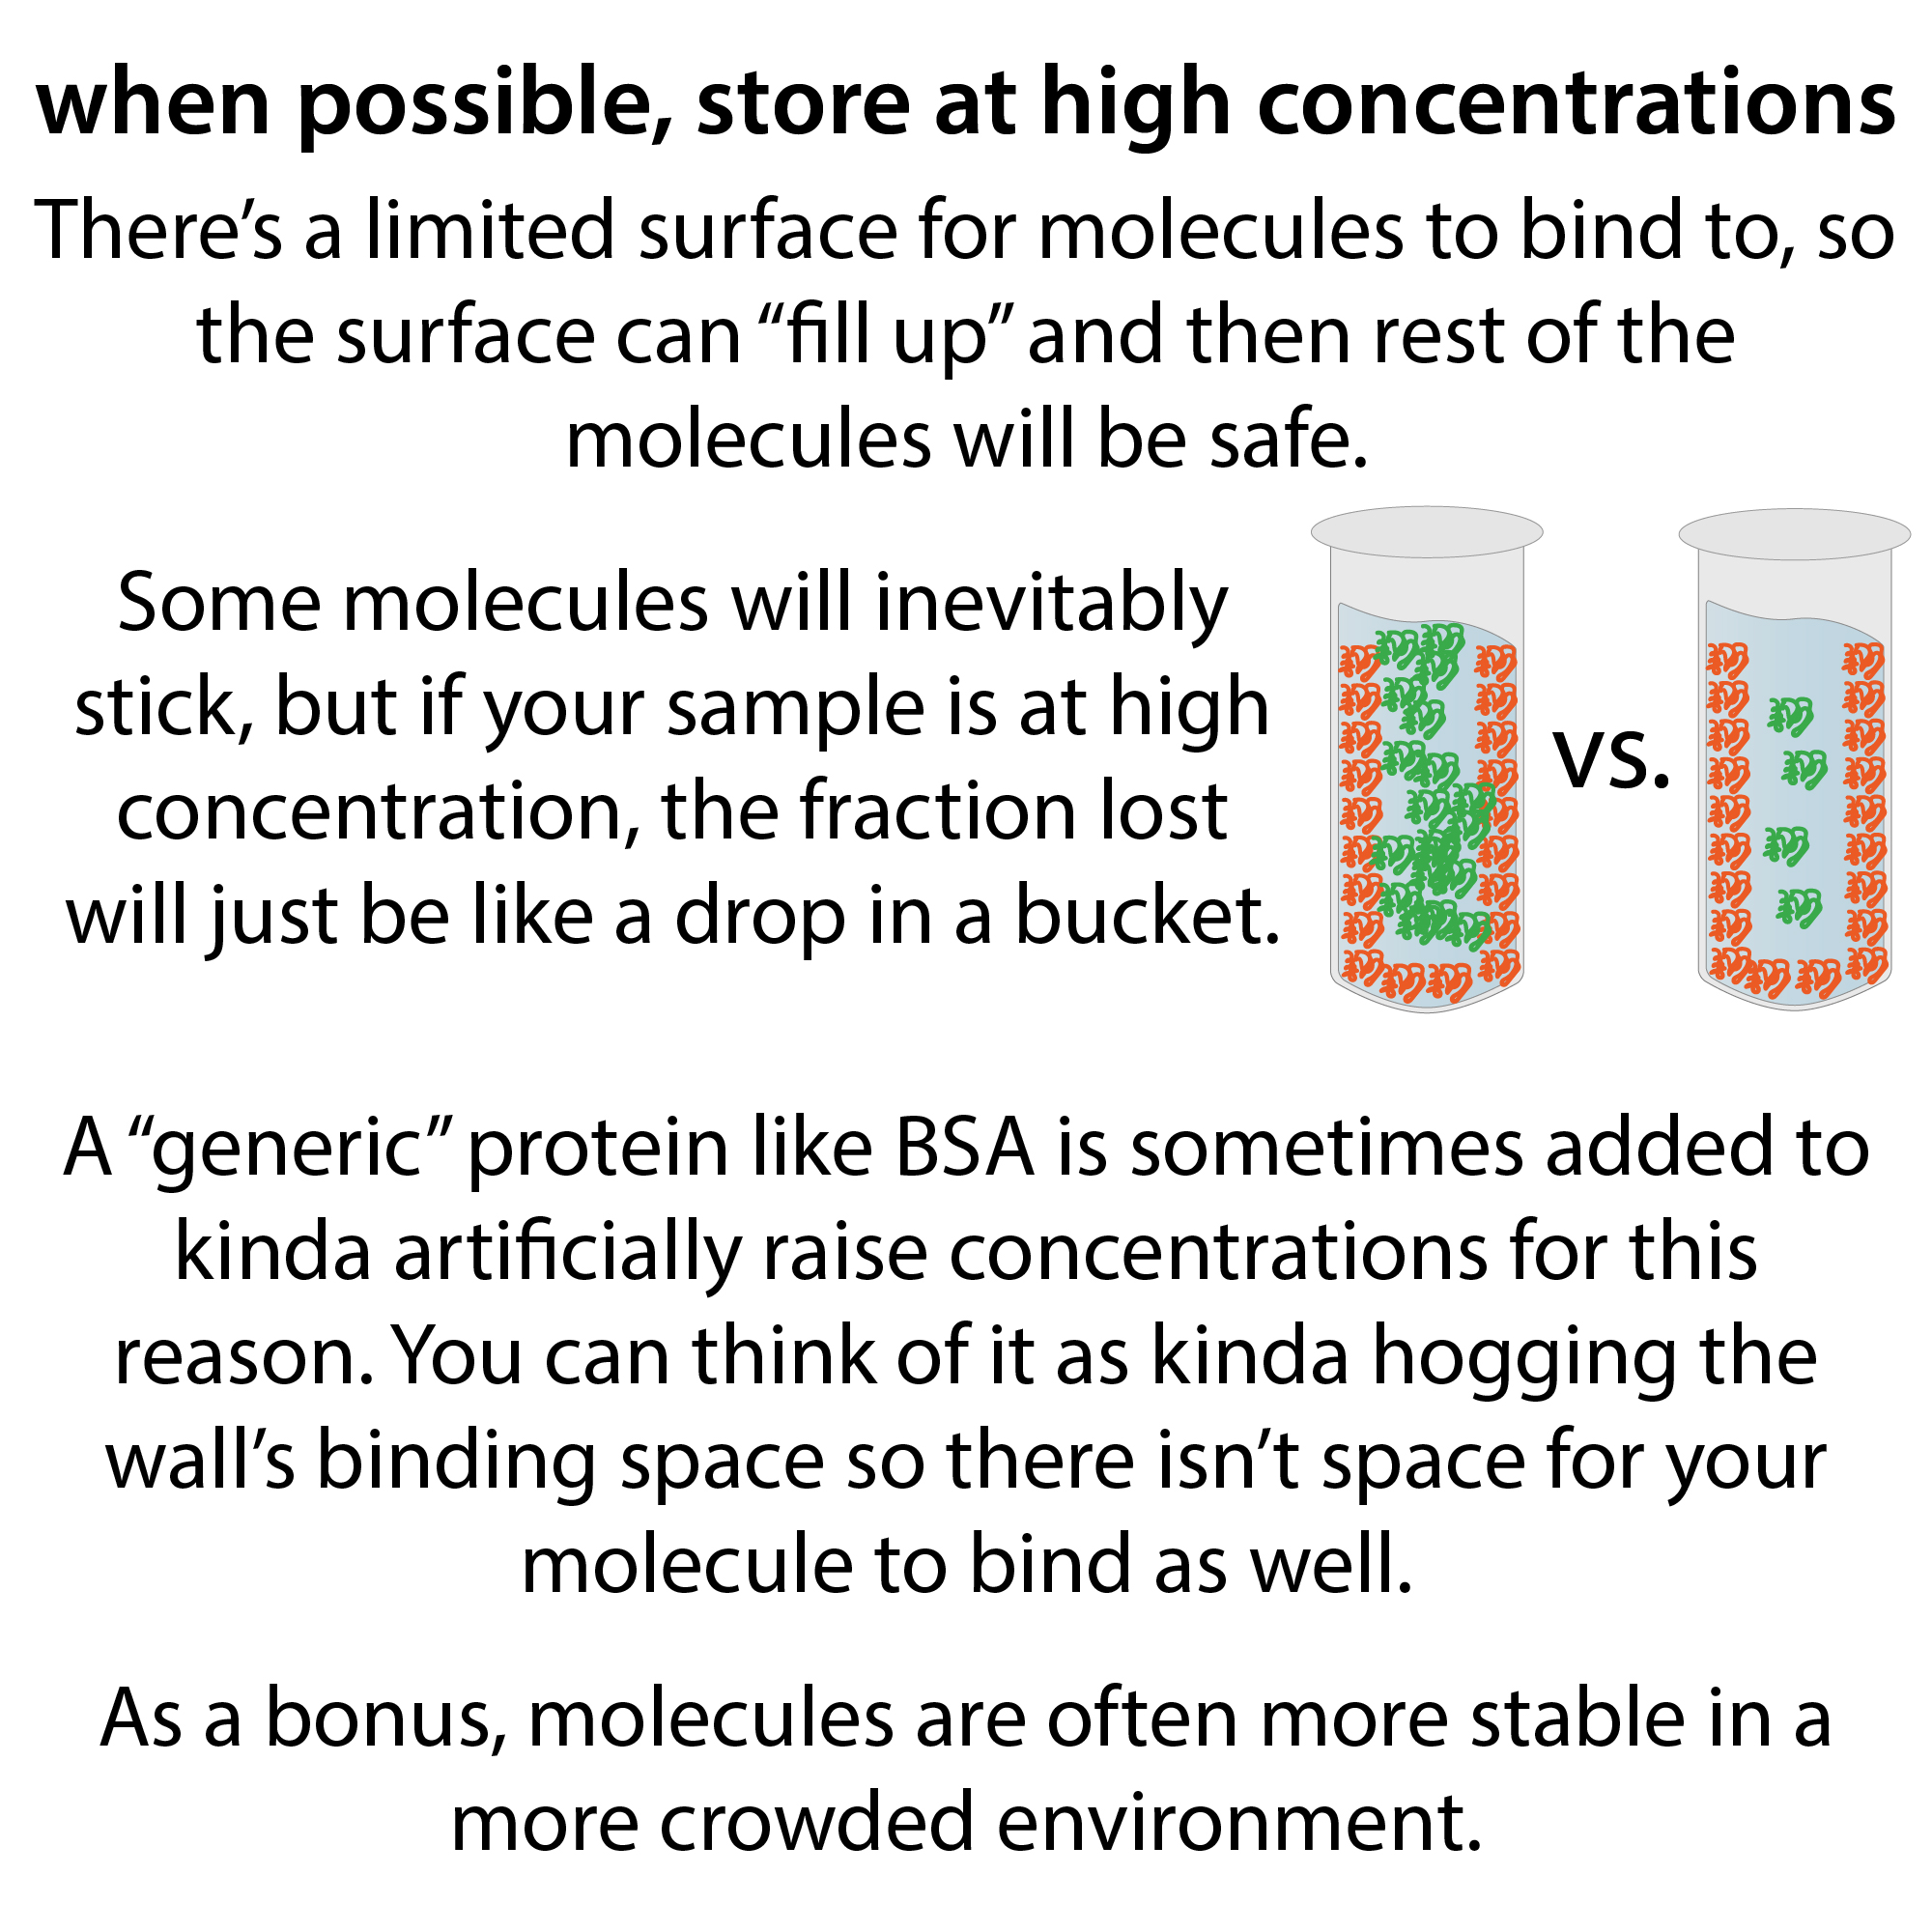
  • When possible, store at high concentrations. There’s a limited surface for molecules to bind to, so the surface can “fill up” and then rest of the molecules will be safe. Some molecules will inevitably stick, but if your sample is at high concentration, the fraction lost will just be like a drop in a bucket.
    • A “generic” protein like BSA is sometimes added to kinda artificially raise concentrations for this reason. You can think of it as kinda hogging the wall’s binding space so there isn’t space for your molecule to bind as well.
    • As a bonus, molecules are often more stable in a more crowded environment.
Make more than you think you need: practical lab tips for avoiding, but preparing for, sample loss…

link to video in case embed isn’t working: https://youtu.be/5VjTpA3ns3g

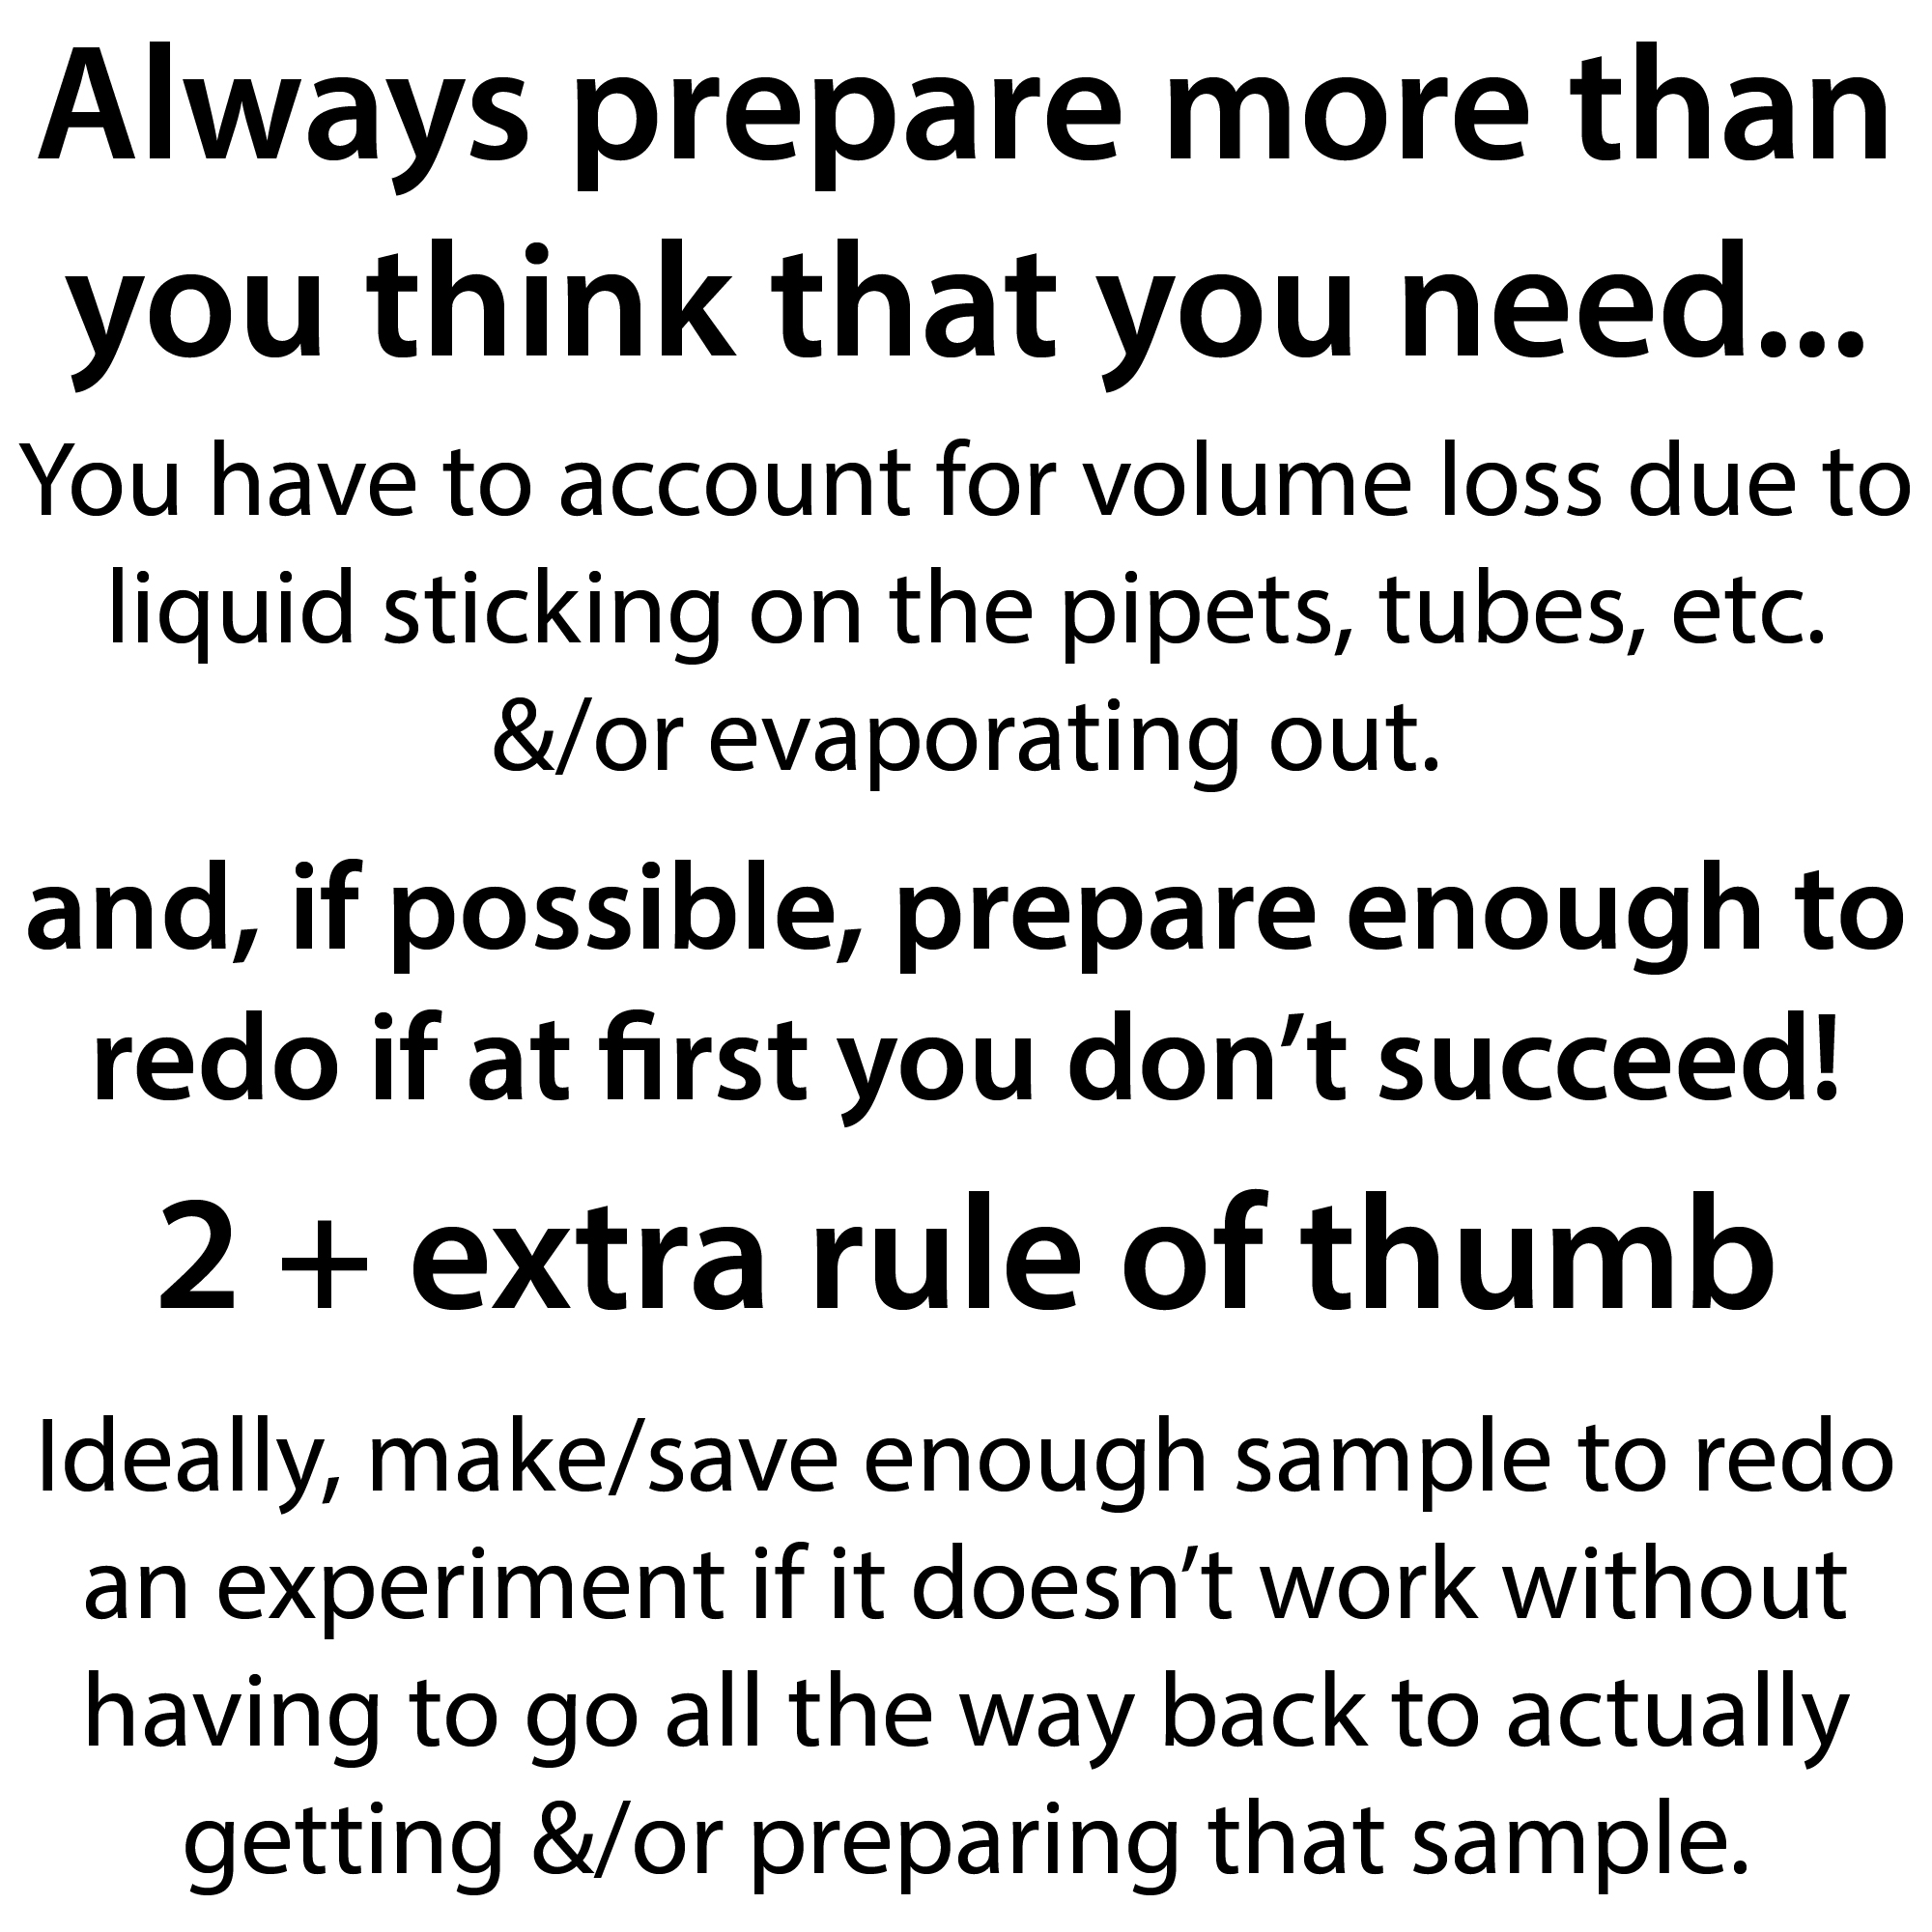
Always prepare more than you think that you need – and, if possible, prepare enough to redo if at first you don’t succeed!

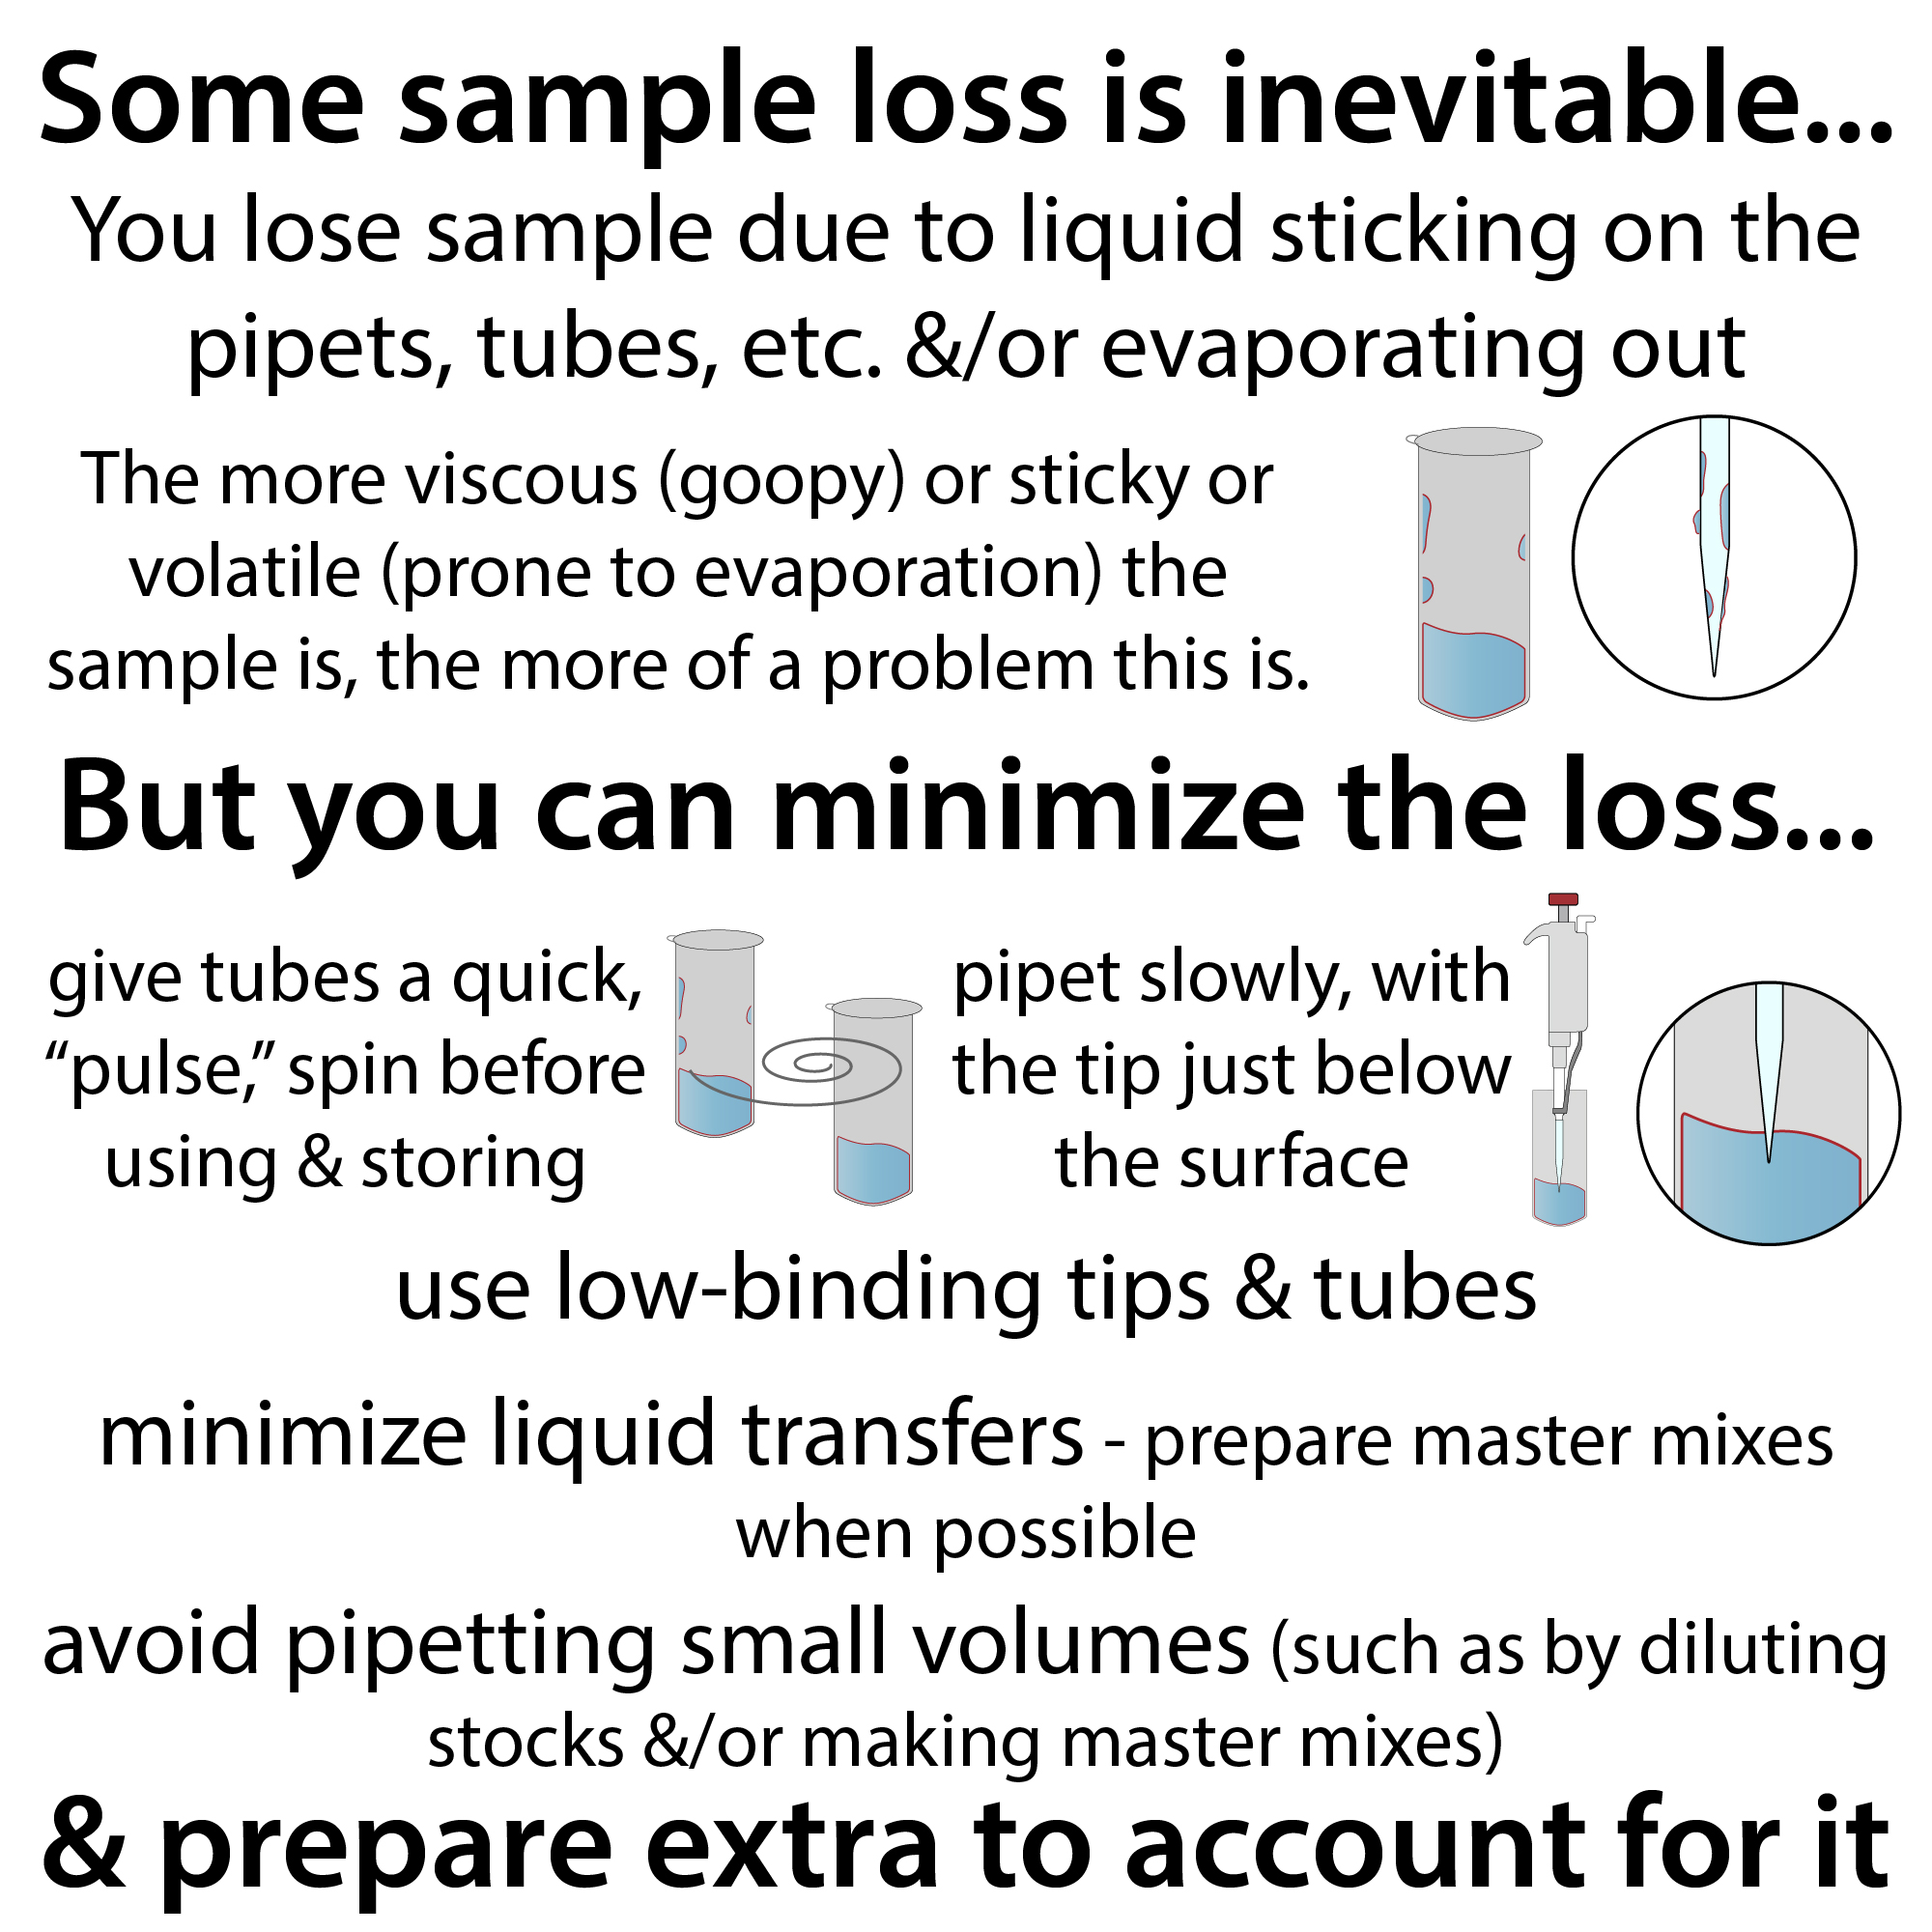
Some sample loss is inevitable…

You lose sample due to liquid sticking on the pipets, tubes, etc. &/or evaporating out. The more viscous (goopy) or sticky or volatile (prone to evaporation) the sample is, the more of a problem this is.

But you can minimize the loss…

  • give tubes a quick, “pulse,” spin before using & storing
  • pipet slowly, with the tip just below the surface
  • use low-binding tips & tubes
  • minimize liquid transfers – prepare master mixes when possible
  • avoid pipetting small volumes (such as by diluting stocks &/or making master mixes)

And prepare extra to account for it

I have a sort of 2 + extra rule of thumb I try to follow where I like to have enough sample so that I can redo an experiment if it doesn’t work without having to go all the way back to actually getting and/or preparing that sample. The “extra” is because you have to account for volume loss due to liquid sticking on the pipets, tubes, etc. and/or evaporating out. 

So, for example, if I’m running an SDS-PAGE gel and I have plenty of sample I will prepare enough to load 2 lanes worth of the gel. Which means making ~2.5 lanes worth. 

How much “extra” you need to make depends on things like how big your total volume is, how sticky or viscous your sample is (you’ll need more for these) and how many pipetting steps you have (remember you lose some each time). It also depends on how expensive and/or available the components are! 

Some practical tips to stain your nucleic acid PAGE gel without rips! Plus more tips on using SYBR gold, etc.

link to video in case embed isn’t working: https://youtu.be/q-RztbG1kWo

  • stick a piece of saran wrap into your staining container & stain on top of it – this way you can lift the saran wrap to take the gel out and transfer it to and fro, reposition it, etc. all without ripping
  • to prevent ripping when getting your gel into the stain… go into it rather than pour onto it
    • crack open the cassette carefully and pull apart slowly making sure the whole gel stays on one of the plates (let it go the way it’s trying to for now)
    • angle the plate, gel-side down, into the stain (transfer into the stain and not stain onto gel), let the gel contact the stain and use the surface tension and some gentle nudging to ease it into the stain

other tips:

  • when you first open a new dye vial, aliquot out single portion aliquots (e.g. 5μL SYBR gold which will make 50mL worth of stain) into PCR tubes and freeze)
    • note: don’t worry about measuring out exactly 50mL, just eyeball it in a Falcon tube
  • make sure to cover things in foil when working with fluorescent stains so they stay fluorescent
  • prepare the stain in your running buffer (e.g. TBE), not water
    • it will be more stable in the buffer and you can even reuse it if you’re just visualizing & not trying to gel extract (in which case you want to avoid contamination so make fresh) – save covered in foil in the fridge

Hope that helps and hope your gels look good!

more on nucleic acid PAGE: http://bit.ly/ureapage & https://youtu.be/MHJqnur6yqk

more on fluorescent nucleic acid stains: http://bit.ly/fluorescentstains & https://youtu.be/YoiNhxPNZJM

more on gel extraction: https://bit.ly/gel_extraction_crush &  https://youtu.be/baNpdx6txOo


Practical tips for processing lots of samples

link to video in case embed isn’t working: https://youtu.be/xcxWAYWD3vQ

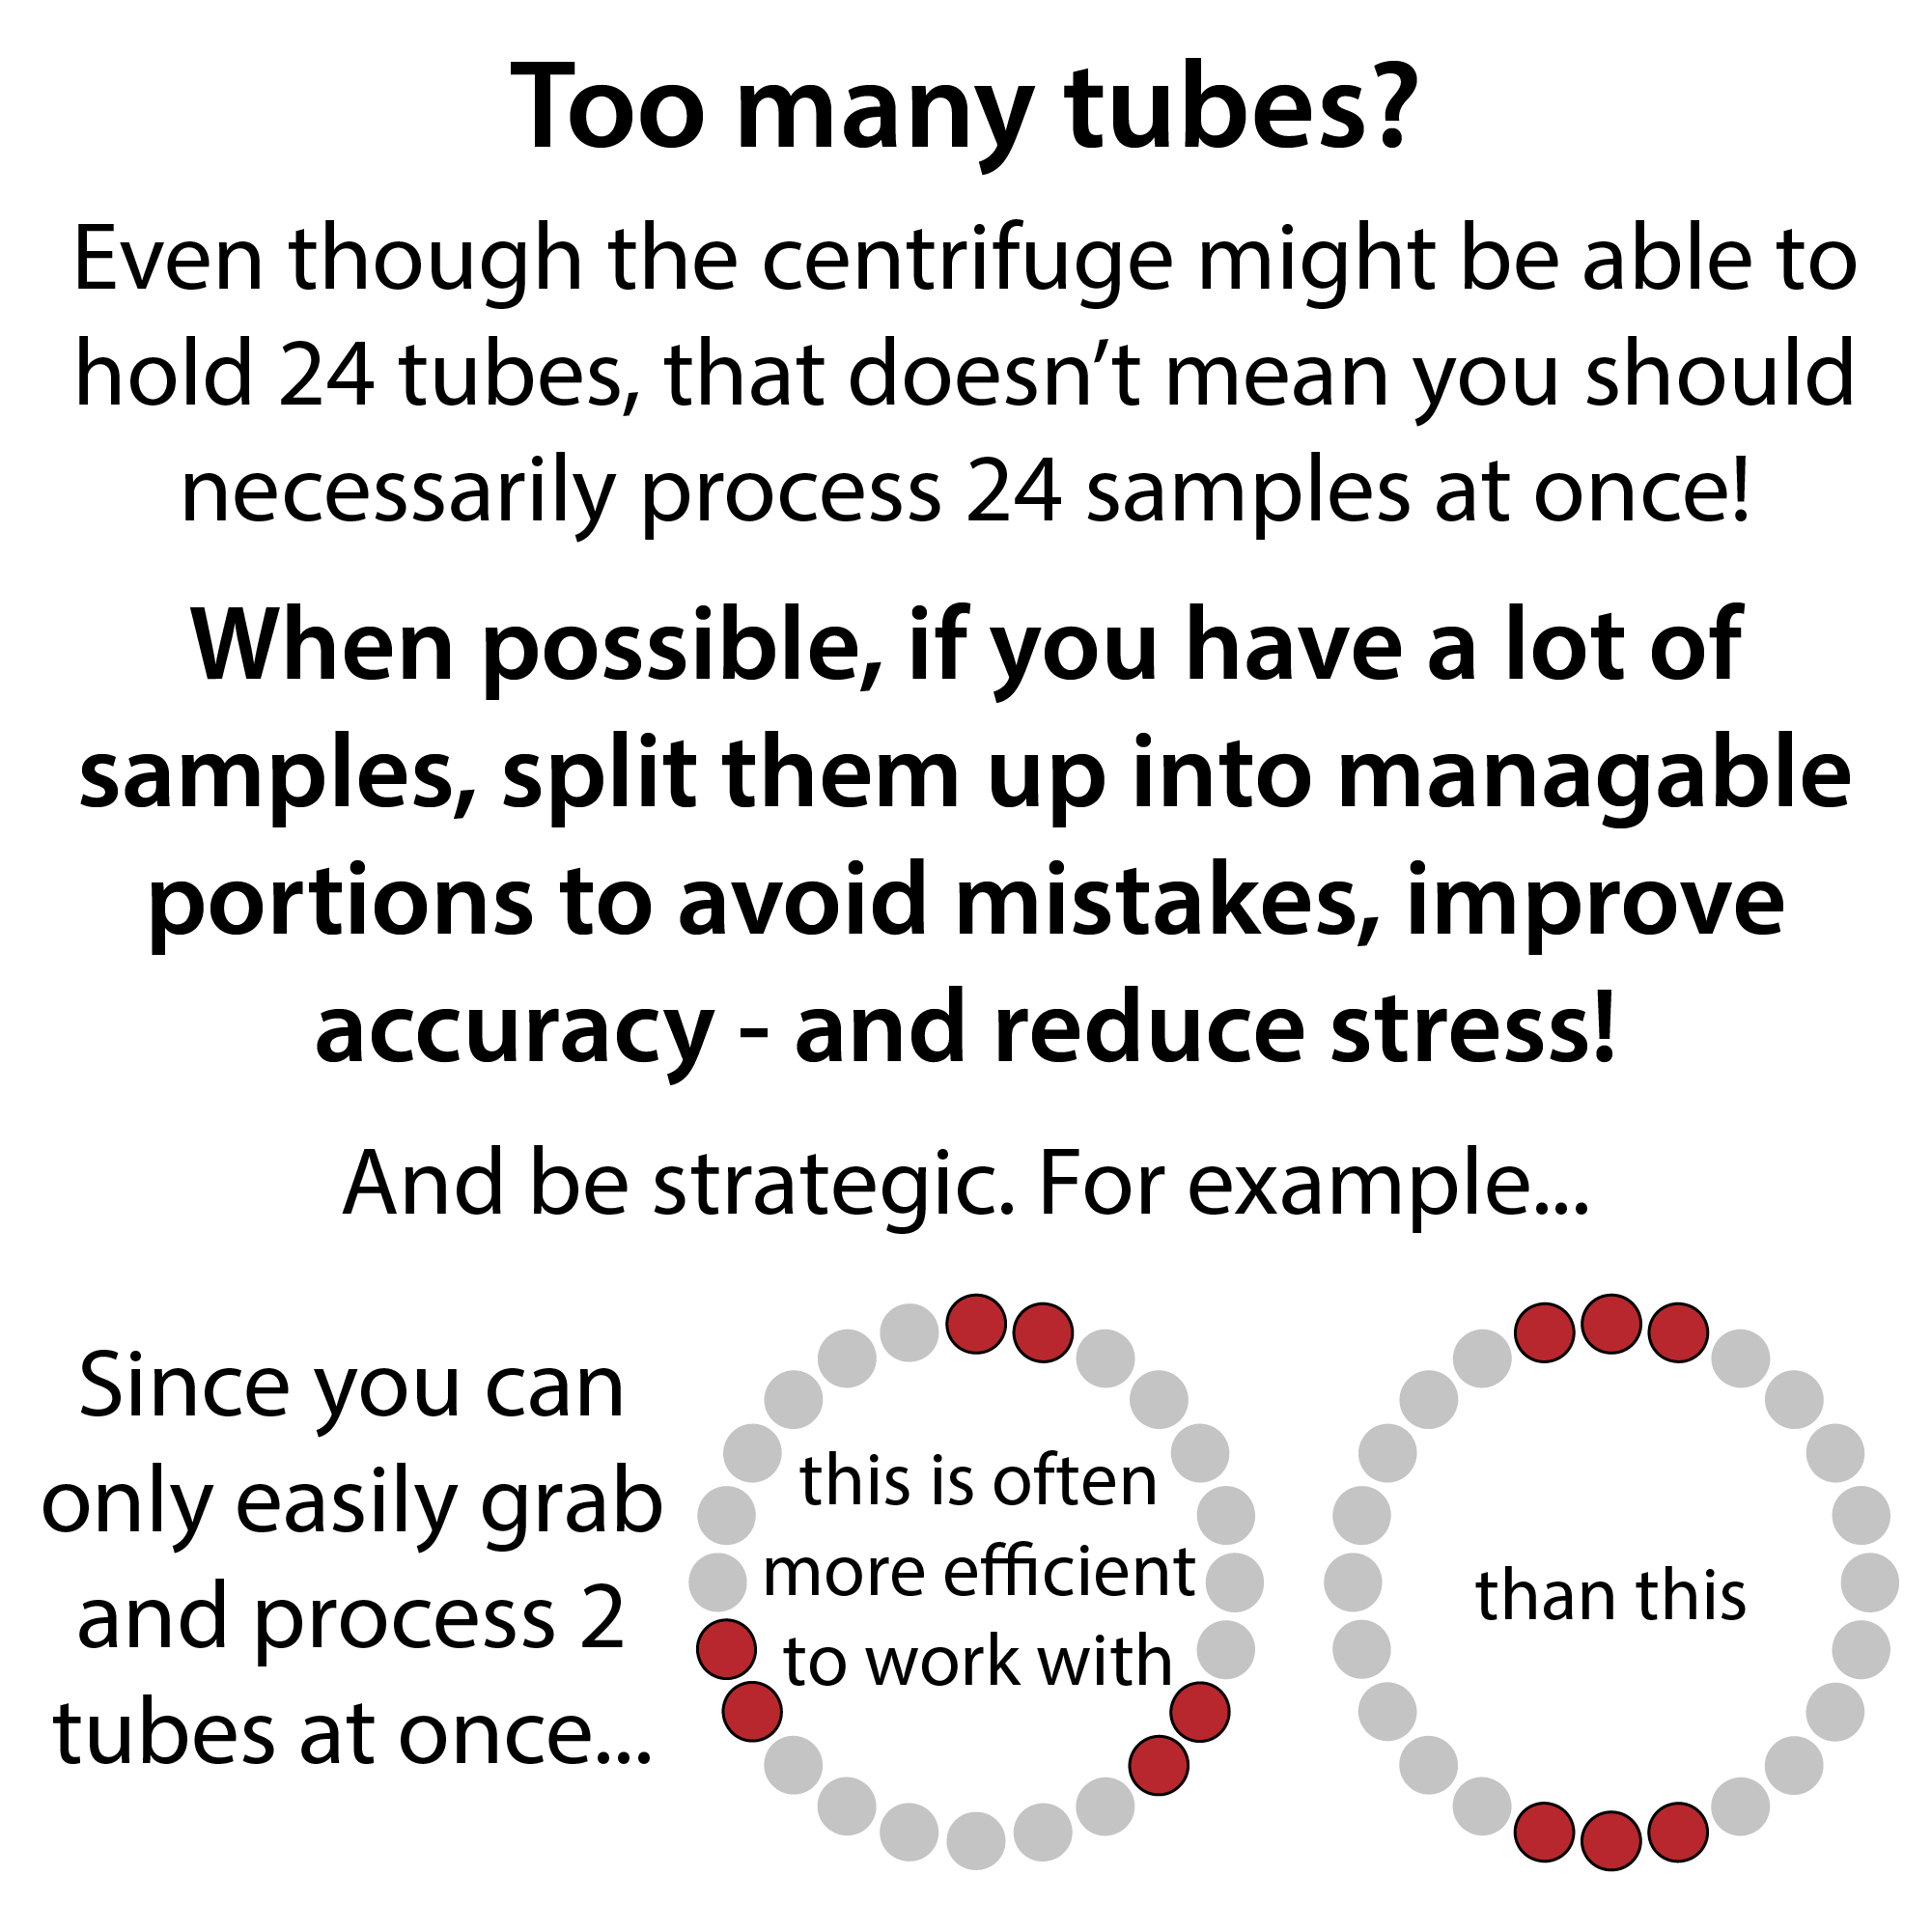
Resist the urge to process all your samples at once – sometimes going through all the steps twice (say on 6 samples, then again with the next 6) can actually be more efficient than trying to do them all in parallel (e.g. all 12 at the same time), which you just don’t have enough hands for! In addition to being a lot less stressful (albeit a bit more tedious), it can improve your accuracy. This is especially relevant if you’re dealing with time-sensitive steps, such as things with enzyme reactions where the timing would be off between the first & last samples, or pellets that might resuspend by the time you get to them. 

YouTube: https://youtu.be/xcxWAYWD3vQ 

It can also prevent you from making silly errors (mixing up tubes, skipping a step, pipetting into the same tube twice, etc.) which would make you have to start over, potentially  even from an earlier step if you lost your sample. Speaking of which, come up with a strategy to keep track of which tubes you are on when working, such as always going in the same tube order each step & moving and/or capping-uncapping tubes after adding to them. Have detailed instructions written out so you don’t lose track of what you’re doing.

Going back to the idea of not having enough hands… You can probably pick up and handle 2 microcentrifuge tubes in one hand fairly easily, but 3’s a challenge (especially if they’re those 2 part things with a column and a collection tube). So try to space out your tubes in even numbers in the centrifuge for most efficient in/out-ing (e.g. if you have 6 tubes, space out 3 groups of 2 rather than 2 groups of 3). 

Try to process an even number of samples if possible for simplest centrifuging. 

If you have steps you’re doing in PCR strips, try to avoid processing more than 8 samples at once if possible so you don’t have to deal with multiple strips. Regardless of tube size, label them well! – top & sides.

Remember to breathe! (I have a bad tendency to hold my breath when I concentrate).

And good luck!

Quick practical tips for keeping centrifuge rotors clean and happy

link to video in case embed isn’t working: https://youtu.be/PKTwxbHWFN8

Be a considerate centrifuger. It will keep you, your colleagues, and your centrifuge happy! (P.S. this post sincerely isn’t a way to let out frustration at a colleague in response to an incident – my lab mates are awesome!) Here are some good practices & tips:

  • Check the buckets for liquid before & after your run
  • Avoid liquid getting in there! It can mess up the centrifuge vacuum, mess up your balanced-ness, and let gross stuff grow!
    • wipe down the outside of the tubes before sticking them in to spin (and before sticking them on the scale so that you don’t balance wrong)
  • Clean out any liquid that is in there
    • it can be awkward to try to get to the bottoms and all the walls of the buckets, but a quick tip is you can twist up a kimwipe (one of those little lab Kleenex-y things) or a paper towel an use that
      • you can (carefully, without scratching the rotor) use a screwdriver, pliers, or a pipet tip to help you apply pressure (and not get the towel stuck!)
  • When applicable, return the rotor to the fridge before you turn the centrifuge off so that it stays cold and ready for the next person’s samples

Practical tips for mixing samples in eppendorf (microcentrifuge) tubes

link to video in case embed isn’t working: https://youtu.be/WB0rprJfP8A

  • via pipetting
    • pipet up & down ~5 times (more if sample is viscous)
      • just go to to and from the first stop (not all the way down (second stop) until the last time)
    • use the right size tool for the job!
      • set the volume to more than 50% the total volume in the tube, but less than the total volume
        • too little and you won’t mix it
        • too much and you’ll bring bubbles
    • keep the tip of the tip just below the surface of the liquid
      • this avoids liquid loss due to sticking to the outside of the tip
      • this also prevents you overflowing
    • make sure all the liquid goes out all the way
  • alternatives;
    • vortex (not if you have enzymes in there though!)
    • finger vortex (flick tube to mix) – safe to do with enzymes too 
    • inverting tubes (only if larger volume) – can do multiple tubes in rack (held firmly down)
    • NOT centrifuging – that doesn’t mix things!
  • no matter the method, give a quick pulse spin after to draw liquid down off the sides of the tube and the inside of the cap before you lift the lid and have stuff splash out! 

more pipetting tips: https://www.youtube.com/playlist?list=PLUWsCDtjESrHnlmO2z2GJZRADaIFSNqt8 


Tips for loading agarose gels

link to video in case embed isn’t working: https://youtu.be/29HLUPuXT-U

  • make sure the gel is completely submerged in the running buffer
  • prepare the samples on Parafilm
    • start by making drops of loading buffer
    • add your samples to the loading buffer and mix (without bubbling)
  • suck up (aspirate) your sample, being careful not to draw up air (which will cause your sample to “pop” out of the well)
  • scout out the wells
    • stick a piece of tape on the cassette or gel box to help you locate them
  • make sure you are inside the well before dispensing
    • but make sure not to stab the well or the barriers between them
  • dispense the sample slowly
    • stabilize your hand by putting your elbow on the bench and/or grabbing your wrist with your other hand
  • keep your thumb depressed until you’re all the way out to prevent sample from getting sucked back up
    • to get all the sample out, you have to go to the full stop of the pipet – this blowout step has a tendency to blow out a bubble, which can cause a bit of sample to pop out – if you are really worried about sample lanes contaminating one another, don’t push all the sample out
  • remember practice makes perfect! and remember to run to red! (set up gel so that the samples are on the black end of the box)

Tips for using repeater pipettes

Repeater pipettes are the energizer bunnies of the pipetting world – pull up liquid once and they just keep on going (dispensing a set amount of liquid over and over)! So your experiments can keep on going – without your thumbs falling off! They’re great for doing things like: making aliquots (splitting up a large volume into a bunch of smaller portions (great for avoiding freeze-thaws, reducing stock contamination, etc.); doing lots of mini preps or other spin column purifications in parallel; setting up crystallography screens, etc. But they can be a bit finicky, so here are some tips for using them.

YouTube: https://youtu.be/arRFvdx_cRc 

Instead of normal pipets where you suck up (aspirate) a set amount of liquid and then push out (dispense) that same amount of liquid – and then have to re-aspirate if you want to dispense again, with a repeater pipet, you pull up more liquid than you need and have it dispense a set amount every time you push down. What that amount is will be restricted by the tip size & their “step sizes” (e.g. you can adjust by 1μL increments with a 100 μL tip but only 2μL increments with a 200 μL tip and only 100 μL with a 10 mL tip). Basically, the smaller the tip, the smaller the portions you can make and the more control you have over the exact size of those portions.

No matter what size, the basic operating principles are the same:

  • snap on the tip (make sure it’s straight) – listen for the click
  • push down the bottom lever – listen for another click
  • use the dial to set the volume you want to dispense each time – it will tell you how many times you can dispense that amount if you fill the tip
  • stick the tip in your liquid (note that some of the tips are pretty wide-diameter-ed, so you might need to use a 50 mL conical instead of a 15 mL one so you can reach the bottom)
  • pull up that bottom lever to suck up enough liquid to dispense the number of samples you want to dispense
    • be careful not to introduce air!
  • push down the top lever back into the tube to get “excess” out – don’t use that first dispensed bit – it won’t be accurate
  • now push down the top lever over and over and over and over… each time dispensing the correct amount until you get the the end and there’s not a full amount left
  • push the bottom lever down to push that out into the original tube or waste container OR, suck up more (again, careful not to introduce bubbles)
  • eject the tip by pushing down the bottom lever and the top lever at the same time

a couple tips:

  • check the tip when you’re dispensing to make sure there aren’t any bubbles in there that would mess up the volume
  • when dispensing small volumes make sure stuff is actually coming out – and going into your dispenser (pipetting onto wall of tube helps)
  • be careful not to splash – especially can be an issue when doing ethanol-containing washes in mini preps – dispense with the tip held inside the tube and don’t rush (you’re still saving time over a normal pipet, don’t worry!)

Another time-saving pipet is the multichannel pipet – this is great when have to pipette into multi-well plates. We have 8-channel and 12-channel ones in multiple volumes.  These are basically just a normal pipet with lots of tips stuck together. So you still only dispense once per aspiration, but you can do it into multiple wells, tubes, etc. at the same time. But your sample has to be “spread out” (in tubes or a reagent reservoir that’s basically just a little dish thing), so you have to make more extra than with the repeater pipet. But with the repeater you do still need to make extra. You should always make extra to account for liquid loss on the tips, etc. but you should make extra extra when using the repeater and extra extra extra when using the multichannel!


Tips for using multichannel pipettes

When it comes to multichannel pipettes, evenness is the name of the game! Apply even, vertical pressure to make sure your liquid levels are the same!

YouTube: https://youtu.be/Kzob9UFkwH8 

When using a multichannel pipette, hold the pipet vertically (not angled!!) above the tips when grabbing and above the liquid when aspirating (sucking up)

When you’re grabbing the tips, make sure you’re applying even pressure (and not too much) to each tip – be careful not to roll in from side or you can get a sort of slant in the levels where one side is higher than the other.

Look at the liquid levels to ensure they’re all even before you go to dispense. If they’re not, try pipetting up and down a few times. If that doesn’t help, try grabbing the tips up again, more evenly hopefully. 

Look a the hopefully-no-liquid levels in the tips after your dispense. Is there stuff stuck in there? If so, make sure you get it out – it might be easiest to do this after you’ve removed the other tips (see video)

Be on the lookout for bubbles and pipette them out before aspirating (see video)

Rotate replicate and sample locations in your plate so that systematic errors (e.g. one side always has slightly more or one tip always has slightly less) don’t always affect the same sample. 

If you have fewer than a full-row’s worth of tips you need, place the tips in the center, not on the ends, to get the most even levels. 

Keep an empty tip box you can use to put “extra” tips after you rearrange tips to suit the number you need.

Make much more than you think you need – especially when using reagent reservoirs, because the liquid will get spread out, including in-between where the tips will actually be drawing from. https://youtu.be/arRFvdx_cRc 

Another time-saving pipette is the repeater pipette. With those you aspirate once and then dispense lots of times (the same volume each time)


Quick tips and tricks for resuspending pellets

Start by breaking up big clumps (especially important for gunky things like cell pellets)

  • Play the eppendorf rack xylophone! Scrape the bottom of the tube across a microcentrifuge tube rack
  • If you have a lot of pellets such as bacterial cell pellets for mini preps, put them in a rack, put your hand firmly on top so they don’t fly out, then move the rack back and forth over a vortex

Then (or if you’ve skipped the big-break-up, which isn’t needed for easier-to-resuspend pellets), make things homogenous (ensure an even mixture).

  • Pipet up and down *over/above* the pellet – create a vortex-like effect in the liquid, giving the pellet a sort of jet-stream bath. 
  • DO NOT TOUCH THE PELLET WITH THE PIPET TIP! If you do, you can get gunk stuck in and/or on the tip. Not only can you lose yield this way, but if it clogs up the tip you can end up making a sort of suction that then breaks and sucks up a bunch of air.
  • When doing that pipetting up and down (triturating) – set your pipet to a lower volume than there is in the tube. This will help prevent bubble formation. 


Suck it back up & shimmy! A quick practical pipetting tip for coaxing out those drops of liquid stuck inside your tip…

If you get a drop of liquid stuck inside the pipet tip (especially a viscous (goopy) liquid), suck the liquid slowly back up just until you make contact with the drop, then slowly push back down, going gently up and down as you do. This will help coax the liquid off the sides of the tip. 

You’re fighting a battle between liquid sticking to the tip walls and to the liquid. You want the liquid to win – so help it out by going at its pace! If a thin liquid film on the walls is trailing the main liquid front, you’re going too fast! Slow down, pausing as needed for that film to catch up with you.

Once you’re back at the surface of the liquid in the container you’re pipetting into, pause. Don’t release your thumb yet. Hold there for long pause, then slowly, very slowly, release your thumb when you’re right at the surface. As you pull out, make sure those last traces of liquid in the tip are getting pulled out (keep them in contact with the rest of the liquid). 

Once it’s all out (liquid’s out of tip and tip’s out of liquid), then – and only then! – release your thumb!

And – next time – release your thumb more slowly when you’re doing the initial pipetting – fast release is usually the culprit when you get those drops stuck in there. And viscous solutions even more so. So be aware!


Lab tape tips

Dog ear your tape!!!!! Each time you tear off a piece, fold the corner over so that you can easily tear of another one and – more importantly – so that you can easily remove the label from the bottle, etc. when you[re done with it!

This is especially important for things going in the autoclave, which will do a pretty good job really caking that adhesive on there… So make sure you remove any old tape before sticking things in the autoclave.

If labels do get stuck on, you can try soaking in hot soapy water and scraping things off with a razor. If soap doesn’t do the trick, you might need to try a solvent like isopropanol (rubbing alcohol) or acetone. But best to not have to do that at all!

To avoid the opposite tape terror, make sure that your hands/gloves are dry when tape-tearing! And the surface you want to stick that tape on is too. So it will actually stick. Sounds “duh” I know, but it can be easy to forget when you’re rushing and gloopy.

And, finally, beware of tape & labels going in the freezer – especially ones going in the -80, and especially especially if you’re flash freezing in liquid nitrogen. Even those labels that say they’re cryo-safe tend to pop off. So, if you do use them, I also suggest putting some sort of shorthand mark under the sticker just in case…


Tips for setting up a bio-rad tetra cell SDS-PAGE box without leaks

Key points:

  • You will need a gel cassette or a buffer dam for both sides of the electrode assembly in order to create an inner buffer chamber.
  • Ensure the short sides are facing the gasket
  • Strategically place your gel(s) so your gel (not just a dam) or your hardest-to-load gel is closest to the outside for easy loading (remembering which way the assembly will need to be in order for the lid to go on red to red
  • Go in with each cassette or buffer dam at an angle, then push back and up
  • Ensure the top of the short sides are flush against the bottom ledge of the rubber gasket line
  • Hold tightly when flipping to place the other side
  • Check that you haven’t disrupted the first side
  • Keep holding tightly until all is clamped
  • Maintain pressure back and up, but not so strong that you push it above the rubber ledge
  • After placing the assembly in the box, pour a small amount of 1X running buffer into the inner chamber and check to ensure the liquid level doesn’t go down. If it does, you need to reassemble your assembly (but at least you know before there’s sample in there!). If no leaks, fill ‘er up!

Note: this is not an endorsement of bio-rad or a video from them or anything, just a very very very frequent user. (And I will say they give great educational discounts!)
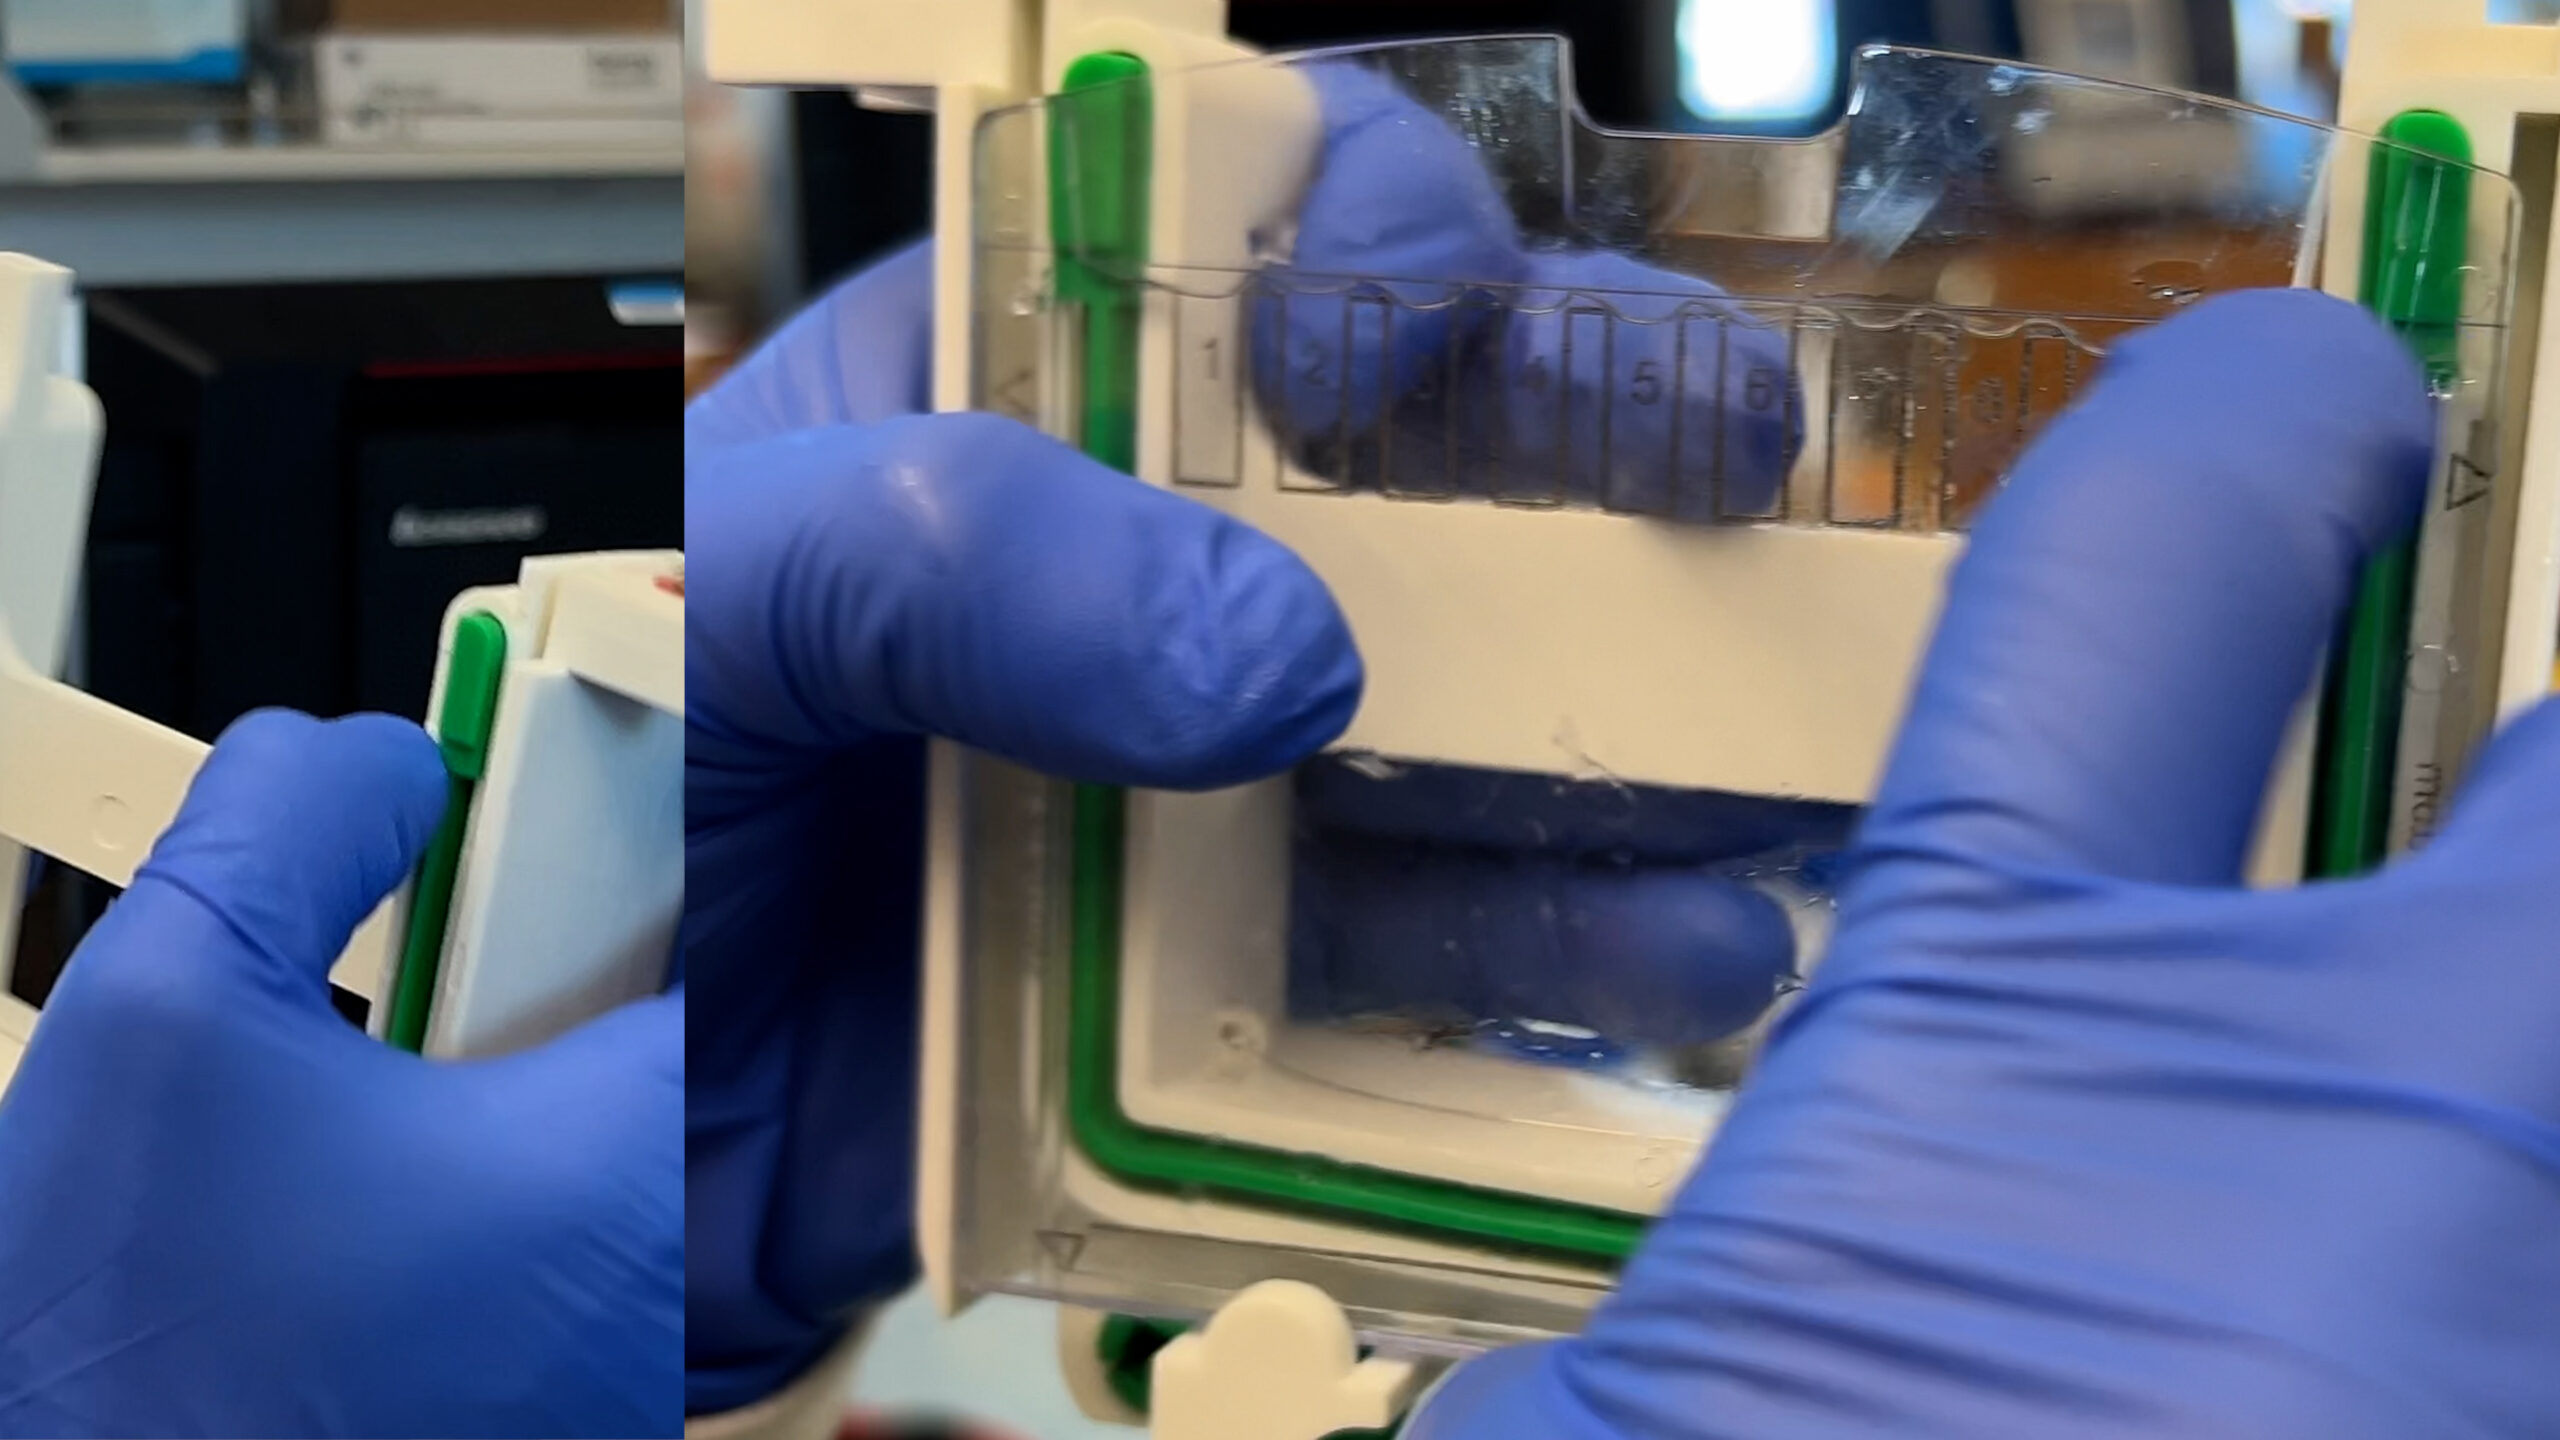
Common problems to avoid when running PAGE gel electrophoresis

  • Forgetting to remove tape sealing precast gels
    • green strip on bottom of BIORAD gels, white strip on the side of Novex gels
  • Not ensuring the gasket is tight
    • for the BIORAD tetra cell boxes, make sure the edge of the inner plate (or top of the ledge of the buffer dam) is snug up against the bottom (not the side) of the green ledge on the rubber seal)
    • pour buffer into the inner chamber first, wait to see if it leaks – if it does, redo; if it doesn’t, pour buffer into outer chamber
  • Having too little buffer
    • make sure that the buffer level in the outer chamber at least covers the level of the wire & that the inner chamber is full
  • Overloading lanes
    • typically don’t want to run more than 2 ug of purified protein or 20 ug total protein in a lysate similar on a typical SDS-PAGE mini gel
  • Not having good contact between the electrodes and the lid
    • if running 4 gels in a tetra cell, you may need to bend the metal plates on the bottom of the lid so that they make contact with the screws
  • Swapping the electrodes and/or putting your samples at the wrong end
    • harder to do with PAGE gels than agarose ones, but it is possible! so make sure you match red to red and black to black

Measuring how much liquid is in your tube using a micropipette

If you need to measure how much liquid is in a tube (small volumes) you can do this with a micropipette. Start by estimating how much there is based on how much should be in there or what the approximate volume lines on the tube show). Then set the volume of an appropriate size micropipet to slightly less than that amount. Spin down the tube briefly to collect all the liquid in the bottom of the tube, then aspirate (suck up) the liquid. There should be a little excess liquid in the tube still. So, with your pipet tip still in there, start turning the dial on the pipet until you have the last of the liquid sucked up without sucking up any air (you want the liquid to be right at the bottom inside of the tip). Now read out the volume the pipet is set to. That’s how much liquid is in the tube. 

If you overshoot it or overpull it and end up sucking up some air, just turn the dial to the right slowly, releasing that excess air (I like to do this with the tip against the bottom of the tube so that if any liquid comes out I can easily suck it back up without bubbles).

Be sure that when you’re turning the dial you don’t end up going beyond the pipet’s range (e.g. don’t go above 200 with a P200 – if you see there’s more than 200, use a P1000).


Random lab “thing you should know” – loosen the carboy lid if you want the water to flow! 

Carboys are these Gatorade-cooler-type-things we fill with super-pure “MilliQ” water and stick by the sinks. If water is only trickling out even though the thing’s full, check the lid! If the lid’s on there tightly, air can’t get in so there isn’t much air pressure helping push the water out the spout (especially once you flow a little liquid out without adding more air). So you need to help it out – loosen that lid to get some air in there!

more on lab water: blog: https://bit.ly/lab_water ; YouTube: https://youtu.be/YFhWh9Zf32c  

Lab hacks for maximizing your agarose gel usefulness:

  • Run out all the DNA and re-use the whole gel to run new samples
    • Can scan it to make sure it’s all out (or at least out enough that it the smallest new bands won’t catch up to any big old ones)
    • Use fresh running buffer (you’ve depleted some of the buffering capacity during the first run & over-run)
    • Not recommended if you are going to gel extract
  • Run again with new samples in unused lanes from previous run (no need to run previous samples all the way out)
    • Can even re-run after cutting out used parts 
  • Cast the gel with 2 combs to get 2 rows of wells so you can run twice as many samples
    • Just make sure to stop the gel running before they run into each other
  • Store in buffer to prevent drying out
    • Room-temp is fine if you’re using it same-day
    • Otherwise, stick it in the fridge (empty pipet tip boxes with some buffer make nice storage containers)
      • Will last for a pretty long time this way 

Preparing glycerol stocks of bacteria

Glycerol stocks are great for long-term storage of bacteria. They’re easy to make and you can prepare them from the same overnight culture you use to miniprep them.  

— take 500μL of that culture & add to 500μL sterile glycerol; invert to mix & store in -80°C freezer (I typically flash freeze in liquid nitrogen before sticking them in) – should be good for years if you avoid freeze-thaws  

—— when you want to use it, just thaw it on ice enough that you can scrape a bit off the top to plate 


– then, if you want, you can miniprep the rest of the overnight culture to isolate the plasmid  


Practical tips for using a vacuum manifold for minipreps and similar spin columns

If you have a lot of minipreps (or other nucleic acid purification columns) to run and/or you have larger volumes than a single column can accommodate in one spin, the vacuum manifold can give you a win! Here are a couple tips to help ensure that the vacuum sucks but your results don’t!

  • make sure all of the spots not in use are stoppered
  • turn off the vacuum (and/or turn the stopcock to horizontal) once the liquid has all been pulled through – don’t leave it sucking the dry membrane or it can damage it
  • after you do what you need to do on the vacuum, spin it (in waste tube) to ensure it’s dry (remember any liquid on the sides of the tube won’t get removed by the vacuum!)
  • use a repeater pipet to make the washes faster, BUT
    • avoid splashing on the sides of the tube while adding the wash buffer
  • label the columns on the ledge-y part so you see it when it’s in the tube & make sure the wash buffer doesn’t wash off the label
  • don’t worry about the vacuum manifold brand matching the column brand – they typically all have the same closures so you can use them with whatever
  • try not to loose the stopper, but if you do, a 15mL falcon tube can save the day… 

Practical tip for balancing centrifuge tubes: remember the 1 g/mL rule of thumb

Quick centrifuge-balancing tip: remember that water and most watery solutions weigh about 1 g per mL. So if your balance tube is down 1g, add 1mL, 2g 2mL etc. If you’re balancing 2 sample tubes (so you can’t just add water), split the difference. So if you’re down 1 mL, transfer 500uL (1/2 mL) from the heavier tube to the lighter one. Always check the weights of the tubes are the same afterwards because it probably won’t be perfect, but it should at least be close! 


Practical tips for pouring plates: cool LB/Agar in a 55C water bath & remember the stir bar!

Practical pointer for preparing plates: While you’re autoclaving your LB/Agar solutions, set a water bath to heat to 55°C. Then, after autoclaving, transfer your too-hot-to-do-anything-with-yet bottles to the water bath. 

Now you can safely forget about them! Well, don’t actually forget about them. But if you put them in the bath you won’t need to worry about monitoring them closely to prevent them from over-cooling and starting to solidify.

At 55°C, the solution will stay liquid, but it won’t be too hot to add antibiotics and pour. And, since it doesn’t start solidifying until ~45°C, you will have enough time to do all that before it gets gelly. 

It’s important that you don’t add antibiotics while the solution is really hot because this can “break” (degrade) the antibiotics, negating the point of adding them… And it’s also important not to pour the plates when it’s too hot because you could damage the plates – or your hands! But 55°C is ideal and comfortable enough to pour. 

So, go ahead and do some other stuff for a while while the bottle gets to that temperature, and then go ahead and add your antibiotics, stir, pour, and enjoy the aroma!

Another tip: autoclave the bottles with a magnetic stir bar in them (don’t worry, they’ll be okay in the autoclave!). This way, you can stir on a stir plate in order to mix the antibiotics, avoiding the bubbles that come with shaking. 

Busy schedule? When you prepare LB-agar, make extra bottles, autoclave them all, use the ones you need now right away (after cooling in a heat bath to ~60°C) and let the others solidify. Then, when you’re ready to make more plates, just re-autoclave to remelt them and you’re good to go! It saves you time over starting from scratch each time. This is especially handy when you are trying to do research with students around their schedules and your teaching schedule!


Practical tips for pouring plates: cool LB/Agar in a 55C water bath & remember the stir bar!

Take 1mL samples pre-induction & at time of harvesting  


Pellet the cells out by centrifuging it at top speed for ~10min and removing liquid media.  


Prepare SDS-PAGE Sample 

add 50uL 1X sample loading buffer (this has a detergent so it will help small-scale lyse things) 

heat 10-15min (can stick in PCR machine set to incubate at 95-100°C) 

centrifuge briefly  

load supernatant (~5uL) 


Run gel 


Look for the appearance of a new band at expected size 


If you don’t see it (especially if you were using a T7 system, where your protein should be majorly overexpressed (since it gets (all the copies of) a whole polymerase devoted to it!), what can you do? 

* check your plasmid if you haven’t recently – make sure it doesn’t have any mutations (other than site-directed ones you might have made of course…) 

* prepare fresh IPTG & try again 

* check the gunky pellet part in case your protein is getting made, but is going into inclusion bodies  

* try a different expression strain or at least a different aliquot or batch 


If you see a faint band, try adjusting IPTG concentration and/or expression temperature and/or expression time 


If you run out of liquid nitrogen – or never had any to begin with – and need to flash freeze some samples, don’t panic. It’s not as good as LN2, but a dry ice bath should do! 

If you run out of liquid nitrogen – or never had any to begin with – and need to flash freeze some samples, don’t panic. It’s not as good as LN2, but a dry ice bath should do! 

If you use ethanol, you can get to ~ -72C. Use isopropanol (rubbing alcohol) or acetone and you can get a little colder – ~ -78. Nowhere near the ~-210 LN2 can get you so it can’t cool your stuff as quickly but it will be quicker than if you were to just stick your sample in the -80 freezer because the alcohol will conduct heat better, sucking the heat out of your sample. And since it has a high heat capacity the alcohol won’t heat up much as it does so. 

For more info: 

JoVE Science Education Database. Organic Chemistry. Conducting Reactions Below Room Temperature. JoVE, Cambridge, MA, (2023). https://app.jove.com/v/10224/conducting-reactions-below-room-temperature?language=Russian 

1.4J: Cooling Baths is shared under a CC BY-NC-ND 4.0 license and was authored, remixed, and/or curated by Lisa Nichols via source content that was edited to the style and standards of the LibreTexts platform; a detailed edit history is available upon request.

https://chem.libretexts.org/Bookshelves/Organic_Chemistry/Organic_Chemistry_Lab_Techniques_(Nichols)/01%3A_General_Techniques/1.04%3A_Heating_and_Cooling_Methods/1.4J%3A_Cooling_Baths#:~:text=It%20is%20also%20quite%20common,bath%20of%20%E2%88%9278oC

Lab freezing bath temperatures, LarkinWeb

https://www.larkinweb.co.uk/science/freezing_bath_temperatures.html

more about flash freezing: https://bit.ly/cryoprotectantsandvitrification & https://youtu.be/JsvjoJmfRDo

more about dry ice: http://bit.ly/sublimedryicescience & https://youtu.be/X6_YtrGp_gE


Simple lab hack for looking at your SDS-PAGE gels

Just stick a sheet of stiff white paper (or just normal paper on cardboard for strength) in a big ziploc bag, stick your gel on it, and revel in the beauty of your bands! It’s also great for taking pictures (without weird light artifacts you get if you try to take a picture of a gel in a light tray)


Makeshift refrigerated incubator

If you need to incubate samples at a temperature below room temperature, but don’t have a refrigerated incubator, just change the room temperature! Sticking a normal incubator into a cold room now opens up incubation at temperatures down to 4C! Great for if you want to express proteins at 16C overnight. Just make sure that you get it warming up to that temp before you’re ready to use it. And stick a thermometer in there to make sure it actually gets to the temp you want. 


Check & adjust the pH of a buffer at the temperature you want to use it at

No matter how diligently you calculate (using Henderson-Hasselbalch) and how carefully you measure out the amounts of conjugate acid and conjugate base you need to mix to theoretically get to the perfect pH, you still should check the pH – and do it AT THE TEMPERATURE YOU WANT TO USE IT! Especially if you’re using Tris, which is notorious for varying with temperature! For each degree C you go DOWN in TEMPERATURE, you go UP in pH ~0.03 units. That is, your solution becomes more basic/alkaline. This is because the Tris becomes less acidic. It a pKa of ~8.30 @20°C, which creeps downwards at a rate of –0.310/10°C. End result 1 that buffer you prepared to be 8.0 at 25C is now at 8.58 when you go to use it at 4C! Which might make your proteins quite unhappy (or at least can affect the reproducibility of your experiment). 

YouTube: https://youtu.be/WHB-kuH7p4c 

Not all buffers are quite this bad. For example, HEPES has a pKa of ~7.55 @20°C, which creeps downwards at a rate of –0.140/10°C.

Why’s Tris so bad about this? Tris deprotonation has a high enthalpy – it requires more energy to overcome the attraction between the proton and the nitrogen its attached to. At lower temperatures, there’s less energy available, so molecules are less willing to give up their protons at lower temperatures and, as a result, the pH will increase at a lower temperature. So you want to adjust the pH to the value you want at the temperature you plan to use it at.⠀ 

Note: I find it easier to remember that it becomes more acidic as you raise the temp (so the pH drops with increasing temp) because  I think about those protons getting the energy to wiggle around more and pop off! Then I just have to flip things for going down. 

Good, N. E., Winget, G. D., Winter, W., Connolly, T. N., Izawa, S., & Singh, R. M. (1966). Hydrogen ion buffers for biological research. Biochemistry, 5(2), 467–477. https://doi.org/10.1021/bi00866a011 

https://www.neb.com/tools-and-resources/usage-guidelines/ph-vs-temperature-for-tris-buffer

Temperature Dependence of pH for Commonly Used Buffers, Promega, referencing Good,N.E.(1986)Biochemistry 5,467. https://www.promega.com/-/media/files/resources/technical-references/temperature-dependence-of-ph-for-common-buffers.pdf 


Lab hacks for drying cuvettes

Lab hacks for drying cuvettes – use a pipet tip attached to vacuum tubing (gently) to suction out liquid, then stick the cuvette inverted over a hold in a membrane in a vacuum filter. Thanks Dr. Sigman!


Tips for Bradford assays (or other microplate assays) without bubbles

Those bubbles can mess up the plate readings, so the best thing is to avoid forming them in the first place by:

  • Making sure your pipet doesn’t come out of the liquid when you’re mixing to avoid introducing air
  • Setting the pipet to a lower volume to mix and/or only sucking up partway when mixing
  • Pipetting slow

But, if they do form, all hope’s not lost! Try…

  • Giving it a min or so to pop on their own
  • Tapping the plate down gently on the benchtop a few times (gently, avoiding getting drops on the lid or spillover)
  • Agitating it with a plate shaker (gently, avoiding getting drops on the lid or spillover)
  • Giving it a quick spin in a centrifuge
  • Popping them with a needle (carefully, avoiding stabbing anyone/thing)

Some lab names and naming conventions that can trip people up

  • KimWipes (not chem wipes): the Kleenex of the lab in more ways than one. It’s a brand name thing (made by Kimtech)
  • Eppendorf tubes: microcentrifuge tubes (typically the 1.8 mL ones)
  • Falcon tubes: plastic conical tubes. Another brand name, so capital F
  • For context – I also for some reason thought “falcon” had 2 L’s. So it may just be me that gets tripped up by names and spellings 🙂
  • RNase and DNase: lowercase a’s 
  • Southern blot: uppercase (last name)
  • western blot: lowercase w (spin-off, not a name)
  • The last letter of restriction enzyme names is a Roman numeral – so pronounce it as a number, not a letter

Some simple ways to save plastic and money in the lab

  • Reuse whatever you can – label serological pipets, vacuum filters, etc with what you used them for, then use them for the same thing again. 
  • Pipet strategically – low concentrations, then high concentrations of the same thing with the same pipet
  • Autoclave and reuse conical tubes 
  • Use reusable glassware instead of plastic when possible 
  • Use “waste” to make helpful lab gadgets like taping pipet tip refill racks together to make a PCR tube rack
  • You can find some nice resources at https://re-advance.com/, which is led by my friend from the IUBMB Trainee Initiative, Patrick Penndorf

Some practical tips for effective mixing of small into big…

Make sure you’re in the liquid when you pipet the small amount in. Then up down a few times with the pipet. Just to get it all out and ensure that there are at least no concentrated drops left in the tip. That won’t mix things though. Now, pick up a big pipette set to a volume slightly lower than your total volume (to avoid air). Before going in the liquid, press your thumb down to the first stop (don’t push past it). Then put your tip down to near the bottom and go almost all the way up – down a few times gently to avoid bubbles and without coming out (and introducing air). Make sure most of the volume is being mixed each time. Then come out of the liquid fully before releasing your thumb. 


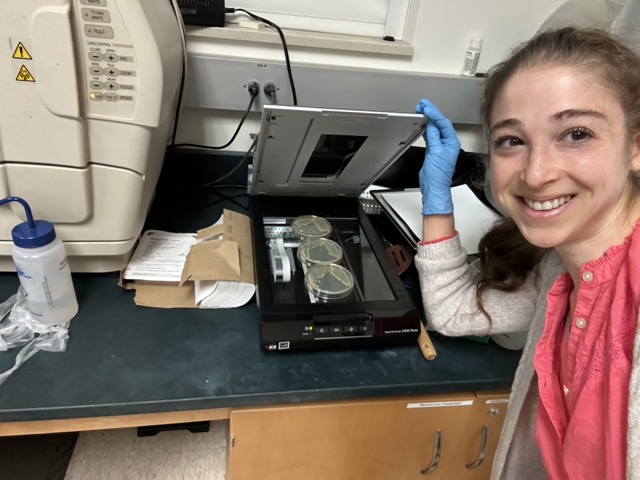
Can we take pics? Yes we scan! 

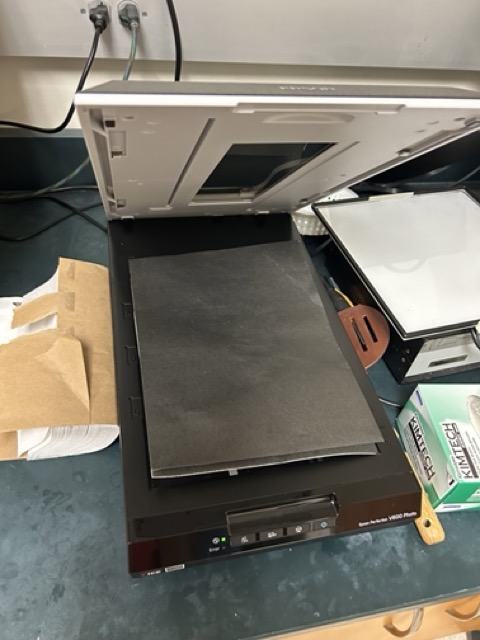
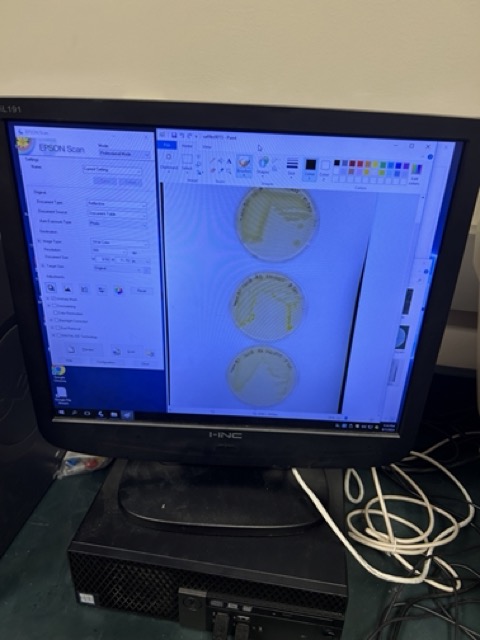
You can avoid camera shadows and reflections by scanning Petri dishes on a regular old scanner. Just put a white or black piece of plastic on top for a nice background. 

Why you should run your samples in (at least) triplicate when doing an experiment

Just 1: no clue if it’s right

2: no clue which is right

3: idea which are right

More than 3: good idea which are right, but lots of work!


Tips for resuspending bacterial cell pellets

Start by adding most of the volume of buffer you want, but save out a few mL for washing out the final bits

Vortex, using a serological pipet to aid as a sort of mixer to help break up clumps (but not pipetting at this time)

Once you’ve got things broken up mostly, start pipetting up and down with the pipet

Go back and forth between vortexing & pipetting as needed

Once it’s resuspended fully, transfer it to a storage tube

Take the last few mL of buffer and use it to rinse out the final bits of pellet


Tips for pouring without pouring out your stir bar

It’s always fun getting to teach students lab tricks: today I got to show them how you can hold a large magnetic stir bar on the outside of your magnetic stir bar containing beaker to prevent the stir bar from falling in (while avoiding having to use (and thus clean) the magnet fisher rod thing.

Comes in really handy when dissolving solids in a partial volume in a beaker, then transferring to a graduated cylinder. 


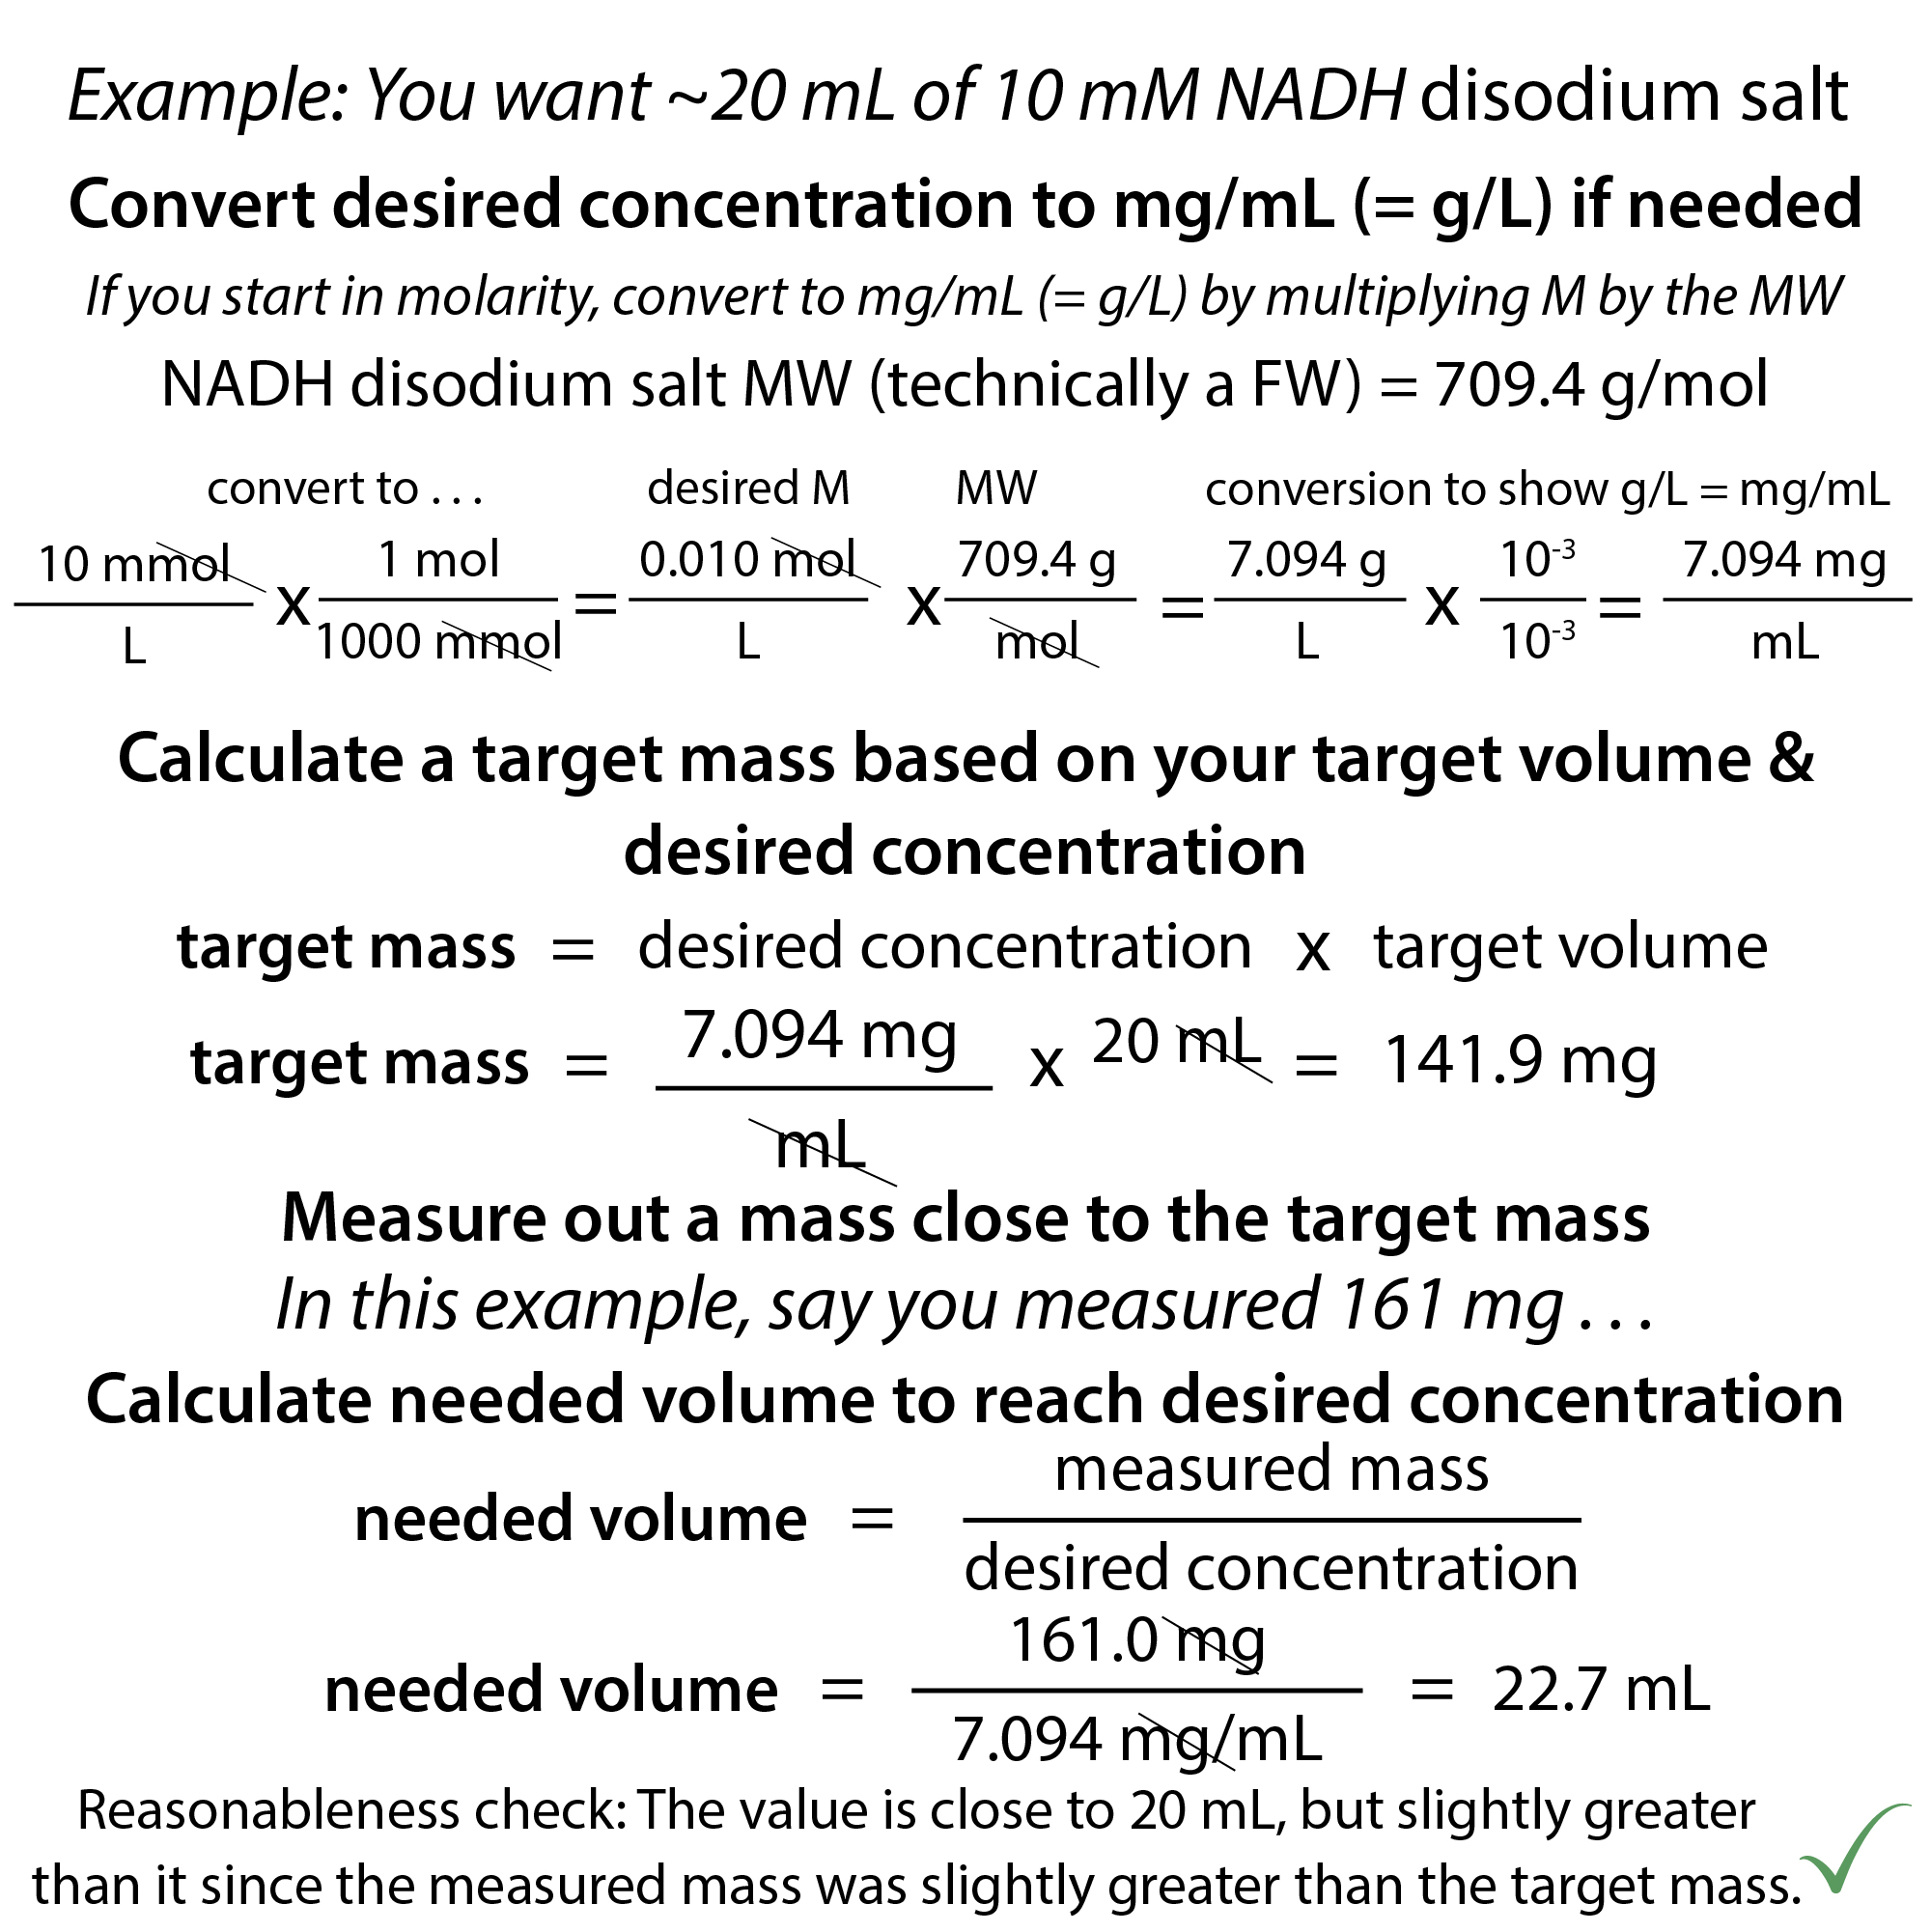
With small masses, adjust volume rather than mass when making a solution

When you have a small amount to weigh out, don’t worry about being exact. Instead, it’s easier to change the volume to match what you weigh to get your desired concentration. 

If you start with a desired weight/volume concentration, divide your actual measured weight by that desired concentration. Taking any unit conversions into account, the weights cancel out, leaving you with volume 

If you start with molarity, just add a step to convert to weight/volume by multiplying the molarity by the molecular weight. 

It can also be helpful to do the weighing in the tube so you don’t have to worry about loss during transfer. 


Quick lab tips for de-stressing your experiments: checklists, play-by-plays, color coding, etc.

After all these years in the lab, I still get anxious preparing and running important experiments like today’s (when I literally ran enzyme assays from 8 am to 6 pm with only a 30 min lunch break of rest).

But, after all these years in the lab, I have developed strategies for staying calm and pipetting productively on!

These include making checkboxes, planning experiments in detail ahead of time and coming with printed play-by-plays, color coding, and strategically placing equipment and reagents. 


Opening Parafilm

Another sign you lab a lot…

Note: some people also find success pinching a corner


Agar stuck in the bottle? Pour it into a beaker, not the sink!

I’m guessing some of y’all can relate to those situations where you’ve got more leftover agar than you can plate. Whatever you do, don’t pour it down the drain, where it can solidify in the plumbing. Instead, just let it solidify in a beaker, plop it out, and throw it away!

PS – if your microwave is tall enough, you can also (carefully) melt it that way too


Save that sleeve! 

When you open up a sleeve of Petri dishes, do so carefully from the top and save the bag to use as a storage sleeve. Let the plates cool, then stack them lids-up, mark them (color-code your plates based on antibiotic and run a colored marker down the side to label them all), carefully slide the bag over the stack, flip the bag over, careful not to let the lids open, roll over the top of the bag, stick on a piece of lab tape, and label it with the type of plates, the dates, and your initials or name. Now, the plates are upside-down for storage (you want to store them lids on the bottom so that condensation doesn’t fall on the agar). 

Save used bags as well for those times you don’t have a complete sleeve-ful. 


Use magnetic clips to clip your protocol above you as you work

You can use metal tape to create surfaces if needed and allowed. Unlike just taping up your protocol, with clips you can easily flip through things to see what’s coming up, change the ordering, etc.


Don’t let your gel run away from you! Use a kimwipe (or other lintless tissue) to prevent your agarose gel from sliding when you image it


Working with and packing protein chromatography resin slurries: practical tips

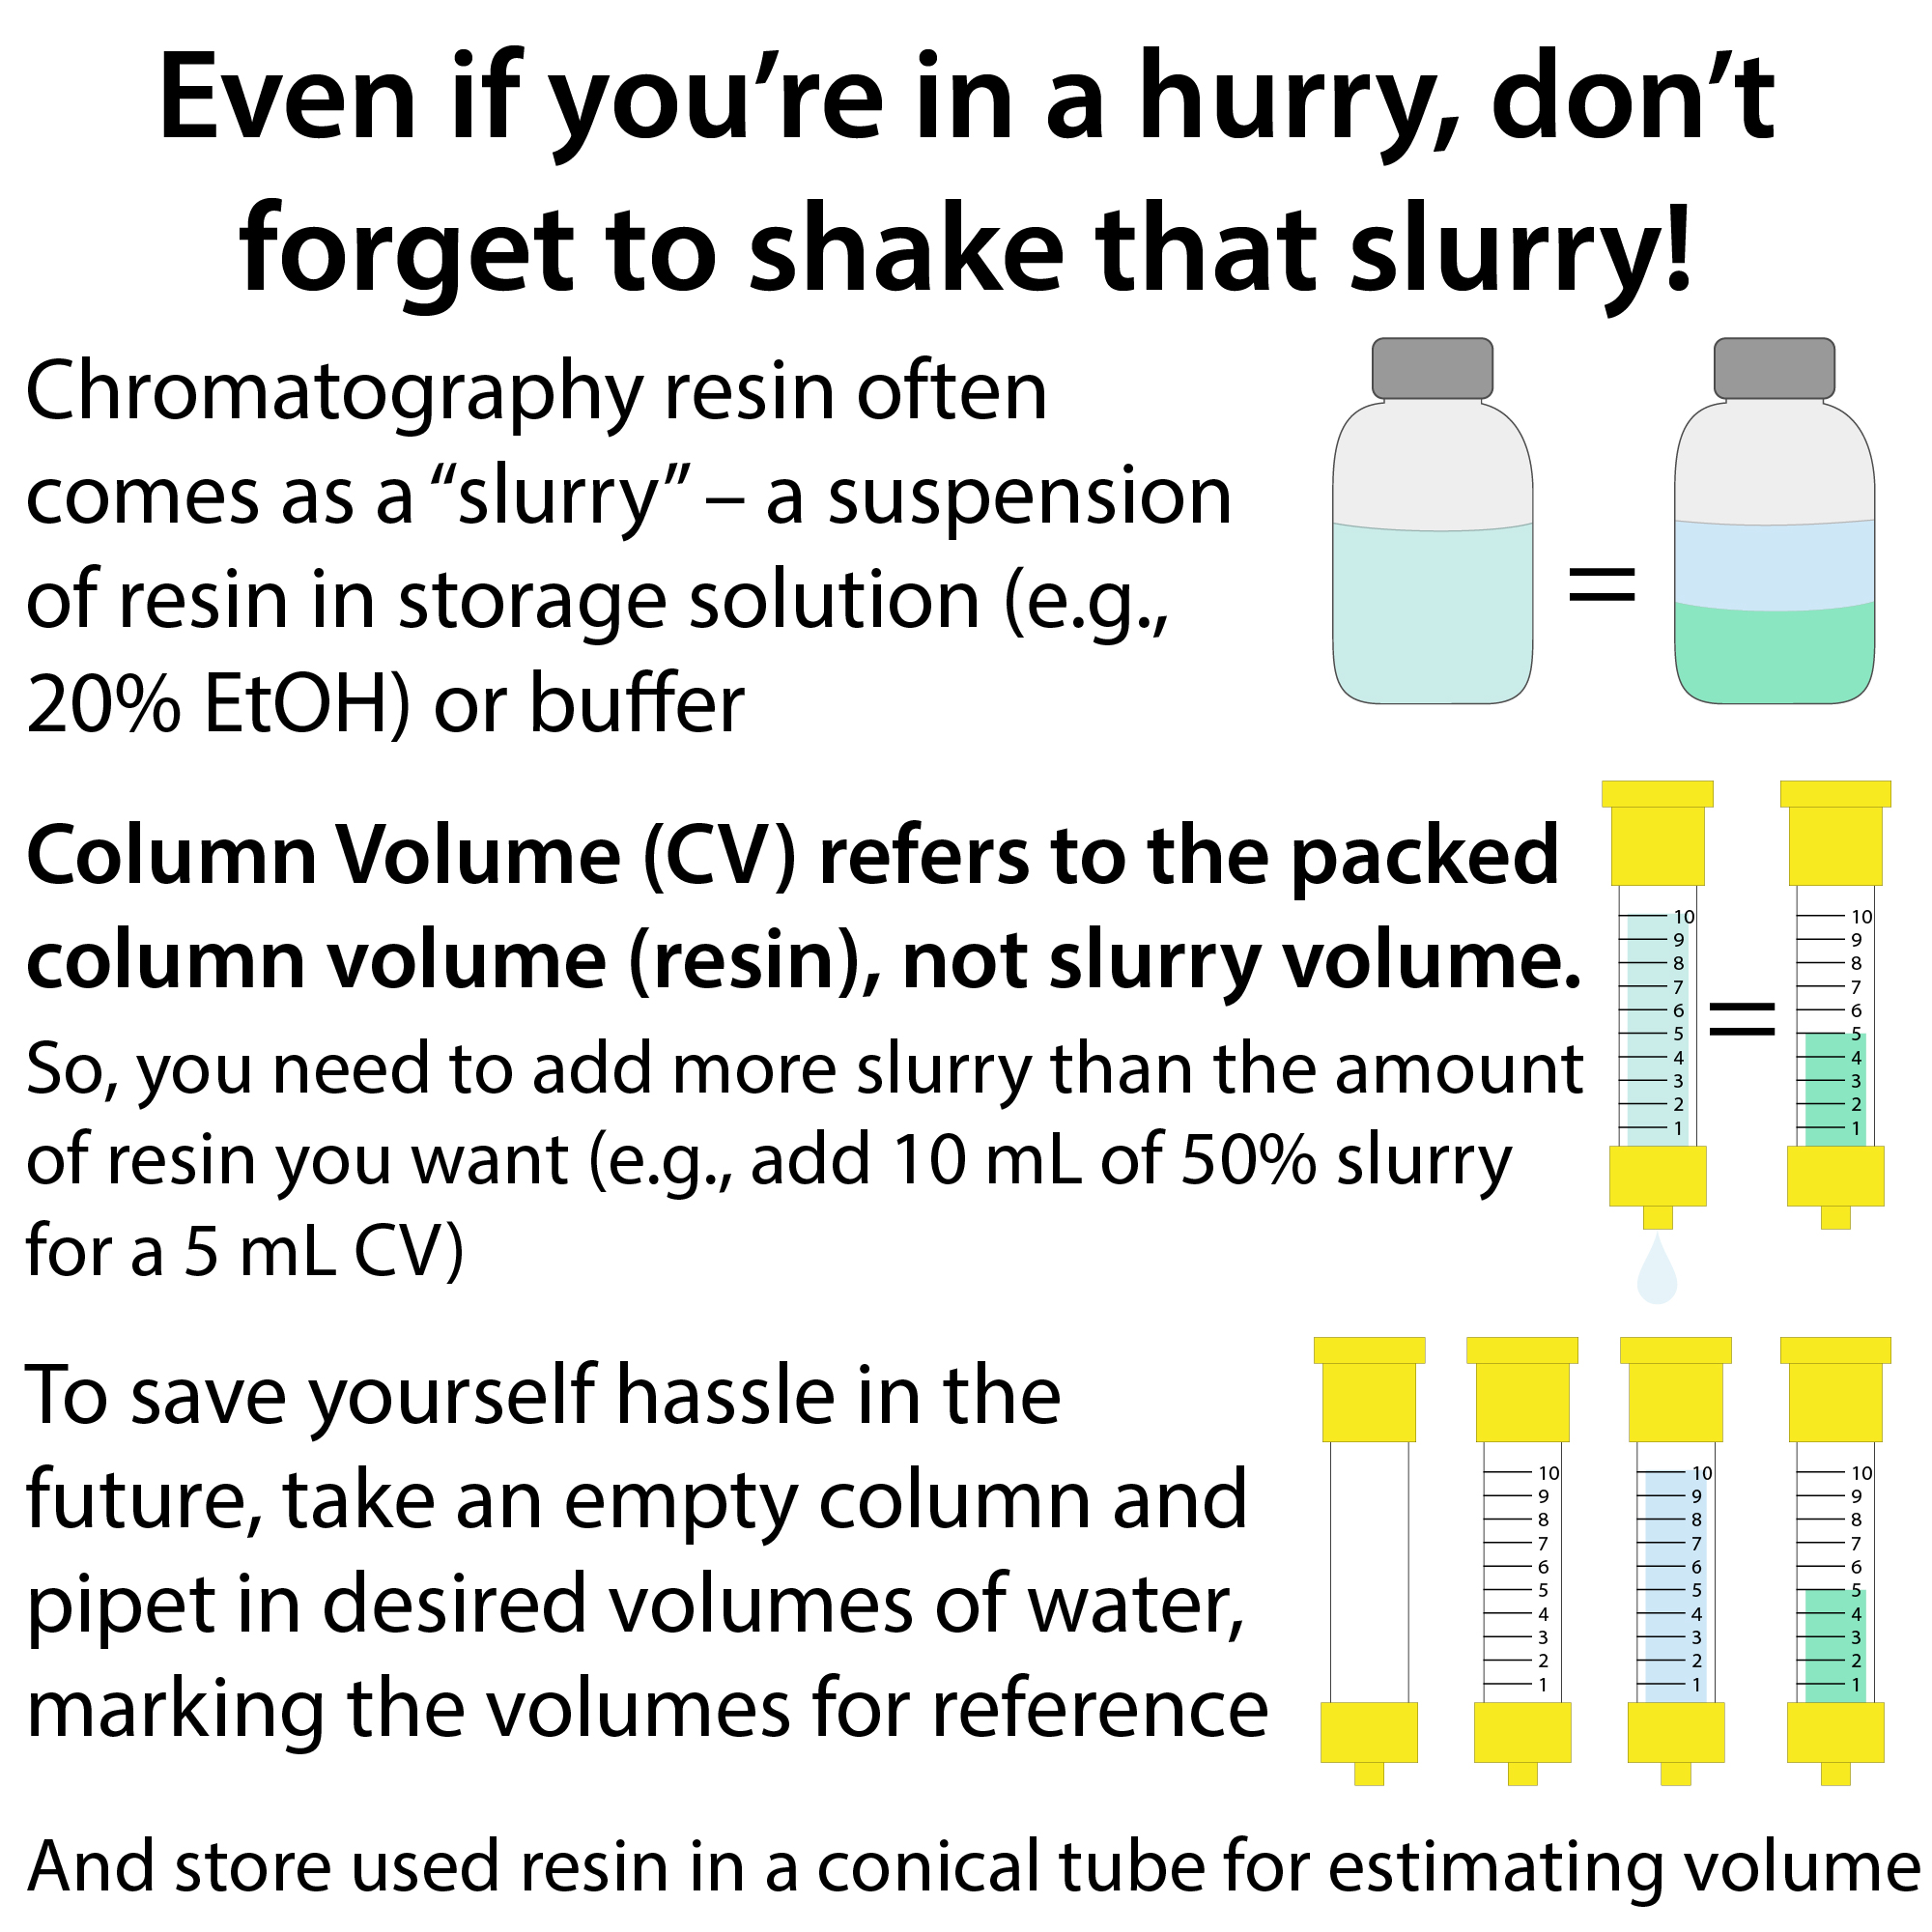
Even if you’re in a hurry, don’t forget to shake that slurry!

Chromatography resin often comes as a “slurry” – a suspension of resin in storage solution (e.g., 20% EtOH) or buffer. Column Volume (CV) refers to the packed column volume (resin), not slurry volume. So, you need to add more slurry than the amount of resin you want (e.g., add 10 mL of 50% slurry for a 5 mL CV). 

To save yourself hassle in the future, take an empty column and pipet in desired volumes of water, marking the volumes for reference

And store used resin in a conical tube for estimating volume


Tip for unclogging empty chromatography columns

Even if you’re in a hurry, don’t forget to shake that slurry!

Start by swirling water. If that doesn’t do the trick, turn it upside-down and (gently) squirt water through – either with a sink spigot or a squirt bottle. Turn it right-side up and add water. Swirl until you get a steady stream. Flick if needed (though be careful because I bruised my fingernail this way last year…). Put on the stopcock (in the open position) to check it for clogs as well. 

Hope that helps. And do, do, do be sure to check for clogs *before* you add your resin!


Quick and easy protein solubility screen


You can “easily” test the solubility of proteins under different conditions (pH, salt type, salt concentration, etc.) by setting up trials in a 96-well plate and monitoring absorbance at 600 nm over time. Aggregate formation will lead to increased absorbance, telling you you’ve gone out of a protein’s comfort zone!

Our strategy:

  • Prepare 3X pH buffers (3 pH’s) and 1.5X salt solutions
  • Add to 96-well plate (190 µL total)
  • Add concentrated protein (10 µL)
  • Measure OD600 for 30 minutes

• ⁃ Use a multichannel whenever possible!


Prevent precipitation post-Ni-affinity

If your protein’s precipitating after Ni-affinity chromatography, try adding some EDTA to ~1 mM to your eluted proteins (AFTER they come off the column). A potential reason you’re seeing precipitation is that nickel ions leached off the column and now are creating bridges of a sort between copies of your protein. EDTA is a chelator, a molecule that binds to metal ions in multiple places, so it can grab the nickel ions away from your protein, disrupting those bridges.

If you are really concerned about precipitation based on your prior experiences with the protein, you can add EDTA to the fraction collection tubes themselves, before you even elute into them. (Just calculate how much you’ll need based on your fraction volumes)

You can also cut off the tags if you have a protease cleavage site, but that’ll take longer.  

Be careful though with the EDTA if you’re working with a metal-dependent protein and/or if it’s incompatible with your future plans for your protein.

It could also be something else about the buffer, like lower salt concentrations, that are causing precipitation, so you can experiment with that as well. Best of luck!


Quick tip for measuring small volumes (approximately)

Practical lab tip – you can measure the approximate volume of liquid in a microcentrifuge tube or similar with a pipet.

  1. Roughly estimate the volume (such as based off of approximation lines on the tubes)
  2. Set the volume of a micropipet to a bit lower than that estimate
  3. Suck up (aspirate) the liquid in the tube
  4. Scroll the pipet adjuster to suck up the remaining liquid until right when you’re about to introduce air
  5. Look to see what volume the pipet reads