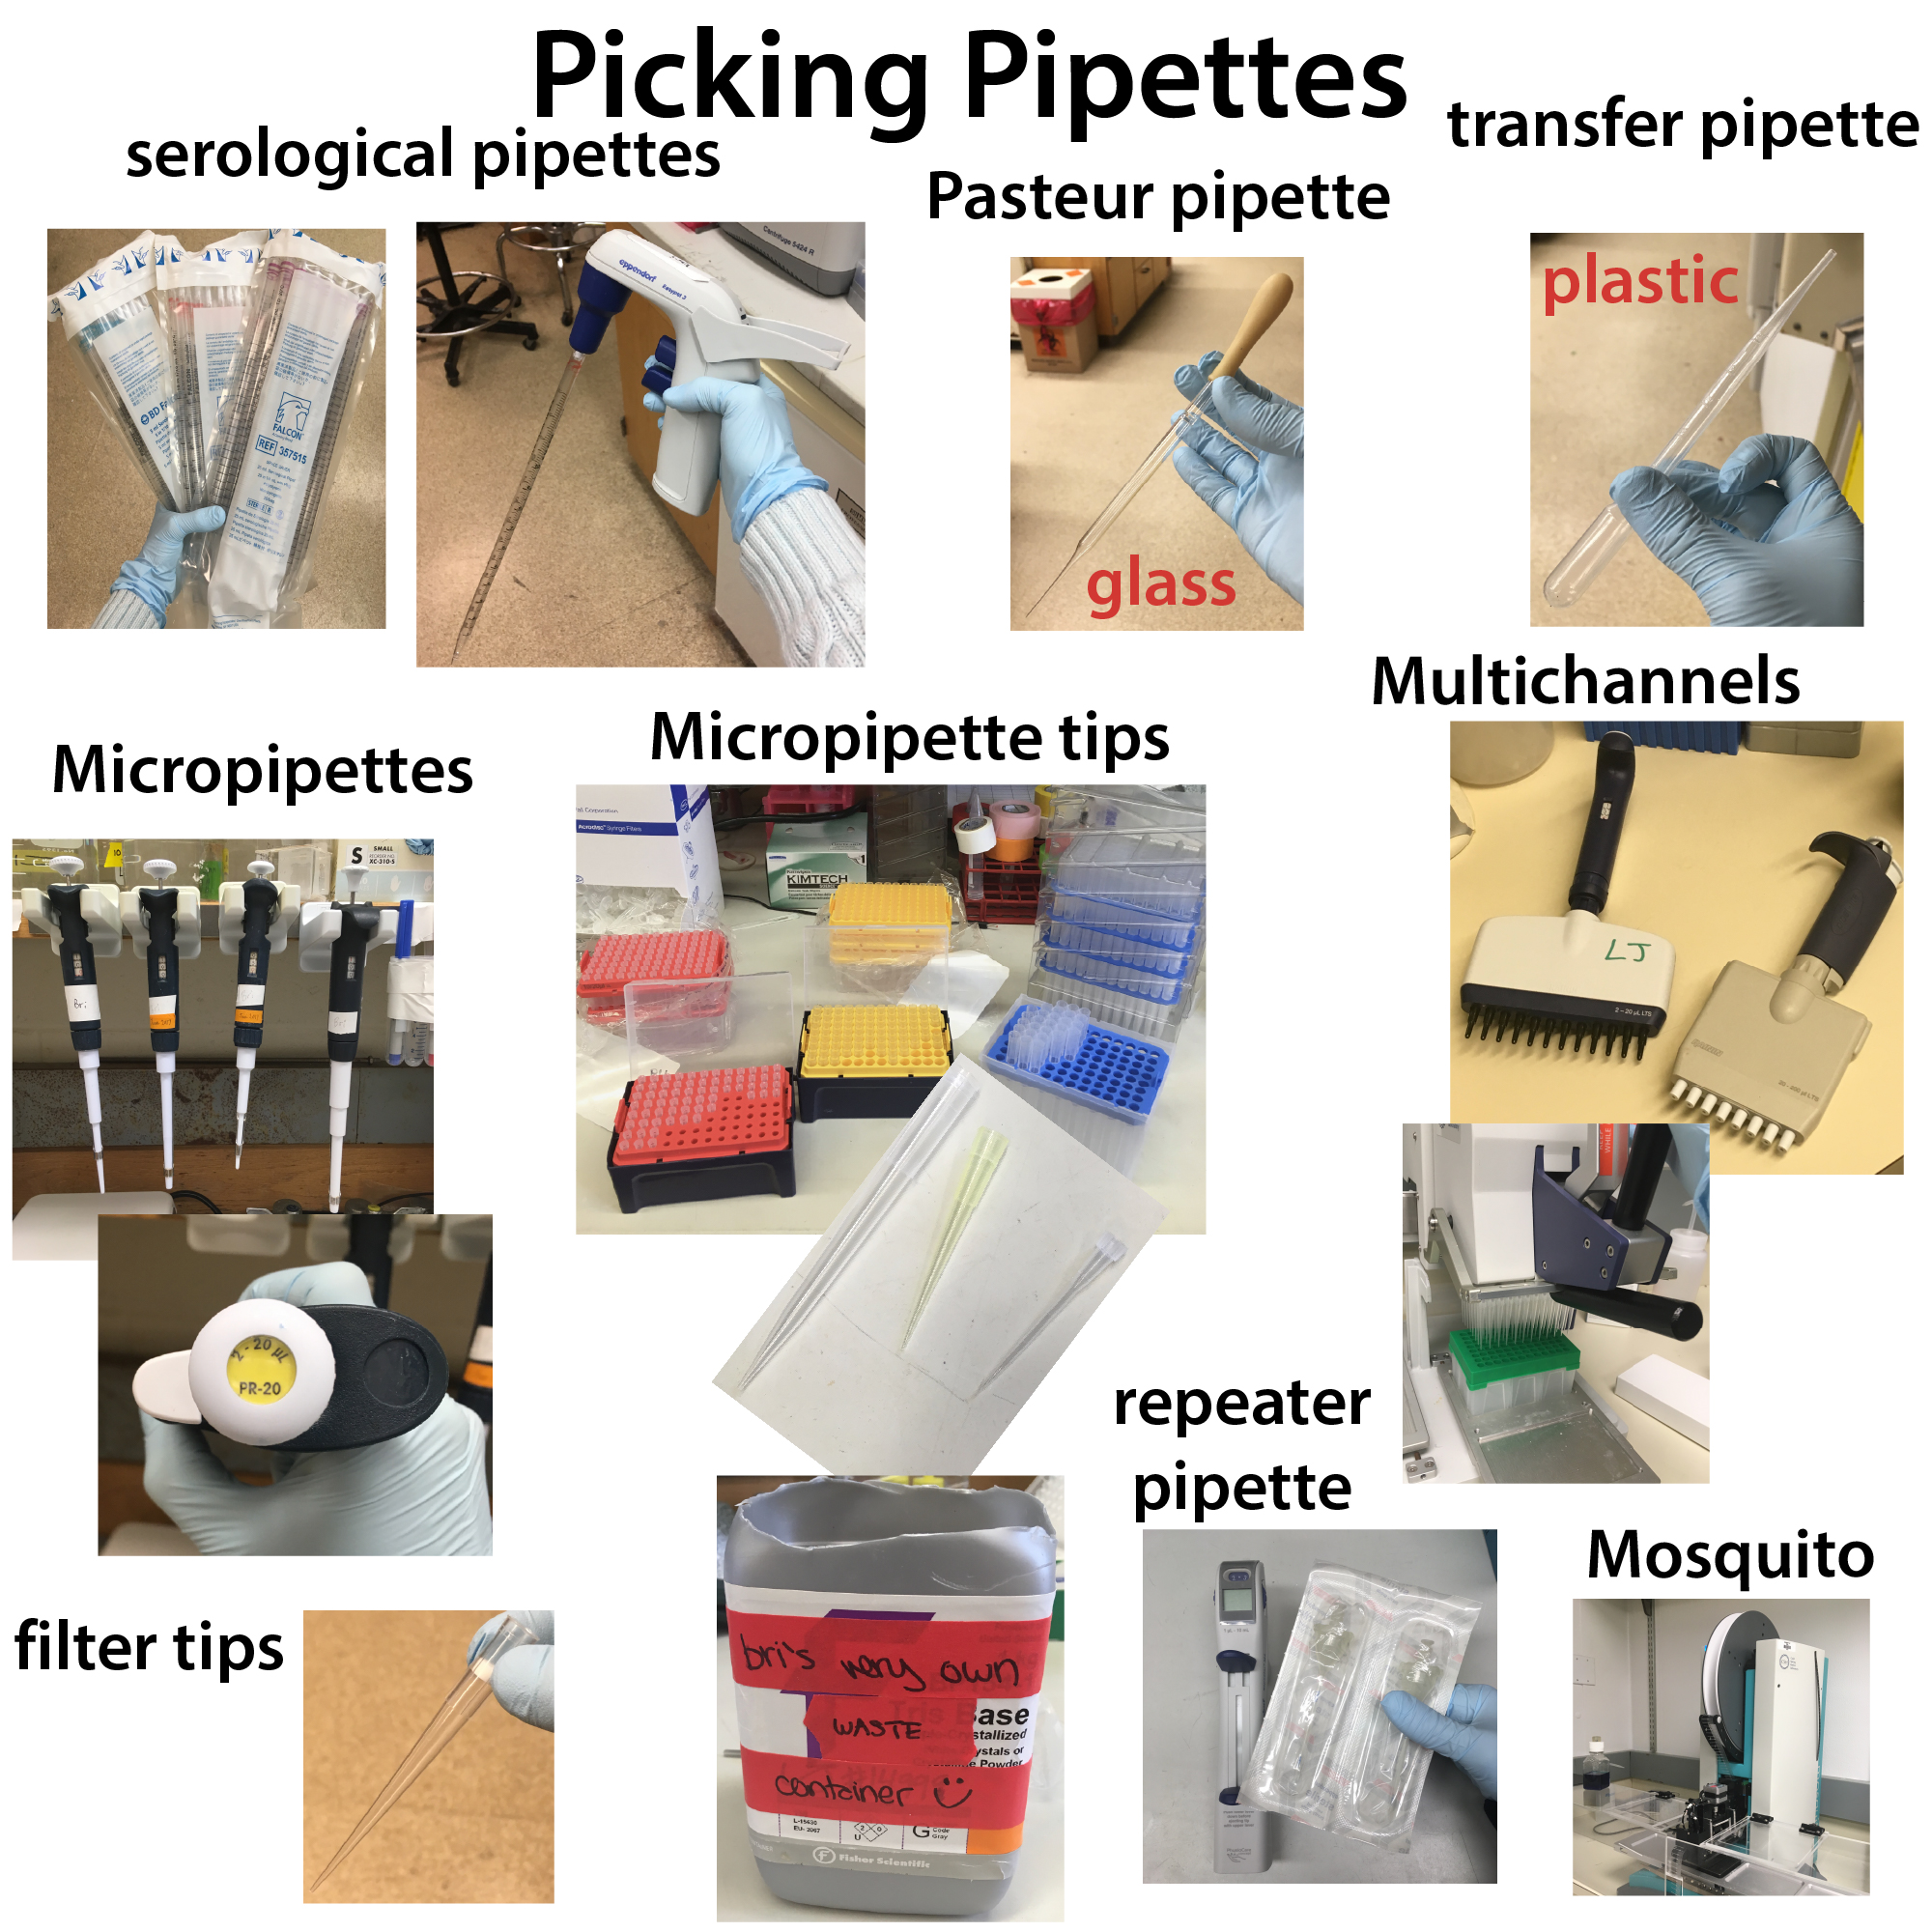
For more on types of pipets, see this comprehensive post
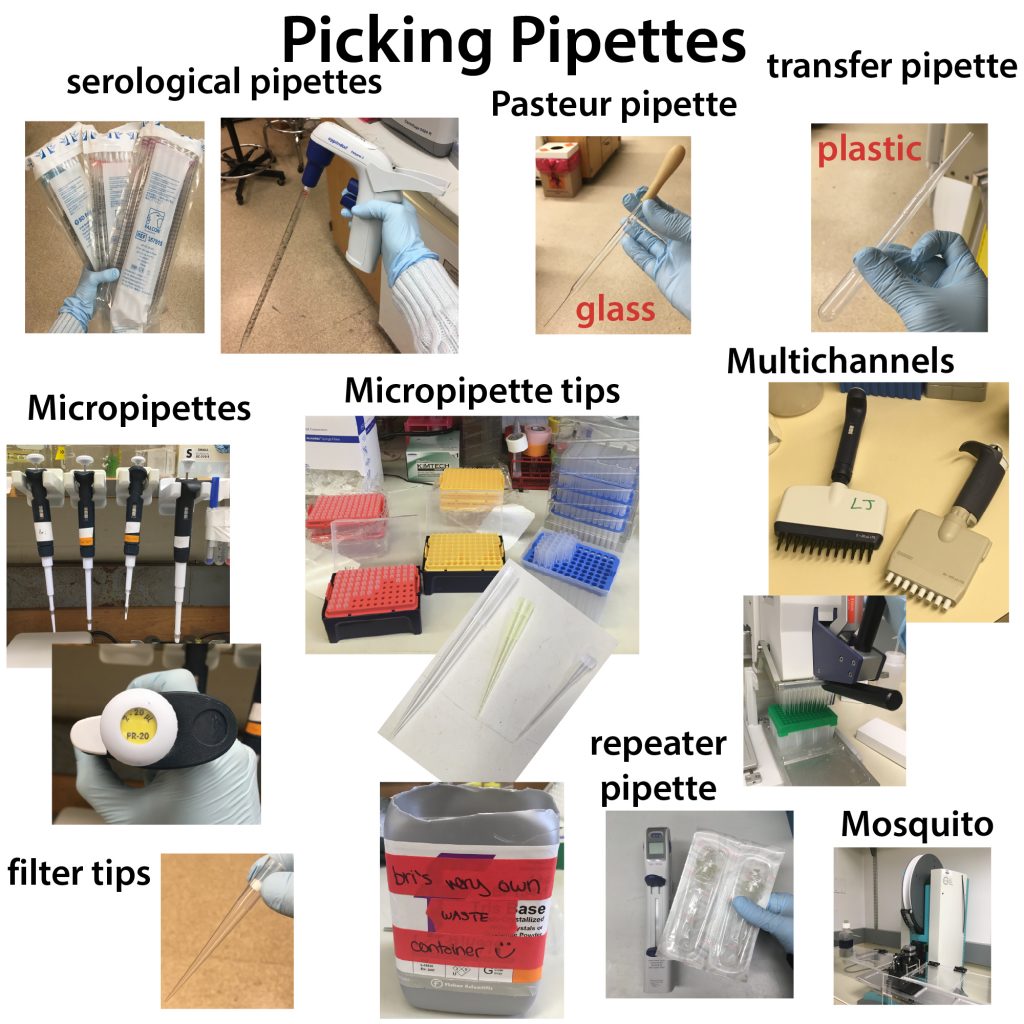
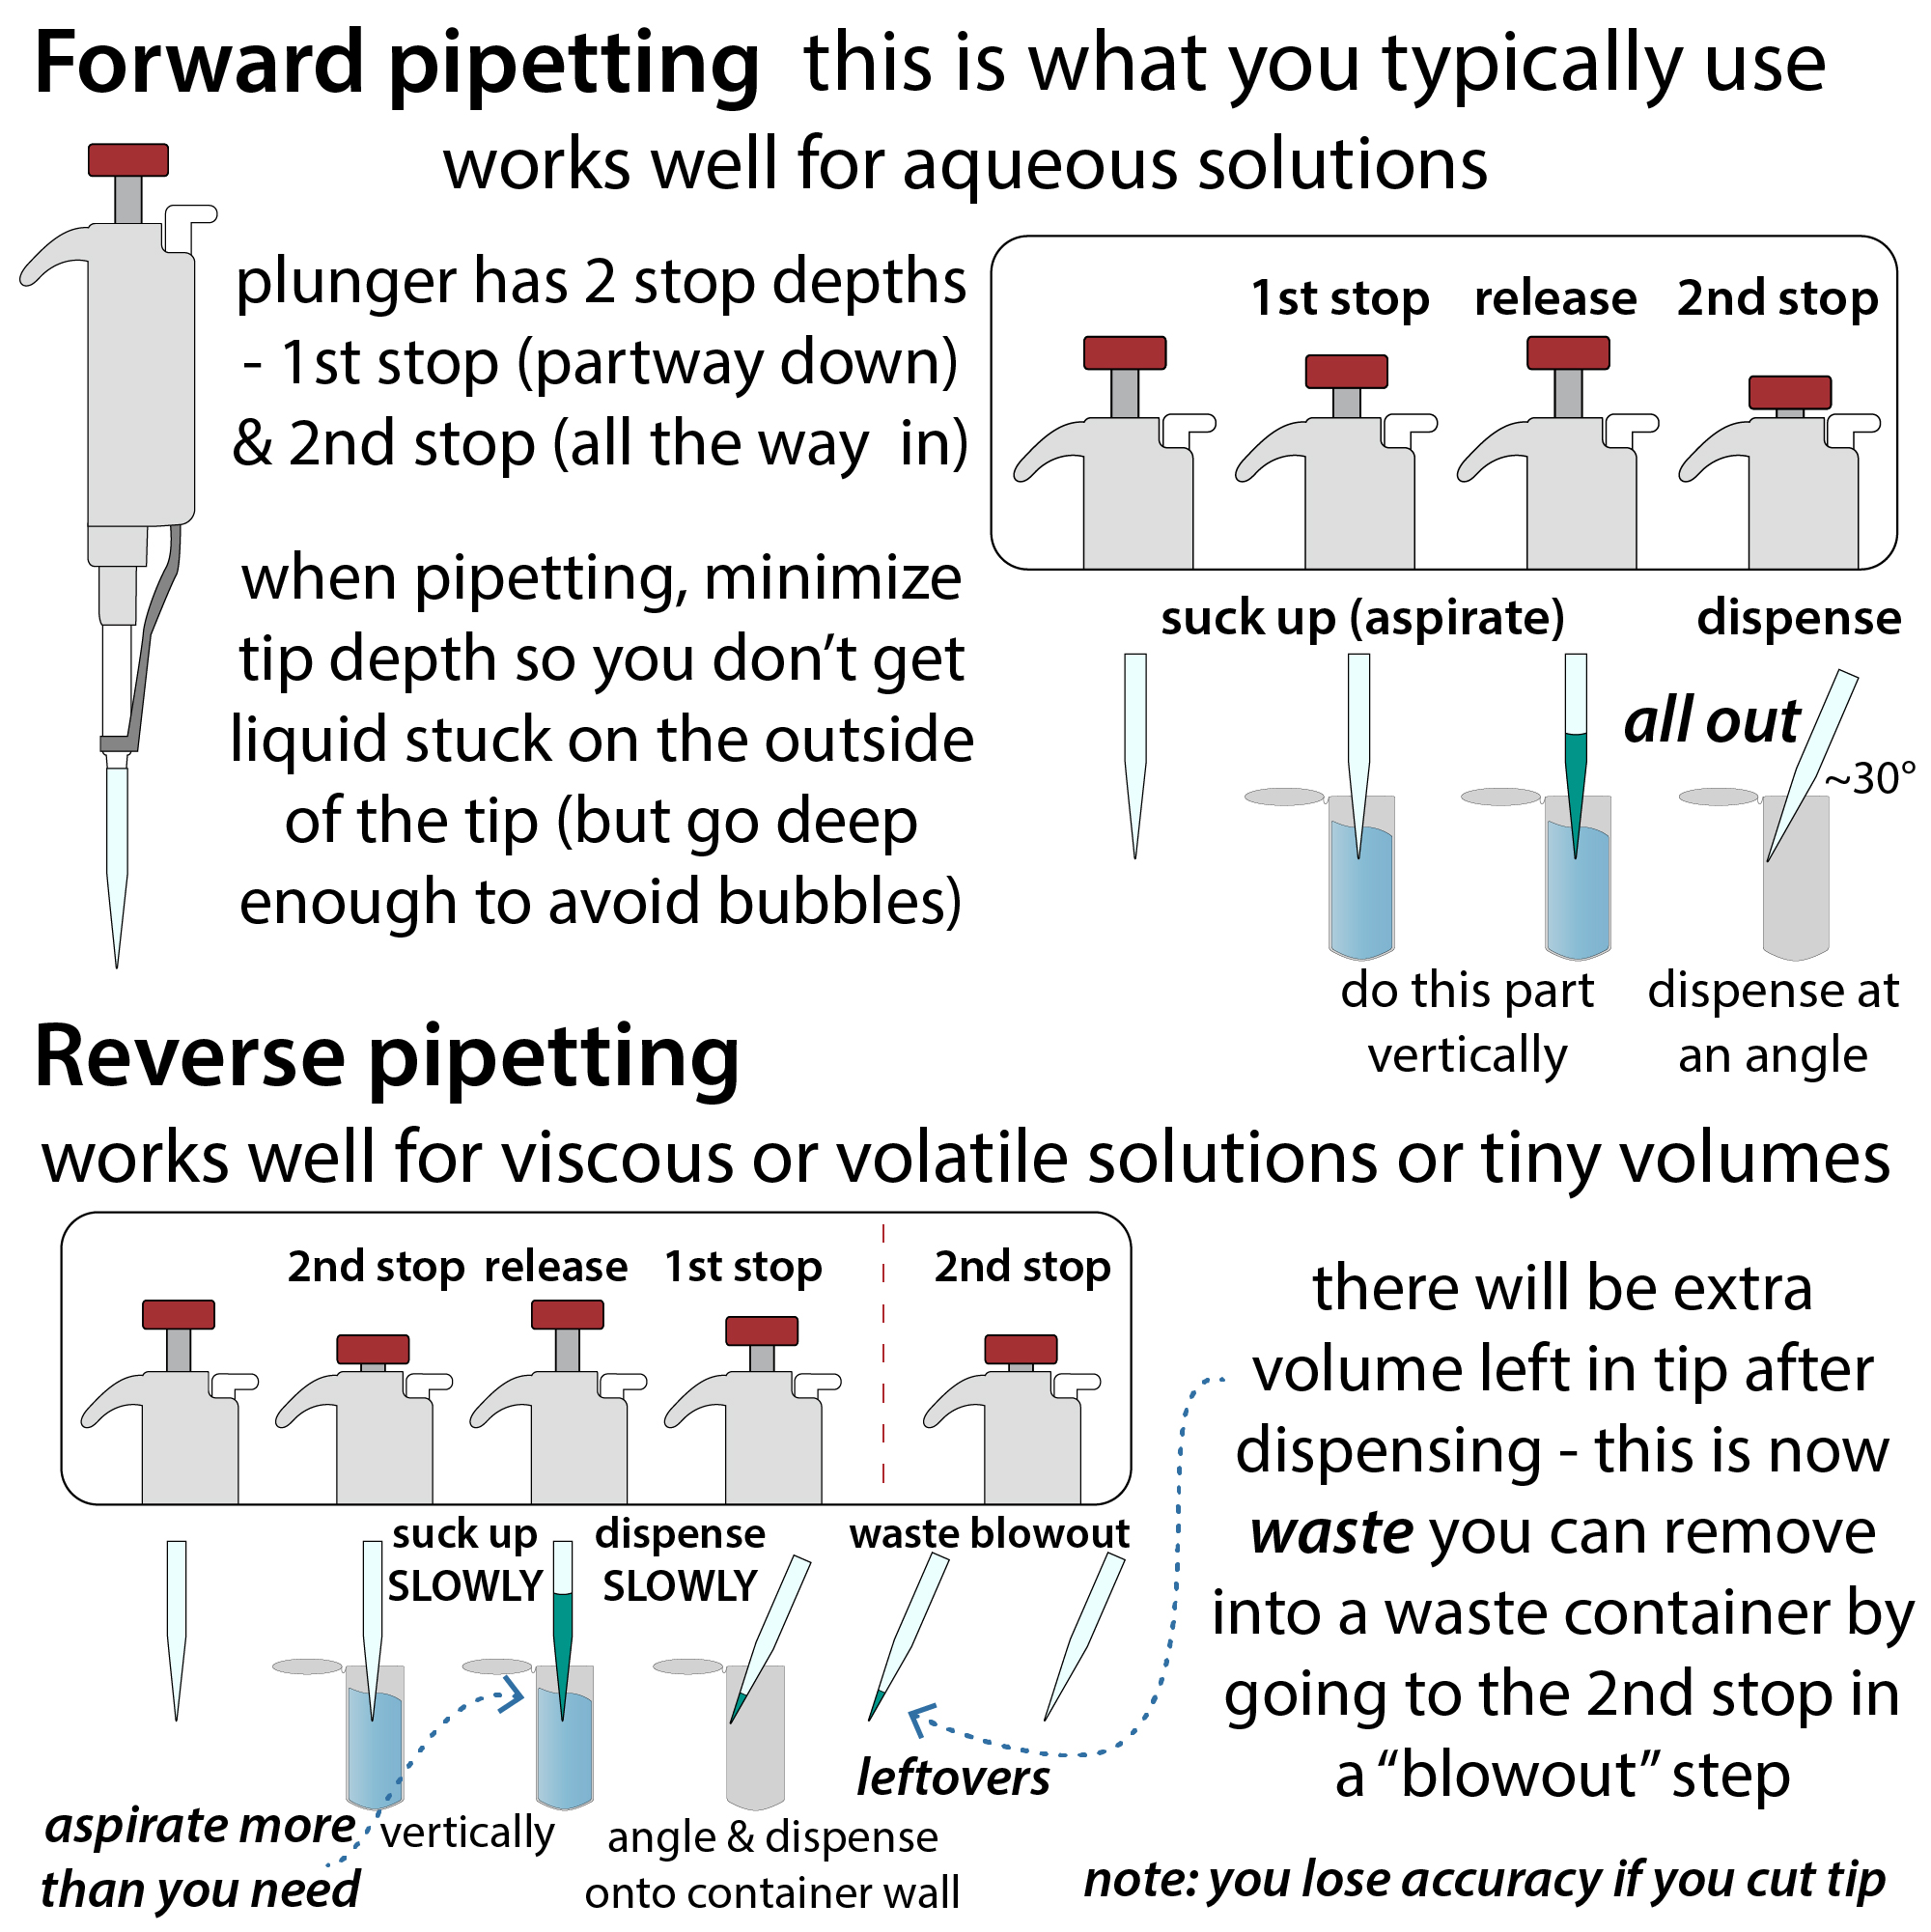
For more on pipetting viscous liquids, see this post
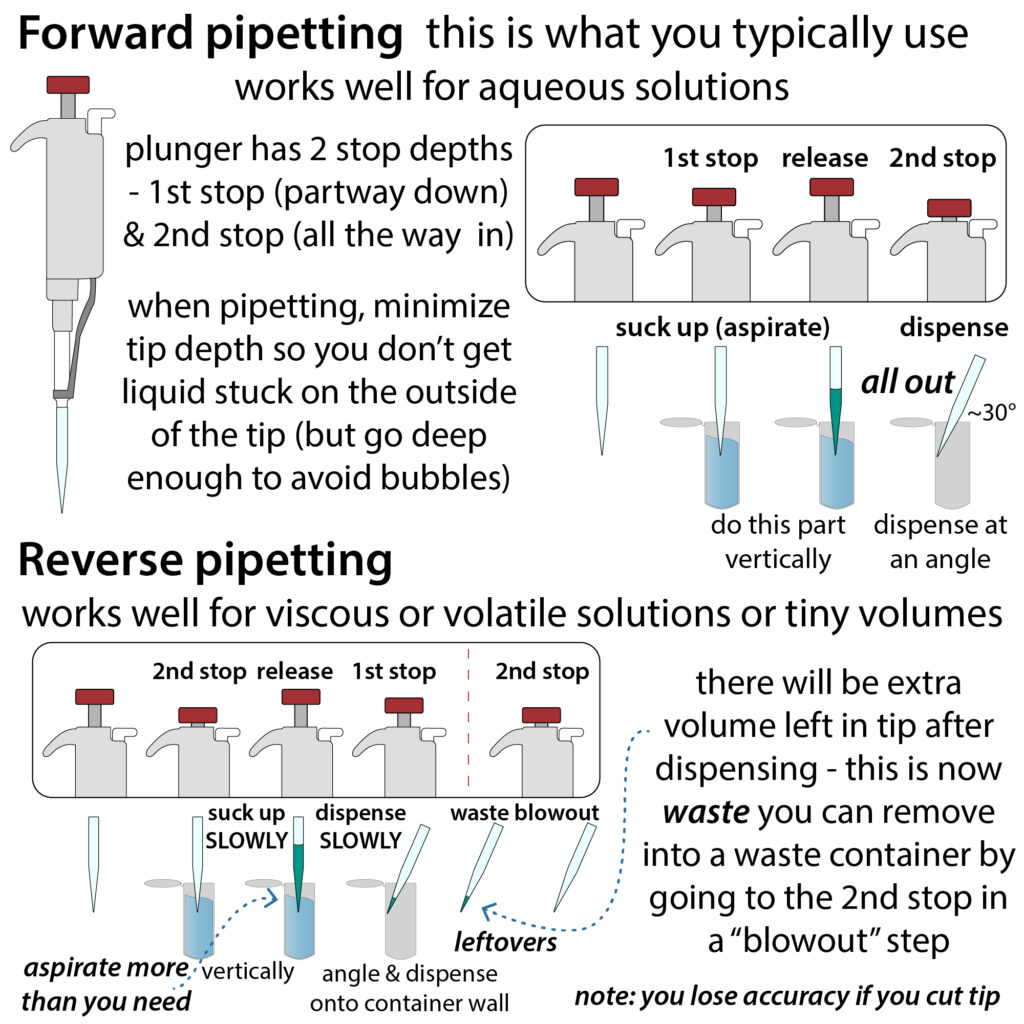
For more on pipetting volatile liquids, see this post

For more on pipetting small volumes, see this post

Practical tips!
Random tips for choosing & using micropipettes. Just some more things I forgot to mentioned before, including:
- for greatest accuracy, choose the smallest pipet that will pipet your volume
- when pipetting small volumes, look to make sure you actually drew up & dispensed the liquid (it can be hard to see!)
- open tubes before loading tip…
- take tips in order to help you keep track
Some quick tips for when liquid jumps back & gets stuck in your tips! And how to prevent it from happening. Spoiler alert – keep your thumb down until all the liquid is out AND the pipet is out! (that’s what it’s all about!)
Tips for using repeater pipettes
Repeater pipettes are the energizer bunnies of the pipetting world – pull up liquid once and they just keep on going (dispensing a set amount of liquid over and over)! So your experiments can keep on going – without your thumbs falling off! They’re great for doing things like: making aliquots (splitting up a large volume into a bunch of smaller portions (great for avoiding freeze-thaws, reducing stock contamination, etc.); doing lots of mini preps or other spin column purifications in parallel; setting up crystallography screens, etc. But they can be a bit finicky, so here are some tips for using them.
YouTube: https://youtu.be/arRFvdx_cRc & https://youtu.be/KgwlmDRlS4s
Instead of normal pipets where you suck up (aspirate) a set amount of liquid and then push out (dispense) that same amount of liquid – and then have to re-aspirate if you want to dispense again, with a repeater pipet, you pull up more liquid than you need and have it dispense a set amount every time you push down. What that amount is will be restricted by the tip size & their “step sizes” (e.g. you can adjust by 1μL increments with a 100 μL tip but only 2μL increments with a 200 μL tip and only 100 μL with a 10 mL tip). Basically, the smaller the tip, the smaller the portions you can make and the more control you have over the exact size of those portions.
No matter what size, the basic operating principles are the same:
- snap on the tip (make sure it’s straight) – listen for the click
- push down the bottom lever – listen for another click
- use the dial to set the volume you want to dispense each time – it will tell you how many times you can dispense that amount if you fill the tip
- stick the tip in your liquid (note that some of the tips are pretty wide-diameter-ed, so you might need to use a 50 mL conical instead of a 15 mL one so you can reach the bottom)
- pull up that bottom lever to suck up enough liquid to dispense the number of samples you want to dispense
- be careful not to introduce air!
- push down the top lever back into the tube to get “excess” out – don’t use that first dispensed bit – it won’t be accurate
- now push down the top lever over and over and over and over… each time dispensing the correct amount until you get the the end and there’s not a full amount left
- push the bottom lever down to push that out into the original tube or waste container OR, suck up more (again, careful not to introduce bubbles)
- eject the tip by pushing down the bottom lever and the top lever at the same time
a couple tips:
- check the tip when you’re dispensing to make sure there aren’t any bubbles in there that would mess up the volume
- when dispensing small volumes make sure stuff is actually coming out – and going into your dispenser (pipetting onto wall of tube helps)
- be careful not to splash – especially can be an issue when doing ethanol-containing washes in mini preps – dispense with the tip held inside the tube and don’t rush (you’re still saving time over a normal pipet, don’t worry!)
Another time-saving pipet is the multichannel pipet – this is great when have to pipette into multi-well plates. We have 8-channel and 12-channel ones in multiple volumes. These are basically just a normal pipet with lots of tips stuck together. So you still only dispense once per aspiration, but you can do it into multiple wells, tubes, etc. at the same time. But your sample has to be “spread out” (in tubes or a reagent reservoir that’s basically just a little dish thing), so you have to make more extra than with the repeater pipet. But with the repeater you do still need to make extra. You should always make extra to account for liquid loss on the tips, etc. but you should make extra extra when using the repeater and extra extra extra when using the multichannel!
Tips for using multichannel pipettes
When it comes to multichannel pipettes, evenness is the name of the game! Apply even, vertical pressure to make sure your liquid levels are the same!
YouTube: https://youtu.be/ZEjBtAFmb_8 & https://youtu.be/Kzob9UFkwH8
When using a multichannel pipette, hold the pipet vertically (not angled!!) above the tips when grabbing and above the liquid when aspirating (sucking up)
When you’re grabbing the tips, make sure you’re applying even pressure (and not too much) to each tip – be careful not to roll in from side or you can get a sort of slant in the levels where one side is higher than the other.
Look at the liquid levels to ensure they’re all even before you go to dispense. If they’re not, try pipetting up and down a few times. If that doesn’t help, try grabbing the tips up again, more evenly hopefully.
Look a the hopefully-no-liquid levels in the tips after your dispense. Is there stuff stuck in there? If so, make sure you get it out – it might be easiest to do this after you’ve removed the other tips (see video)
Be on the lookout for bubbles and pipette them out before aspirating (see video)
Rotate replicate and sample locations in your plate so that systematic errors (e.g. one side always has slightly more or one tip always has slightly less) don’t always affect the same sample.
If you have fewer than a full-row’s worth of tips you need, place the tips in the center, not on the ends, to get the most even levels.
Keep an empty tip box you can use to put “extra” tips after you rearrange tips to suit the number you need.
Make much more than you think you need – especially when using reagent reservoirs, because the liquid will get spread out, including in-between where the tips will actually be drawing from. https://youtu.be/arRFvdx_cRc
Another time-saving pipette is the repeater pipette. With those you aspirate once and then dispense lots of times (the same volume each time)
Tips for loading PAGE gels – the strategy that works for me. Practice makes perfect but when it comes to pipetting sample into a PAGE gel well, here are some tips that I hope will help you excel!
Practical tips for mixing samples in eppendorf (microcentrifuge) tubes
link to video in case embed isn’t working: https://youtu.be/WB0rprJfP8A
- via pipetting
- pipet up & down ~5 times (more if sample is viscous)
- just go to to and from the first stop (not all the way down (second stop) until the last time)
- use the right size tool for the job!
- set the volume to more than 50% the total volume in the tube, but less than the total volume
- too little and you won’t mix it
- too much and you’ll bring bubbles
- set the volume to more than 50% the total volume in the tube, but less than the total volume
- keep the tip of the tip just below the surface of the liquid
- this avoids liquid loss due to sticking to the outside of the tip
- this also prevents you overflowing
- make sure all the liquid goes out all the way
- pipet up & down ~5 times (more if sample is viscous)
- alternatives;
- vortex (not if you have enzymes in there though!)
- finger vortex (flick tube to mix) – safe to do with enzymes too
- inverting tubes (only if larger volume) – can do multiple tubes in rack (held firmly down)
- NOT centrifuging – that doesn’t mix things!
- no matter the method, give a quick pulse spin after to draw liquid down off the sides of the tube and the inside of the cap before you lift the lid and have stuff splash out!
more pipetting tips: https://www.youtube.com/playlist?list=PLUWsCDtjESrHnlmO2z2GJZRADaIFSNqt8
Quick tips and tricks for resuspending pellets
Start by breaking up big clumps (especially important for gunky things like cell pellets)
- Play the eppendorf rack xylophone! Scrape the bottom of the tube across a microcentrifuge tube rack
- If you have a lot of pellets such as bacterial cell pellets for mini preps, put them in a rack, put your hand firmly on top so they don’t fly out, then move the rack back and forth over a vortex
Then (or if you’ve skipped the big-break-up, which isn’t needed for easier-to-resuspend pellets), make things homogenous (ensure an even mixture).
- Pipet up and down *over/above* the pellet – create a vortex-like effect in the liquid, giving the pellet a sort of jet-stream bath.
- DO NOT TOUCH THE PELLET WITH THE PIPET TIP! If you do, you can get gunk stuck in and/or on the tip. Not only can you lose yield this way, but if it clogs up the tip you can end up making a sort of suction that then breaks and sucks up a bunch of air.
- When doing that pipetting up and down (triturating) – set your pipet to a lower volume than there is in the tube. This will help prevent bubble formation.
Suck it back up & shimmy! A quick practical pipetting tip for coaxing out those drops of liquid stuck inside your tip…
If you get a drop of liquid stuck inside the pipet tip (especially a viscous (goopy) liquid), suck the liquid slowly back up just until you make contact with the drop, then slowly push back down, going gently up and down as you do. This will help coax the liquid off the sides of the tip.
You’re fighting a battle between liquid sticking to the tip walls and to the liquid. You want the liquid to win – so help it out by going at its pace! If a thin liquid film on the walls is trailing the main liquid front, you’re going too fast! Slow down, pausing as needed for that film to catch up with you.
Once you’re back at the surface of the liquid in the container you’re pipetting into, pause. Don’t release your thumb yet. Hold there for long pause, then slowly, very slowly, release your thumb when you’re right at the surface. As you pull out, make sure those last traces of liquid in the tip are getting pulled out (keep them in contact with the rest of the liquid).
Once it’s all out (liquid’s out of tip and tip’s out of liquid), then – and only then! – release your thumb!
And – next time – release your thumb more slowly when you’re doing the initial pipetting – fast release is usually the culprit when you get those drops stuck in there. And viscous solutions even more so. So be aware!
Measuring how much liquid is in your tube using a micropipette
If you need to measure how much liquid is in a tube (small volumes) you can do this with a micropipette. Start by estimating how much there is based on how much should be in there or what the approximate volume lines on the tube show). Then set the volume of an appropriate size micropipet to slightly less than that amount. Spin down the tube briefly to collect all the liquid in the bottom of the tube, then aspirate (suck up) the liquid. There should be a little excess liquid in the tube still. So, with your pipet tip still in there, start turning the dial on the pipet until you have the last of the liquid sucked up without sucking up any air (you want the liquid to be right at the bottom inside of the tip). Now read out the volume the pipet is set to. That’s how much liquid is in the tube.
If you overshoot it or overpull it and end up sucking up some air, just turn the dial to the right slowly, releasing that excess air (I like to do this with the tip against the bottom of the tube so that if any liquid comes out I can easily suck it back up without bubbles).
Be sure that when you’re turning the dial you don’t end up going beyond the pipet’s range (e.g. don’t go above 200 with a P200 – if you see there’s more than 200, use a P1000).
Some practical tips for effective mixing of small into big…
Make sure you’re in the liquid when you pipet the small amount in. Then up down a few times with the pipet. Just to get it all out and ensure that there are at least no concentrated drops left in the tip. That won’t mix things though. Now, pick up a big pipette set to a volume slightly lower than your total volume (to avoid air). Before going in the liquid, press your thumb down to the first stop (don’t push past it). Then put your tip down to near the bottom and go almost all the way up – down a few times gently to avoid bubbles and without coming out (and introducing air). Make sure most of the volume is being mixed each time. Then come out of the liquid fully before releasing your thumb.
Pipetting pics! (click on picture to enlarge)